


Cotter tools
 01-04-15, 08:46 PM
#1
Senior Member
Thread Starter
Cotter tools
I see bikesmithdesigns.com has a tool. How does it work or do you still resort to drilling, sledgehammer and heat fairly frequently?
Are there other alternatives other than shelling out the big bucks for the vintage ones that pop up on eBay from time to time?
Are there other alternatives other than shelling out the big bucks for the vintage ones that pop up on eBay from time to time?
 01-04-15, 08:48 PM
#2

feros ferio

Join Date: Jul 2000
Location: www.ci.encinitas.ca.us
Posts: 21,800
Bikes: 1959 Capo Modell Campagnolo; 1960 Capo Sieger (2); 1962 Carlton Franco Suisse; 1970 Peugeot UO-8; 1982 Bianchi Campione d'Italia; 1988 Schwinn Project KOM-10;
Mentioned: 44 Post(s)
Tagged: 0 Thread(s)
Quoted: 1393 Post(s)
Liked 1,331 Times
in
837 Posts
I use a socket wrench and a C-clamp. When I worked at a Peugeot/Nishiki dealership in the early 1970s, we had a VAR monstronsity with tremendous leverage which made quick work of most cotters we encountered.
__________________
"Far and away the best prize that life offers is the chance to work hard at work worth doing." --Theodore Roosevelt
Capo: 1959 Modell Campagnolo, S/N 40324; 1960 Sieger (2), S/N 42624, 42597
Carlton: 1962 Franco Suisse, S/N K7911
Peugeot: 1970 UO-8, S/N 0010468
Bianchi: 1982 Campione d'Italia, S/N 1.M9914
Schwinn: 1988 Project KOM-10, S/N F804069
01-04-15, 08:49 PM
#3
SE Wis
Join Date: Apr 2005
Location: Milwaukee, WI
Posts: 10,517
Bikes: '68 Raleigh Sprite, '02 Raleigh C500, '84 Raleigh Gran Prix, '91 Trek 400, 2013 Novara Randonee, 1990 Trek 970
Mentioned: 40 Post(s)
Tagged: 0 Thread(s)
Quoted: 2747 Post(s)
Liked 3,401 Times
in
2,058 Posts
01-04-15, 08:55 PM
#4

Extraordinary Magnitude

Join Date: Aug 2009
Location: Waukesha WI
Posts: 13,649
Bikes: 1978 Trek TX700; 1978/79 Trek 736; 1984 Specialized Stumpjumper Sport; 1984 Schwinn Voyageur SP; 1985 Trek 620; 1985 Trek 720; 1986 Trek 400 Elance; 1987 Schwinn High Sierra; 1990 Miyata 1000LT
Mentioned: 84 Post(s)
Tagged: 0 Thread(s)
Quoted: 2608 Post(s)
Liked 1,703 Times
in
937 Posts
I used the C-Clamp and Socket method.
I also used the "big ****ing hammer" method. I do not recommend that.
I also used the "big ****ing hammer" method. I do not recommend that.
__________________
*Recipient of the 2006 Time Magazine "Person Of The Year" Award*
Commence to jigglin� huh?!?!
"But hey, always love to hear from opinionated amateurs." -says some guy to Mr. Marshall.
Commence to jigglin� huh?!?!
"But hey, always love to hear from opinionated amateurs." -says some guy to Mr. Marshall.
01-04-15, 09:00 PM
#5
Senior Member
Thread Starter
I am post - big f'ing hammer phase right now with two colters still firmly lodged with a bent screw portion. Apparently it was refurbished 10 years ago at a shop here in town and then purchased by the previous owner but I guess there was a city-wide shortage of grease at the time.
I imagine ill end up drilling (those gold drill bits for metal should be ok, right?) this but I'd like to avoid this...pleasant experience...in the future.
I imagine ill end up drilling (those gold drill bits for metal should be ok, right?) this but I'd like to avoid this...pleasant experience...in the future.
01-04-15, 09:29 PM
#7
Senior Member

Join Date: Nov 2014
Location: Eugene, Oregon, USA
Posts: 27,547
Mentioned: 217 Post(s)
Tagged: 0 Thread(s)
Quoted: 18382 Post(s)
Liked 4,515 Times
in
3,355 Posts
I must admit that my cotter pin removal tool isn't quite as refined.
As far as drilling, the one thing that I'd warn you about is that the cotter pin isn't round.
It is round on the bottom end, then tapers with a flat side up to the threaded portion.
If your goal is to save either the crank or the bottom bracket, then you will have to be very careful.
I think I've knocked my cotters out unsupported (generally replacing the cranks with cotter-less). However, if you're planning on re-using the bottom bracket, then it may be helpful to support the bottom side of the crank when you're knocking out the pin.
I'd be more inclined to use a flat punch than a drill.
 01-04-15, 09:33 PM
#8
Senior Member
Join Date: Apr 2009
Location: New Rochelle, NY
Posts: 38,729
Bikes: too many bikes from 1967 10s (5x2)Frejus to a Sumitomo Ti/Chorus aluminum 10s (10x2), plus one non-susp mtn bike I use as my commuter
Mentioned: 140 Post(s)
Tagged: 1 Thread(s)
Quoted: 5793 Post(s)
Liked 2,593 Times
in
1,437 Posts
I have a near 100% success record with a single hammer blow.
The key is to properly support the crank arm so all the energy of the blow is concentrated on the pin.
The key is to properly support the crank arm so all the energy of the blow is concentrated on the pin.
__________________
FB
Chain-L site
An ounce of diagnosis is worth a pound of cure.
Just because I'm tired of arguing, doesn't mean you're right.
�One accurate measurement is worth a thousand expert opinions� - Adm Grace Murray Hopper - USN
WARNING, I'm from New York. Thin skinned people should maintain safe distance.
FB
Chain-L site
An ounce of diagnosis is worth a pound of cure.
Just because I'm tired of arguing, doesn't mean you're right.
�One accurate measurement is worth a thousand expert opinions� - Adm Grace Murray Hopper - USN
WARNING, I'm from New York. Thin skinned people should maintain safe distance.
01-04-15, 09:36 PM
#9
Still learning
 01-04-15, 09:38 PM
#10
I got 99 projects

Join Date: Nov 2008
Location: Hills of Central NH
Posts: 1,581
Mentioned: 9 Post(s)
Tagged: 0 Thread(s)
Quoted: 42 Post(s)
Likes: 0
Liked 2 Times
in
2 Posts
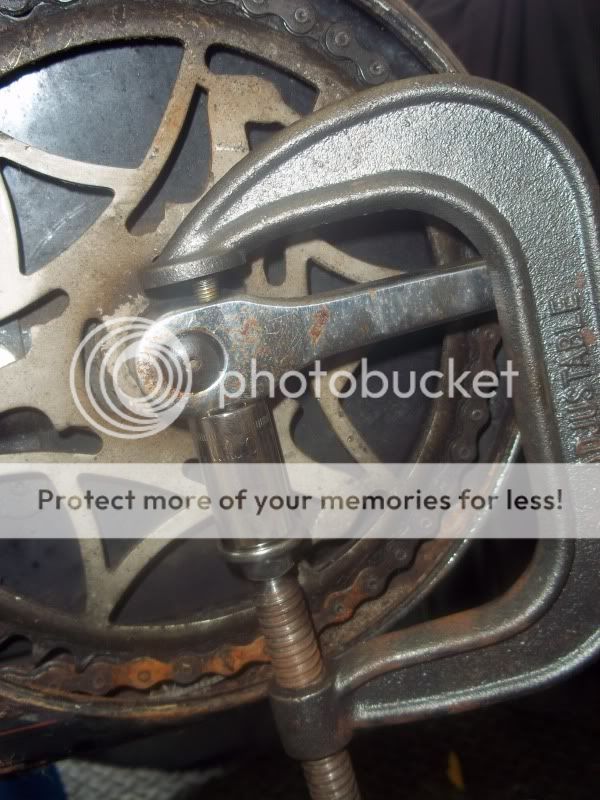
Photo borrowed from @supafast213 from another thread on this forum. I used this technique a few weeks ago on my 1968 Raleigh Record, which had sat in my parents' damp basement for 25 years. I dripped some Tri-Flow on the cotter, cranked down the clamp and let it sit. It popped on its own about 30 seconds later.
01-04-15, 09:42 PM
#11
Senior Member
Join Date: Apr 2009
Location: New Rochelle, NY
Posts: 38,729
Bikes: too many bikes from 1967 10s (5x2)Frejus to a Sumitomo Ti/Chorus aluminum 10s (10x2), plus one non-susp mtn bike I use as my commuter
Mentioned: 140 Post(s)
Tagged: 1 Thread(s)
Quoted: 5793 Post(s)
Liked 2,593 Times
in
1,437 Posts
Step two, use a length of pipe, or something similar to dolly the crank arm an brace it so something heavy. A short length of pipe held in a vise, and supported on the movable jaw cross arm is a good example. Or if you have a repair stand, a pipe stood on something solid, with the crank resting on top.
Step three, clamp a drift punch in a vise-grip (because you're chicken and not likely to hammer with full force with your hand holding the punch)
Step four, find your heaviest hammer and deliver a blow as if you want to send that cotter to China. One shot with everything you've got, not a series of smaller shots.
Step five, Retrieve the cotter from the other end of the pipe.
Step six, email me so we can get together for a couple of beers --- on you.
__________________
FB
Chain-L site
An ounce of diagnosis is worth a pound of cure.
Just because I'm tired of arguing, doesn't mean you're right.
�One accurate measurement is worth a thousand expert opinions� - Adm Grace Murray Hopper - USN
WARNING, I'm from New York. Thin skinned people should maintain safe distance.
FB
Chain-L site
An ounce of diagnosis is worth a pound of cure.
Just because I'm tired of arguing, doesn't mean you're right.
�One accurate measurement is worth a thousand expert opinions� - Adm Grace Murray Hopper - USN
WARNING, I'm from New York. Thin skinned people should maintain safe distance.
01-04-15, 10:32 PM
#12
Full Member
Join Date: Dec 2014
Location: Retired to Penang Malaysia originally from UK
Posts: 346
Bikes: My 1978 Raleigh from new, 1995 Trek, & constant changing & rebuilding of other bike projects.
Mentioned: 1 Post(s)
Tagged: 0 Thread(s)
Quoted: 41 Post(s)
Likes: 0
Liked 3 Times
in
3 Posts
FBinNY has got it right I would only add a couple of extra points:-
1/
Make sure someone is holding the bike real steady regardless of any stand
2/
On the underside of the crank arm where you support it, put some hard material but not steel so you do not end up with half moon shape, piece of brass etc obviously allowing for the pin to pop out.
3/
Make sure the drift punch is the same diameter as the pin otherwise it will just slide off & make things worse, drift punches tend to have long shanks you may also use a SS hex head screw about 1/2" + long as you are only trying to break it free not push it all the way though, then of course clamp the hex head in a pair of mole / vice grips.
4./
If in your effort to remove it the threaded pin section has buckled inside the crank arm you really have a problem, heating the arm up with any form a flame torch maybe the only answer.
I'm too far away to join any beers
01-05-15, 12:00 AM
#13
Ride, Wrench, Swap, Race

Join Date: Jan 2010
Location: Northern California
Posts: 9,194
Bikes: Cheltenham-Pedersen racer, Boulder F/S Paris-Roubaix, Varsity racer, '52 Christophe, '62 Continental, '92 Merckx, '75 Limongi, '76 Presto, '72 Gitane SC, '71 Schwinn SS, etc.
Mentioned: 132 Post(s)
Tagged: 0 Thread(s)
Quoted: 1565 Post(s)
Liked 1,296 Times
in
866 Posts
When I had an old Raleigh, the cotters hammered out without getting damaged.
I later encountered Peugeots whose cotters I couldn't hammer out, even with proper steps taken.
Before I realized that high-quality replacement cotters weren't generally available, I found the drilling method to be fairly quick and painless even on Peugeots.
Subsequent to that, I'd heat the big end of the crank with a propane torch (until smoke issued forth from residual lube), then easily knocked the pin out without damage.
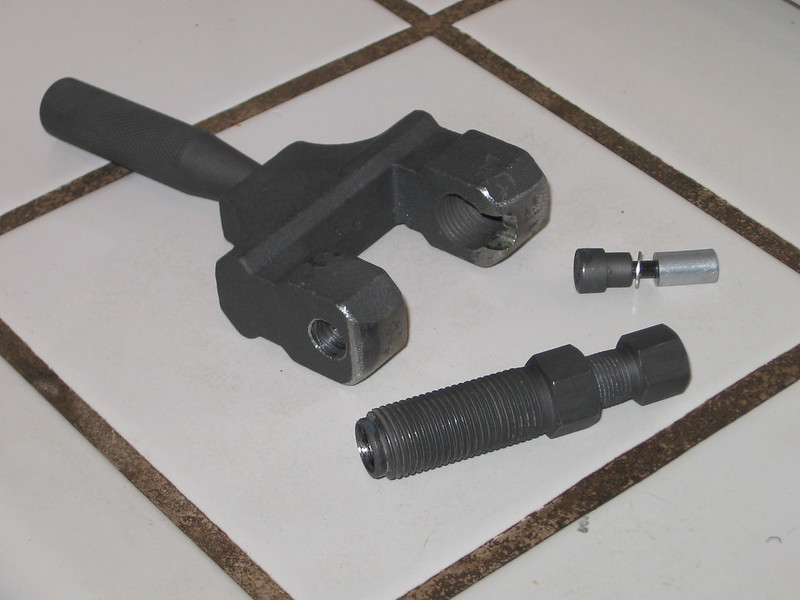
Then I made one of those Harbor-Freight tools, but I still heat the big end of the crank for a minute or two with the torch before expecting this cast-iron tool to push the pin out. I relieved the casting for needed clearance and reinforced the shortened driving pin with an alloy sleeve as shown.
I later encountered Peugeots whose cotters I couldn't hammer out, even with proper steps taken.
Before I realized that high-quality replacement cotters weren't generally available, I found the drilling method to be fairly quick and painless even on Peugeots.
Subsequent to that, I'd heat the big end of the crank with a propane torch (until smoke issued forth from residual lube), then easily knocked the pin out without damage.
Then I made one of those Harbor-Freight tools, but I still heat the big end of the crank for a minute or two with the torch before expecting this cast-iron tool to push the pin out. I relieved the casting for needed clearance and reinforced the shortened driving pin with an alloy sleeve as shown.
01-05-15, 12:51 AM
#14
Senior Member

Join Date: Aug 2009
Location: Berkeley, CA
Posts: 7,248
Bikes: '72 Cilo Pacer, '72 Gitane Gran Tourisme, '72 Peugeot PX10, '73 Speedwell Ti, '74 Peugeot UE-8, '75 Peugeot PR-10L, '80 Colnago Super, '85 De Rosa Pro, '86 Look Equipe 753, '86 Look KG86, '89 Parkpre Team, '90 Parkpre Team MTB, '90 Merlin
Mentioned: 87 Post(s)
Tagged: 0 Thread(s)
Quoted: 835 Post(s)
Liked 2,147 Times
in
559 Posts
The Bikesmith cotter press works great! Very sturdy and performs perfectly. Been using mine for a couple years. It's a little costly but I'm sure they are not selling in massive quantities either. Sure beats the going rate on a vintage VAR cotter press (now that's a fine tool!). I got mine as a X-mas gift a couple years ago and it's made dealing with cotter pins nearly painless. I'm still not great at filing cotters pins to the perfect angle, but the rest of the drilling, hammering, and crude bludgeoning are in the past.
I've used the socket in a c-clamp method, and the socket in the vice method (a big pain with a built up frame and a cluttered work space).
Also used the support with a confident and strong whack. I fashioned a piece of 2x4 with a drilled out hole for the cotter to fall into and a curve to fit the crank arms. But the height was only perfect for one of my bikes and I wasn't always as successful as FBinNY.
If you plan to do much maintenance or work on cottered cranks, it's an investment you won't regret. But I am also easily convinced by arguments to purchase new tools.
01-05-15, 07:14 AM
#15

Senior Member
Join Date: Dec 2005
Posts: 17,160
Mentioned: 481 Post(s)
Tagged: 0 Thread(s)
Quoted: 3811 Post(s)
Liked 6,717 Times
in
2,614 Posts
I mostly use the BikeSmith press, but some drive side crank arms have narrow spacing between the spider and the cotter hole, such that you can't get a good angle with the BS press. In those cases, I hope for the best with a punch and hammer, and then usually resort to cutting, drilling, pushing, as I did this past week with the cottered drive-side crank on my '69 Raleigh SuperCourse.
01-05-15, 07:23 AM
#16
Senior Member

Join Date: Apr 2006
Location: Washington County, Vermont, USA
Posts: 3,778
Bikes: 1966 Dawes Double Blue, 1976 Raleigh Gran Sport, 1975 Raleigh Sprite 27, 1980 Univega Viva Sport, 1971 Gitane Tour de France, 1984 Lotus Classique, 1976 Motobecane Grand Record
Mentioned: 77 Post(s)
Tagged: 0 Thread(s)
Quoted: 765 Post(s)
Liked 660 Times
in
351 Posts
Another vote for the Bikesmith cotter press--well worth the money in terms of problems avoided. Plus it's just fun to have the right tool for the job. It makes working on a cottered crank a routine job, not a thrash to be avoided whenever possible.
__________________
www.redclovercomponents.com
"Progress might have been all right once, but it has gone on too long."
--Ogden Nash
www.redclovercomponents.com
"Progress might have been all right once, but it has gone on too long."
--Ogden Nash
01-05-15, 07:25 AM
#17
aka Phil Jungels
I'm with Francis! I've never seen one I couldn't drive out with a good smack!
01-05-15, 07:37 AM
#18
Mr. Anachronism
Join Date: Jan 2013
Location: Somewhere west of Tobie's
Posts: 2,087
Bikes: fillet-brazed Chicago Schwinns, and some other stuff
Mentioned: 29 Post(s)
Tagged: 0 Thread(s)
Quoted: 526 Post(s)
Liked 256 Times
in
165 Posts
I've used the modified Harbor Freight chain break like dedhed and dddd did with great success (thanks for the modification tips dddd, gonna add those to my press). What's interesting is that the older and rustier the cotters have been, the easier they've come out for some reason. I also soak em with JB-80 for at least an hour before attempting removal. No heat necessary. The press created so much force while working on a '72 Raleigh that the cotter shot 4-5 yards across the garage floor when it finally released.
__________________
"My only true wisdom is in knowing I have none" -Socrates
"My only true wisdom is in knowing I have none" -Socrates
01-05-15, 08:22 AM
#19
Senior Member

Join Date: Apr 2007
Location: Thunder Bay, Ontario, Canada - burrrrr!
Posts: 11,674
Bikes: 1958 Rabeneick 120D, 1968 Legnano Gran Premio, 196? Torpado Professional, 2000 Marinoni Piuma
Mentioned: 210 Post(s)
Tagged: 0 Thread(s)
Quoted: 1372 Post(s)
Likes: 0
Liked 1,752 Times
in
939 Posts
I made a bunch of these cotter pin presses for myself and friends...

I do not hit cotter pins with a hammer, be it for removal or installation. I use the press every time and my cottered cranks stay tight, mile after mile.
The press is not a guaranteed removal tool. Sometimes the cotter can become "hooked" and all the hammering in the world will not budge it. In cases like that, drill and remove, carefully. To that, add this...

Once you have rebuilt the bottom bracket, complete with new ball bearings and or races, do you really want to take the chance of damaging them with hammer blows? Well, this is where the press really shows it value. Press the pin in, snug the nut on the pin, press a wee bit more, snug the nut, press, snug until it stops moving. Now that is tight!
I do not hit cotter pins with a hammer, be it for removal or installation. I use the press every time and my cottered cranks stay tight, mile after mile.
The press is not a guaranteed removal tool. Sometimes the cotter can become "hooked" and all the hammering in the world will not budge it. In cases like that, drill and remove, carefully. To that, add this...
Once you have rebuilt the bottom bracket, complete with new ball bearings and or races, do you really want to take the chance of damaging them with hammer blows? Well, this is where the press really shows it value. Press the pin in, snug the nut on the pin, press a wee bit more, snug the nut, press, snug until it stops moving. Now that is tight!
__________________
"98% of the bikes I buy are projects".
"98% of the bikes I buy are projects".
01-10-15, 10:03 PM
#20
Senior Member
Thread Starter
$&#%@-rds.
This has been months in the making. It broke two of my drill bits and bent my new c-clamp but I had the last laugh...minus a slightly rusty crankset.
Looks like I left a bit of myself on it too.oops. better go clean that up now.
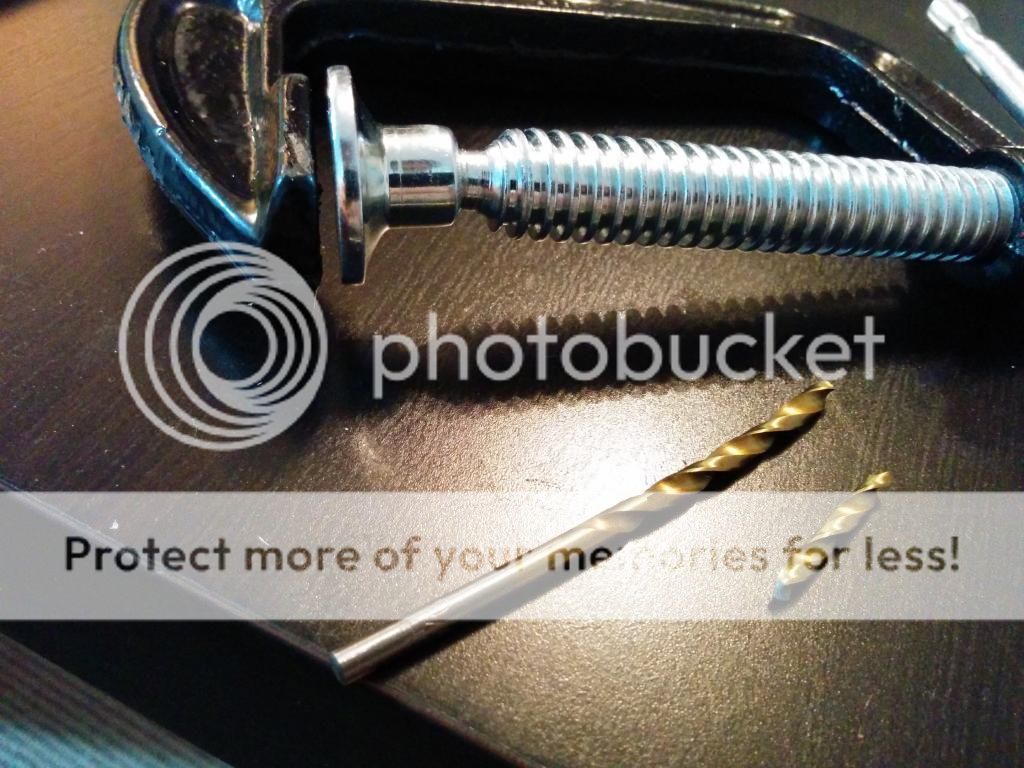
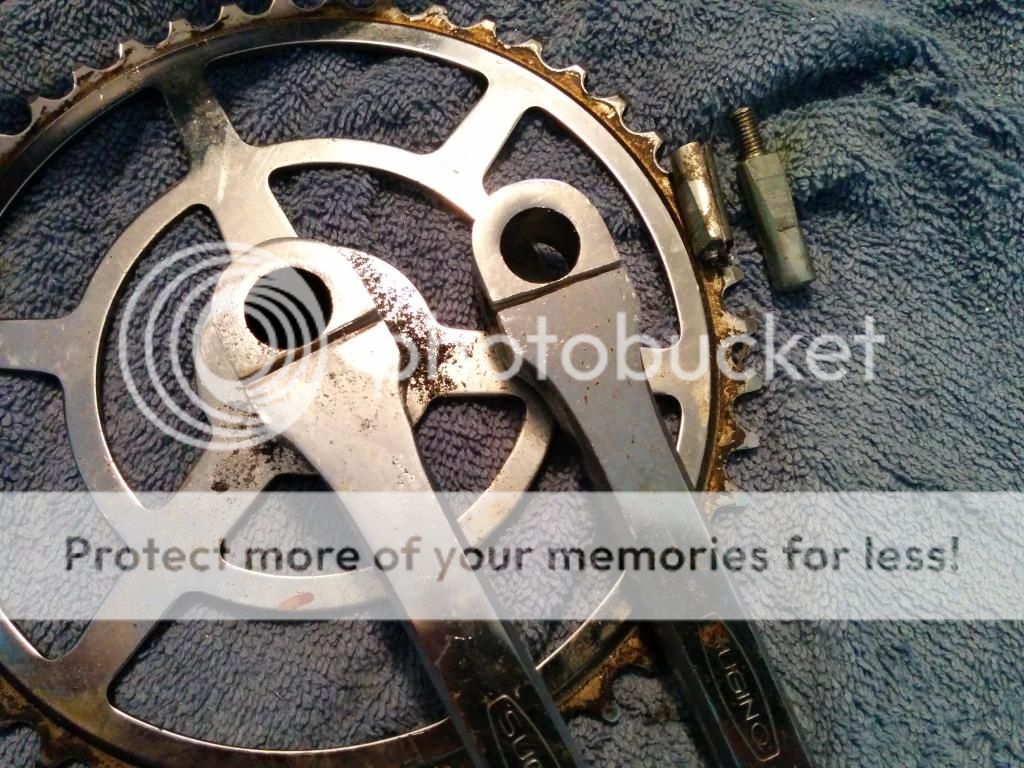
This has been months in the making. It broke two of my drill bits and bent my new c-clamp but I had the last laugh...minus a slightly rusty crankset.
Looks like I left a bit of myself on it too.oops. better go clean that up now.


 01-11-15, 08:50 AM
#22
Senior Member
Join Date: Dec 2005
Posts: 17,160
Mentioned: 481 Post(s)
Tagged: 0 Thread(s)
Quoted: 3811 Post(s)
Liked 6,717 Times
in
2,614 Posts
Congrats on your victory! And a Sugino cottered crankset? I've never seen one of those.
01-11-15, 09:52 AM
#23
Senior Member
Join Date: May 2013
Location: Northern Neck of Virginia
Posts: 316
Bikes: Some Raleighs,some Schwinns and an Azor
Mentioned: 0 Post(s)
Tagged: 0 Thread(s)
Quoted: 0 Post(s)
Likes: 0
Liked 3 Times
in
2 Posts
+1 on the Harbor Freight tool. The fine threads can create much more force than a c-clamp. I grind and file on mine to make it fit whatever it needs to fit.
01-11-15, 10:24 AM
#24
Senior Member
Drilling out the cotters on a drill press is not difficult, if it comes to that. The cotters are much softer than the crank or the axle and you should be able to do it without leaving a mark on either. If I can do it, anyone can.
Breaking a bit is the biggest risk so be careful. If you do break a bit, the other end of the cotter can still be drilled. You might take it to a machinist if it has a broken bit. Should be a five minute, minimum charge job.
If you're doing the removal with a hammer, a length of 3/4" iron pipe, either black or galvanized, between the concrete floor and the crank arm should provide good support. Might break some concrete -- I have.
01-11-15, 10:57 AM
#25
Senior Member

Join Date: Apr 2009
Location: Detroit
Posts: 10,303
Mentioned: 6 Post(s)
Tagged: 0 Thread(s)
Quoted: 17 Post(s)
Likes: 0
Liked 43 Times
in
33 Posts
Step one, hacksaw the bent screw end flush to the crank (or close).
Step two, use a length of pipe, or something similar to dolly the crank arm an brace it so something heavy. A short length of pipe held in a vise, and supported on the movable jaw cross arm is a good example. Or if you have a repair stand, a pipe stood on something solid, with the crank resting on top.
Step three, clamp a drift punch in a vise-grip (because you're chicken and not likely to hammer with full force with your hand holding the punch)
Step four, find your heaviest hammer and deliver a blow as if you want to send that cotter to China. One shot with everything you've got, not a series of smaller shots.
Step five, Retrieve the cotter from the other end of the pipe.
Step six, email me so we can get together for a couple of beers --- on you.
Once the threaded portion is smooshed over, cotter tools are out and FBinNY's method is the best (pre-beer) method.
If you're doing this post-beer, have someone else hold the drift punch.

__________________
- Auchen
- Auchen