


Circa 1955 Phillips Step Through SA Dyno-Three Hubs with Working Lights! PHOTOS HEAVY
 01-07-15, 01:16 AM
#1
Senior Member
Thread Starter

Circa 1955 Phillips Step Through SA Dyno-Three Hubs with Working Lights! PHOTOS HEAVY
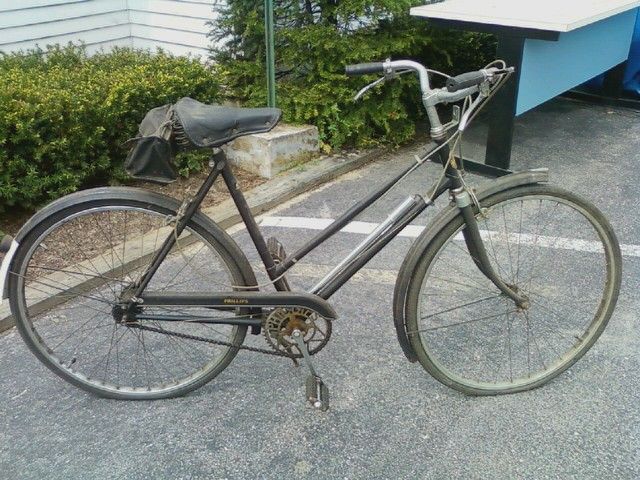
I already talked a bit about this bike on the "For the Love of Three Speeds" thread. Been wanting a project and something different, so spent $100 on a 1955 Phillips 3 speed with SA Dyno-Three hub dated "55", so bike likely around that era.
Front/rear lights work, chain has a "master link" type thing, front hub, rear hub & top of bb shell have oil ports. It's all original. Has original Phillips bell too. Strangely I didn't take the full bike photo, but it's sort of an "oxblood red" with gold lettering & stripes. Has Dunlop 26 x 1 3/8" rims and original "tyres" which say "The Silver Star Tyre....Extra Fine Quality...To Fit Rims B.S.F. 4 & EA 3" Looks like front chainring is approximately 47 teeth & rear about 18 teeth. Right brake is for the front & left brake for the rear. I tapped on the original brake pads and they actually sound like metal. Let's just say the test ride was short as bike really didn't stop me.


Front/rear lights work, chain has a "master link" type thing, front hub, rear hub & top of bb shell have oil ports. It's all original. Has original Phillips bell too. Strangely I didn't take the full bike photo, but it's sort of an "oxblood red" with gold lettering & stripes. Has Dunlop 26 x 1 3/8" rims and original "tyres" which say "The Silver Star Tyre....Extra Fine Quality...To Fit Rims B.S.F. 4 & EA 3" Looks like front chainring is approximately 47 teeth & rear about 18 teeth. Right brake is for the front & left brake for the rear. I tapped on the original brake pads and they actually sound like metal. Let's just say the test ride was short as bike really didn't stop me.
Last edited by Velocivixen; 01-07-15 at 01:26 AM. Reason: changed some duplicate photos.
 01-07-15, 01:21 AM
#2
Senior Member
Thread Starter
I pulled the seat post out and it looks pristine, just little rust where the saddle mounts. Stem moves also. I put some penetrating oil on the cotter pins as a prelude to tomorrow's excitement. I am in posession of a Park Tool Cotter Pin Press & the mechanic who gave it to me gave me some "tips". I plan to take care of the bottom bracket & headset first. If those are in good shape, then I'll clean & replace consumables.
Seller was a young guy whose friend's father passed away. He didn't know if the father rode it, but it was "in his family" and was housed in their barn outside of Portland. Very tiny amount of rust, just thick caked on grease & dust. So....feel free to impart any information, expertise or tips. Never dealt with cotter pins before.
Anyone know how to get that "master link" off & what kind of link it is? What chain? By the way, chain is not stretched, but very dirty, dry & stiff.
Last edited by Velocivixen; 01-07-15 at 01:28 AM. Reason: Added more photos.
01-07-15, 05:43 AM
#3

Freewheel Medic

Join Date: Oct 2005
Location: An Island on the Coast of GA!
Posts: 12,886
Bikes: Snazzy* Schwinns, Classy Cannondales & a Super Pro Aero Lotus (* Ed.)
Mentioned: 140 Post(s)
Tagged: 0 Thread(s)
Quoted: 1455 Post(s)
Liked 2,197 Times
in
963 Posts
Nice find Vv! I've had a '52 (minus the Dynohub and lights) in my basement for the past 4 years waiting for the same treatment. A member of my church has expressed interest so I need to get busy over the winter and bring it back to life so she can take possession this Spring. Mine is black with gold details.
__________________
Bob
Enjoying the GA coast all year long!
Thanks for visiting my website: www.freewheelspa.com
Bob
Enjoying the GA coast all year long!
Thanks for visiting my website: www.freewheelspa.com
01-07-15, 06:24 AM
#4
Senior Member
Join Date: Jan 2007
Location: Ontario
Posts: 2,648
Mentioned: 16 Post(s)
Tagged: 0 Thread(s)
Quoted: 478 Post(s)
Liked 634 Times
in
336 Posts
Master Link: pretty typical style - easy to remove but also easy to poke yourself in the fingers doing it....The thin flat outer plate that looks like an extended "C" - you slightly spread the open ends apart and press the whole plate towards the closed end (and since the plate is so thin, this is where the screwdriver slips and pokes a hole in your hand). Once the closed end is moved off the link pin, the plate is rotated 90 degrees and pulled off. I usually do this by placing a suitable flat screwdriver flush with the open end and brute forcing the plate forward (not really a lot of force) - pushing will spread the arms, taking care not to hurt my hands, and it usually pops forward reasonably quickly. The other, more awkward way is to put a slightly larger flat screwdriver between the arms of the C on the inside of the pin, twist to spread the arms of the C, then with the third hand you don't have slide the clip forward.
BTW - that paint looks pretty good and will likely respond extremely well to polishing and waxing. Lots of folks recommend something like Meguire's Scratch-X followed by a good waxing....first thing you can try is a good rubdown with a cloth wetted with motor oil though....careful around the decals though.
BTW - that paint looks pretty good and will likely respond extremely well to polishing and waxing. Lots of folks recommend something like Meguire's Scratch-X followed by a good waxing....first thing you can try is a good rubdown with a cloth wetted with motor oil though....careful around the decals though.
Last edited by markk900; 01-07-15 at 06:28 AM.
01-07-15, 06:40 AM
#5
Extraordinary Magnitude

Join Date: Aug 2009
Location: Waukesha WI
Posts: 13,649
Bikes: 1978 Trek TX700; 1978/79 Trek 736; 1984 Specialized Stumpjumper Sport; 1984 Schwinn Voyageur SP; 1985 Trek 620; 1985 Trek 720; 1986 Trek 400 Elance; 1987 Schwinn High Sierra; 1990 Miyata 1000LT
Mentioned: 84 Post(s)
Tagged: 0 Thread(s)
Quoted: 2608 Post(s)
Liked 1,703 Times
in
937 Posts
I'm looking forward to seeing it!
__________________
*Recipient of the 2006 Time Magazine "Person Of The Year" Award*
Commence to jigglin� huh?!?!
"But hey, always love to hear from opinionated amateurs." -says some guy to Mr. Marshall.
Commence to jigglin� huh?!?!
"But hey, always love to hear from opinionated amateurs." -says some guy to Mr. Marshall.
01-07-15, 07:02 AM
#6
Abuse Magnet

Join Date: Jun 2012
Location: Colorado
Posts: 1,870
Bikes: '91 Mtn Tek Vertical, '74 Raleigh Sports, '72 Raleigh Twenty, '84 Univega Gran Turismo, '09 Surly Karate Monkey, '92 Burley Rock-n-Roll, '86 Miyata 310, '76 Raleigh Shopper
Mentioned: 5 Post(s)
Tagged: 0 Thread(s)
Quoted: 151 Post(s)
Liked 175 Times
in
89 Posts
Really cool.
01-07-15, 08:54 AM
#7
Senior Member
Join Date: Nov 2014
Location: Versailles, KY
Posts: 137
Bikes: Too many to list in this particular space...
Mentioned: 0 Post(s)
Tagged: 0 Thread(s)
Quoted: 0 Post(s)
Likes: 0
Liked 0 Times
in
0 Posts
Too cool! Be prepared to get lots of attention, questions!
01-07-15, 09:13 AM
#8
Senior Member
Join Date: Nov 2005
Location: NW Ohio
Posts: 3,423
Bikes: 1984 Miyata 310, 1986 Schwinn Sierra, 2011 Jamis Quest, 1980 Peugeot TH8 Tandem, 1992 Performance Parabola, 1987 Ross Mt. Hood, 1988 Schwinn LeTour, 1988 Trek 400T, 1981 Fuji S12-S LTD, 197? FW Evans
Mentioned: 24 Post(s)
Tagged: 0 Thread(s)
Quoted: 533 Post(s)
Liked 1,009 Times
in
517 Posts
Master Link: pretty typical style - easy to remove but also easy to poke yourself in the fingers doing it....The thin flat outer plate that looks like an extended "C" - you slightly spread the open ends apart and press the whole plate towards the closed end (and since the plate is so thin, this is where the screwdriver slips and pokes a hole in your hand). Once the closed end is moved off the link pin, the plate is rotated 90 degrees and pulled off. I usually do this by placing a suitable flat screwdriver flush with the open end and brute forcing the plate forward (not really a lot of force) - pushing will spread the arms, taking care not to hurt my hands, and it usually pops forward reasonably quickly. The other, more awkward way is to put a slightly larger flat screwdriver between the arms of the C on the inside of the pin, twist to spread the arms of the C, then with the third hand you don't have slide the clip forward.
BTW - that paint looks pretty good and will likely respond extremely well to polishing and waxing. Lots of folks recommend something like Meguire's Scratch-X followed by a good waxing....first thing you can try is a good rubdown with a cloth wetted with motor oil though....careful around the decals though.
BTW - that paint looks pretty good and will likely respond extremely well to polishing and waxing. Lots of folks recommend something like Meguire's Scratch-X followed by a good waxing....first thing you can try is a good rubdown with a cloth wetted with motor oil though....careful around the decals though.
Nice find. My dad has a Hercules of similar vintage that he still rides in the summer.
Does any one know if the bags like on pastorbob's bike are still available?
01-07-15, 10:58 AM
#9
Senior Member

Join Date: Nov 2011
Location: Port Angeles, WA
Posts: 7,922
Bikes: A green one, "Ragleigh," or something.
Mentioned: 194 Post(s)
Tagged: 0 Thread(s)
Quoted: 1627 Post(s)
Liked 630 Times
in
356 Posts
Heh, you bought it. I knew you would. 
Surprised it lasted so long on CL in the PDX market.
Surprised it lasted so long on CL in the PDX market.
__________________
● 1971 Grandis SL ● 1972 Lambert Grand Prix frankenbike ● 1972 Raleigh Super Course fixie ● 1973 Nishiki Semi-Pro ● 1979 Motobecane Grand Jubile ●1980 Apollo "Legnano" ● 1984 Peugeot Vagabond ● 1985 Shogun Prairie Breaker ● 1986 Merckx Super Corsa ● 1987 Schwinn Tempo ● 1988 Schwinn Voyageur ● 1989 Bottechia Team ADR replica ● 1990 Cannondale ST600 ● 1993 Technium RT600 ● 1996 Kona Lava Dome ●
● 1971 Grandis SL ● 1972 Lambert Grand Prix frankenbike ● 1972 Raleigh Super Course fixie ● 1973 Nishiki Semi-Pro ● 1979 Motobecane Grand Jubile ●1980 Apollo "Legnano" ● 1984 Peugeot Vagabond ● 1985 Shogun Prairie Breaker ● 1986 Merckx Super Corsa ● 1987 Schwinn Tempo ● 1988 Schwinn Voyageur ● 1989 Bottechia Team ADR replica ● 1990 Cannondale ST600 ● 1993 Technium RT600 ● 1996 Kona Lava Dome ●
01-07-15, 11:15 AM
#10
Aspiring curmudgeon

Join Date: Aug 2014
Location: Saint Louis
Posts: 2,486
Bikes: Guerciotti, Serotta, Gaulzetti
Mentioned: 10 Post(s)
Tagged: 0 Thread(s)
Quoted: 111 Post(s)
Likes: 0
Liked 26 Times
in
13 Posts
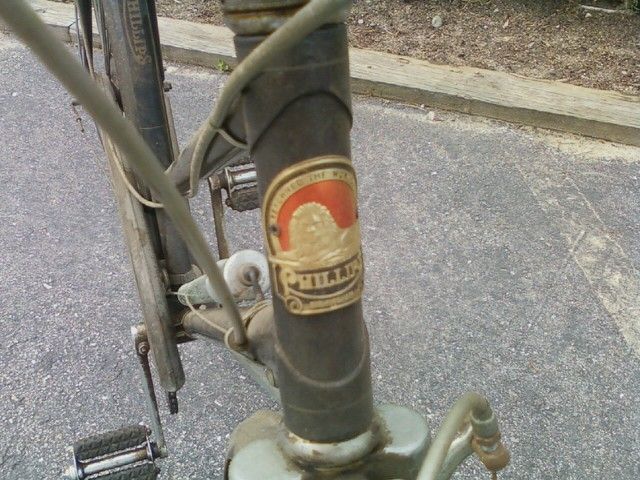
Cool headbadge.
__________________
"Party on comrades" -- Lenin, probably
"Party on comrades" -- Lenin, probably
01-07-15, 11:55 AM
#11
Senior Member
Thread Starter
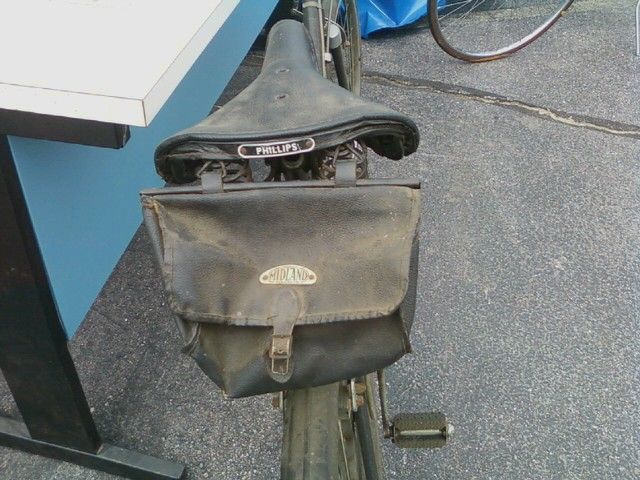
@pastorbobinnh - fantastic bicycle! The person you fix it up for will really like it. As they say, "It'll buff right out"  Could you please tell me what pump it on there & take photos if you've got time? Also the grips? That saddlebag is just great too. Wonderful find for you. Maybe my post will nudge you toward the refurb.
Thanks all. I'll keep you posted with the progress. Today is cottered crank day. It's been soaking in Liquid Wrench all night & I've got a cotter pin press so keep your fingers crossed.
Question: Black Tires or tan walls? I know tan walled tires like the Paselas are popular on older bikes, but how far back does that trend go? Current tires are all black & think that buy using tan/black tires it will take away from the overall aesthetics of the bike. Saddle is also black, grips are RED! (Hunt-Wilde so not original) and housing is beige. So I thought to keep tires/saddle/grips all black & either reuse housing or go black. What do you all think? I've tried more colorful housing & tan/black tires on other bikes & it was too "visually messy" & distracting.
Thanks.
Could you please tell me what pump it on there & take photos if you've got time? Also the grips? That saddlebag is just great too. Wonderful find for you. Maybe my post will nudge you toward the refurb. Thanks all. I'll keep you posted with the progress. Today is cottered crank day. It's been soaking in Liquid Wrench all night & I've got a cotter pin press so keep your fingers crossed.
Question: Black Tires or tan walls? I know tan walled tires like the Paselas are popular on older bikes, but how far back does that trend go? Current tires are all black & think that buy using tan/black tires it will take away from the overall aesthetics of the bike. Saddle is also black, grips are RED! (Hunt-Wilde so not original) and housing is beige. So I thought to keep tires/saddle/grips all black & either reuse housing or go black. What do you all think? I've tried more colorful housing & tan/black tires on other bikes & it was too "visually messy" & distracting.
Thanks.
01-07-15, 03:05 PM
#12
Senior Member
Thread Starter
Update: bent the left side cotter pin, but the right side came out easily. Removed the fixed cup, and undid the left side lock ring & adjustable cup and the entire bb is out.
Got the "master link" figured out & things are cleaning up nicely.
Question: That brown stuff is actually dirt that's sort of "baked on" I've soaked in oil & degreaser, but is not softening & am having to very carefully with a tiny tool, scrape it off. How to I scrape & not mess up the paint?
Got the "master link" figured out & things are cleaning up nicely.
Question: That brown stuff is actually dirt that's sort of "baked on" I've soaked in oil & degreaser, but is not softening & am having to very carefully with a tiny tool, scrape it off. How to I scrape & not mess up the paint?
01-07-15, 03:19 PM
#13
Freewheel Medic
Join Date: Oct 2005
Location: An Island on the Coast of GA!
Posts: 12,886
Bikes: Snazzy* Schwinns, Classy Cannondales & a Super Pro Aero Lotus (* Ed.)
Mentioned: 140 Post(s)
Tagged: 0 Thread(s)
Quoted: 1455 Post(s)
Liked 2,197 Times
in
963 Posts
Update: bent the left side cotter pin, but the right side came out easily. Removed the fixed cup, and undid the left side lock ring & adjustable cup and the entire bb is out.
Got the "master link" figured out & things are cleaning up nicely.
Question: That brown stuff is actually dirt that's sort of "baked on" I've soaked in oil & degreaser, but is not softening & am having to very carefully with a tiny tool, scrape it off. How to I scrape & not mess up the paint?
Got the "master link" figured out & things are cleaning up nicely.
Question: That brown stuff is actually dirt that's sort of "baked on" I've soaked in oil & degreaser, but is not softening & am having to very carefully with a tiny tool, scrape it off. How to I scrape & not mess up the paint?
__________________
Bob
Enjoying the GA coast all year long!
Thanks for visiting my website: www.freewheelspa.com
Bob
Enjoying the GA coast all year long!
Thanks for visiting my website: www.freewheelspa.com
01-07-15, 04:28 PM
#14
aka Tom Reingold

Join Date: Jan 2009
Location: New York, NY, and High Falls, NY, USA
Posts: 40,509
Bikes: 1962 Rudge Sports, 1971 Raleigh Super Course, 1971 Raleigh Pro Track, 1974 Raleigh International, 1975 Viscount Fixie, 1982 McLean, 1996 Lemond (Ti), 2002 Burley Zydeco tandem
Mentioned: 511 Post(s)
Tagged: 0 Thread(s)
Quoted: 7353 Post(s)
Liked 2,481 Times
in
1,440 Posts
This is just great.
You won't need to take apart the rear hub. Just drop some oil in it.
Blackwall tires would be period correct. Skinwall tires came later and were not fashionable for three-speeds.
You won't need to take apart the rear hub. Just drop some oil in it.
Blackwall tires would be period correct. Skinwall tires came later and were not fashionable for three-speeds.
__________________
Tom Reingold, tom@noglider.com
New York City and High Falls, NY
Blogs: The Experienced Cyclist; noglider's ride blog
�When man invented the bicycle he reached the peak of his attainments.� � Elizabeth West, US author
Please email me rather than PM'ing me. Thanks.
Tom Reingold, tom@noglider.com
New York City and High Falls, NY
Blogs: The Experienced Cyclist; noglider's ride blog
�When man invented the bicycle he reached the peak of his attainments.� � Elizabeth West, US author
Please email me rather than PM'ing me. Thanks.
01-07-15, 05:32 PM
#15

Senior Member
Join Date: Dec 2005
Posts: 17,160
Mentioned: 481 Post(s)
Tagged: 0 Thread(s)
Quoted: 3811 Post(s)
Liked 6,717 Times
in
2,614 Posts
I just put a set of Schwalbe Marathon 590mm tires on a 3-speed; they seem pretty nice. And I did see that Harris is once again stocking Panaracer Col de la vie tires in that size. Those are very plush.
01-07-15, 05:50 PM
#16
Senior Member
Join Date: Dec 2005
Posts: 17,160
Mentioned: 481 Post(s)
Tagged: 0 Thread(s)
Quoted: 3811 Post(s)
Liked 6,717 Times
in
2,614 Posts
For the Raleigh Sports and the like, the typical tire was actually a whitewall: the Dunlop Tourist Sprite. Here's someone's 1958 Raleigh with those tires:

Blackballs were common, too, but definitely not the only "fashion."
01-07-15, 05:55 PM
#17
aka Tom Reingold
Join Date: Jan 2009
Location: New York, NY, and High Falls, NY, USA
Posts: 40,509
Bikes: 1962 Rudge Sports, 1971 Raleigh Super Course, 1971 Raleigh Pro Track, 1974 Raleigh International, 1975 Viscount Fixie, 1982 McLean, 1996 Lemond (Ti), 2002 Burley Zydeco tandem
Mentioned: 511 Post(s)
Tagged: 0 Thread(s)
Quoted: 7353 Post(s)
Liked 2,481 Times
in
1,440 Posts
Happy to be corrected. Nothing to say sorry about!
__________________
Tom Reingold, tom@noglider.com
New York City and High Falls, NY
Blogs: The Experienced Cyclist; noglider's ride blog
�When man invented the bicycle he reached the peak of his attainments.� � Elizabeth West, US author
Please email me rather than PM'ing me. Thanks.
Tom Reingold, tom@noglider.com
New York City and High Falls, NY
Blogs: The Experienced Cyclist; noglider's ride blog
�When man invented the bicycle he reached the peak of his attainments.� � Elizabeth West, US author
Please email me rather than PM'ing me. Thanks.
01-07-15, 06:24 PM
#18
Senior Member
Thread Starter
Thinking about getting the Rubena Flash V66 tires - $15 at local place.
I have another thread regarding the trials & tribulations of bent cotter pin. LBS whacked it & it came out.
01-07-15, 07:34 PM
#19
aka Tom Reingold
Join Date: Jan 2009
Location: New York, NY, and High Falls, NY, USA
Posts: 40,509
Bikes: 1962 Rudge Sports, 1971 Raleigh Super Course, 1971 Raleigh Pro Track, 1974 Raleigh International, 1975 Viscount Fixie, 1982 McLean, 1996 Lemond (Ti), 2002 Burley Zydeco tandem
Mentioned: 511 Post(s)
Tagged: 0 Thread(s)
Quoted: 7353 Post(s)
Liked 2,481 Times
in
1,440 Posts
I believe oiling the hub in the usual way will get oil into the bearings. I don't know about the AG hub, but I know it's easy to demagnetize the front dyno hub accidentally by not following procedure. I just don't think it's necessary, and it carries some risk.
__________________
Tom Reingold, tom@noglider.com
New York City and High Falls, NY
Blogs: The Experienced Cyclist; noglider's ride blog
�When man invented the bicycle he reached the peak of his attainments.� � Elizabeth West, US author
Please email me rather than PM'ing me. Thanks.
Tom Reingold, tom@noglider.com
New York City and High Falls, NY
Blogs: The Experienced Cyclist; noglider's ride blog
�When man invented the bicycle he reached the peak of his attainments.� � Elizabeth West, US author
Please email me rather than PM'ing me. Thanks.
01-07-15, 08:18 PM
#20
Senior Member
Join Date: Jan 2007
Location: Ontario
Posts: 2,648
Mentioned: 16 Post(s)
Tagged: 0 Thread(s)
Quoted: 478 Post(s)
Liked 634 Times
in
336 Posts
I agree with Tom on this one - you will be astounded at where the oil gets to! I think right now I'd leave the hub alone with just a squirt of fresh oil and ride the bike a bit.
@nlerner: thanks for the update on non-black tires - I just invested $50 in new tires for the Humber and ordered the Panaracer Col de la Vie from Niagara, along with some nice shiny CR18s. I was a little worried the tan walls might look out of place....When I first got the Humber it needed a saddle (a nice Brooks *had* to be obtained) - that doubled my investment. The new rims and tires are going to double my investment again.....but it will be worth it I hope, and it feeds the sickness.
@nlerner: thanks for the update on non-black tires - I just invested $50 in new tires for the Humber and ordered the Panaracer Col de la Vie from Niagara, along with some nice shiny CR18s. I was a little worried the tan walls might look out of place....When I first got the Humber it needed a saddle (a nice Brooks *had* to be obtained) - that doubled my investment. The new rims and tires are going to double my investment again.....but it will be worth it I hope, and it feeds the sickness.
01-07-15, 08:24 PM
#21
Senior Member

Join Date: Dec 2012
Location: St. Paul, MN
Posts: 1,597
Bikes: Too many 3-speeds, Jones Plus LWB
Mentioned: 12 Post(s)
Tagged: 0 Thread(s)
Quoted: 359 Post(s)
Liked 265 Times
in
119 Posts
A good oil for SA hubs is automatic transmission fluid. The next thing you will want is a period correct oiler can so you can oil the fittings on the bike in style
01-07-15, 08:38 PM
#22
Extraordinary Magnitude
Join Date: Aug 2009
Location: Waukesha WI
Posts: 13,649
Bikes: 1978 Trek TX700; 1978/79 Trek 736; 1984 Specialized Stumpjumper Sport; 1984 Schwinn Voyageur SP; 1985 Trek 620; 1985 Trek 720; 1986 Trek 400 Elance; 1987 Schwinn High Sierra; 1990 Miyata 1000LT
Mentioned: 84 Post(s)
Tagged: 0 Thread(s)
Quoted: 2608 Post(s)
Liked 1,703 Times
in
937 Posts
That's just a small example of what makes you awesome Tom.
__________________
*Recipient of the 2006 Time Magazine "Person Of The Year" Award*
Commence to jigglin� huh?!?!
"But hey, always love to hear from opinionated amateurs." -says some guy to Mr. Marshall.
Commence to jigglin� huh?!?!
"But hey, always love to hear from opinionated amateurs." -says some guy to Mr. Marshall.
01-07-15, 09:13 PM
#23
Hoards Thumbshifters

Join Date: Jul 2010
Location: Signal Mountain, TN
Posts: 1,157
Bikes: '23 Black Mtn MC, '87 Bruce Gordon Chinook, '08 Jamis Aurora, '86 Trek 560, '97 Mongoose Rockadile, & '91 Trek 750
Mentioned: 11 Post(s)
Tagged: 0 Thread(s)
Quoted: 246 Post(s)
Liked 338 Times
in
193 Posts
Velocivixen, I just wanted to say how much I have enjoyed you constantly stepping up your game with repairing/restoring bikes since you have joined BF. It's fun to see someone so open minded and with such good spirit go about learning to do all this stuff. I think we all appreciate it.
01-07-15, 11:52 PM
#24
Senior Member
 01-08-15, 12:03 AM
#25
Senior Member
Thread Starter
Velocivixen, I just wanted to say how much I have enjoyed you constantly stepping up your game with repairing/restoring bikes since you have joined BF. It's fun to see someone so open minded and with such good spirit go about learning to do all this stuff. I think we all appreciate it.
I'm torn on the tires. On one hand I want to get some decent riding tires, because if I get super cheap ones now, then end up loving the bike, making new wheels I'd want "nicer" tires, so then I'd have a inferior pair hanging around. I don't really want/need several pairs of 26 x 1 3/8" tires around. On the other hand, I don't want to buy real plush & expensive tires and come to find out that I don't really like riding the bike. If I sold it not sure I could get my money back. I figured if I got the Rubena V66 Flash or the Continental World Tour they would be somewhere middle of the road.
Grips? Not leather. Preferably black. Period correct or era correct?
Handlebars? Don't necessarily wanna spring for Nitto, not knowing whether or not I'll love the bike. VO Has "Tourist" bars supposed to be for English 3 speeds. Thoughts?
OK....now the good stuff.
 Pictures:
Some "before" & "afters". Master Link chain system, spindle from bb, fixed cup. The chain even says "Made in England" as do all the other parts so far. I'm still working on that baked on brown dirt on the bb shell. Ugh....slow going.