


3D Printing a Handlebar-mounted Water Bottle Cage Bracket!!
 01-04-24, 12:53 AM
#1
Master Parts Rearranger
Thread Starter

Join Date: Mar 2015
Location: Portlandia's Kuiper Belt, OR
Posts: 4,403
Bikes: 1982 Trek 720 - 1985 Trek 620 - 1984 Trek 620 - 1980 Trek 510 - Other luminaries past and present
Mentioned: 221 Post(s)
Tagged: 0 Thread(s)
Quoted: 1556 Post(s)
Liked 2,024 Times
in
989 Posts
3D Printing a Handlebar-mounted Water Bottle Cage Bracket!!
Can I do it better than the other guys out there?
"Ok, Riddle, what is this? There are, like, a million other handlebar-mounted bracket designs out there, and they come in all sorts of great colors, in metal, and are adaptable to many handlebar diameters."
I understand. And this is just the beginning...
Three years ago during the Illustrious Era of the Covid19 when I was laid off, I designed this bracket to be a better version of what I'd seen and what has come before in the world of handlebar-mounted bottle cage brackets. Areas for improvement that I saw included--depending on the design--a much lower center of gravity, a much simpler design, a more aesthetically-pleasing/elegant design, a design that cooperated with the bicycle overall, particularly vintage bicycles with their considerably higher silver/polished component count. I made a handful of sketches and design revisions on both paper and in CAD. My primary inspiration was pre- and post-WWII Racing/TdF bikes who carried their water bottles just ahead of the handlebars. The bottle's profile was "low" over the top of the bar. It looked sleek. I looked at other designs and came up with more or less a then-final form. More refinement needed to be done, but it got put on the back burner for various reasons. I found work again, and unfortunately it sat.
Until now.
[dun dun dunnnnn]
My brother had me convert his (formerly mine and built for him by me, years ago, in the Before Times, when Recycled Cycles sold Shimano brake cables and housings instead of Jagwire..) 1983 Fuji Supreme from swept back bars to its original drop bar configuration. The bars would be modern compact affairs--Soma Highway Ones that I've been trying to sell locally--held by a 100mm Nitto Technomic stem. The big deal was shifting. I have no idea which bike I bought sorta-kinda recently that had Microshift 2x7 brifters on it, but I was very grateful for having kept them (and not sold them yet). My brother's bike has an RSX/Mavic wheelset with a 7-speed cassette, so apart from swapping the Suntour rear derailleur for a Shimano example, the bike was ready to easily convert.
Alas, no water bottle cage bosses exist on this humble (but great-riding) Fuji. The proverbial lightbulb in my head turned on: I have it! I will 3D print my bottle cage bracket design so that he can actually do road riding! Of course I'd need to simplify my original design, which specified (machined) aluminum and (formed) rubber. Two main pieces plus some hardware I'd ordered and used on other 3D printing endeavors. Last year was a long year, in many ways. Some of those storylines are still playing out, but overall, it is good to have 2023 in the rear view. One of the positives was the purchasing of a 3D printer for personal and saleable design work (I am an industrial designer). I had loooooong held off on this technology for a number of reasons, but had found, finally, a very capable machine for a fair price. It has been a very good decision and this bracket is one of the benefits.
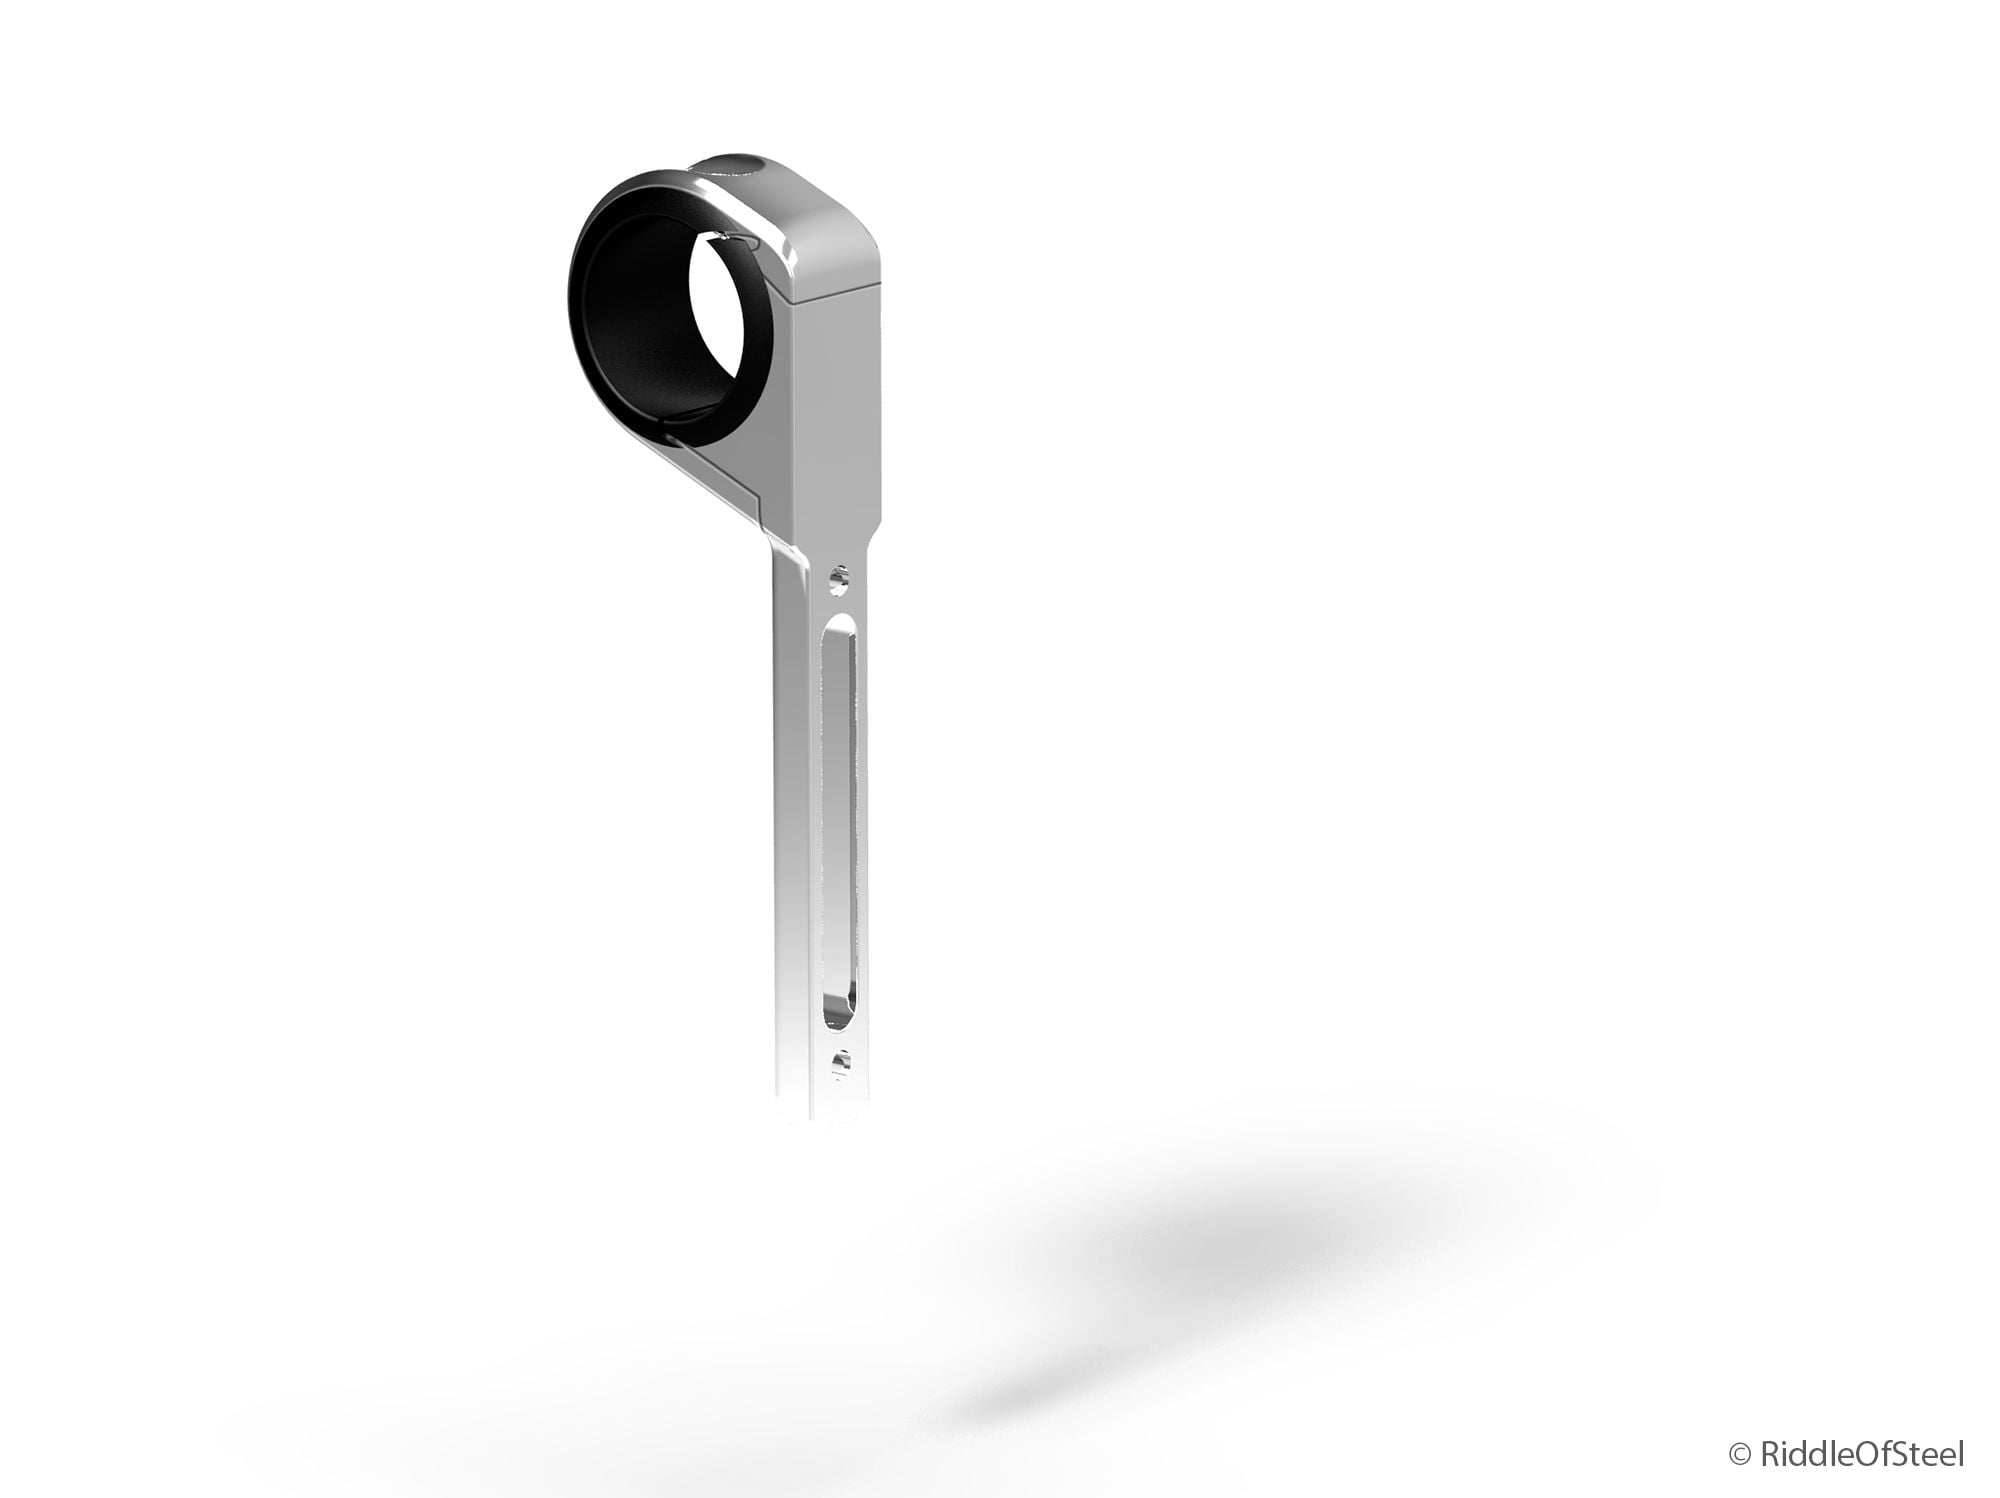
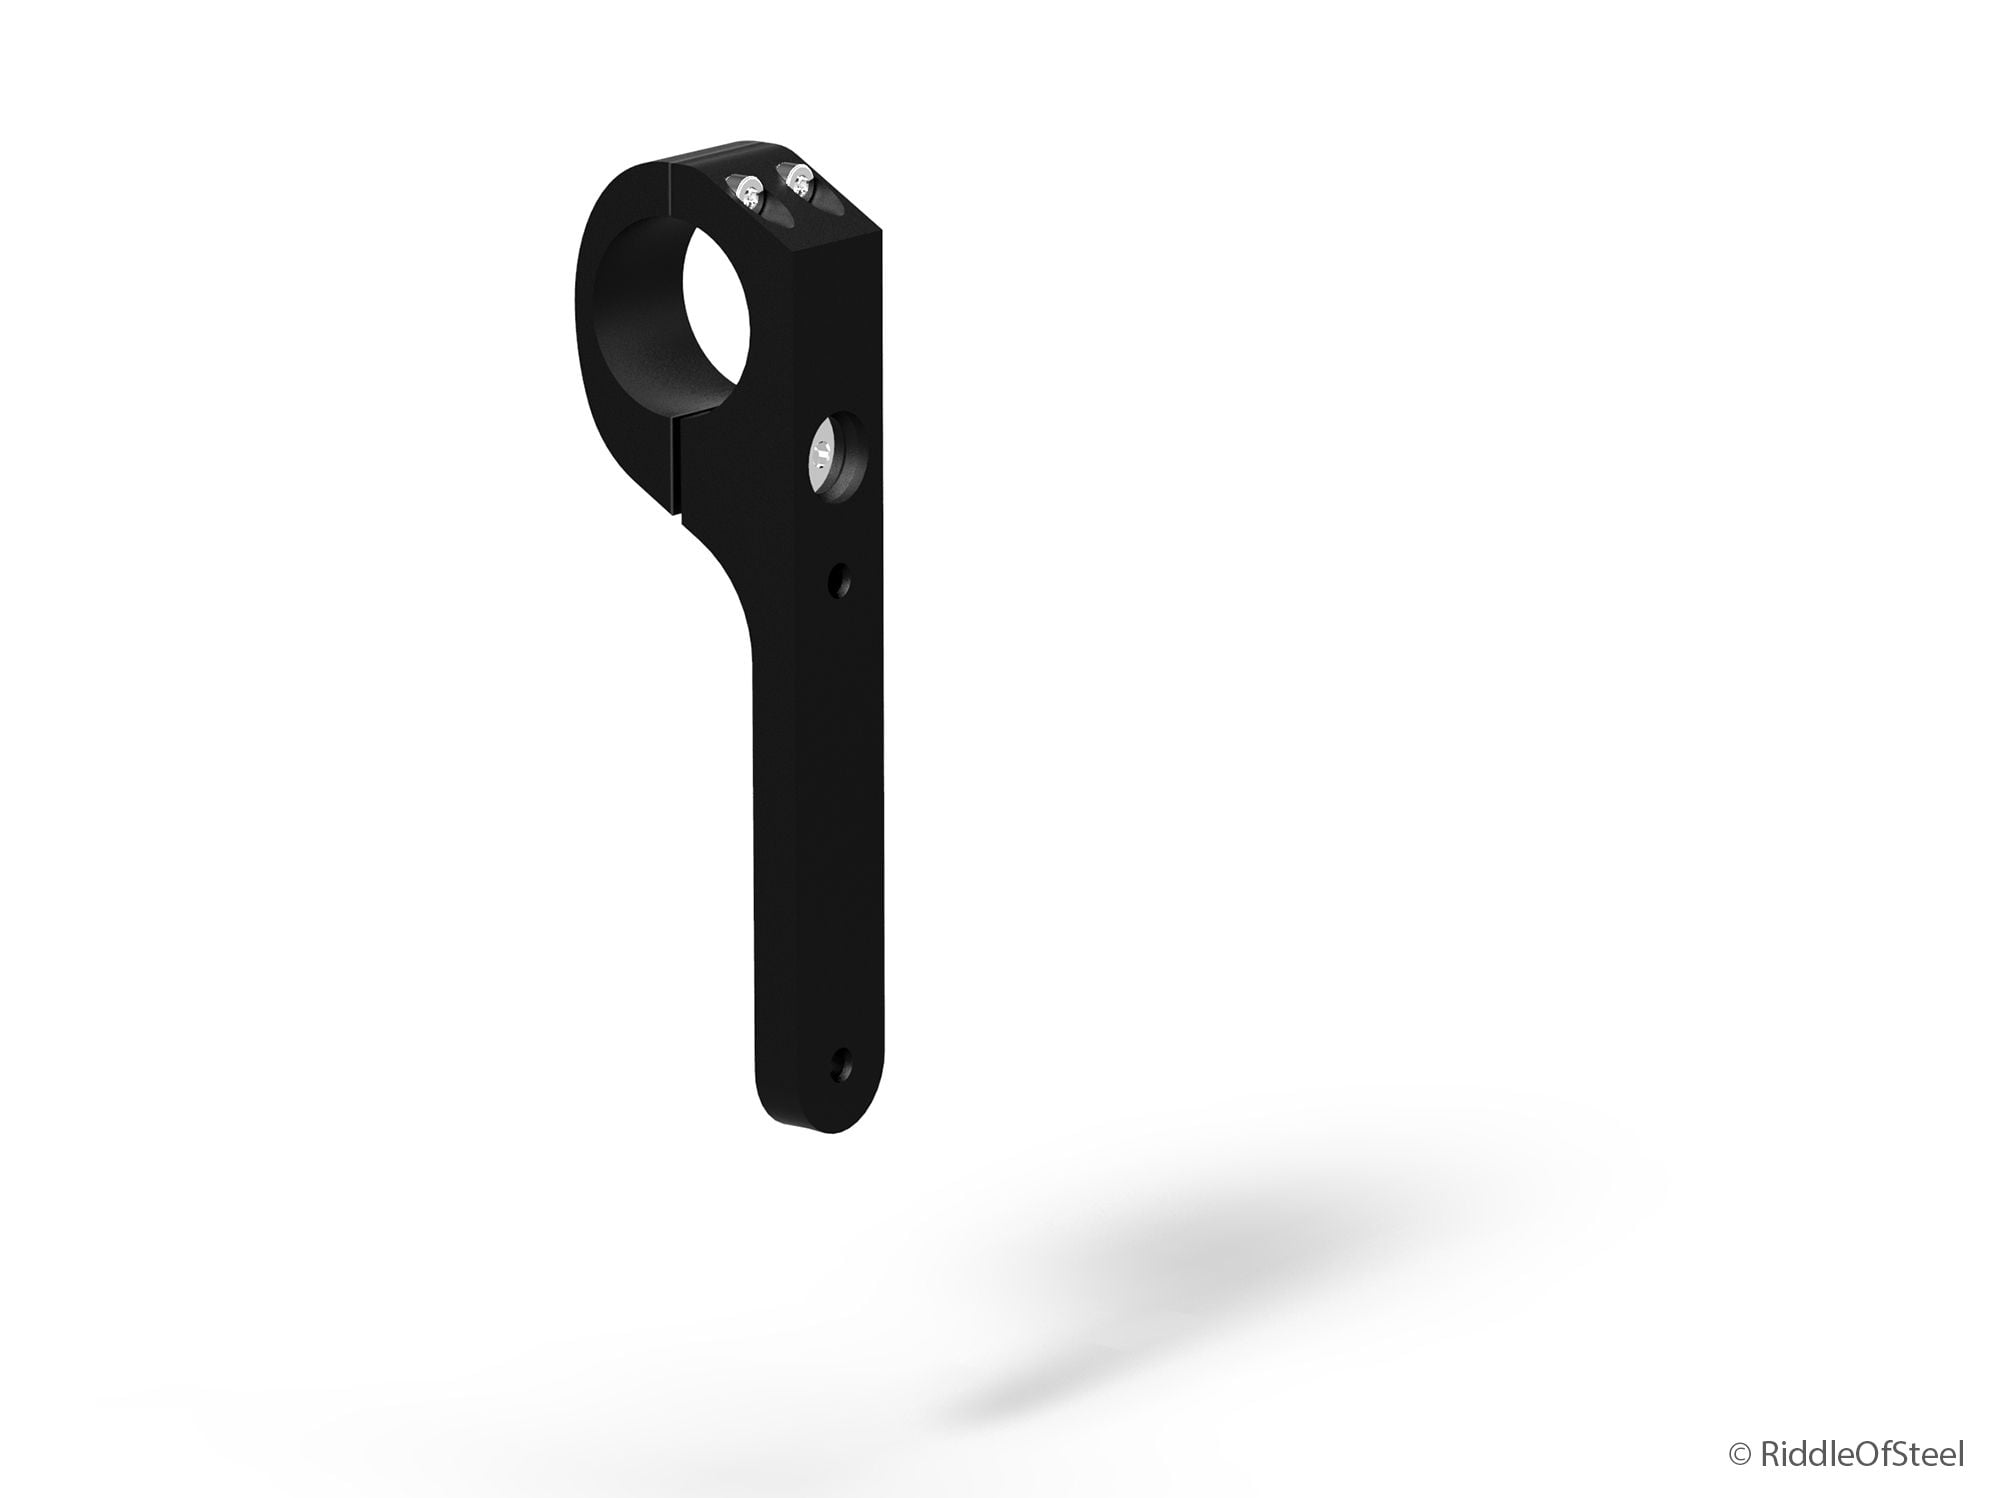
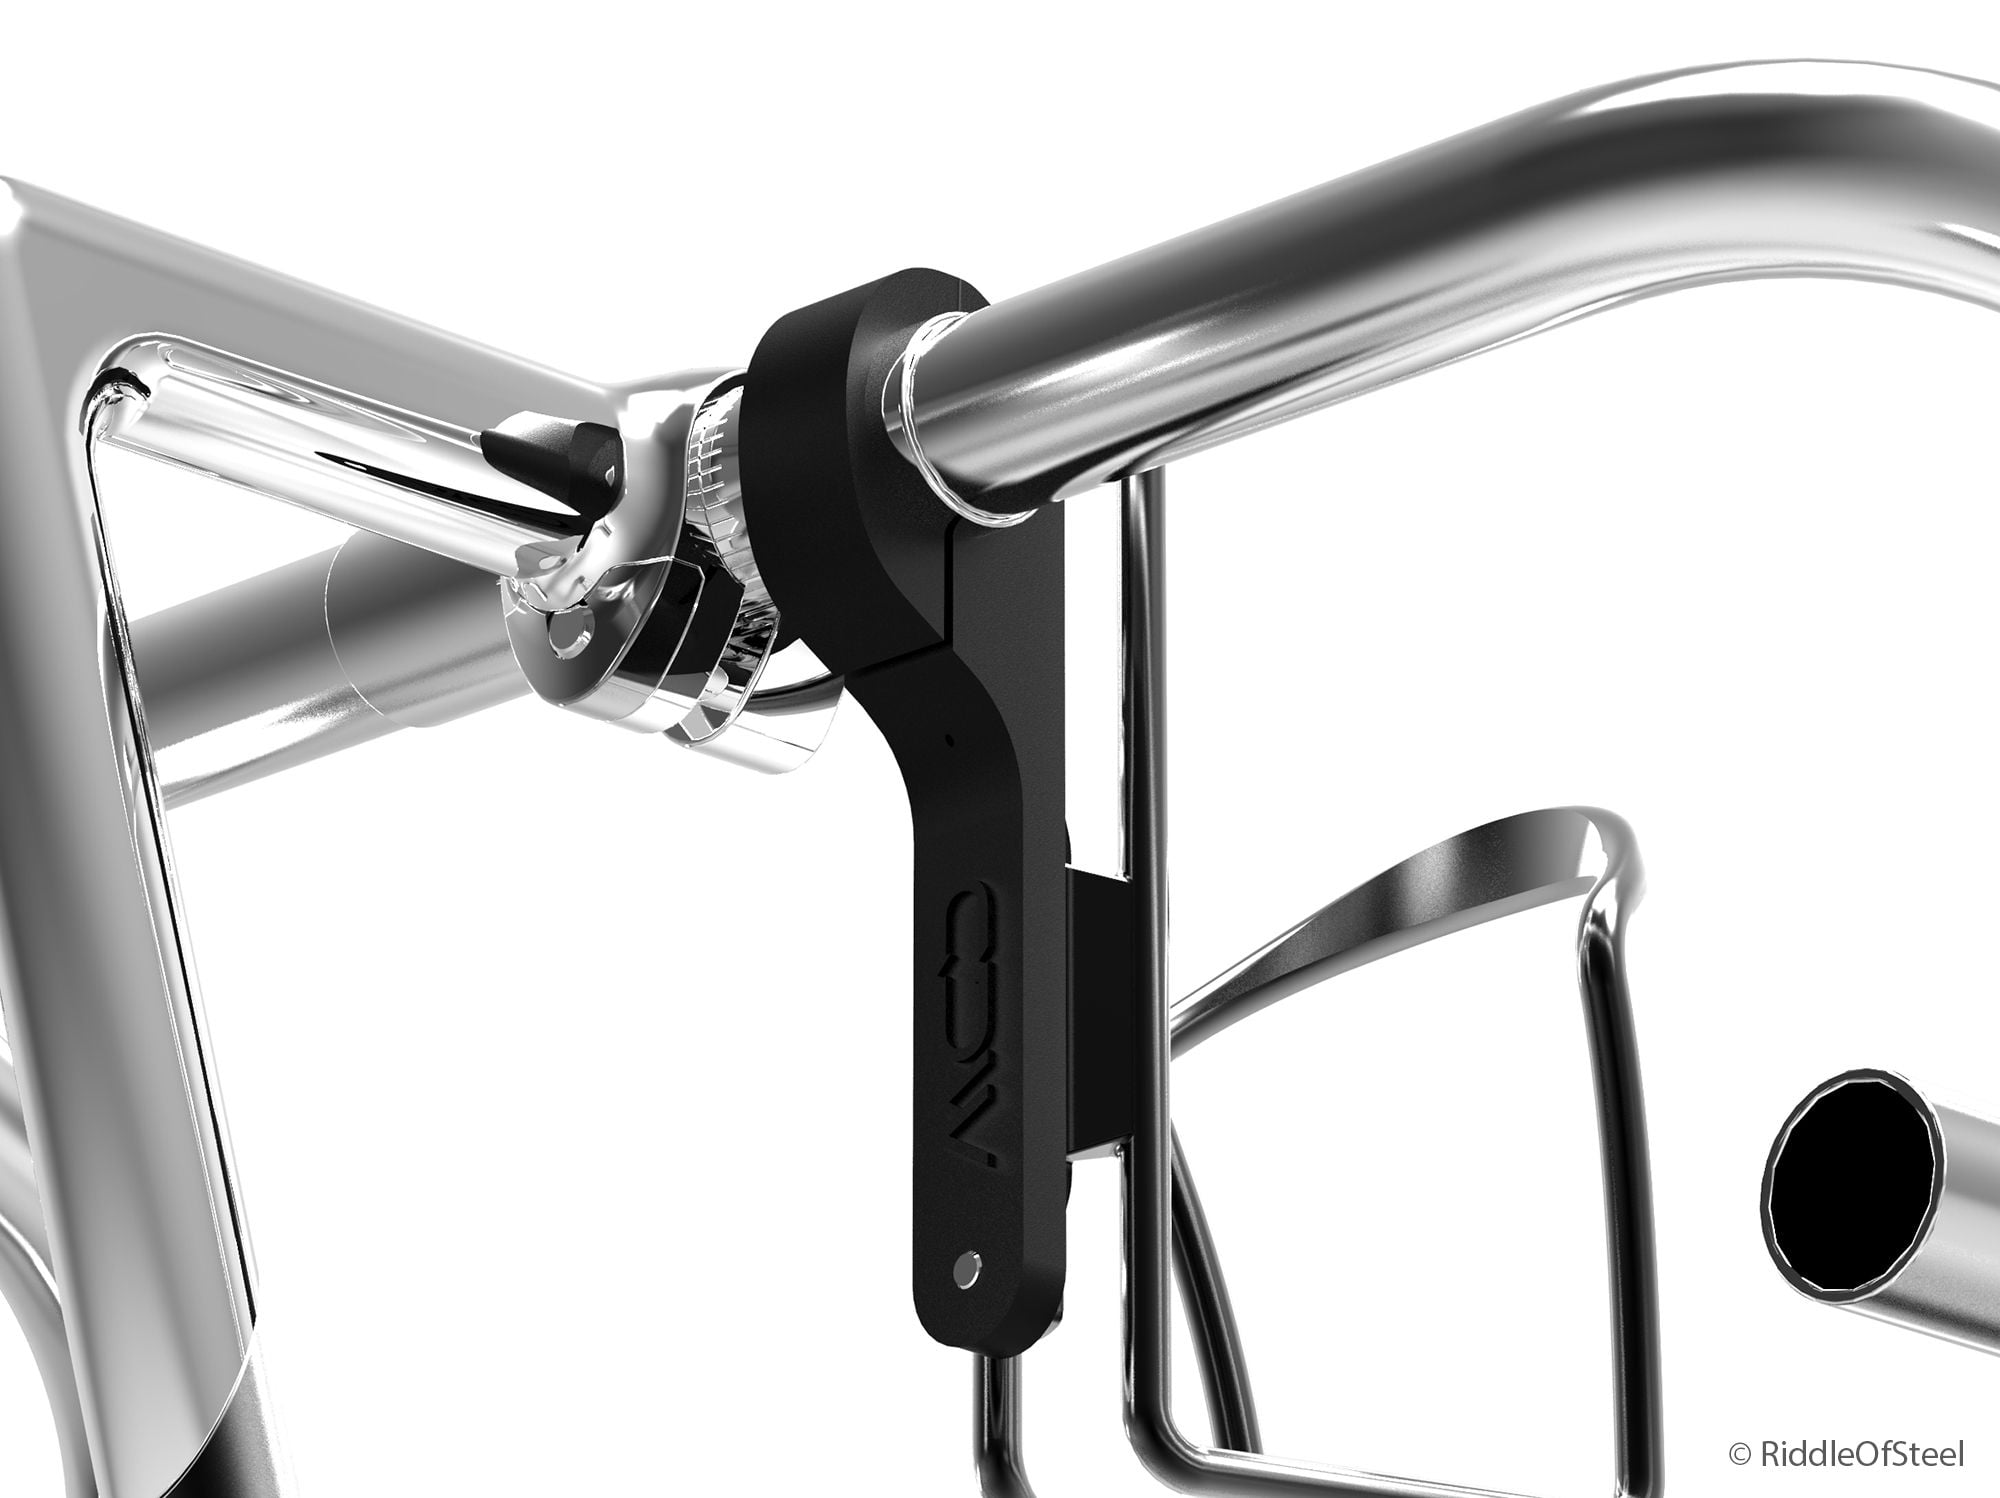
I had planned on getting a prototype of the original design produced and seeing what market(s) would be interested in them, starting with the C&V community as many of our bikes lack the standard two bottle cage accommodations. Plus, how cool and how convenient would this be (so long as one doesn't have a handlebar bag...)? Since a metal and rubber version is taking yet another back seat to something else, I want this thread to be not only informative as to what 3D printing can do for our bikes, but also to gauge viability were I to sell it on some platform (my own, Etsy or similar, etc etc). The 3D printed design is slated for further refinement, but let me show you what the original design looks like:
A svelte form, polished of course, in two pieces. The clamping would be done by an underside-located bolt, with the upper portion secured a la Mavic and Cinelli multi-piece stems.
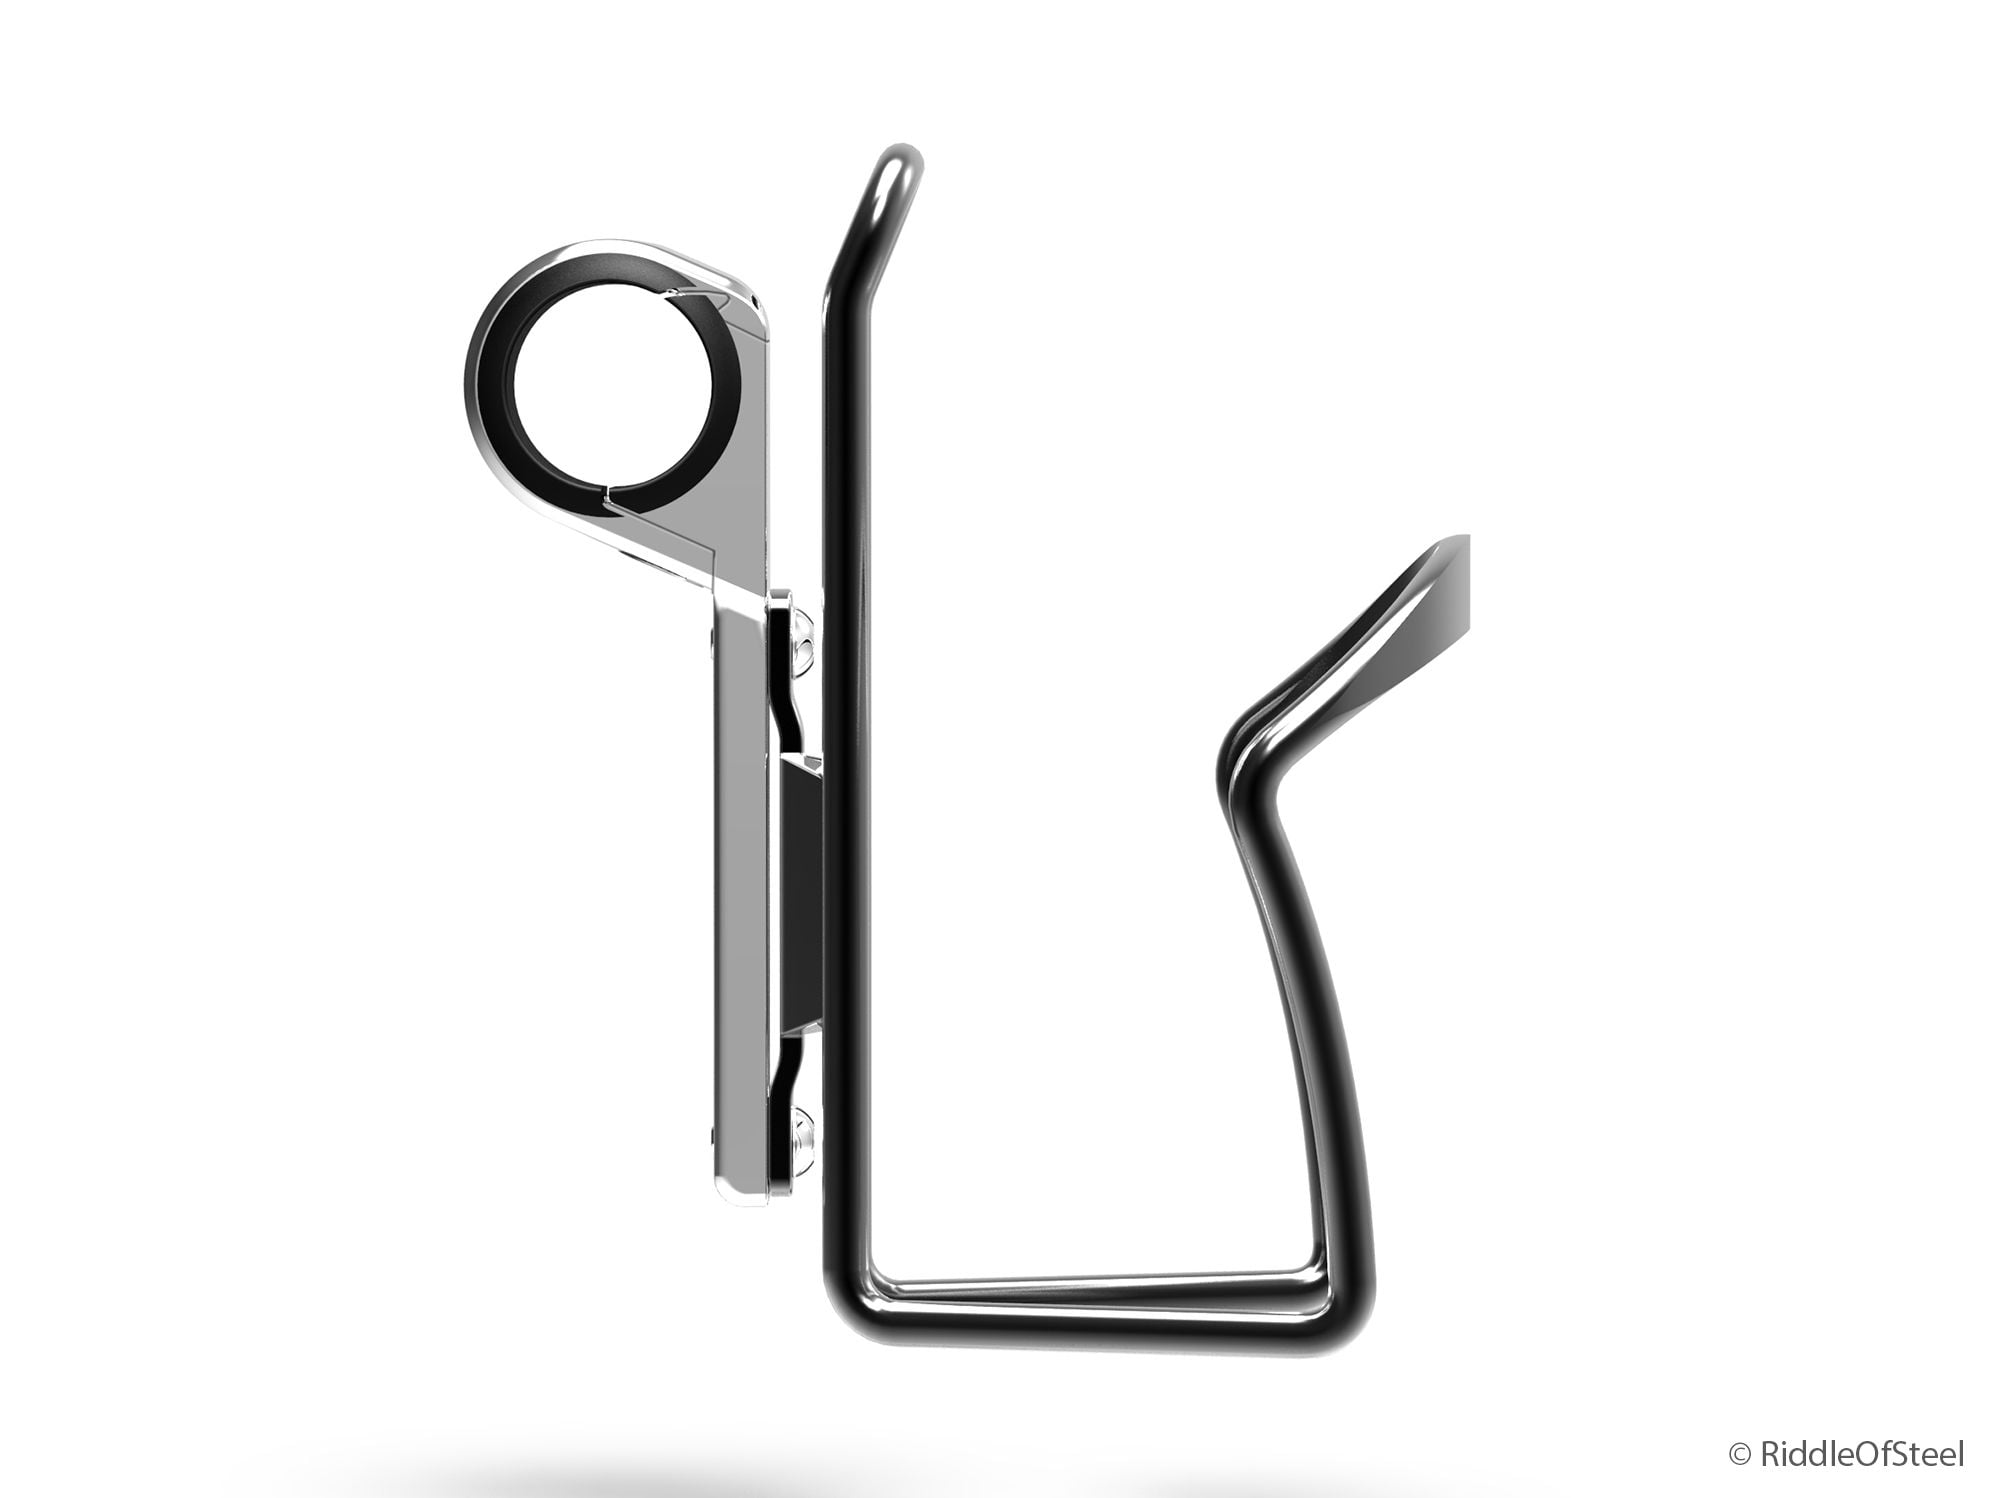
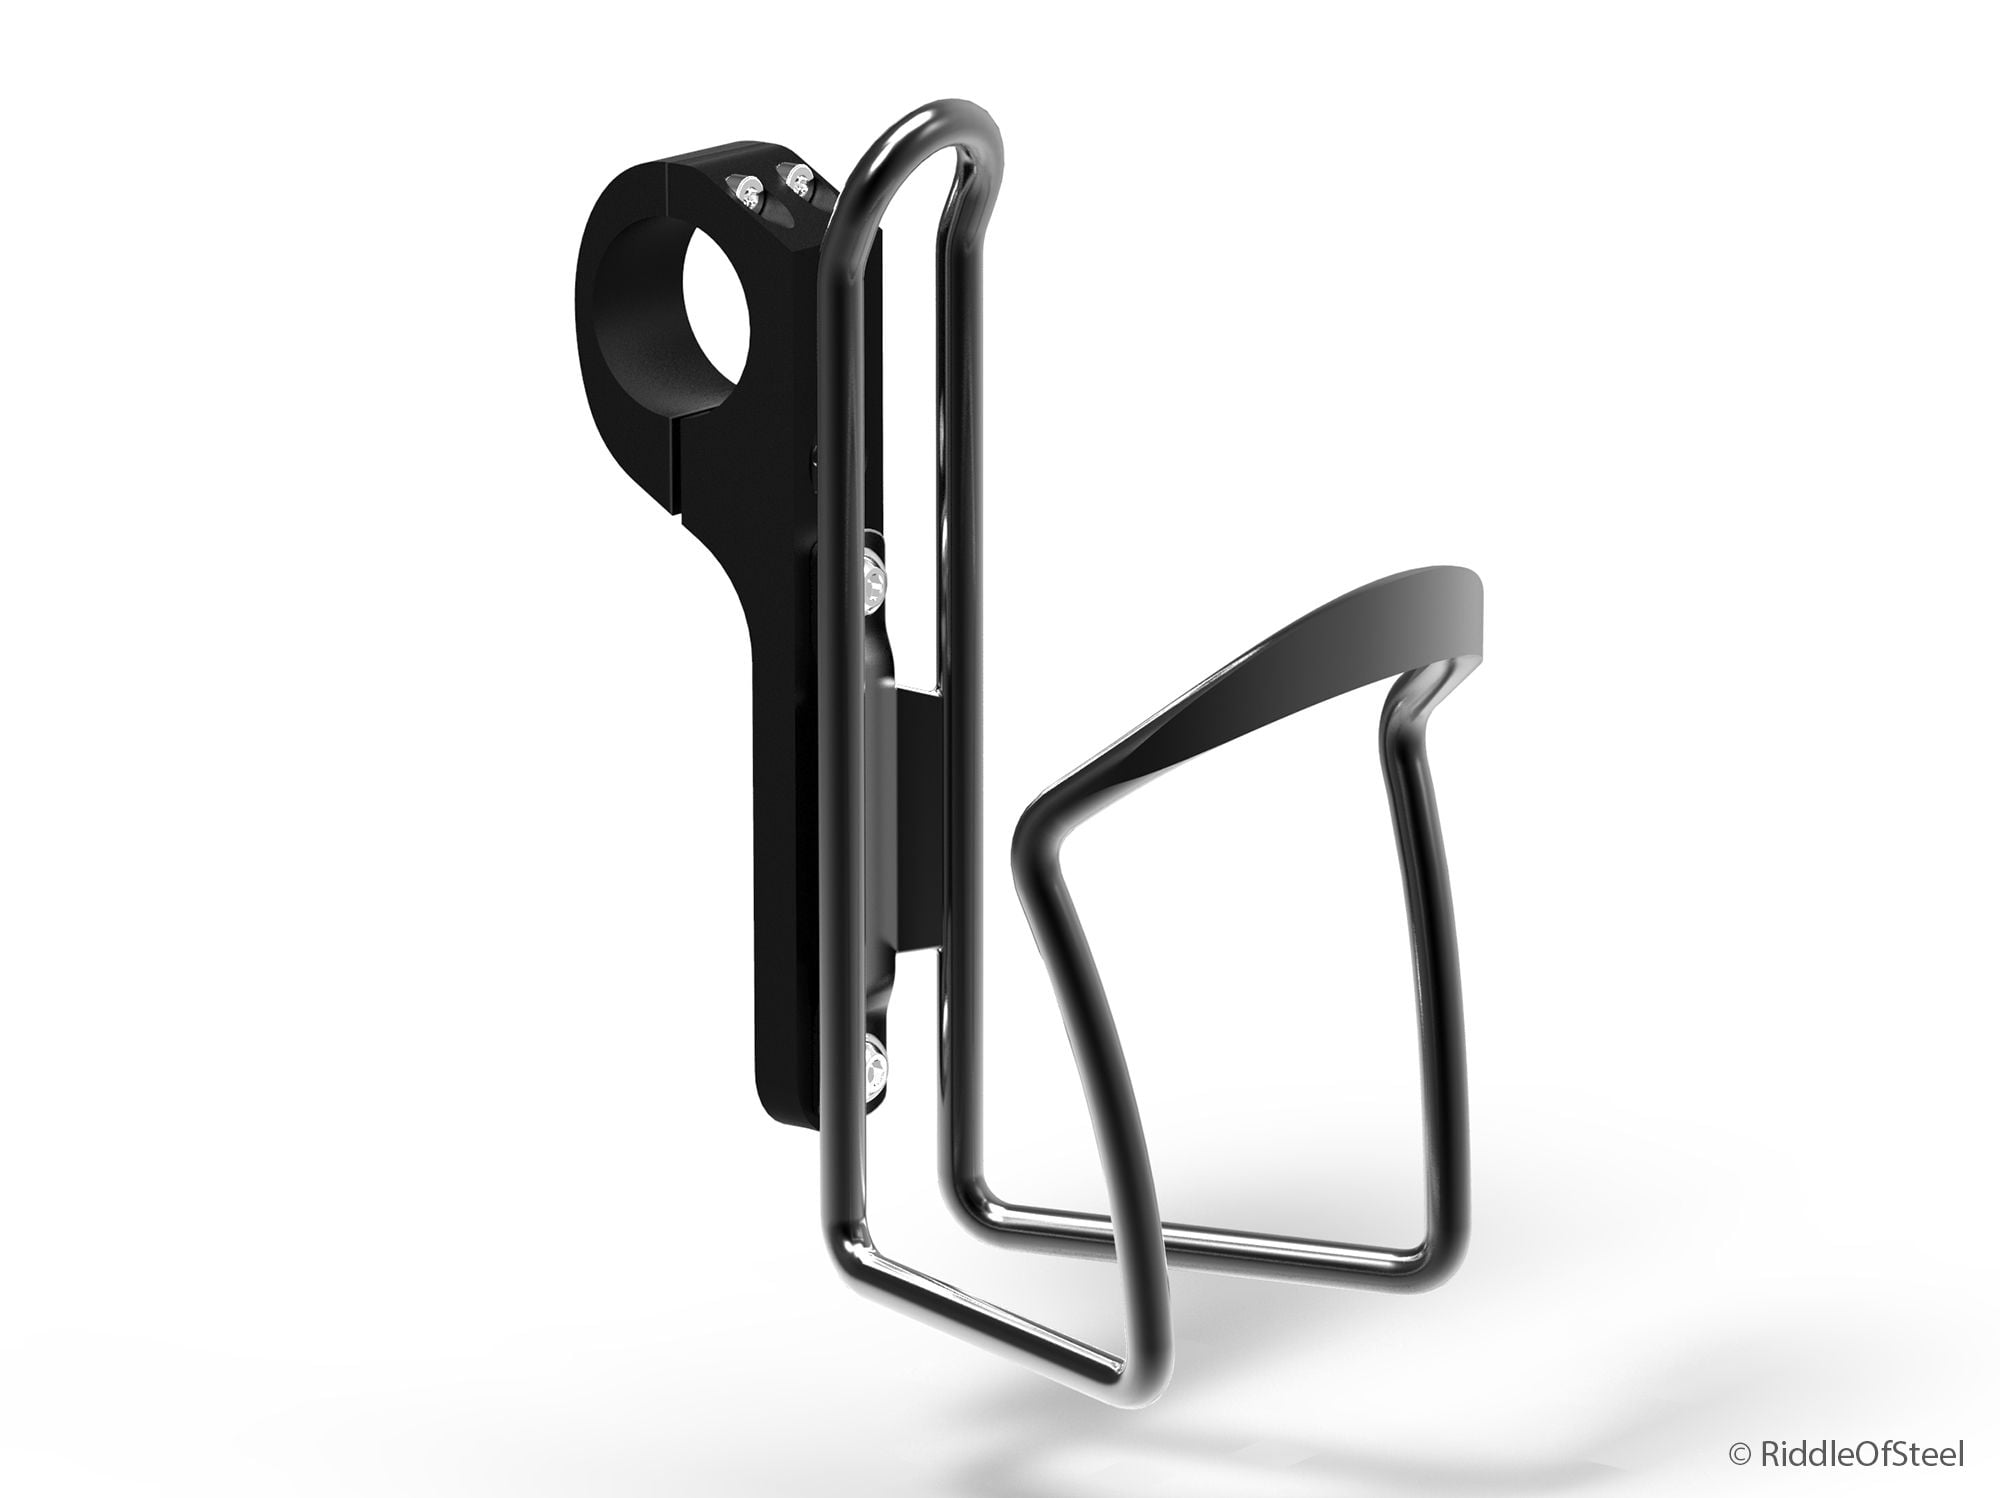
As assembled with a typical bottle cage:

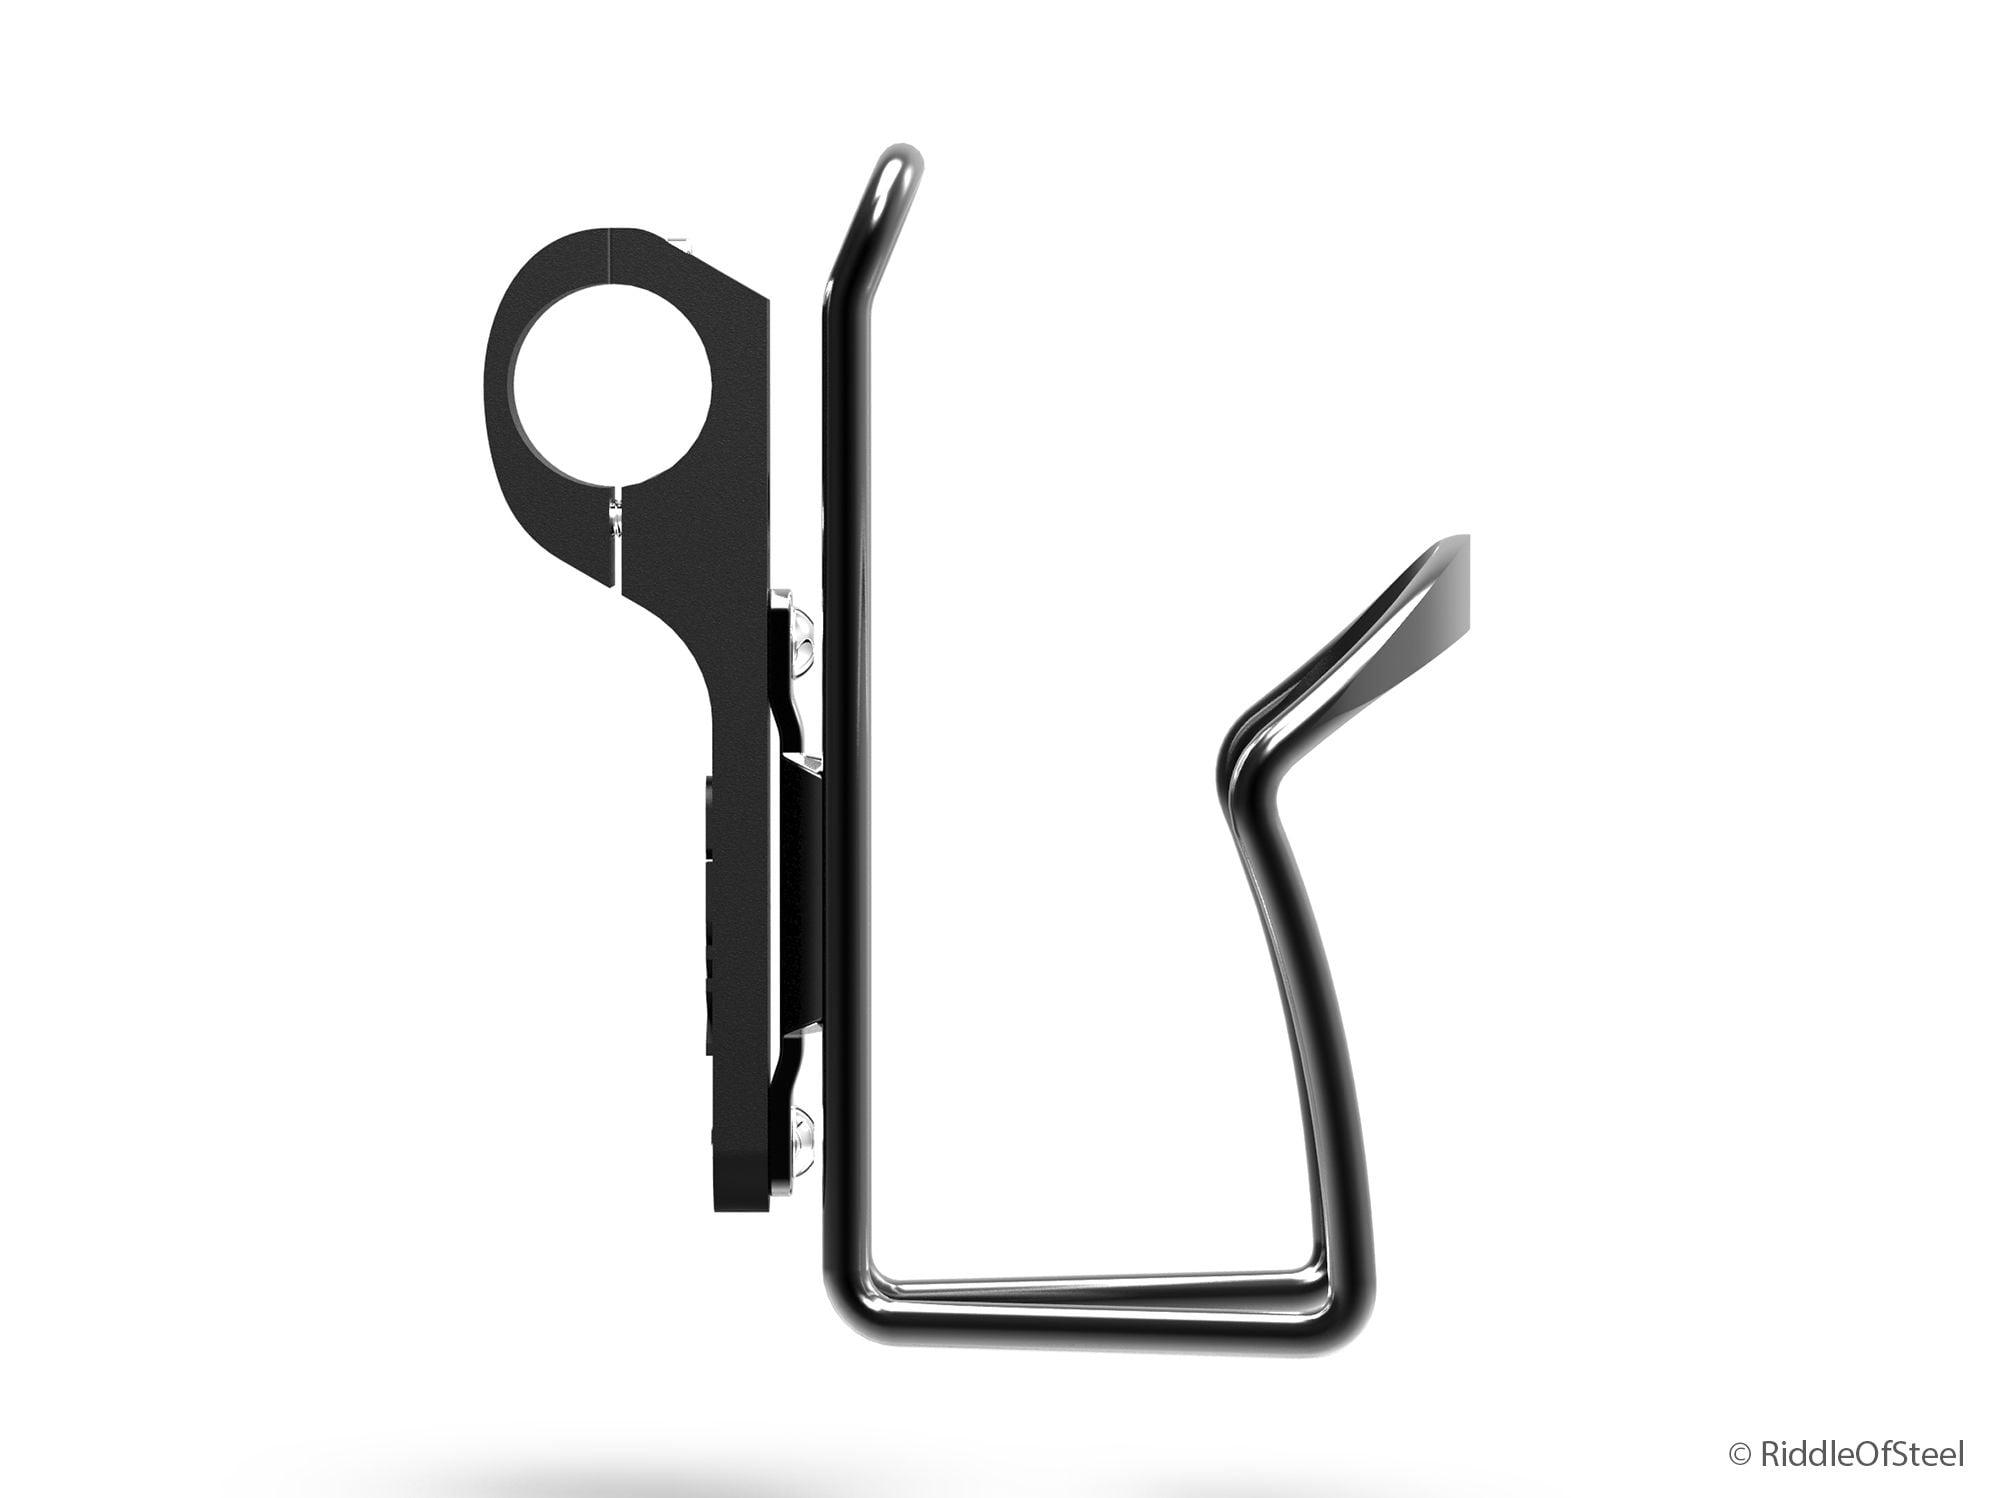
Side view:
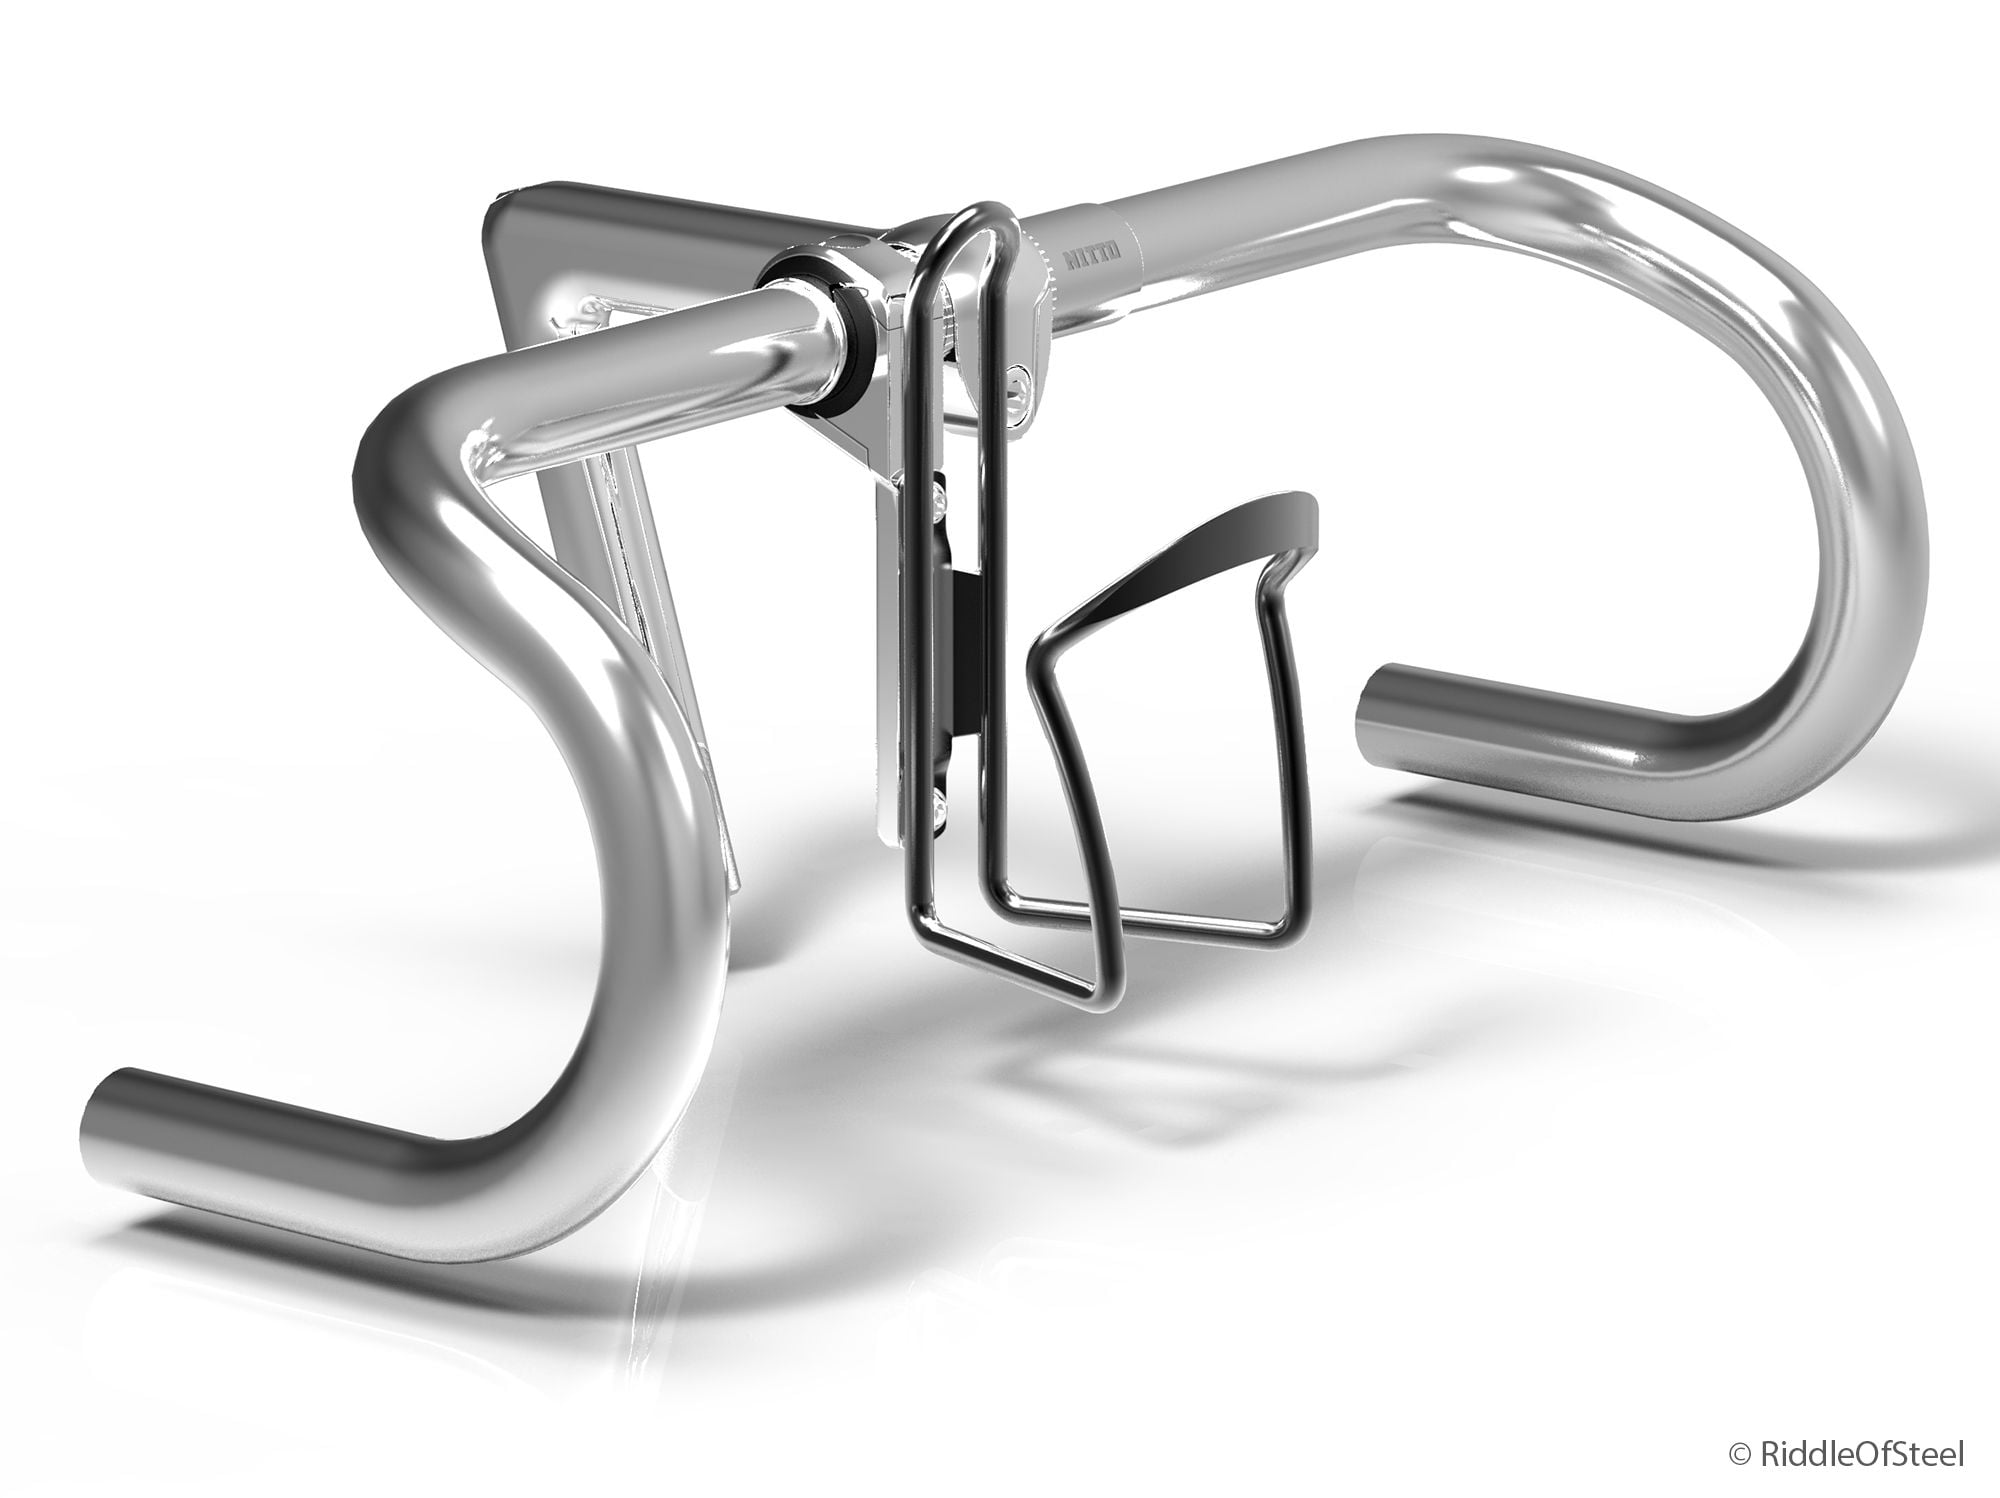
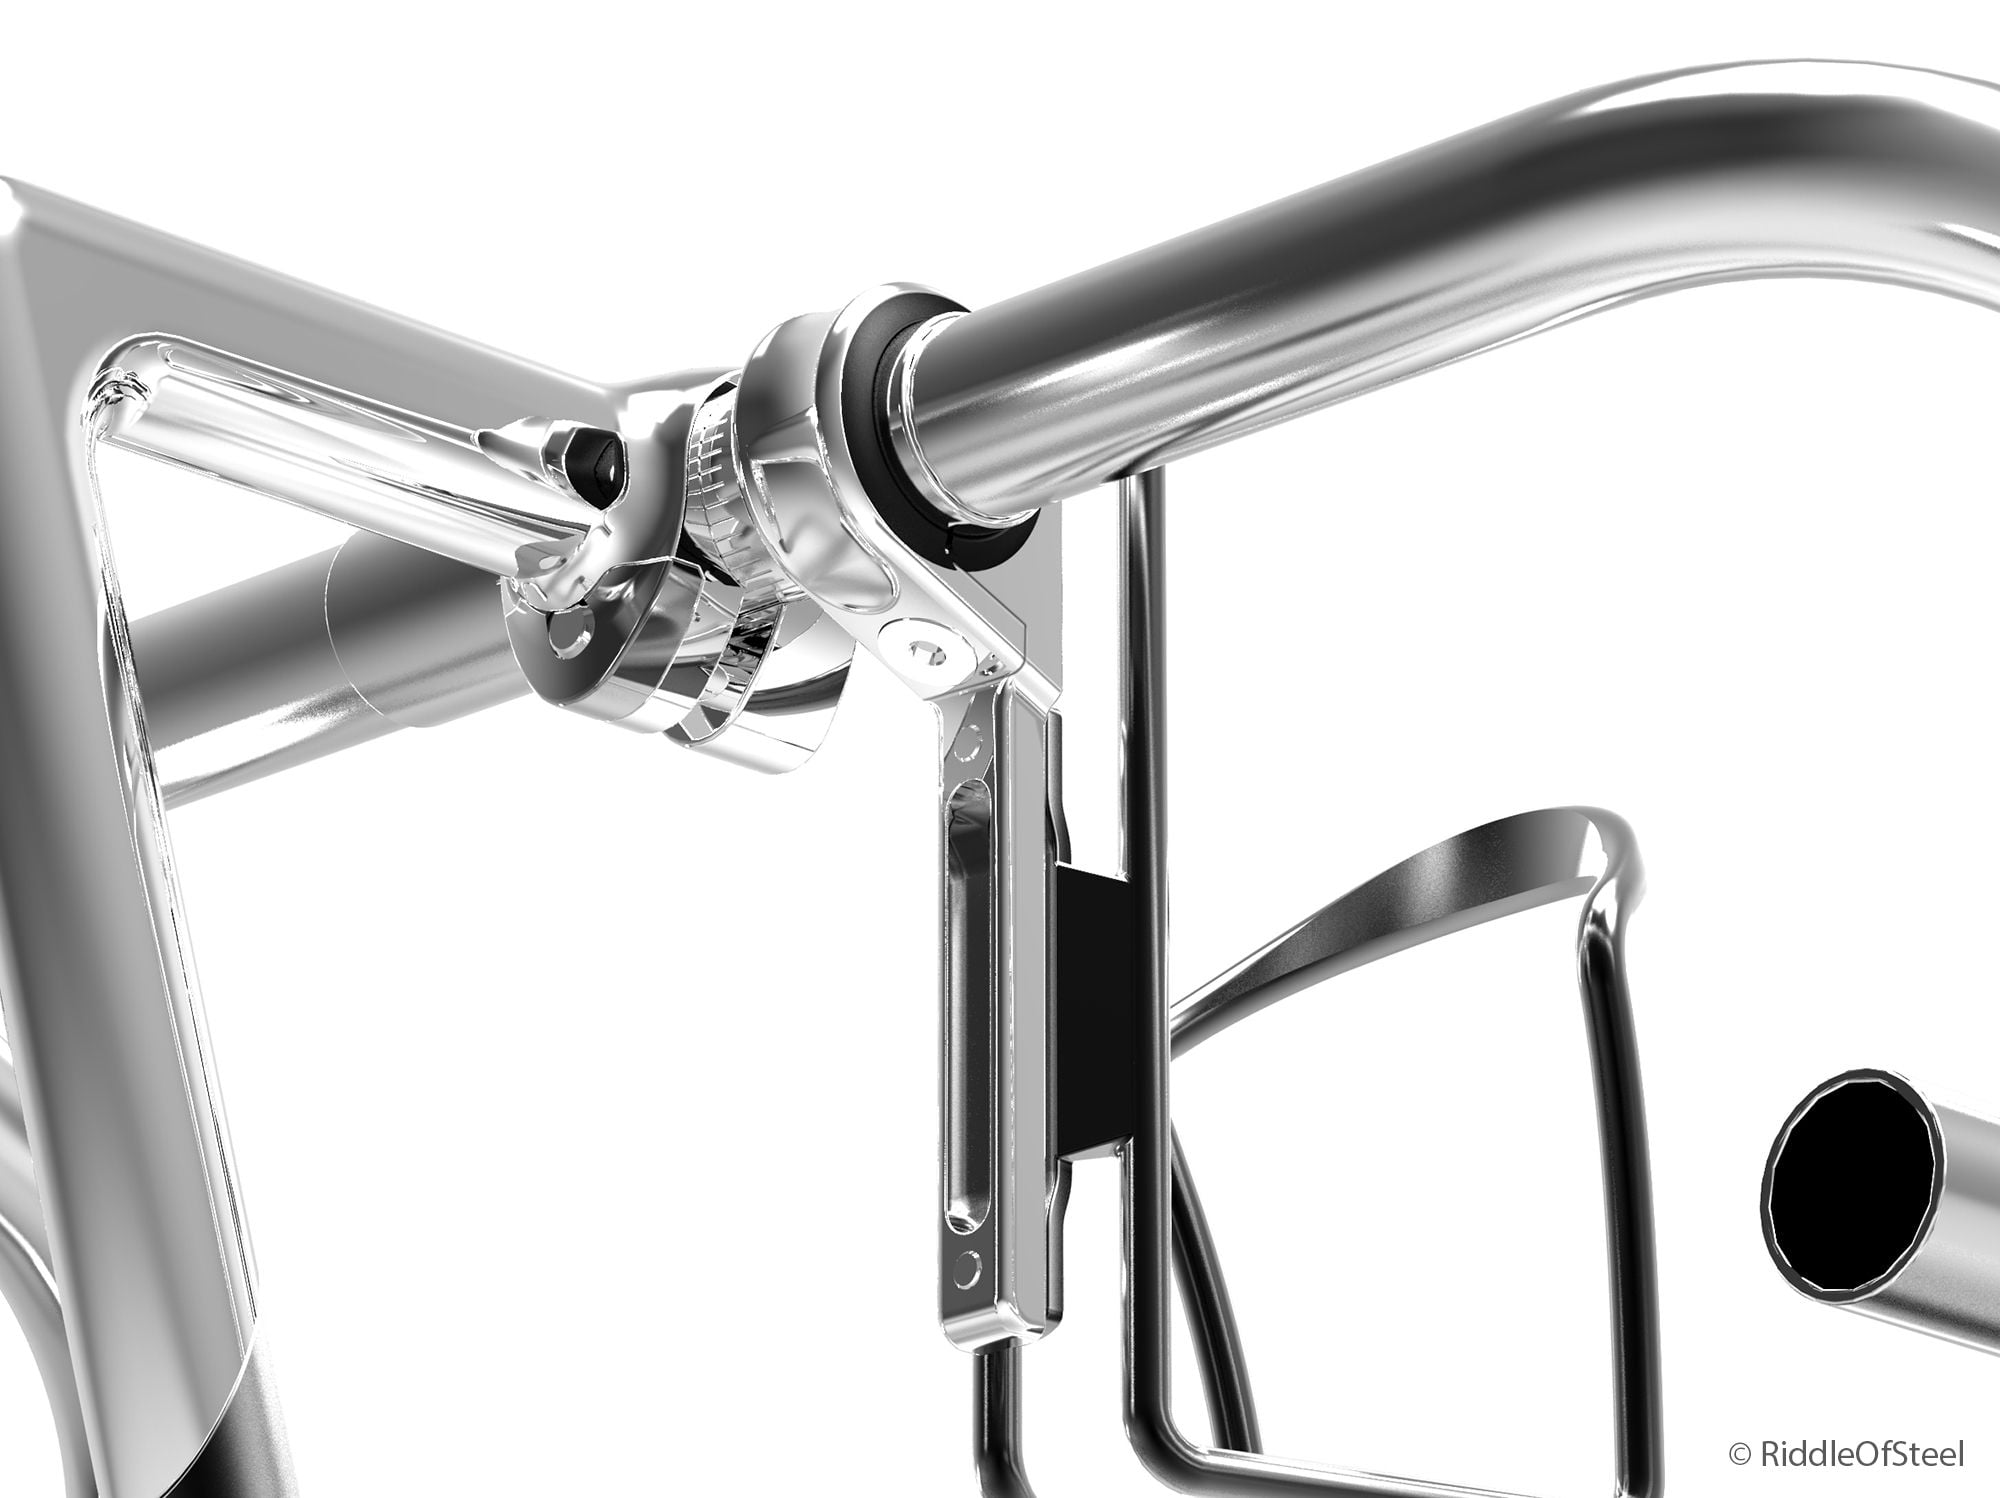
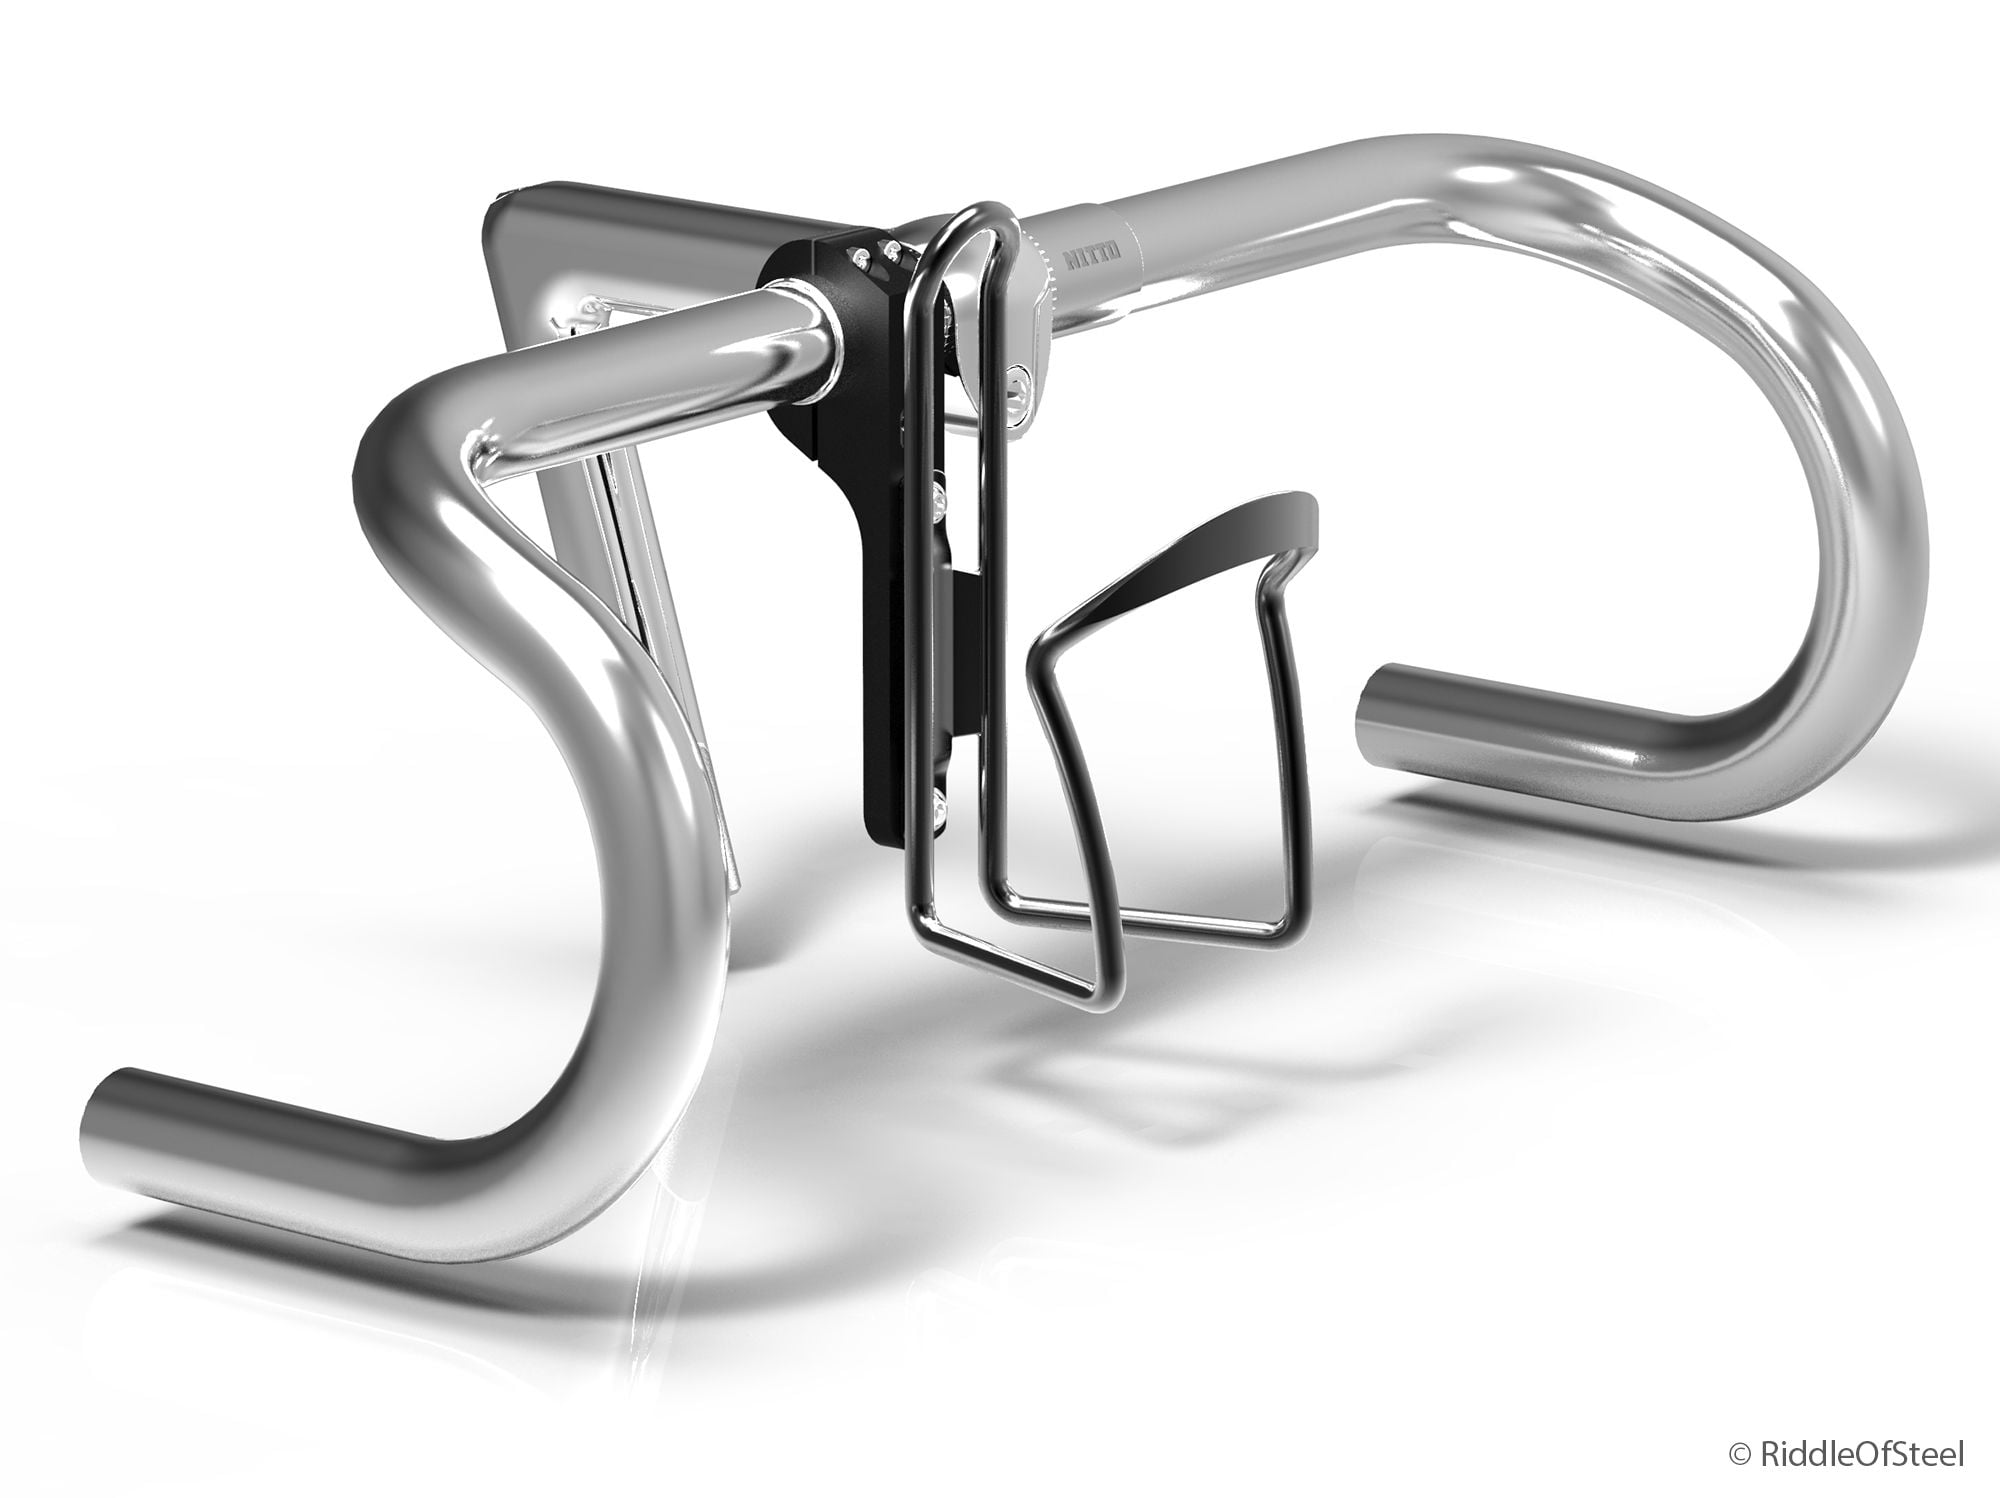
In context:
View from below:
"Ok, Riddle, what is this? There are, like, a million other handlebar-mounted bracket designs out there, and they come in all sorts of great colors, in metal, and are adaptable to many handlebar diameters."
I understand. And this is just the beginning...
Three years ago during the Illustrious Era of the Covid19 when I was laid off, I designed this bracket to be a better version of what I'd seen and what has come before in the world of handlebar-mounted bottle cage brackets. Areas for improvement that I saw included--depending on the design--a much lower center of gravity, a much simpler design, a more aesthetically-pleasing/elegant design, a design that cooperated with the bicycle overall, particularly vintage bicycles with their considerably higher silver/polished component count. I made a handful of sketches and design revisions on both paper and in CAD. My primary inspiration was pre- and post-WWII Racing/TdF bikes who carried their water bottles just ahead of the handlebars. The bottle's profile was "low" over the top of the bar. It looked sleek. I looked at other designs and came up with more or less a then-final form. More refinement needed to be done, but it got put on the back burner for various reasons. I found work again, and unfortunately it sat.
Until now.
[dun dun dunnnnn]
My brother had me convert his (formerly mine and built for him by me, years ago, in the Before Times, when Recycled Cycles sold Shimano brake cables and housings instead of Jagwire..) 1983 Fuji Supreme from swept back bars to its original drop bar configuration. The bars would be modern compact affairs--Soma Highway Ones that I've been trying to sell locally--held by a 100mm Nitto Technomic stem. The big deal was shifting. I have no idea which bike I bought sorta-kinda recently that had Microshift 2x7 brifters on it, but I was very grateful for having kept them (and not sold them yet). My brother's bike has an RSX/Mavic wheelset with a 7-speed cassette, so apart from swapping the Suntour rear derailleur for a Shimano example, the bike was ready to easily convert.
Alas, no water bottle cage bosses exist on this humble (but great-riding) Fuji. The proverbial lightbulb in my head turned on: I have it! I will 3D print my bottle cage bracket design so that he can actually do road riding! Of course I'd need to simplify my original design, which specified (machined) aluminum and (formed) rubber. Two main pieces plus some hardware I'd ordered and used on other 3D printing endeavors. Last year was a long year, in many ways. Some of those storylines are still playing out, but overall, it is good to have 2023 in the rear view. One of the positives was the purchasing of a 3D printer for personal and saleable design work (I am an industrial designer). I had loooooong held off on this technology for a number of reasons, but had found, finally, a very capable machine for a fair price. It has been a very good decision and this bracket is one of the benefits.
I had planned on getting a prototype of the original design produced and seeing what market(s) would be interested in them, starting with the C&V community as many of our bikes lack the standard two bottle cage accommodations. Plus, how cool and how convenient would this be (so long as one doesn't have a handlebar bag...)? Since a metal and rubber version is taking yet another back seat to something else, I want this thread to be not only informative as to what 3D printing can do for our bikes, but also to gauge viability were I to sell it on some platform (my own, Etsy or similar, etc etc). The 3D printed design is slated for further refinement, but let me show you what the original design looks like:
A svelte form, polished of course, in two pieces. The clamping would be done by an underside-located bolt, with the upper portion secured a la Mavic and Cinelli multi-piece stems.
As assembled with a typical bottle cage:
Side view:
In context:
View from below:
Last edited by RiddleOfSteel; 01-04-24 at 01:14 AM.

Likes For RiddleOfSteel:
01-04-24, 01:05 AM
#2
Master Parts Rearranger
Thread Starter
Join Date: Mar 2015
Location: Portlandia's Kuiper Belt, OR
Posts: 4,403
Bikes: 1982 Trek 720 - 1985 Trek 620 - 1984 Trek 620 - 1980 Trek 510 - Other luminaries past and present
Mentioned: 221 Post(s)
Tagged: 0 Thread(s)
Quoted: 1556 Post(s)
Liked 2,024 Times
in
989 Posts
The 3D Printed Design
I think the metal bracket design came out well. I like the form, and there are a few ways to go to make it better or simply different. I've even had ideas for twin bottle setups and centered single bottle setups.
But to the 3D printed plastic example. In the 3D printing world, there are many kinds of plastic (available in wound rolls called filament) with which to print from. Many different colors, properties, strengths, and prices. PLA seems to be the cheapest, and in my opinion you get what you pay for. It's good for many things, but for what I wanted with the 3D printed design, I chose what is known as PA6-CF, which is basically a strong, high-temp-tolerant plastic infused with carbon fiber bits. I had bought it (and one of its other high-temp brethren) for some under-hood automotive designs I've been doing, and appreciated its strength and dimensional accuracy when printing. It's also black and not some "look at me!" color, which is what I wanted for this project.
The design is below. Again, there is much room for further refinement and simplification, if not aesthetic exploration, but it's perfect for a quick and dirty-yet-effective prototype.
The unit as is. A pair of M3 bolts and a longer M5.
With the bottle cage attached.
Side profile:
In context:
From below:
Last edited by RiddleOfSteel; 01-04-24 at 01:18 AM.
Likes For RiddleOfSteel:
01-04-24, 01:40 AM
#3
Master Parts Rearranger
Thread Starter
Join Date: Mar 2015
Location: Portlandia's Kuiper Belt, OR
Posts: 4,403
Bikes: 1982 Trek 720 - 1985 Trek 620 - 1984 Trek 620 - 1980 Trek 510 - Other luminaries past and present
Mentioned: 221 Post(s)
Tagged: 0 Thread(s)
Quoted: 1556 Post(s)
Liked 2,024 Times
in
989 Posts
As Seen On Fu-ji...
Sorry about the pun attempt there...
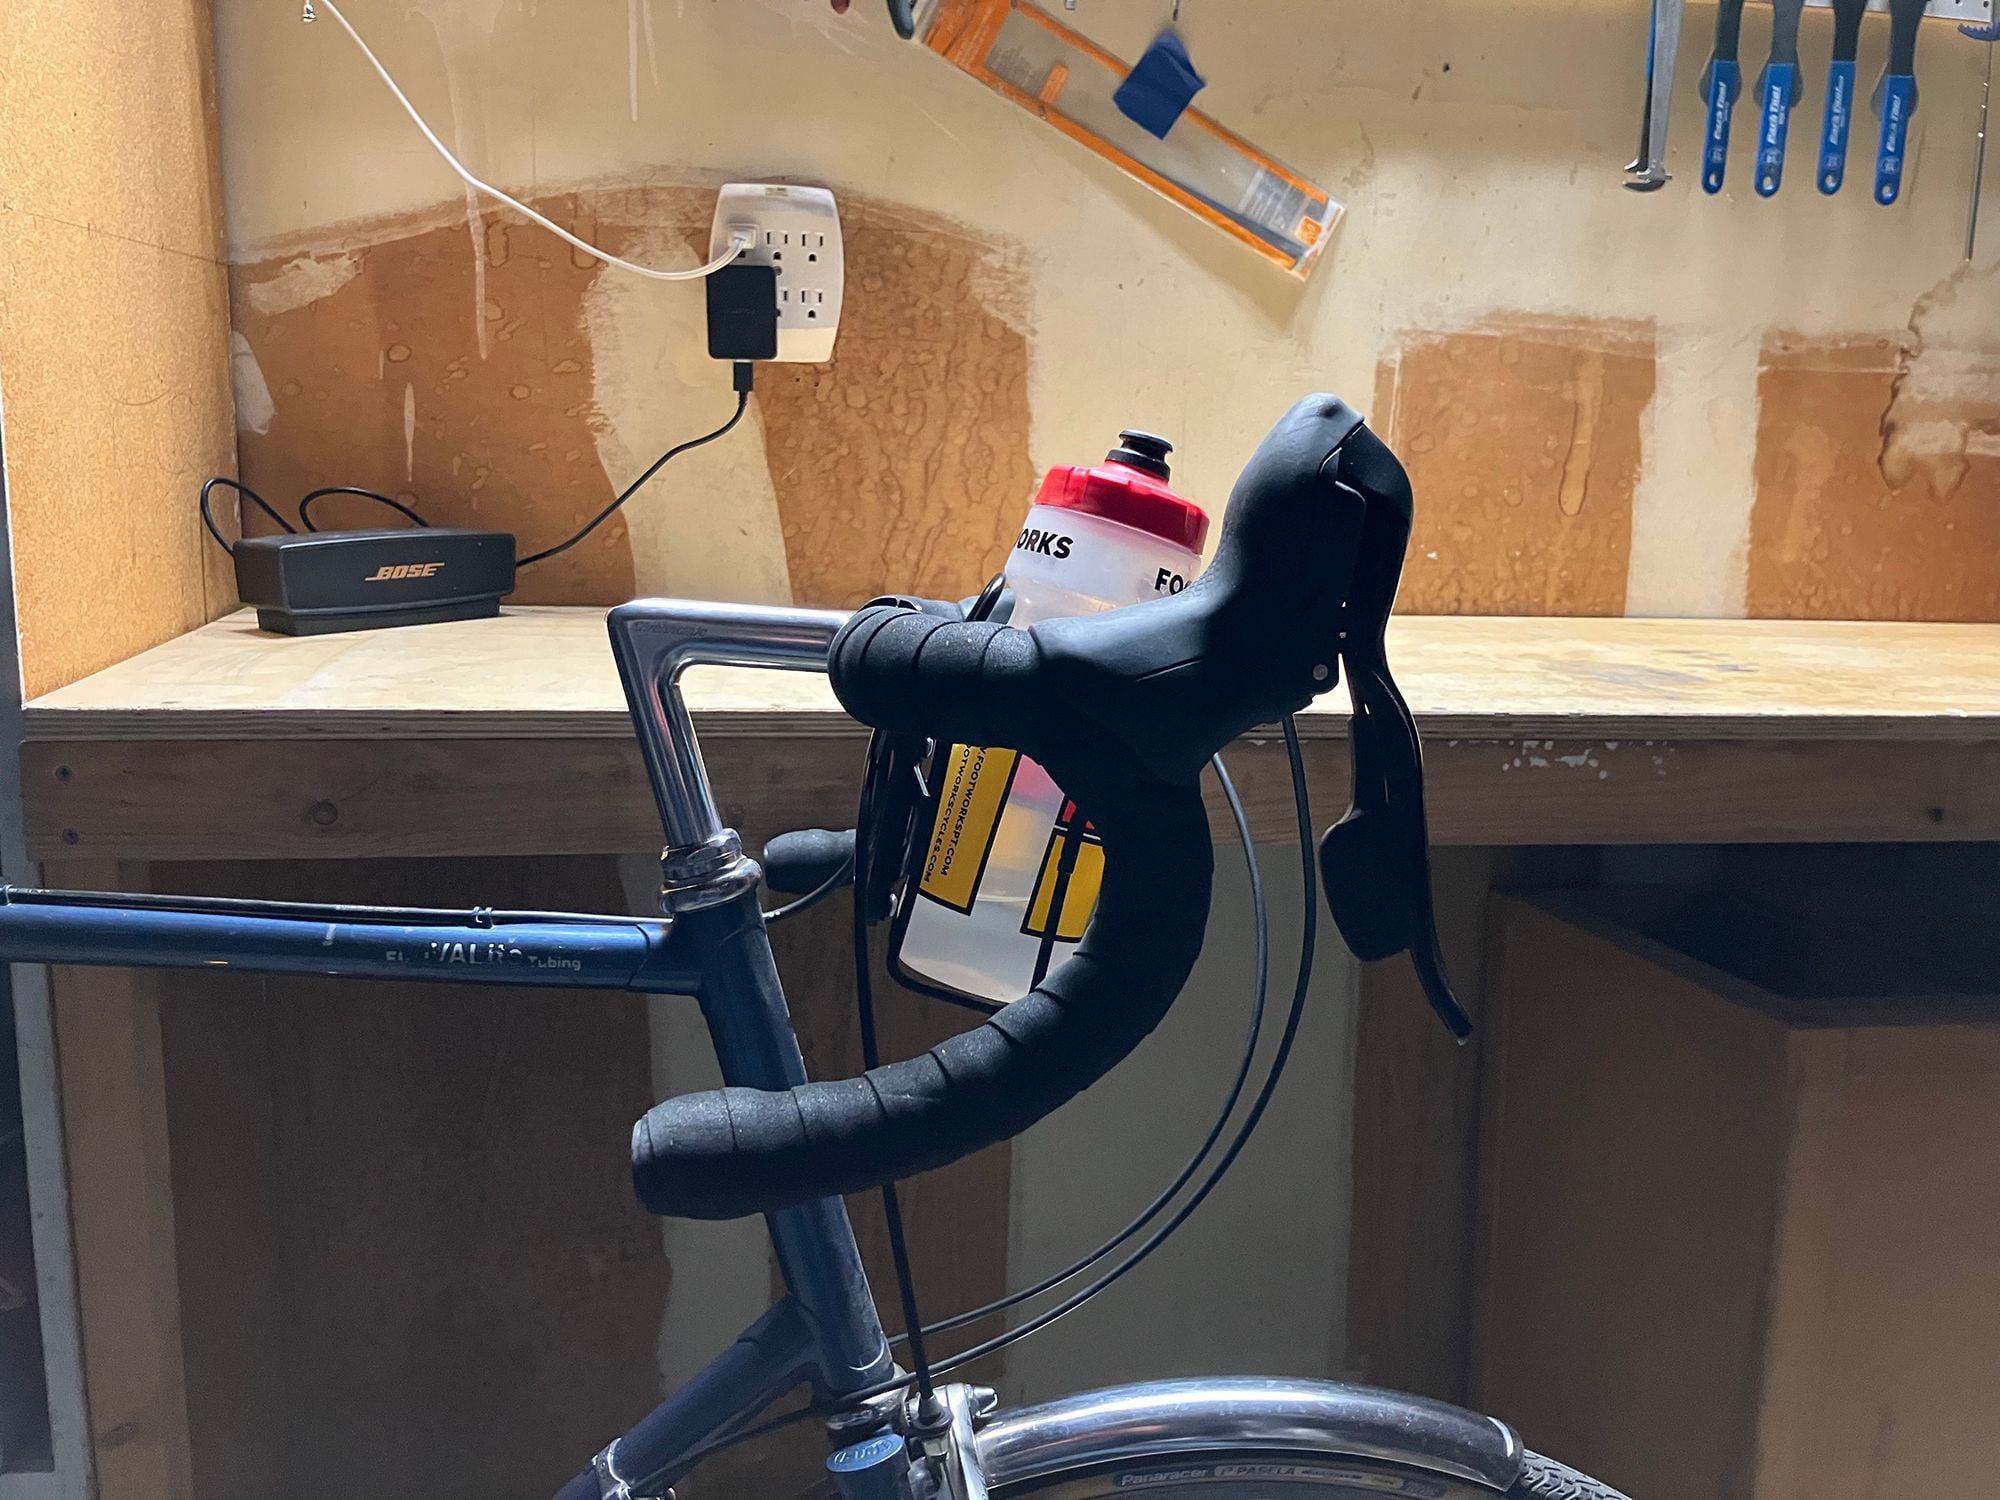
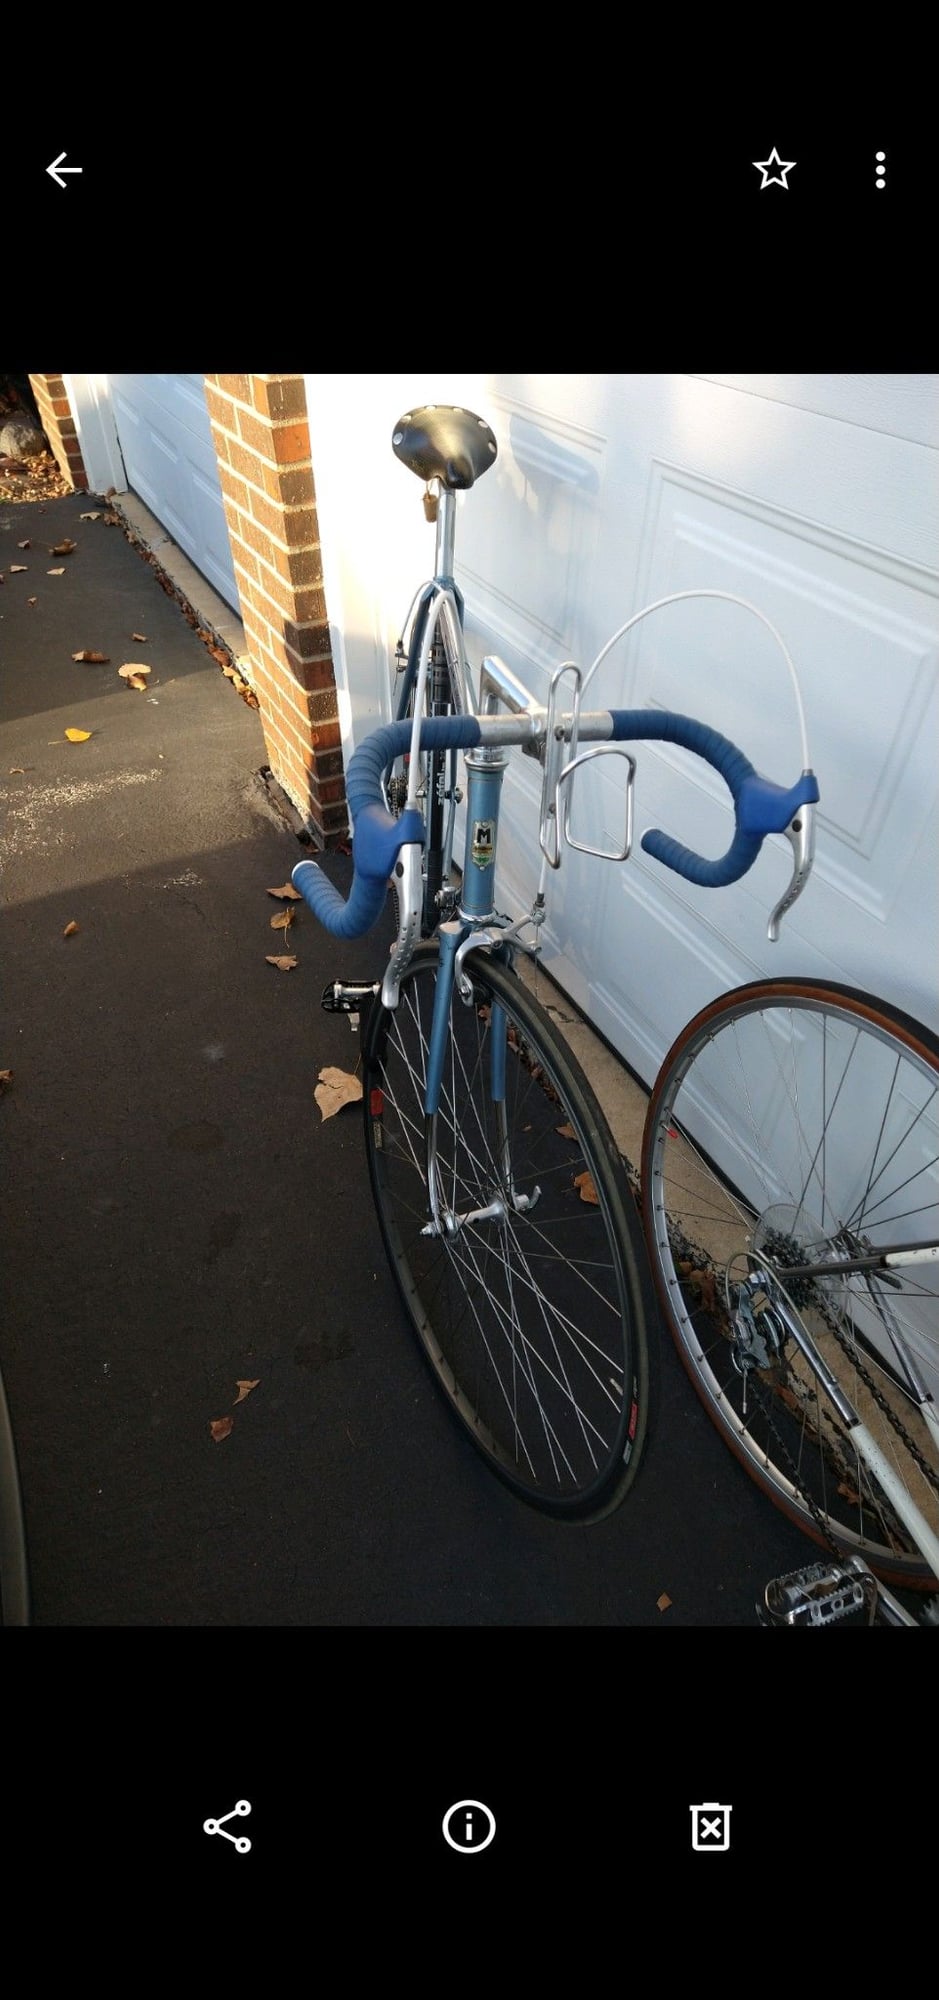
Late nights in cold garages. Gettin' it done. Tall water bottle in an oddly-long old Blackburn cage. Nice and low in profile over the top of the bar.
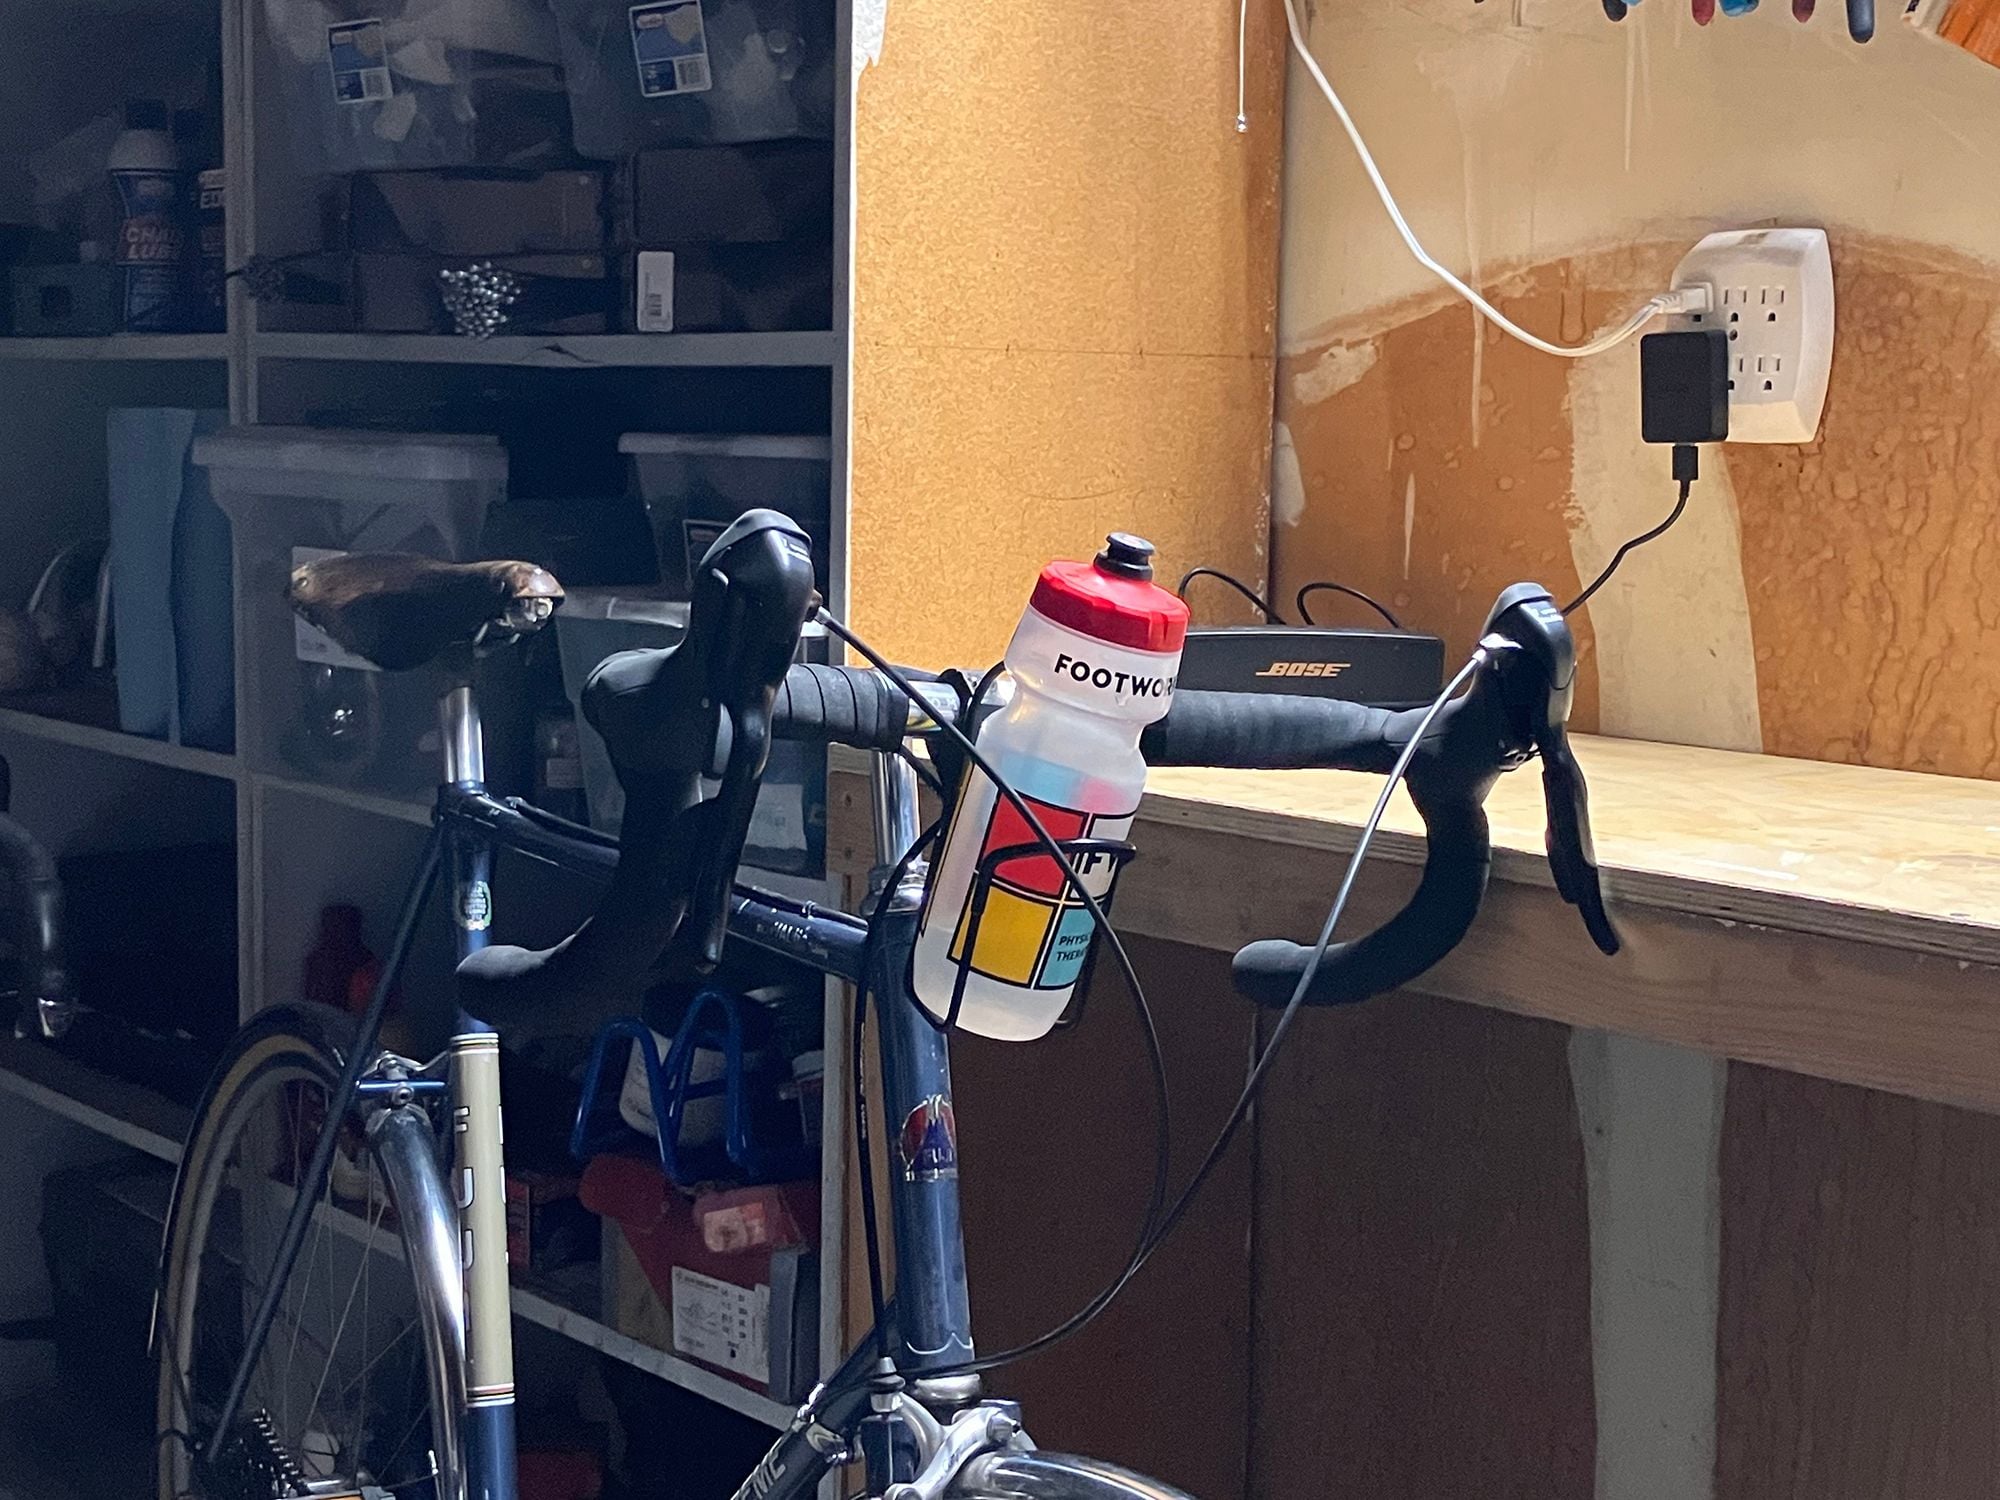
I mounted my NiteRyder headlamp to the bars to check for interference, and essentially there is none. It's barely detectable at the farthest, faintest edge of cast light. Approved.
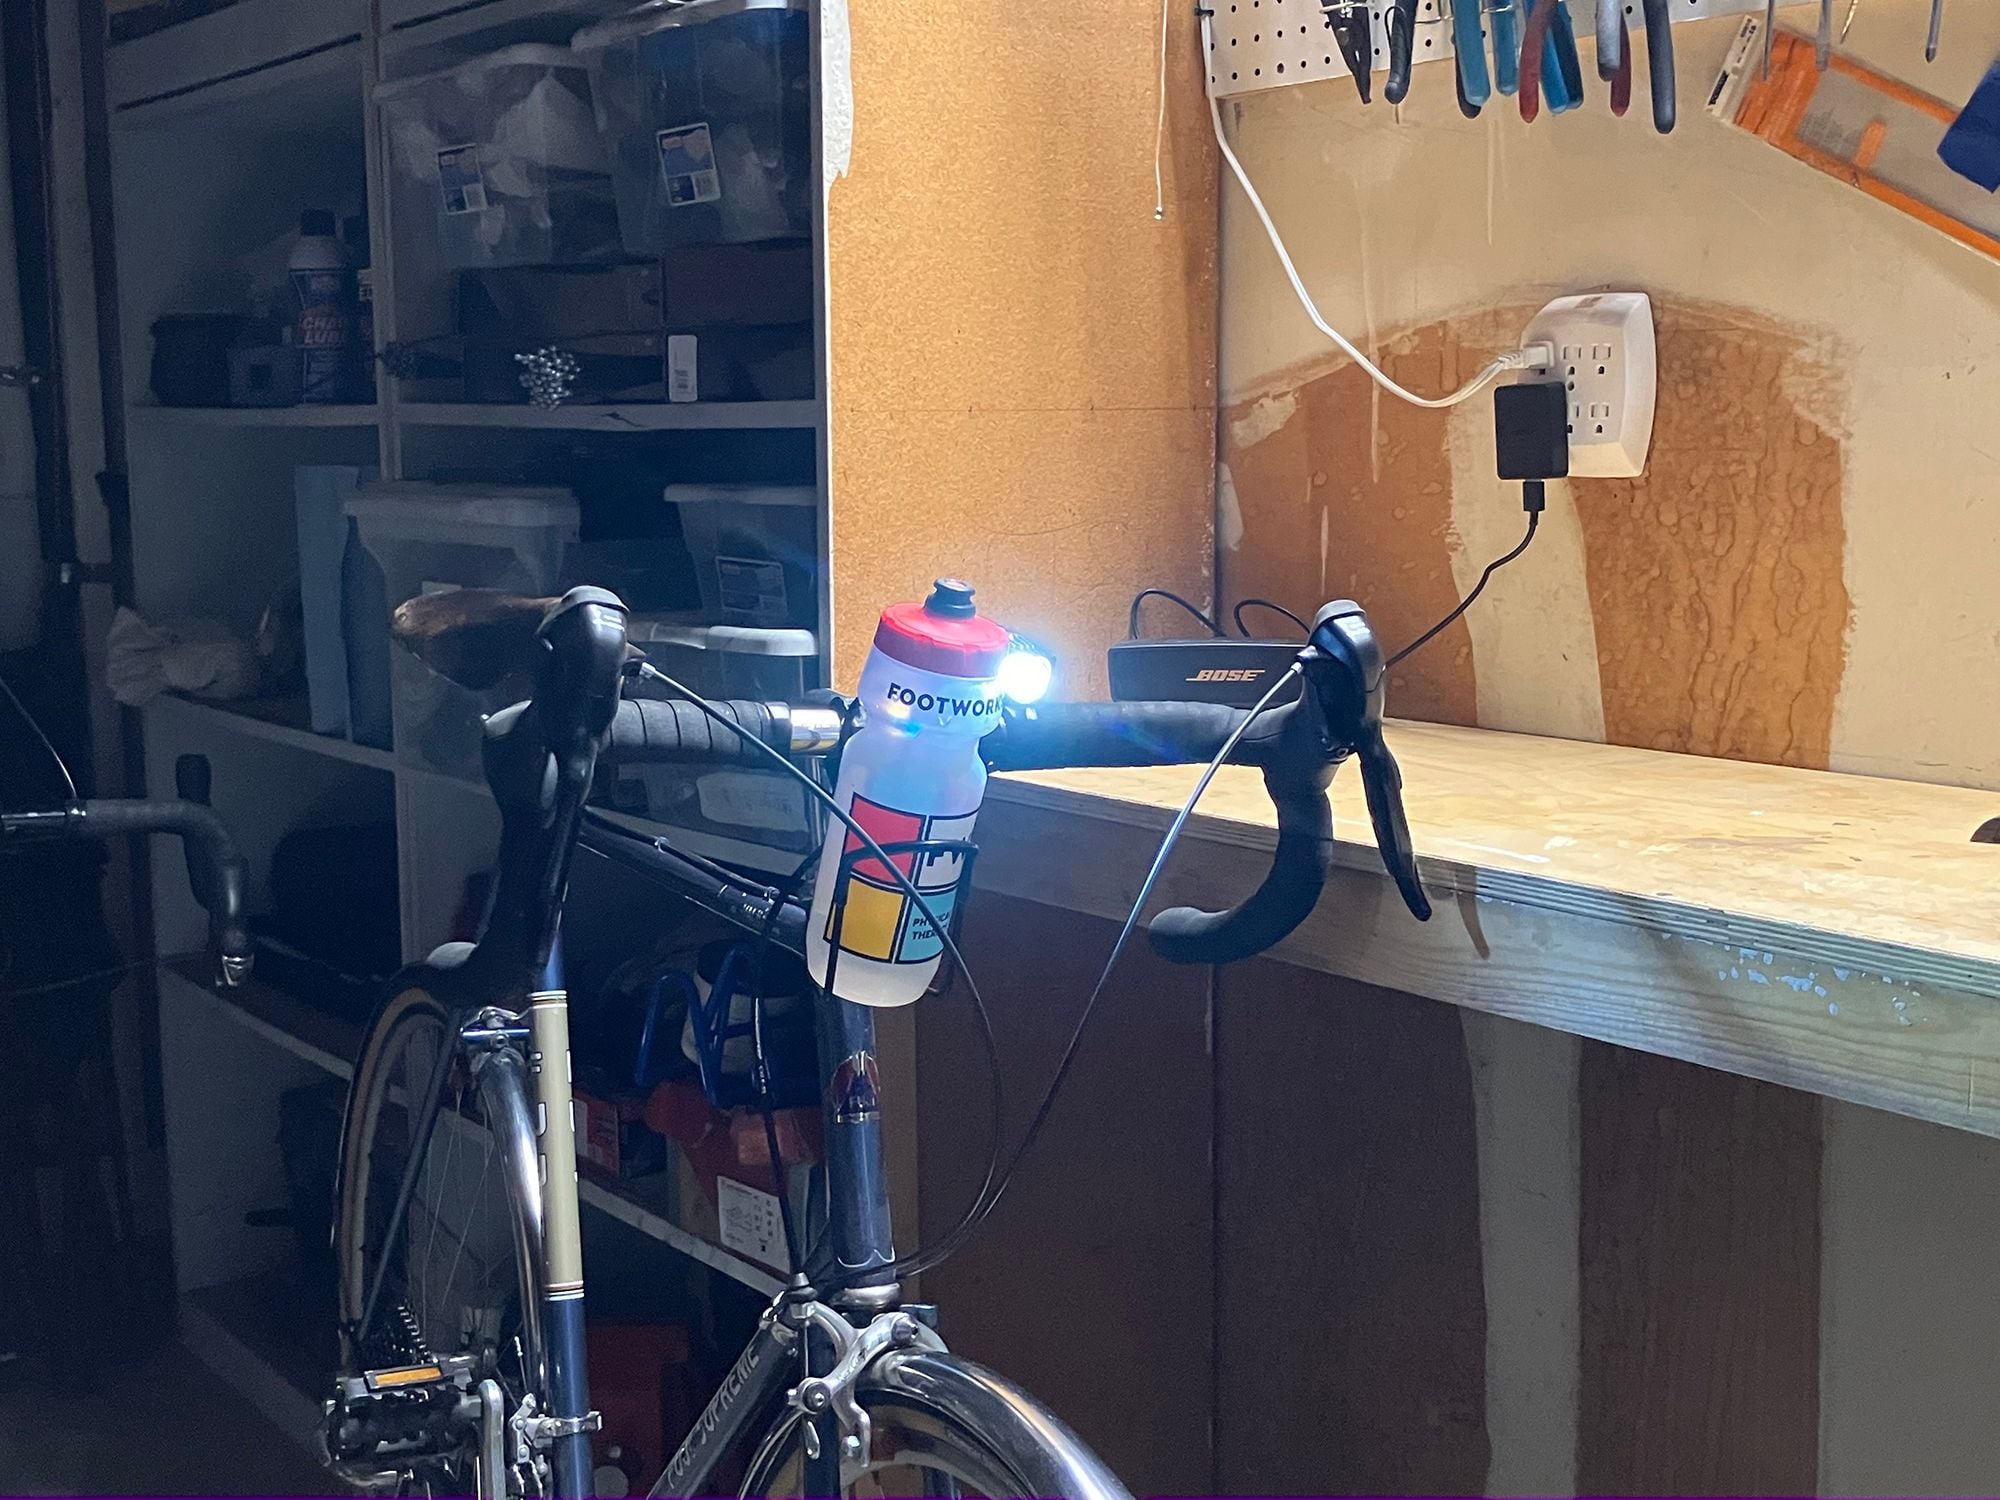
I have this bracket mounted right up next to the stem clamp, so it's definitely crowding the light.

Late nights in cold garages. Gettin' it done. Tall water bottle in an oddly-long old Blackburn cage. Nice and low in profile over the top of the bar.
I mounted my NiteRyder headlamp to the bars to check for interference, and essentially there is none. It's barely detectable at the farthest, faintest edge of cast light. Approved.
I have this bracket mounted right up next to the stem clamp, so it's definitely crowding the light.
Likes For RiddleOfSteel:
01-04-24, 01:52 AM
#4

Senior Member

Join Date: Aug 2009
Location: Berkeley, CA
Posts: 7,247
Bikes: '72 Cilo Pacer, '72 Gitane Gran Tourisme, '72 Peugeot PX10, '73 Speedwell Ti, '74 Peugeot UE-8, '75 Peugeot PR-10L, '80 Colnago Super, '85 De Rosa Pro, '86 Look Equipe 753, '86 Look KG86, '89 Parkpre Team, '90 Parkpre Team MTB, '90 Merlin
Mentioned: 87 Post(s)
Tagged: 0 Thread(s)
Quoted: 835 Post(s)
Liked 2,141 Times
in
558 Posts
Great job on the bracket mount. That said, in my experience, that style of cage is not well-suited for a handlebar mount. There is too much weight bearing on the bottom forward elbows of the cage. I had a similar setup and eventually developed cracks in both a T.A. and Cobra cage. They start to sag over time with bumps in the road, potentially causing a hazard with bottles dropping. Those cages are better suited for the main triangle. There is a reason the handlebar cages typically have a full circle support toward the top, along with a bit of a “lip” at the front. I switched to a King Iris style cage (https://kingcage.com/collections/wat...iris-king-cage), and it’s much more secure.
__________________
-Randy
'72 Cilo Pacer � '72 Peugeot PX10 � '73 Speedwell Ti � '74 Nishiki Competition � '74 Peugeot UE-8 � '86 Look Equipe 753 � '86 Look KG86 � '89 Parkpre Team Road � '90 Parkpre Team MTB � '90 Merlin Ti
Avatar photo courtesy of jeffveloart.com, contact: contact: jeffnil8 (at) gmail.com.
-Randy
'72 Cilo Pacer � '72 Peugeot PX10 � '73 Speedwell Ti � '74 Nishiki Competition � '74 Peugeot UE-8 � '86 Look Equipe 753 � '86 Look KG86 � '89 Parkpre Team Road � '90 Parkpre Team MTB � '90 Merlin Ti
Avatar photo courtesy of jeffveloart.com, contact: contact: jeffnil8 (at) gmail.com.
Last edited by gaucho777; 01-04-24 at 02:01 AM.

Likes For gaucho777:
01-04-24, 02:07 AM
#5
Master Parts Rearranger
Thread Starter
Join Date: Mar 2015
Location: Portlandia's Kuiper Belt, OR
Posts: 4,403
Bikes: 1982 Trek 720 - 1985 Trek 620 - 1984 Trek 620 - 1980 Trek 510 - Other luminaries past and present
Mentioned: 221 Post(s)
Tagged: 0 Thread(s)
Quoted: 1556 Post(s)
Liked 2,024 Times
in
989 Posts
Turning the Lights On
...and brainstorming a hook/pivot type upper attachment (instead of the two M3 bolts) along with some captured nuts to make the whole print/pack/send/assemble process an actual reality.
Below you'll see some images of the post-print processing and assembly. One of the characteristics of high-performing plastic like PA6-CF or PET-CF is its moisture absorption and resulting need for drying out before printing. It's a battle, and for best results, one needs to dry it out (heated to 80-90� C for 10 hours or so) and then basically print right after. High strength, high temperature handling capability, and great dimensional accuracy are high points. It has a really nice sheen, too. On the other end, left for days or weeks with no anti-moisture recourse, it gets stringy and ugly. Still strong and all those other things, but a lot of post-print work awaits. So that's what I'm doing here. File, drill, file some more, fit, "tap threads," file, etc until satisfactory.
I printed two backside clamps in different print orientations to see which one would be less of a hassle for post-print work. Six one way, half a dozen another pretty much. Oh well!
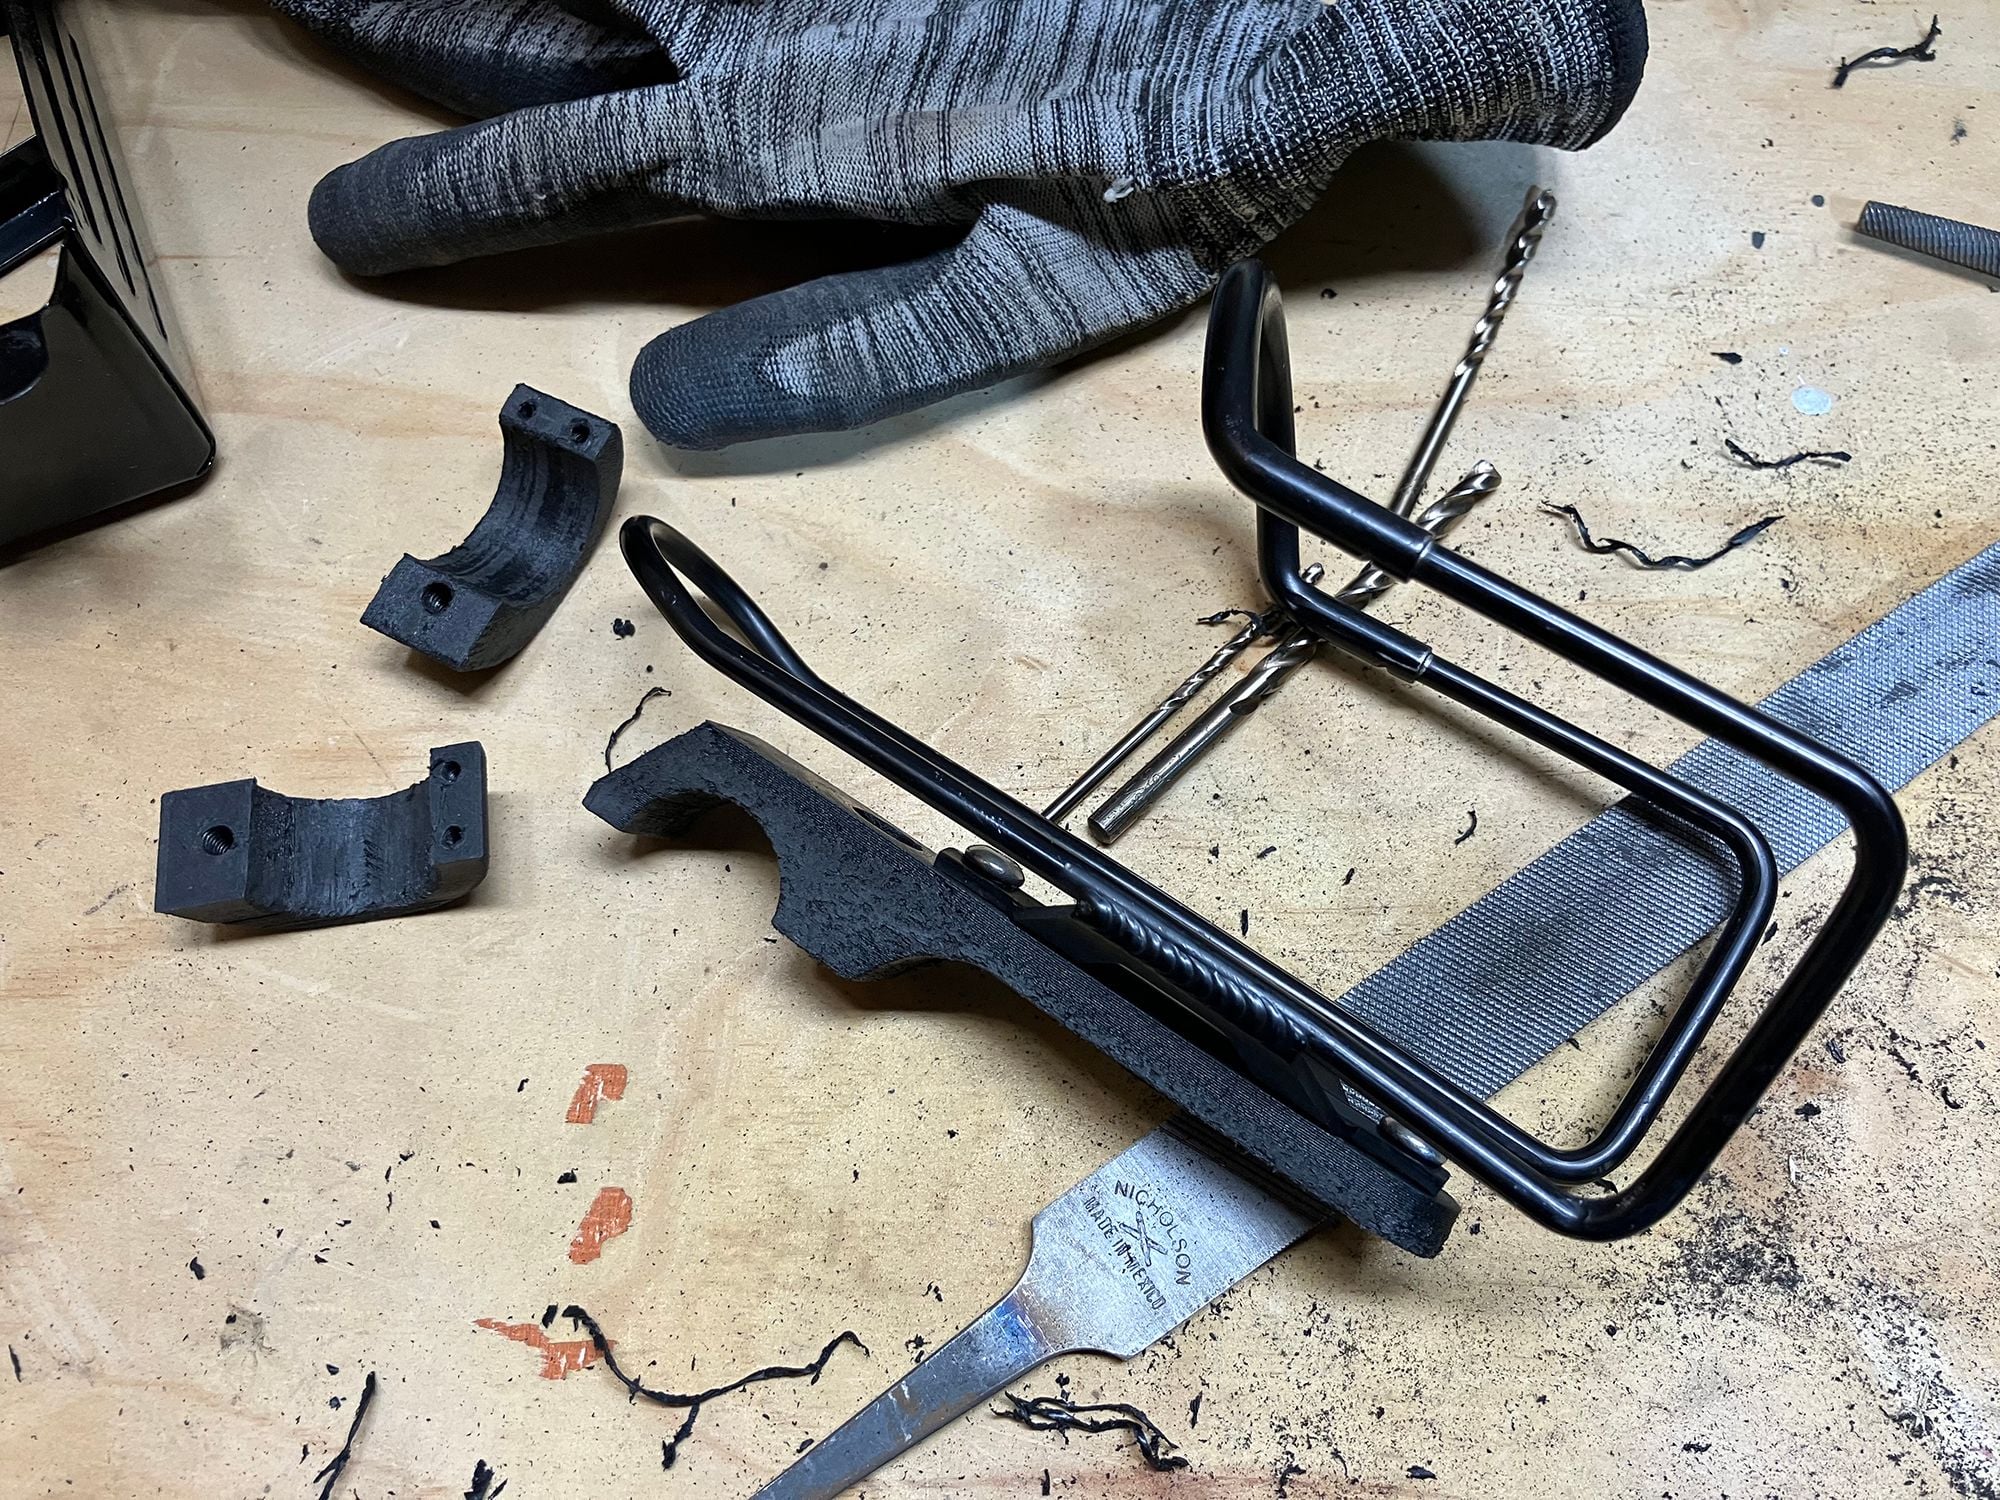
Not pretty, but clamps and holds position really well (and on a slick handlebar surface).
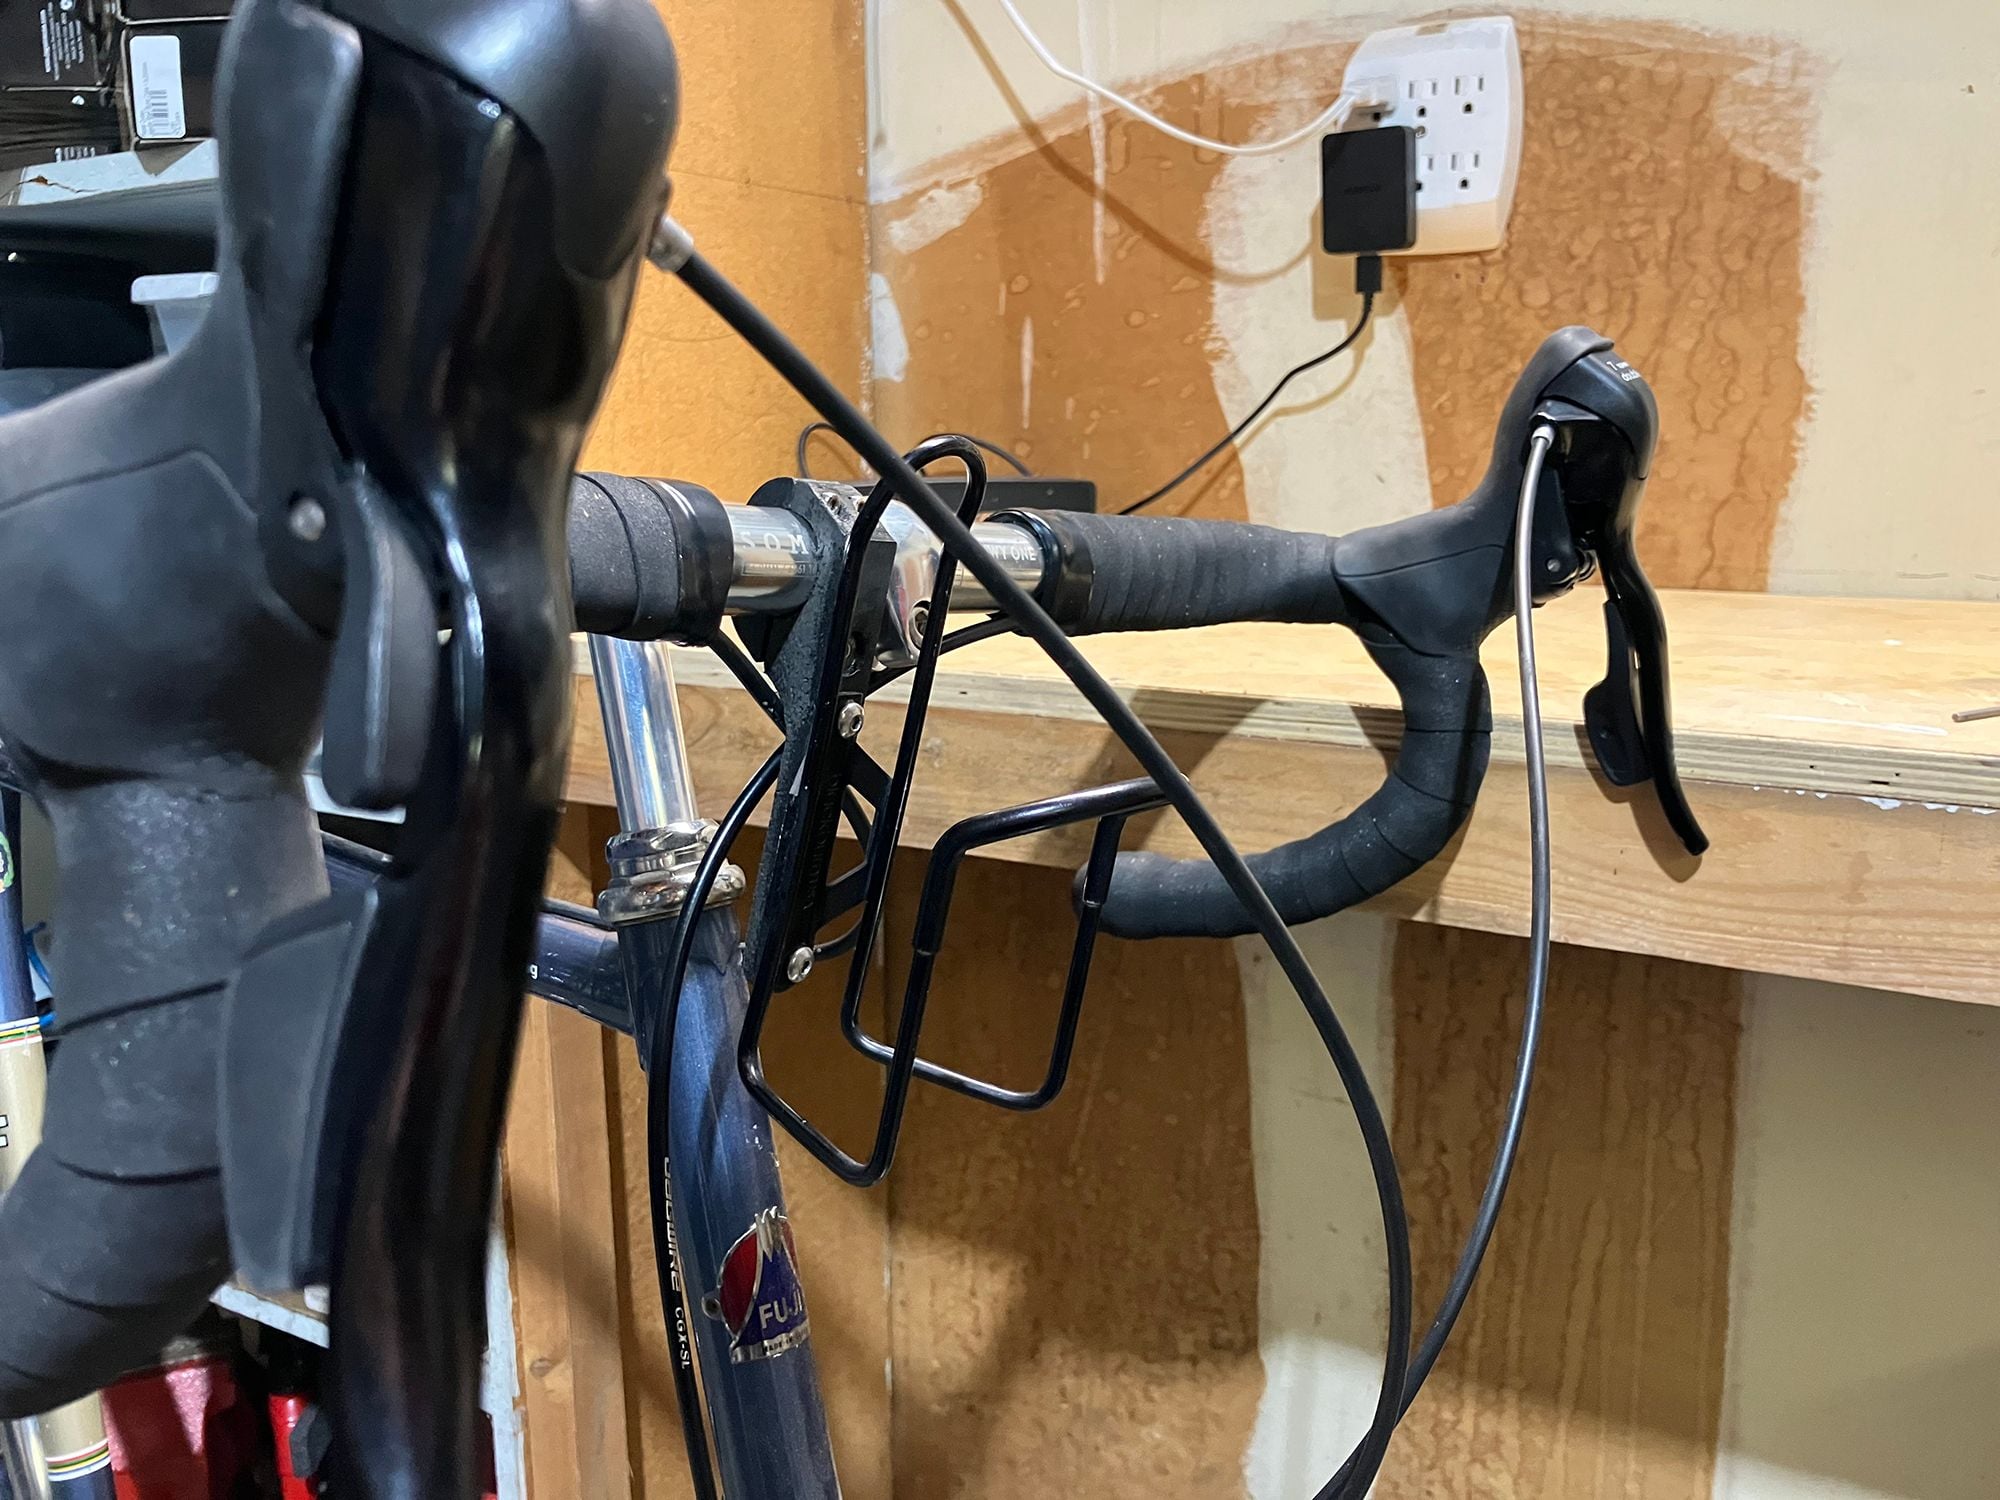
Since I didn't want this bracket hanging out in front of the bars (for bracket strength, bracket-and-bottle movement, and steering influence concerns), it got tucked in, and that crowds the cable situation a little. The available in-market designs that mount the bottle cage considerably higher (as in 3-4" higher) likely don't have this problem, they just look like they took the little blue pill instead. Trying to avoid that!
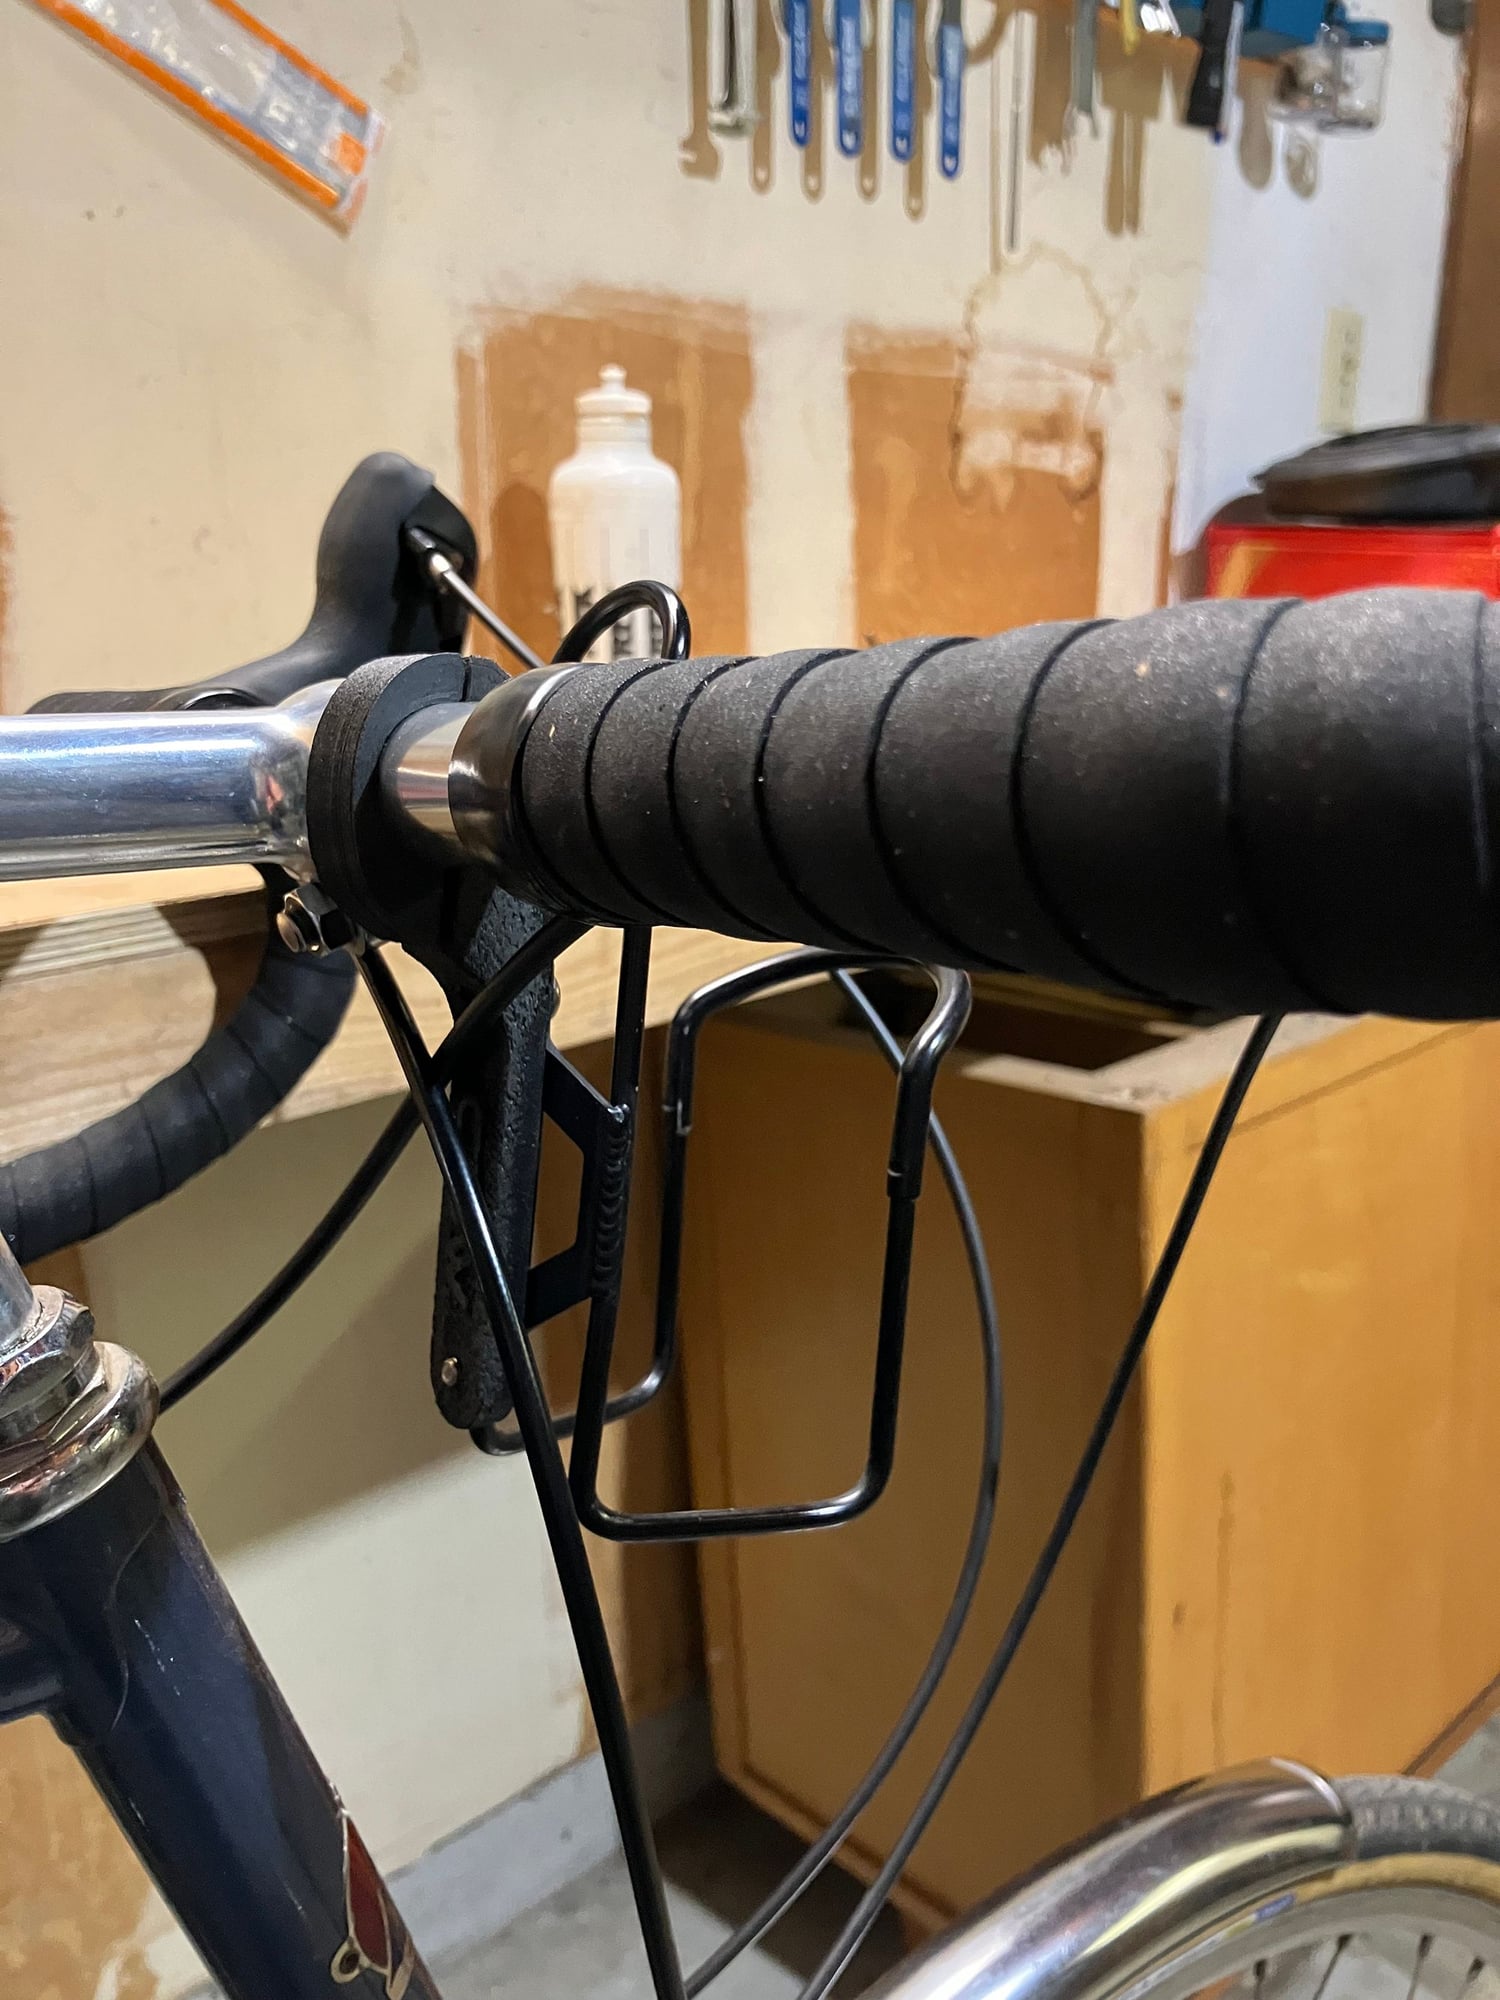
Cage looking quite stealth for a non-intrusive (when not in use) view.
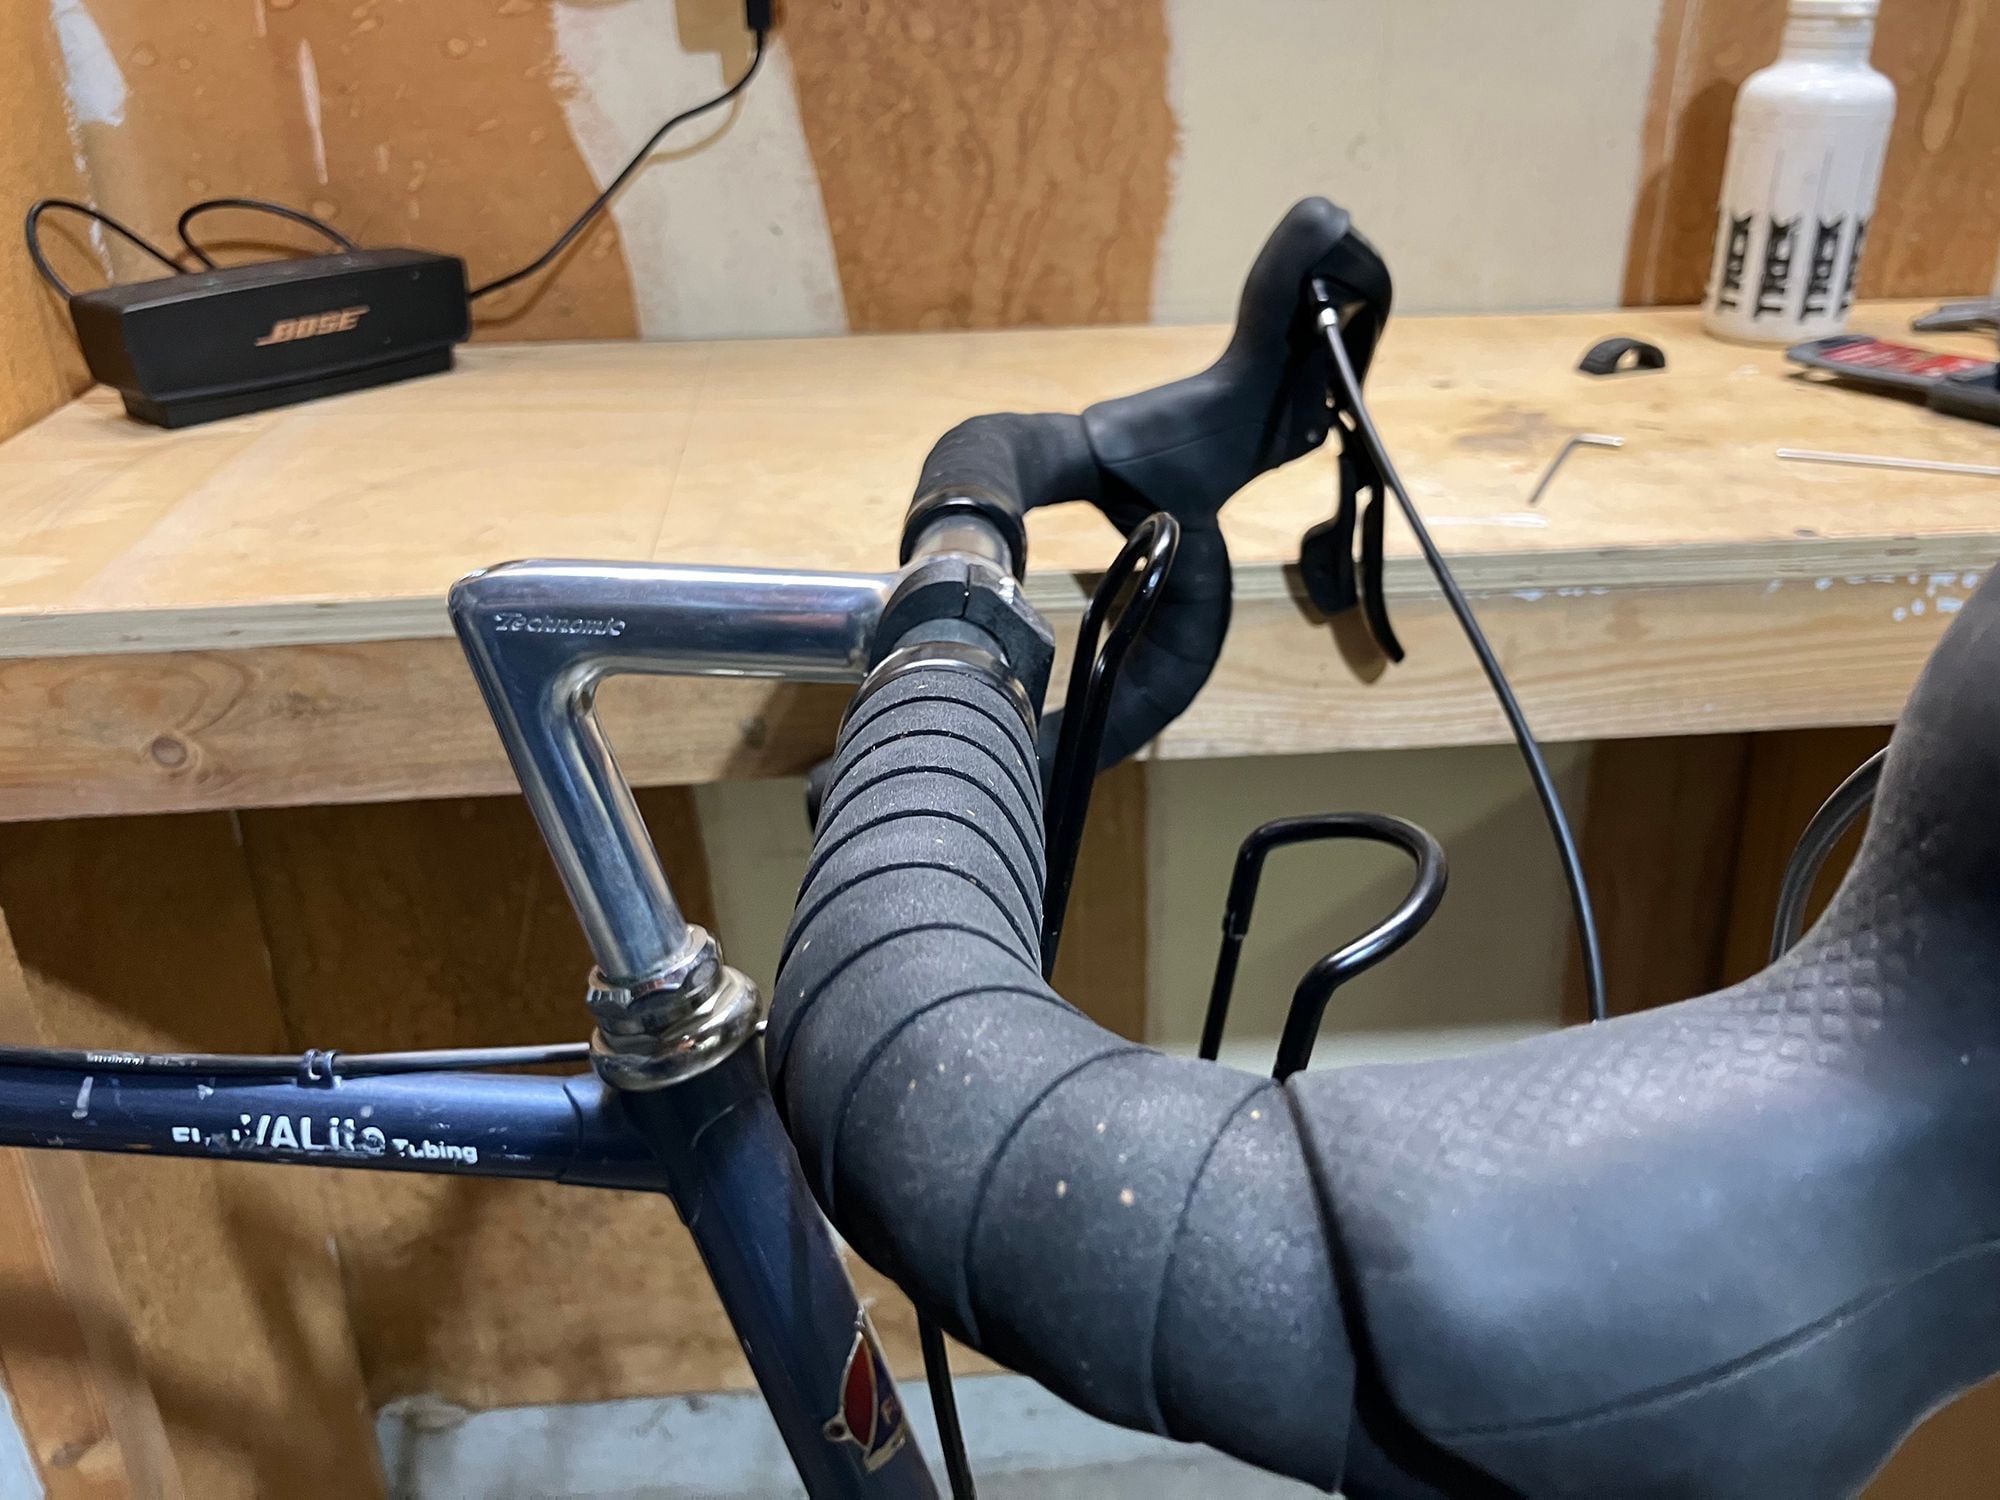
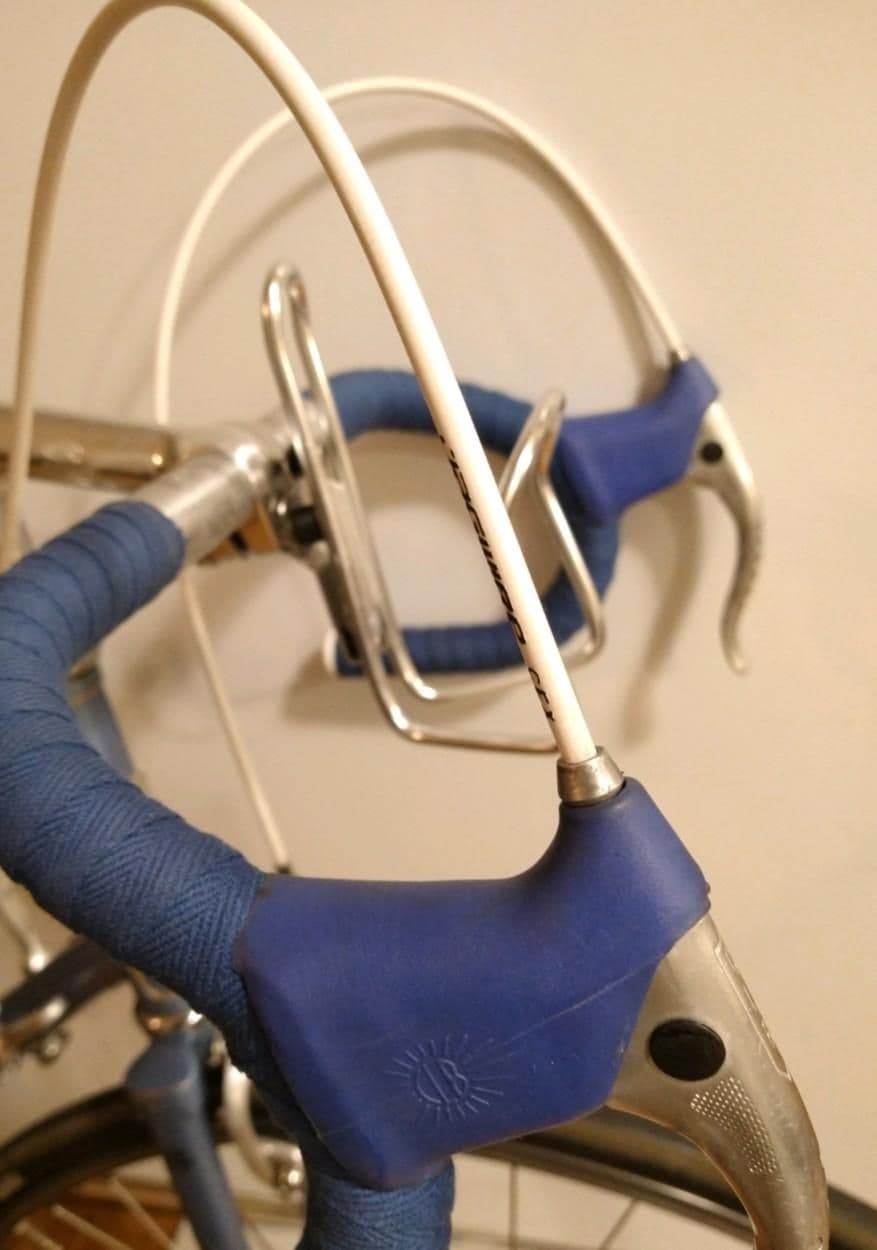
The shorter Trek-branded water bottle off my very low mile 1984 Trek 620 sitting very low. The forward lean harkens back to the racers of old, and its leaned-forward posture matches a bicycle's ethos.
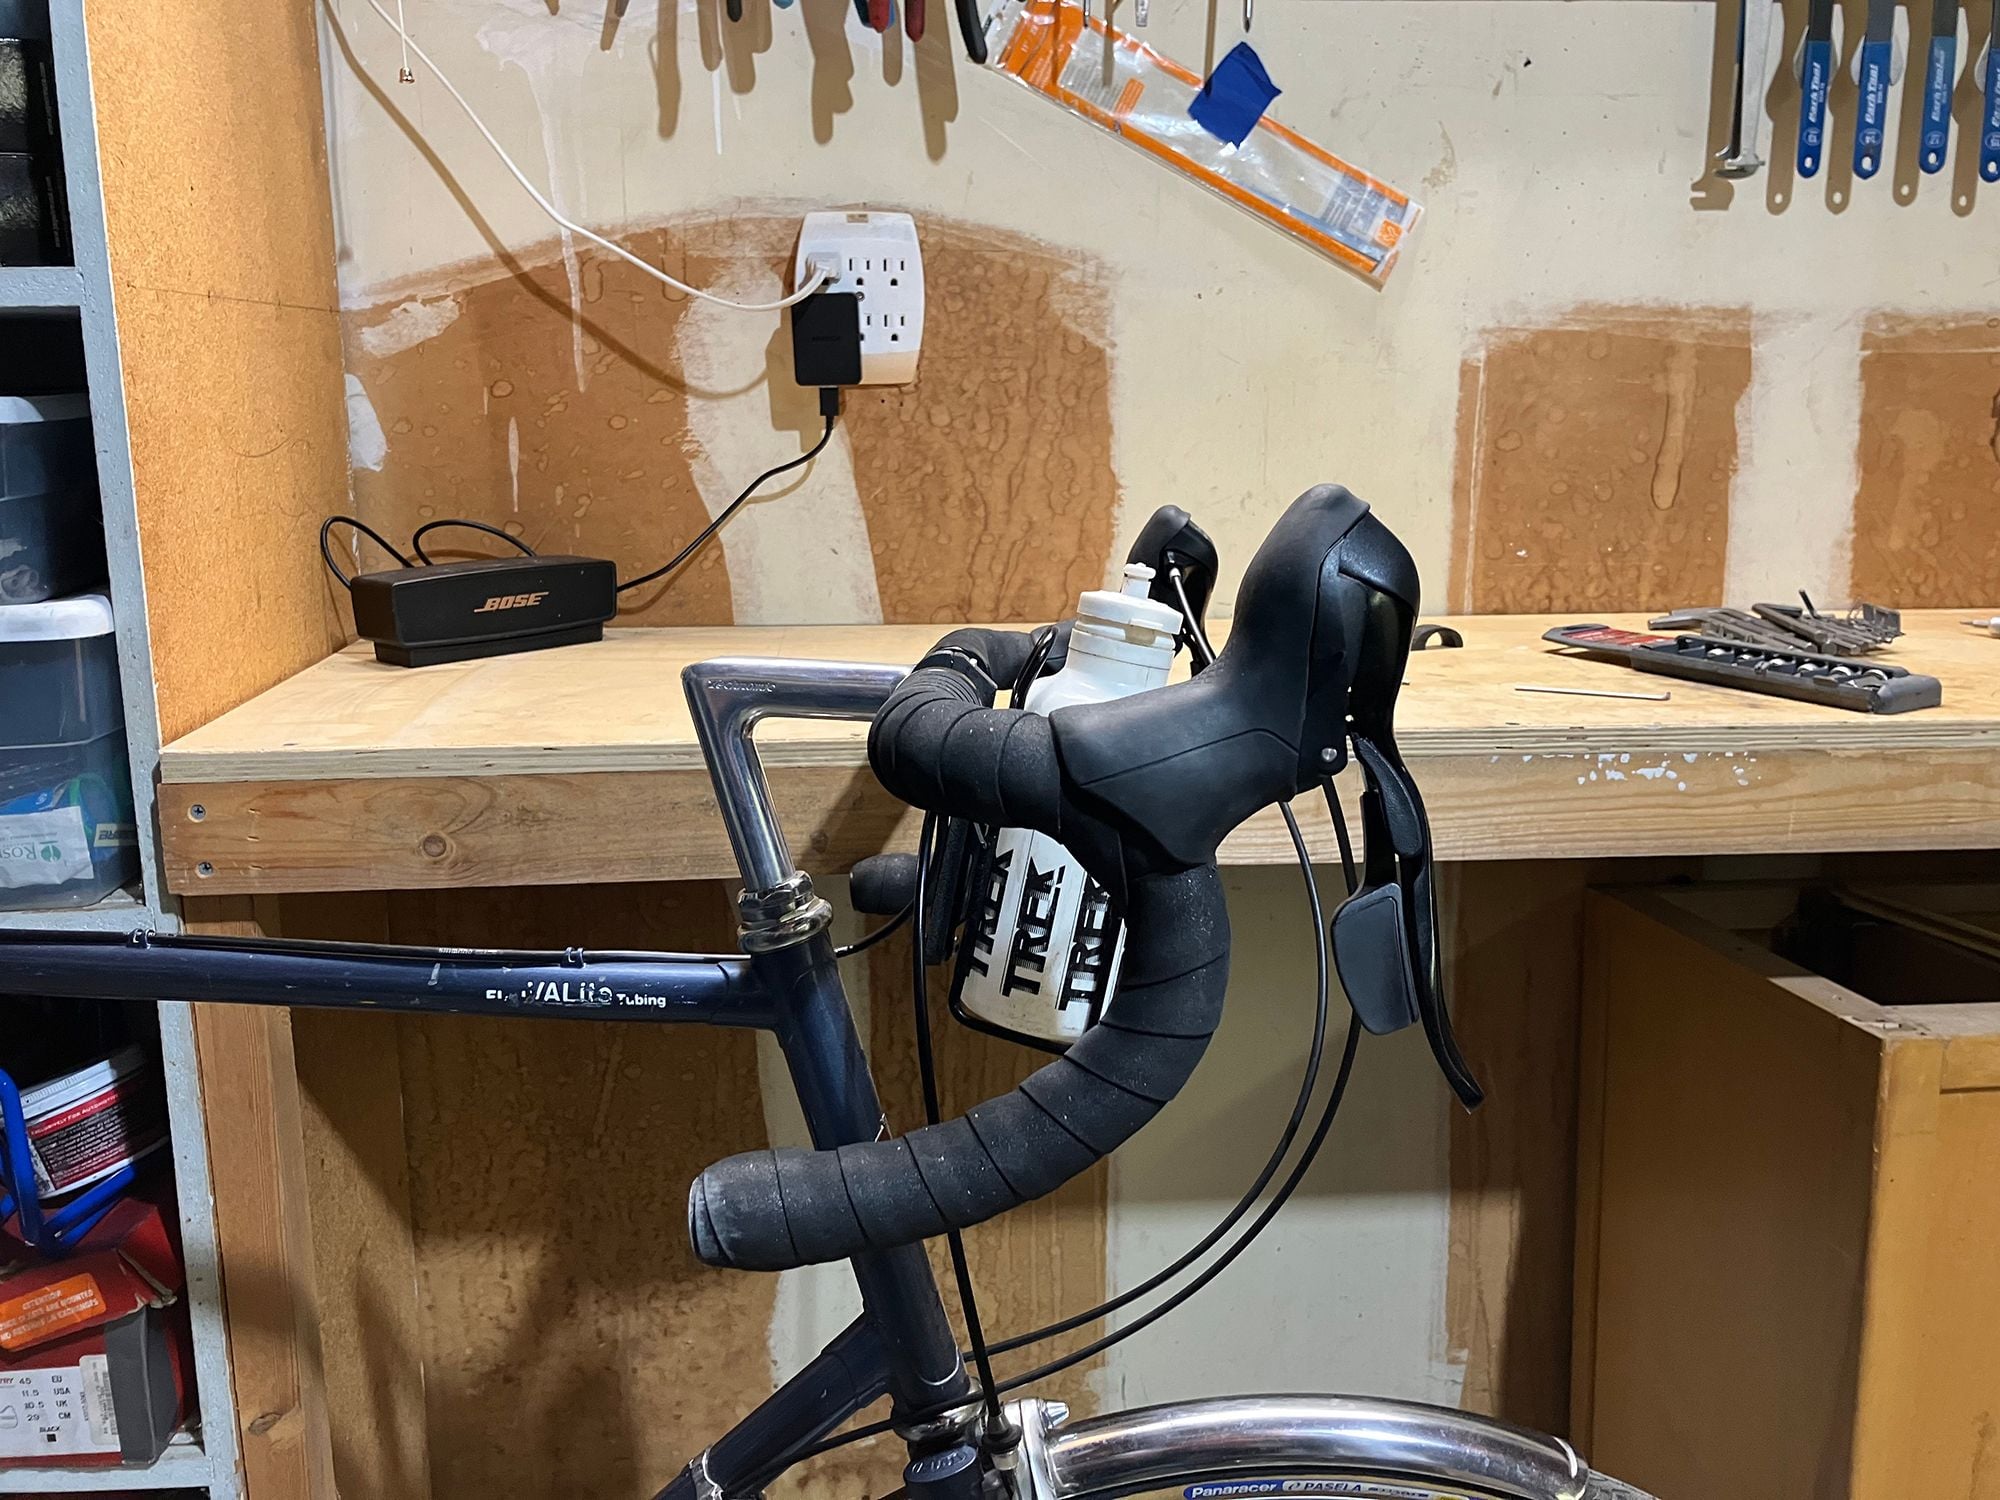
One more side shot here: my tall Footworks water bottle in situ. Thanks to the rather tall (7800/6600/5600-era Shimano-aping) shifter design, it doesn't tower above them.
I'd call this is a success, and hope to add further designs and updates as this thread rolls along. Let me know what you think of it. Sure, I'd like a polished metal one for a bike or two of mine, or, you know, another '70s Paramount or similar that didn't come with brazed on cage accommodations; but I'm gonna work the plastic for the time being.
Below you'll see some images of the post-print processing and assembly. One of the characteristics of high-performing plastic like PA6-CF or PET-CF is its moisture absorption and resulting need for drying out before printing. It's a battle, and for best results, one needs to dry it out (heated to 80-90� C for 10 hours or so) and then basically print right after. High strength, high temperature handling capability, and great dimensional accuracy are high points. It has a really nice sheen, too. On the other end, left for days or weeks with no anti-moisture recourse, it gets stringy and ugly. Still strong and all those other things, but a lot of post-print work awaits. So that's what I'm doing here. File, drill, file some more, fit, "tap threads," file, etc until satisfactory.
I printed two backside clamps in different print orientations to see which one would be less of a hassle for post-print work. Six one way, half a dozen another pretty much.
Oh well!Not pretty, but clamps and holds position really well (and on a slick handlebar surface).
Since I didn't want this bracket hanging out in front of the bars (for bracket strength, bracket-and-bottle movement, and steering influence concerns), it got tucked in, and that crowds the cable situation a little. The available in-market designs that mount the bottle cage considerably higher (as in 3-4" higher) likely don't have this problem, they just look like they took the little blue pill instead. Trying to avoid that!
Cage looking quite stealth for a non-intrusive (when not in use) view.
The shorter Trek-branded water bottle off my very low mile 1984 Trek 620 sitting very low. The forward lean harkens back to the racers of old, and its leaned-forward posture matches a bicycle's ethos.
One more side shot here: my tall Footworks water bottle in situ. Thanks to the rather tall (7800/6600/5600-era Shimano-aping) shifter design, it doesn't tower above them.
I'd call this is a success, and hope to add further designs and updates as this thread rolls along. Let me know what you think of it. Sure, I'd like a polished metal one for a bike or two of mine, or, you know, another '70s Paramount or similar that didn't come with brazed on cage accommodations; but I'm gonna work the plastic for the time being.
Likes For RiddleOfSteel:
01-04-24, 02:11 AM
#6
Master Parts Rearranger
Thread Starter
Join Date: Mar 2015
Location: Portlandia's Kuiper Belt, OR
Posts: 4,403
Bikes: 1982 Trek 720 - 1985 Trek 620 - 1984 Trek 620 - 1980 Trek 510 - Other luminaries past and present
Mentioned: 221 Post(s)
Tagged: 0 Thread(s)
Quoted: 1556 Post(s)
Liked 2,024 Times
in
989 Posts
Great job on the bracket mount. That said, in my experience, that style of cage is not well-suited for a handlebar mount. There is too much weight bearing on the bottom forward elbows of the cage. I had a similar setup and eventually developed cracks in both a T.A. and Cobra cage. They start to sag over time with bumps in the road, potentially causing a hazard with bottles dropping. Those cages are better suited for the main triangle. There is a reason the handlebar cages typically have a full circle support toward the top, along with a bit of a �lip� at the front. I switched to a King Iris style cage (https://kingcage.com/collections/wat...iris-king-cage), and it�s much more secure.
01-04-24, 07:02 AM
#7

Senior Member
Join Date: Jun 2006
Posts: 20,305
Mentioned: 130 Post(s)
Tagged: 0 Thread(s)
Quoted: 3464 Post(s)
Liked 2,831 Times
in
1,997 Posts
The rendering software does a great job of making the digital model look very good.
�great work.
now time for some durability testing. That oversized bottle when full can be quite a mass.
�great work.
now time for some durability testing. That oversized bottle when full can be quite a mass.
Likes For repechage:
01-04-24, 07:45 AM
#8
Freewheel Medic

Join Date: Oct 2005
Location: An Island on the Coast of GA!
Posts: 12,886
Bikes: Snazzy* Schwinns, Classy Cannondales & a Super Pro Aero Lotus (* Ed.)
Mentioned: 140 Post(s)
Tagged: 0 Thread(s)
Quoted: 1455 Post(s)
Liked 2,197 Times
in
963 Posts
This is fantastic! I use bar mounted bottle cage(s) on a couple of bikes (including a double on my '71 P13 Paramount), and like the location but not the height. I've been toying with the ideal of trying to fabricate lower ones from oak or another hardwood. I'd be glad to become an early adopter and tester of your design.
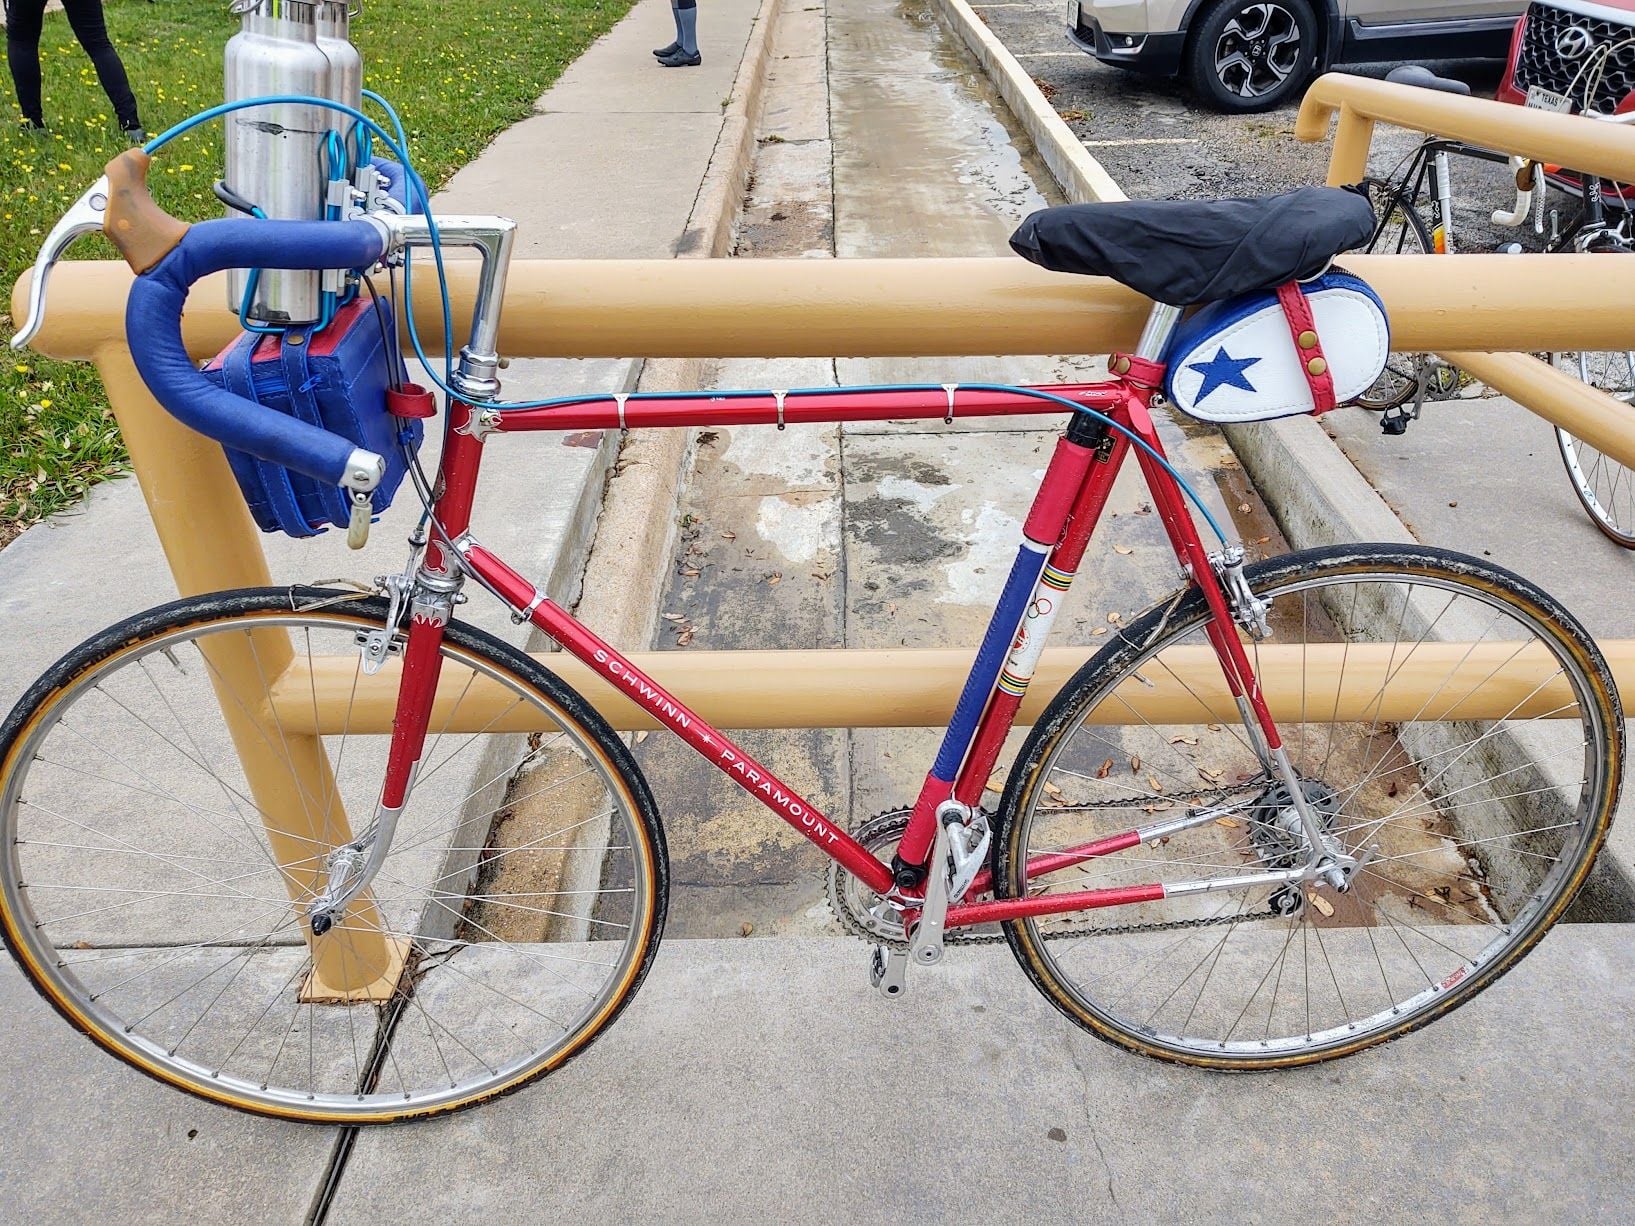
A good example of bar bottles on the "little blue pill."
A good example of bar bottles on the "little blue pill."
__________________
Bob
Enjoying the GA coast all year long!
Thanks for visiting my website: www.freewheelspa.com
Bob
Enjoying the GA coast all year long!
Thanks for visiting my website: www.freewheelspa.com
Likes For pastorbobnlnh:
01-04-24, 08:24 AM
#9
*____*
Will they be ready before I break and overspend on a vintage TA model? Who knows! But it looks like a great initial design regardless, very impressive.
Likes For GullyFoylesbike:
01-04-24, 10:57 AM
#10
Senior Member
I lowered the center of gravity on a Topeak mount by drilling and tapping a piece of aluminum bar.
Last edited by gearbasher; 01-04-24 at 11:03 AM.
Likes For gearbasher:
01-04-24, 12:06 PM
#11
Senior Member

Join Date: Feb 2008
Location: Peoria, IL
Posts: 4,481
Mentioned: 86 Post(s)
Tagged: 0 Thread(s)
Quoted: 1830 Post(s)
Liked 3,382 Times
in
1,583 Posts
.....There is a reason the handlebar cages typically have a full circle support toward the top, along with a bit of a �lip� at the front. I switched to a King Iris style cage (https://kingcage.com/collections/wat...iris-king-cage), and it�s much more secure.
I've been using handlebar cages since the 70's, and they do serve a purpose on vintage bikes that have a frame pump on the seat tube. My preference is the T.A. bar cage, although I've used more modern variations such as the Minoura adapter bracket and a Blackburn cage that fitted to the stem extension (might need to take a photo of that). One advantage of the T.A. is indeed that lip at the front that helps guide the bottle into the cage. It might not be essential, but it's quite useful.
A couple of photos, for those not familiar with the T.A. cage...


and since I don't have a better shot of the cage by itself, here's the Cyclo-Pedia catalog page....

I always thought that Nitto or someone should do a modern reproduction of this T.A. cage, but no signs of that yet.
Back in the 70's, there was a plastic bar cage made by Reg(?). The plastic just wasn't up to the task, but maybe modern plastics would do better??
It certainly seems like an excuse to play with a 3D printer.

It's on the lower left of this page from Cyclo-Pedia...

Steve in Peoria
Likes For steelbikeguy:
01-04-24, 12:51 PM
#12
small ring

Join Date: Jul 2012
Location: PNW
Posts: 1,025
Mentioned: 24 Post(s)
Tagged: 0 Thread(s)
Quoted: 438 Post(s)
Liked 925 Times
in
370 Posts
Wolf Tooth B-RAD 2 for those who can't make their own
__________________
59 Allegro Special -- 72 Bob Jackson -- 74 Motobecane Grand Jubile -- 74 Sekine SHS 271 -- 80 Nishiki International
85 Shogun 800 -- 86 Tommasini Super Prestige -- 92 Specialized Rockhopper -- 17 Colnago Arabesque
59 Allegro Special -- 72 Bob Jackson -- 74 Motobecane Grand Jubile -- 74 Sekine SHS 271 -- 80 Nishiki International
85 Shogun 800 -- 86 Tommasini Super Prestige -- 92 Specialized Rockhopper -- 17 Colnago Arabesque
Likes For droppedandlost:
01-04-24, 12:58 PM
#13
Full Member
Join Date: Jan 2023
Posts: 486
Mentioned: 0 Post(s)
Tagged: 0 Thread(s)
Quoted: 175 Post(s)
Likes: 0
Liked 452 Times
in
232 Posts
Nice effort by the OP. There's many handlebar bottle mounts on the market priced under $10 to a high of $20.
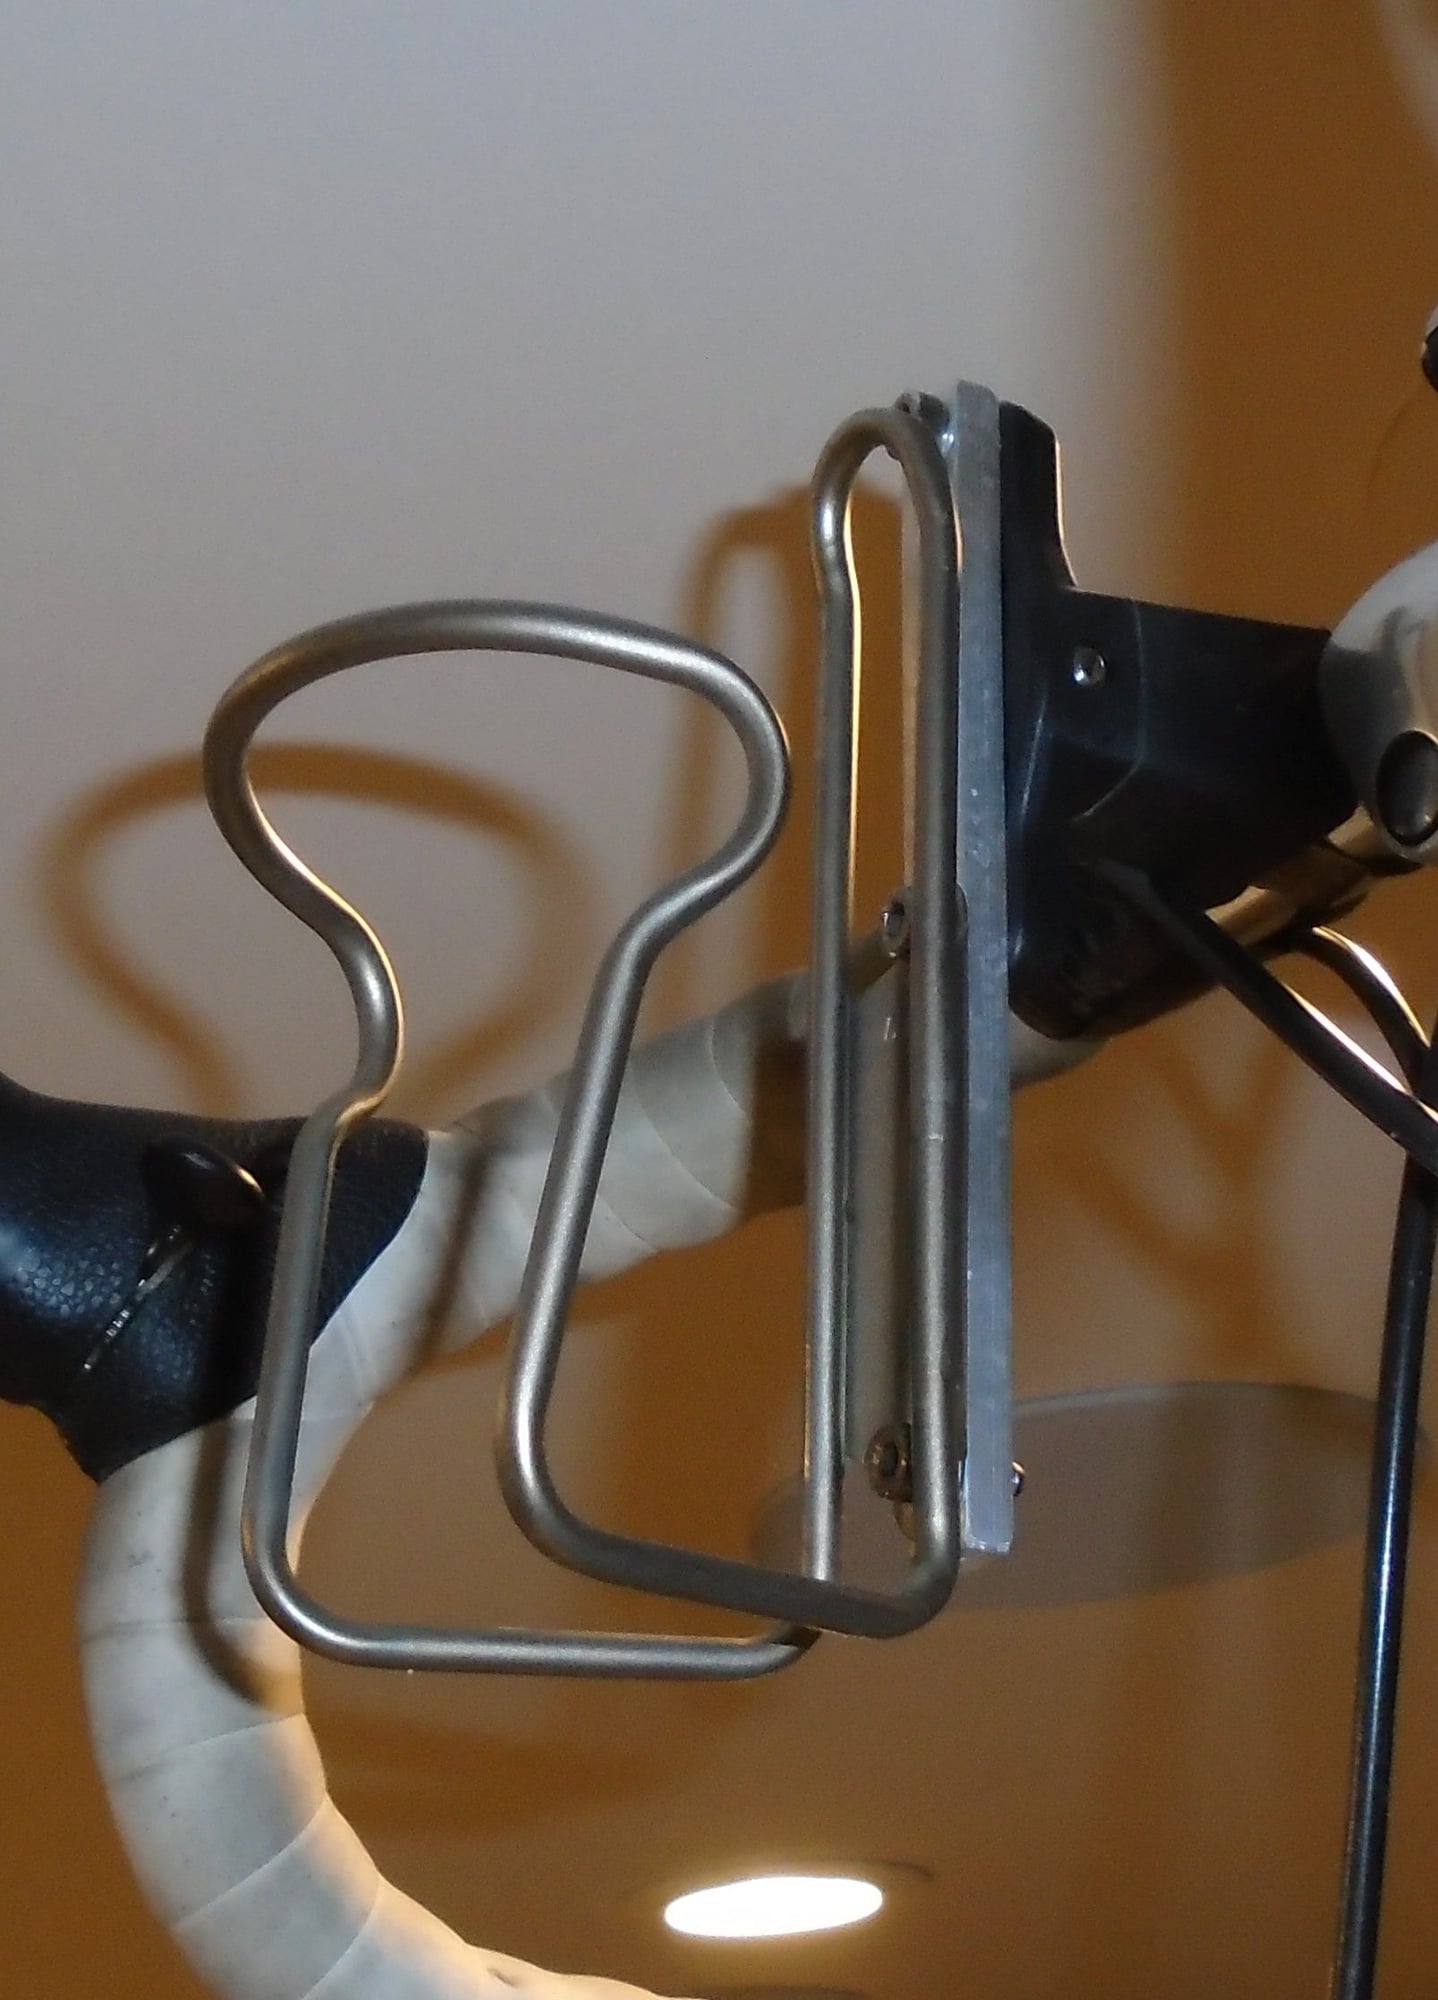
Here's a DIY simple mount I've done that saves handlebar space and prevents marring. You can bolt any standard 2 hole cage to it.
The stainless bracket is removed from a Minoura quick mount handlebar type. The original stem clamp bolt is replaced with a longer shank bolt. An aluminum spacer is placed in the stem recess. Show and tell pics;
Likes For chain_whipped:
01-04-24, 02:48 PM
#14
Master Parts Rearranger
Thread Starter
Join Date: Mar 2015
Location: Portlandia's Kuiper Belt, OR
Posts: 4,403
Bikes: 1982 Trek 720 - 1985 Trek 620 - 1984 Trek 620 - 1980 Trek 510 - Other luminaries past and present
Mentioned: 221 Post(s)
Tagged: 0 Thread(s)
Quoted: 1556 Post(s)
Liked 2,024 Times
in
989 Posts
Thanks! Durability testing indeed. The Fuji has fenders which is perfect for Oregon weather (and we went for a quick spin last night), but it will need to be seen how much he rides it. I'll spin up one for myself and put it to use on my '85 620 (which already has three bottle cage locations on it).
01-04-24, 02:53 PM
#15
Master Parts Rearranger
Thread Starter
Join Date: Mar 2015
Location: Portlandia's Kuiper Belt, OR
Posts: 4,403
Bikes: 1982 Trek 720 - 1985 Trek 620 - 1984 Trek 620 - 1980 Trek 510 - Other luminaries past and present
Mentioned: 221 Post(s)
Tagged: 0 Thread(s)
Quoted: 1556 Post(s)
Liked 2,024 Times
in
989 Posts
This is fantastic! I use bar mounted bottle cage(s) on a couple of bikes (including a double on my '71 P13 Paramount), and like the location but not the height. I've been toying with the ideal of trying to fabricate lower ones from oak or another hardwood. I'd be glad to become an early adopter and tester of your design.
Likes For RiddleOfSteel:
01-04-24, 02:55 PM
#16
Master Parts Rearranger
Thread Starter
Join Date: Mar 2015
Location: Portlandia's Kuiper Belt, OR
Posts: 4,403
Bikes: 1982 Trek 720 - 1985 Trek 620 - 1984 Trek 620 - 1980 Trek 510 - Other luminaries past and present
Mentioned: 221 Post(s)
Tagged: 0 Thread(s)
Quoted: 1556 Post(s)
Liked 2,024 Times
in
989 Posts
Haha, perhaps not. Mostly because if you're human like the rest of us, the wait wait wait can turn into NOW at a moment's notice. Those TA cages/mounts are really pretty.
01-04-24, 02:56 PM
#17
Master Parts Rearranger
Thread Starter
Join Date: Mar 2015
Location: Portlandia's Kuiper Belt, OR
Posts: 4,403
Bikes: 1982 Trek 720 - 1985 Trek 620 - 1984 Trek 620 - 1980 Trek 510 - Other luminaries past and present
Mentioned: 221 Post(s)
Tagged: 0 Thread(s)
Quoted: 1556 Post(s)
Liked 2,024 Times
in
989 Posts
01-04-24, 03:12 PM
#18
Senior Member
Join Date: Feb 2008
Location: Peoria, IL
Posts: 4,481
Mentioned: 86 Post(s)
Tagged: 0 Thread(s)
Quoted: 1830 Post(s)
Liked 3,382 Times
in
1,583 Posts
Thank you! Seeing how Schwinn was apparently alright with people clamping bottle cages to the down tube over their branding has long baffled me. Heart breaks for the paint and decals! And I realize that bikes of this age aren't ridden widely, perhaps even less widely than their '80's counterparts, but I'd still like to pursue it to a practical end.

Steve in Peoria
Likes For steelbikeguy:
01-04-24, 03:13 PM
#19
Master Parts Rearranger
Thread Starter
Join Date: Mar 2015
Location: Portlandia's Kuiper Belt, OR
Posts: 4,403
Bikes: 1982 Trek 720 - 1985 Trek 620 - 1984 Trek 620 - 1980 Trek 510 - Other luminaries past and present
Mentioned: 221 Post(s)
Tagged: 0 Thread(s)
Quoted: 1556 Post(s)
Liked 2,024 Times
in
989 Posts
Good observation, and not appreciated by a lot of folks!
I've been using handlebar cages since the 70's, and they do serve a purpose on vintage bikes that have a frame pump on the seat tube. My preference is the T.A. bar cage, although I've used more modern variations such as the Minoura adapter bracket and a Blackburn cage that fitted to the stem extension (might need to take a photo of that). One advantage of the T.A. is indeed that lip at the front that helps guide the bottle into the cage. It might not be essential, but it's quite useful.
A couple of photos, for those not familiar with the T.A. cage...
I always thought that Nitto or someone should do a modern reproduction of this T.A. cage, but no signs of that yet.
Back in the 70's, there was a plastic bar cage made by Reg(?). The plastic just wasn't up to the task, but maybe modern plastics would do better??
It certainly seems like an excuse to play with a 3D printer.
Steve in Peoria
I think plastics have come a long way. We've heard and/or experienced Delrin plastic etc on French bikes (I did recently--swapped with a Suntour front derailleur). Material science is incredible now, and we are the beneficiaries. I have a handful of 3D printing projects under my belt now, having learned quite a lot. This bracket is the latest and is in use, and I or my family use the other ones daily. The 3D printing community has long cornered the cutesy toy and trinket market, which is good/fine/whatever, but my goal has never been to make toys (Lord knows there are too many that end up in landfills straightaway). Something beneficial, practical, but also beautiful (as much as possible) is my aim.
Likes For RiddleOfSteel:
01-04-24, 03:22 PM
#20
Master Parts Rearranger
Thread Starter
Join Date: Mar 2015
Location: Portlandia's Kuiper Belt, OR
Posts: 4,403
Bikes: 1982 Trek 720 - 1985 Trek 620 - 1984 Trek 620 - 1980 Trek 510 - Other luminaries past and present
Mentioned: 221 Post(s)
Tagged: 0 Thread(s)
Quoted: 1556 Post(s)
Liked 2,024 Times
in
989 Posts
Nice effort by the OP. There's many handlebar bottle mounts on the market priced under $10 to a high of $20.
Here's a DIY simple mount I've done that saves handlebar space and prevents marring. You can bolt any standard 2 hole cage to it.
The stainless bracket is removed from a Minoura quick mount handlebar type. The original stem clamp bolt is replaced with a longer shank bolt. An aluminum spacer is placed in the stem recess.
Yeah, the market is well-populated with solutions. Some look better than others, and all have the benefit of mass production behind them and the resulting economies of scale. Those are likely just fine for many people, just like low- to mid-tier bikes are. Why buy a P15-9 Paramount when a Le Tour is largely the same bike (geometry, form, etc)? Oh right, because it's a better/higher quality or potentially more enjoyable two-wheeled solution to the transportation need. My design intent is the same refrain: "It's like these other available solutions, but better."
01-04-24, 03:24 PM
#21
Master Parts Rearranger
Thread Starter
Join Date: Mar 2015
Location: Portlandia's Kuiper Belt, OR
Posts: 4,403
Bikes: 1982 Trek 720 - 1985 Trek 620 - 1984 Trek 620 - 1980 Trek 510 - Other luminaries past and present
Mentioned: 221 Post(s)
Tagged: 0 Thread(s)
Quoted: 1556 Post(s)
Liked 2,024 Times
in
989 Posts
I've never had the nerve to clamp a cage onto the downtube of my Raleigh International... it's just too pristine. The T.A. bar cage is one way to avoid it, along with just putting a second bottle into a jersey pocket. Admittedly, it is possible to put some tape under the clamps for a downtube cage to protect the paint, but I'm just not ready to do this to the International yet.
Steve in Peoria
Steve in Peoria
Likes For RiddleOfSteel:
01-04-24, 04:48 PM
#22
Senior Member
Join Date: Oct 2015
Location: PDX
Posts: 13,059
Bikes: Merz x 5 + Specialized Merz Allez x 2, Strawberry/Newlands/DiNucci/Ti x3, Gordon, Fuso/Moulton x2, Bornstein, Paisley,1958-74 Paramounts x3, 3rensho, 74 Moto TC, 73-78 Raleigh Pro's x5, Marinoni x2, 1960 Cinelli SC, 1980 Bianchi SC, PX-10 X 2
Mentioned: 267 Post(s)
Tagged: 0 Thread(s)
Quoted: 4513 Post(s)
Liked 6,389 Times
in
3,674 Posts
@RiddleOfSteel
Great work, not a big fan of bottle on the bar but you're really onto something here.
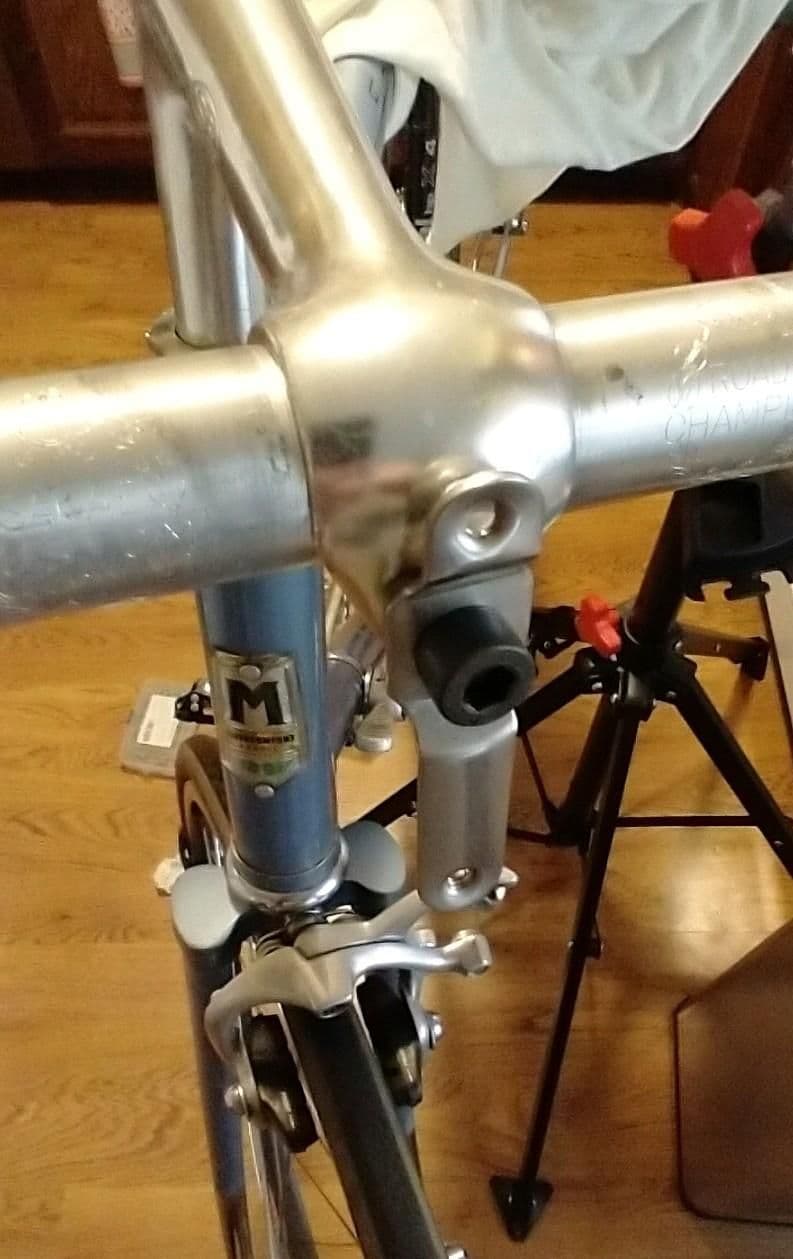
My ask would be for GPS/light/camera mounts like K-Edge, Barfly where your clamp would be a better setup for holding in place than the current ones I think.
They are a challenge to get them to stay put with all the weight hanging on them. I have my GPS and Cycliq camera mounted on an ebay clone and it works ok but slips often with shims for the skinny bar instead of later bigger ones.
These are very fiddly, fussy and I'm going to add some emblem tape to the mix for now.
Regardless, I would also be glad to do some testing as well if you want.
Great work, not a big fan of bottle on the bar but you're really onto something here.
My ask would be for GPS/light/camera mounts like K-Edge, Barfly where your clamp would be a better setup for holding in place than the current ones I think.
They are a challenge to get them to stay put with all the weight hanging on them. I have my GPS and Cycliq camera mounted on an ebay clone and it works ok but slips often with shims for the skinny bar instead of later bigger ones.
These are very fiddly, fussy and I'm going to add some emblem tape to the mix for now.
Regardless, I would also be glad to do some testing as well if you want.
Last edited by merziac; 01-04-24 at 04:57 PM.
Likes For merziac:
01-04-24, 05:03 PM
#23
Senior Member
Join Date: Oct 2015
Location: PDX
Posts: 13,059
Bikes: Merz x 5 + Specialized Merz Allez x 2, Strawberry/Newlands/DiNucci/Ti x3, Gordon, Fuso/Moulton x2, Bornstein, Paisley,1958-74 Paramounts x3, 3rensho, 74 Moto TC, 73-78 Raleigh Pro's x5, Marinoni x2, 1960 Cinelli SC, 1980 Bianchi SC, PX-10 X 2
Mentioned: 267 Post(s)
Tagged: 0 Thread(s)
Quoted: 4513 Post(s)
Liked 6,389 Times
in
3,674 Posts
I'd be in the same boat. I'm presently not using any electrical tape between the bar and bracket on the Fuji--something that would be good for both position-holding and anti-marring--but maybe that will be spec'd later on. I'll certainly try it on my next printed design.
Garmin incorporates a rubber insert that is very robust and holds/grips very well when used with the right bar even with a camera too which is impressive as they are plastic/composite too.
Likes For merziac:
01-04-24, 05:35 PM
#24
Master Parts Rearranger
Thread Starter
Join Date: Mar 2015
Location: Portlandia's Kuiper Belt, OR
Posts: 4,403
Bikes: 1982 Trek 720 - 1985 Trek 620 - 1984 Trek 620 - 1980 Trek 510 - Other luminaries past and present
Mentioned: 221 Post(s)
Tagged: 0 Thread(s)
Quoted: 1556 Post(s)
Liked 2,024 Times
in
989 Posts
@RiddleOfSteel
Great work, not a big fan of bottle on the bar but you're really onto something here.
My ask would be for GPS/light/camera mounts like K-Edge, Barfly where your clamp would be a better setup for holding in place than the current ones I think.
They are a challenge to get them to stay put with all the weight hanging on them. I have my GPS and Cycliq camera mounted on an ebay clone and it works ok but slips often with shims for the skinny bar instead of later bigger ones.
These are very fiddly, fussy and I'm going to add some emblem tape to the mix for now.
Regardless, I would also be glad to do some testing as well if you want.
Looking at those mounts you mentioned, 100% look fiddly and annoying. Holding phones of any weight, on a bike, with thin clamps, cantilevered horizontally forward, is a recipe for struggle. The leverage situation of my bottle bracket design ranges from nearly along the bar's vertical centerline (if bracket positioned completely vertical), to in line (if bracket and bottle are in a leaned forward orientation). This is inherently less prone to shifting. I could draw up a twin mount system where the bottle cage has an area to fasten a phone/GPS mount to it. You'd start getting some weight on the front end, and certainly off center, thus deviating from the simplicity of the original design. For now, I need to keep things on mission.
Likes For RiddleOfSteel:
01-04-24, 05:48 PM
#25
Senior Member
Join Date: Feb 2008
Location: Peoria, IL
Posts: 4,481
Mentioned: 86 Post(s)
Tagged: 0 Thread(s)
Quoted: 1830 Post(s)
Liked 3,382 Times
in
1,583 Posts
I'll also testify that a hose clamp seems to work at least as well as the original T.A. clamp.

Steve in Peoria
Likes For steelbikeguy: