


Freewheel internals questions
 04-17-22, 06:11 PM
#1

WGB
Thread Starter
Join Date: Jul 2017
Location: Niagara Region
Posts: 2,917
Bikes: Panasonic PT-4500
Mentioned: 46 Post(s)
Tagged: 0 Thread(s)
Quoted: 1800 Post(s)
Liked 2,334 Times
in
1,378 Posts
Freewheel internals questions
First - I know that there are alternatives to rebuilding a freewheel but I want to do it so I can say I've done it.
Last week I rebuilt a Regina FW. I loosened the freewheel using the correct tool and then I used a punch to loosen the lock ring while it was seated on the hub.
Easy enough to strip down to a point. After that I was left with two sides (+ a ton of tiny dull bearings, two spacers).
Unlike the photo from @pastorbobnlnh (below) I could not remove the locking ring from the front of the FW. I was able to loosen it to the point I had enough room to get to the old bearings on the front of the FW and cleaned them and regreased but I couldn't remove those as I couldn't get that ring off. Since that ring didn't want to come off, I didn't get the cogs themselves free.
I've stolen photos from a previous post of Pastorbobnlnh as my hands were greasy when I got to this point. The only difference between us at this point was that my lock ring was on but loose
Please note I didn't tumble the cog and body or the base in a case tumbler as has been suggested because I was concerned that there might be a small part hidden under the case ring that might fall out and get lost if that ring came off while in the tumbler). As a result, I didn't polish the FW, just made it spin smoother and quieter.
Replacing the old bearings with new bearings was straight forward.
It look about 5 tries (first time I forgot the spacers, second and third times the dental floss holding the pawls stuck and snapped or tore and on the fourth the grease had been wiped off so bearings fell out) before I got it back together.
Finally on the fifth try it worked, seemingly perfectly.
Now I am emboldened and want to try more. I can buy bearings and grease quite easily but I'd like to disassemble the cogs from the body.
Question 1) Should I use a freewheel vise tool do do these task? If so, much like how Shimano/Suntour/Regina required different freewheel tools to remove them from a hub do you need a brand specific vise tool for each brand? or does a single vise work for all/most freewheels
Ex. 1

Ex. 2

Question 2: I see examples posted of freewheels having their cogs removed using two chain whips. Should I have used the whips instead of a punch and if I used the two chain whip method will that loosen the cogs?
@pastorbobnlnh - any thoughts??
Last week I rebuilt a Regina FW. I loosened the freewheel using the correct tool and then I used a punch to loosen the lock ring while it was seated on the hub.
Easy enough to strip down to a point. After that I was left with two sides (+ a ton of tiny dull bearings, two spacers).
Unlike the photo from @pastorbobnlnh (below) I could not remove the locking ring from the front of the FW. I was able to loosen it to the point I had enough room to get to the old bearings on the front of the FW and cleaned them and regreased but I couldn't remove those as I couldn't get that ring off. Since that ring didn't want to come off, I didn't get the cogs themselves free.
I've stolen photos from a previous post of Pastorbobnlnh as my hands were greasy when I got to this point. The only difference between us at this point was that my lock ring was on but loose
Please note I didn't tumble the cog and body or the base in a case tumbler as has been suggested because I was concerned that there might be a small part hidden under the case ring that might fall out and get lost if that ring came off while in the tumbler). As a result, I didn't polish the FW, just made it spin smoother and quieter.
Replacing the old bearings with new bearings was straight forward.
It look about 5 tries (first time I forgot the spacers, second and third times the dental floss holding the pawls stuck and snapped or tore and on the fourth the grease had been wiped off so bearings fell out) before I got it back together.
Finally on the fifth try it worked, seemingly perfectly.
Now I am emboldened and want to try more. I can buy bearings and grease quite easily but I'd like to disassemble the cogs from the body.
Question 1) Should I use a freewheel vise tool do do these task? If so, much like how Shimano/Suntour/Regina required different freewheel tools to remove them from a hub do you need a brand specific vise tool for each brand? or does a single vise work for all/most freewheels
Ex. 1
Ex. 2
Question 2: I see examples posted of freewheels having their cogs removed using two chain whips. Should I have used the whips instead of a punch and if I used the two chain whip method will that loosen the cogs?
@pastorbobnlnh - any thoughts??
Last edited by WGB; 04-17-22 at 06:55 PM.

Likes For WGB:
04-17-22, 06:29 PM
#2
Banned.

Join Date: Jul 2009
Location: PAZ
Posts: 12,294
Mentioned: 255 Post(s)
Tagged: 0 Thread(s)
Quoted: 2588 Post(s)
Liked 4,824 Times
in
1,709 Posts
Perhaps I read this wrong (and I read through it three times just to be sure), but how were you able to service the bearings and pawls without removing the lockring completely? I'm at a loss as to how this could possibly be accomplished.
DD
DD
 04-17-22, 06:53 PM
#3
WGB
Thread Starter
Join Date: Jul 2017
Location: Niagara Region
Posts: 2,917
Bikes: Panasonic PT-4500
Mentioned: 46 Post(s)
Tagged: 0 Thread(s)
Quoted: 1800 Post(s)
Liked 2,334 Times
in
1,378 Posts
Drillium Dude
Sorry, I guess I'm struggling to describe it.
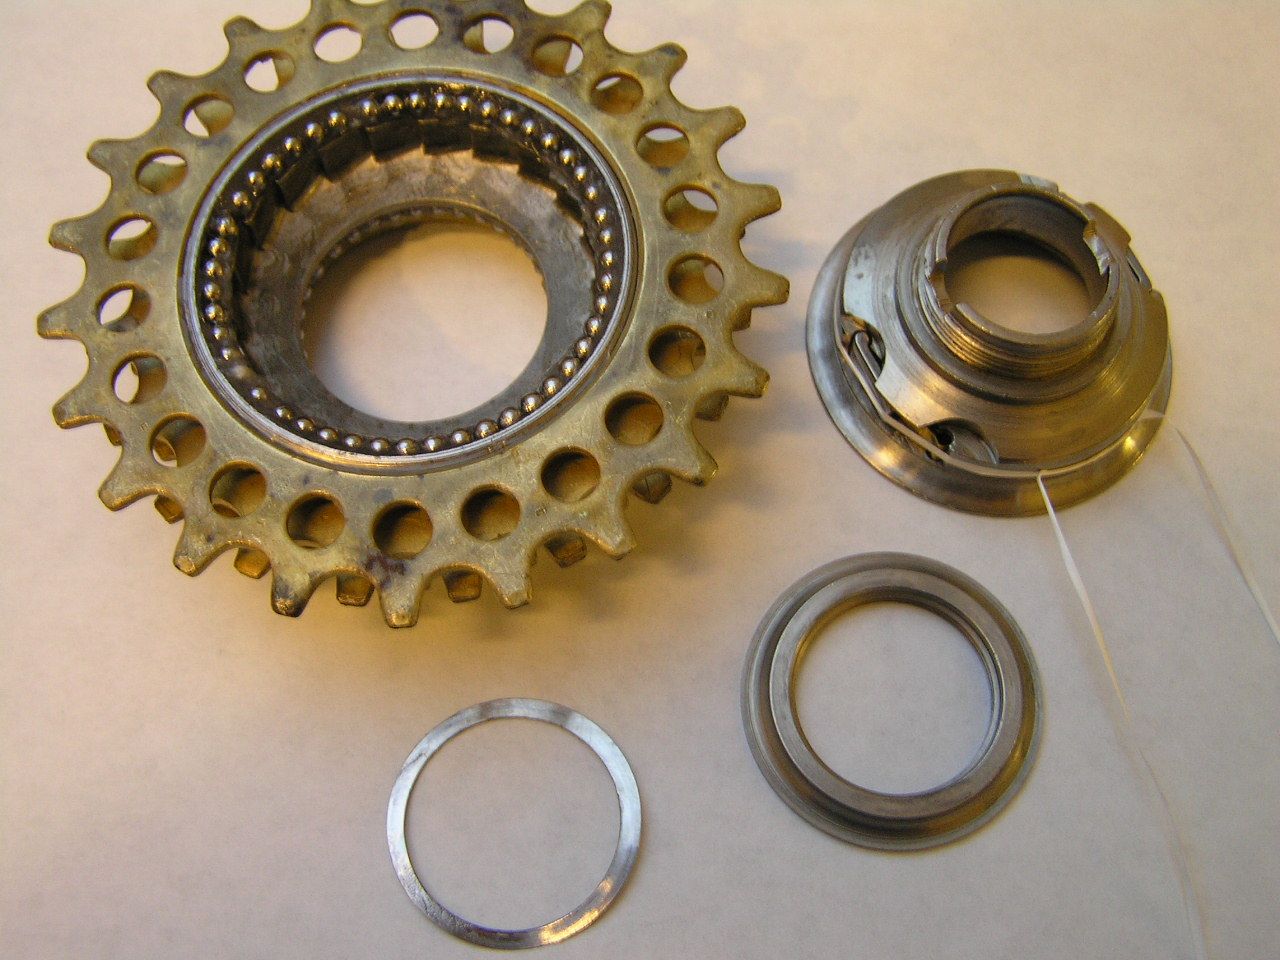
It came apart into two main pieces, just as shown in this photo (two big parts on the top).
The cluster with cogs still attached and the hub. In my scenario the ring stayed on and I couldn't replace the old bearings that are/were under the lock ring.
Sorry, I guess I'm struggling to describe it.
It came apart into two main pieces, just as shown in this photo (two big parts on the top).
The cluster with cogs still attached and the hub. In my scenario the ring stayed on and I couldn't replace the old bearings that are/were under the lock ring.
04-17-22, 07:01 PM
#4
Banned.
Join Date: Jul 2009
Location: PAZ
Posts: 12,294
Mentioned: 255 Post(s)
Tagged: 0 Thread(s)
Quoted: 2588 Post(s)
Liked 4,824 Times
in
1,709 Posts
Yeah, no - the pics of Pastobob's fully-disassembled unit I understand. I guess you mean you were able to remove the lockring on the back (hub side) of the freewheel, but not the front (dropout side)? I guess that'd work to gain access to the pawls and one set of bearings if the other lockring wasn't coming off. Never heard of this approach, but whatever works!
DD
DD
04-17-22, 07:03 PM
#5
WGB
Thread Starter
Join Date: Jul 2017
Location: Niagara Region
Posts: 2,917
Bikes: Panasonic PT-4500
Mentioned: 46 Post(s)
Tagged: 0 Thread(s)
Quoted: 1800 Post(s)
Liked 2,334 Times
in
1,378 Posts
That's the problem! It doesn't work. I couldn't fully access the dropout side bearings
04-18-22, 04:25 AM
#6
Senior Member
Join Date: Nov 2013
Location: Near Pottstown, PA: 30 miles NW of Philadelphia
Posts: 2,186
Bikes: 2 Trek Mtn, Cannondale R600 road, 6 vintage road bikes
Mentioned: 83 Post(s)
Tagged: 0 Thread(s)
Quoted: 472 Post(s)
Liked 1,028 Times
in
404 Posts
Question 1) Should I use a freewheel vise tool do do these task? If so, much like how Shimano/Suntour/Regina required different freewheel tools to remove them from a hub do you need a brand specific vise tool for each brand? or does a single vise work for all/most freewheels
Question 2: I see examples posted of freewheels having their cogs removed using two chain whips. Should I have used the whips instead of a punch and if I used the two chain whip method will that loosen the cogs?
@pastorbobnlnh - any thoughts??
Question 1) keep in mind that most (all?) lock rings (the threaded ring inside the small cog, just outside the small ball track) are threaded left hand. Righty loosely lefty tightly. Some of them, by now, are VERY tight and even have damaged threads making them very hard to unscrew and remove. If you are holding the FW with a FW vice (IOW holding the cogs, not the center body) the impacts can transmit shock to the pawls which I�d rather not do. Rather I made a FW holder from a scrap steel R hub. Mounted that hub in a 2x4 wood block which I clamp in my bench vice. I can get the lock ring off then remove the FW core, at times using the tool I needed to get the FW off the wheel. I�d rather not use a �FW vice� for that job.
Question 2). Even worse than the lock rings, many of those small dogs have been tightened onto the FW body for decades (just riding the bike tightens them more and more) and they can be WICKED tight. If I used only two chain whips I would have failed several times. Somewhere else on here, I�ve posted photos of the block I made for holding a FW - 2x6 block with 5 steel screws that engage the large cog in 5 place around the outside. This and the FW are clamped in the bench vice which is bolted to the building. I�ve also made �the mother of all chain whips�, about 2 feet long of 1/4� plate steel, reinforced, with a BMX SS chain. Even with that trying to rotate my whole shop building on its foundation with the whip, I�ve struggled with some small cogs. But it has prevailed each time. With that much force needed, I like having the rest locked down rather than trying to hold two chain whips. But, then, I am a pretty skinny old fart.
Oh yeah, before you start, drool some light or penetrating oil into the thread junction for a few days. A heat gun on the cog helps too.
I look forward to Bob�s reply.
04-18-22, 06:35 AM
#7
Freewheel Medic

Join Date: Oct 2005
Location: An Island on the Coast of GA!
Posts: 12,885
Bikes: Snazzy* Schwinns, Classy Cannondales & a Super Pro Aero Lotus (* Ed.)
Mentioned: 140 Post(s)
Tagged: 0 Thread(s)
Quoted: 1453 Post(s)
Liked 2,196 Times
in
963 Posts
Unfortunately, I'm traveling at the moment and don't have a connection except through my phone, so this will be brief for now.
The old Regina Corsa, Atom, Everest, etc., to name a few, have the hardest sprockets to unthread from the body--- which needs to occur before the two body halves are disassembled. In the case of the Regina and Atom five speeds, the three smallest sprockets thread off from the top with regular threads using the Bicycle Research Tool pictured.
Once the middle sprocket is removed, the threads on the body at that point need to be threaded into the VAR 368 tool pictured. The freewheel is flipped upside-down in the vise with the VAR tool clamped in the vise. The remaining two largest sprockets thread off in reverse. BUT--- there are two problems:
First: Using the Bicycle Research Tool, tightens the two largest as you remove the three smallest.
Second: The VAR tool has very soft steel and the threads easily strip, thus ruining the tool. I've found that aluminum foil between the threads can help--- but not always.
WGB, you were very fortunate that the pawls did not drop out of place!
My guess as to why the lock ring can't be removed in such instances is that the two-notch freewheel removal tool deforms the threaded neck on the inner body out of round when stubborn freewheels are successfully removed from the hub.
Hope this helps until I have a better connection.
__________________
Bob
Enjoying the GA coast all year long!
Thanks for visiting my website: www.freewheelspa.com
Bob
Enjoying the GA coast all year long!
Thanks for visiting my website: www.freewheelspa.com
04-18-22, 08:19 AM
#8
WGB
Thread Starter
Join Date: Jul 2017
Location: Niagara Region
Posts: 2,917
Bikes: Panasonic PT-4500
Mentioned: 46 Post(s)
Tagged: 0 Thread(s)
Quoted: 1800 Post(s)
Liked 2,334 Times
in
1,378 Posts
Thank you all.
As for tight locked cogs, I bent a cheap eBay no-brand chain whip trying to unthread the cogs. I had planned to make a stronger set of whips anyway out of old chain and bar stock.
@Prowler "Rather I made a FW holder from a scrap steel R hub. Mounted that hub in a 2x4 wood block which I clamp in my bench vice". If you have a photo I'd appreciate seeing it, at $100 (if I"m lucky) for an FW vise a cheaper alternative isn't a bad idea.
@pastorbobnlnh "you were very fortunate that the pawls did not drop out of place", Apparently, holding pawls in place on an old freewheel is the role of rust, which this one had. One pawl did fall out. But I saw it and saved it.
04-18-22, 09:45 AM
#9

Senior Member
Join Date: Jun 2006
Posts: 20,305
Mentioned: 130 Post(s)
Tagged: 0 Thread(s)
Quoted: 3464 Post(s)
Liked 2,831 Times
in
1,997 Posts
be aware that as Pastorbob mentions, some of the position "3" cogs, the inboard two on most regina bodies of the classic era, can "cup" from the force in an attempt to remove them.
I bought some regina freewheels where the last cog was so deformed, the seller denying the condition.
So it goes.
reference potential replacements before you attempt removal.
the freewheel service can be done without removal of those cogs.
A problem laying in wait for later, yes.
I bought some regina freewheels where the last cog was so deformed, the seller denying the condition.
So it goes.
reference potential replacements before you attempt removal.
the freewheel service can be done without removal of those cogs.
A problem laying in wait for later, yes.
04-18-22, 10:13 AM
#10
Freewheel Medic
Join Date: Oct 2005
Location: An Island on the Coast of GA!
Posts: 12,885
Bikes: Snazzy* Schwinns, Classy Cannondales & a Super Pro Aero Lotus (* Ed.)
Mentioned: 140 Post(s)
Tagged: 0 Thread(s)
Quoted: 1453 Post(s)
Liked 2,196 Times
in
963 Posts

__________________
Bob
Enjoying the GA coast all year long!
Thanks for visiting my website: www.freewheelspa.com
Bob
Enjoying the GA coast all year long!
Thanks for visiting my website: www.freewheelspa.com
04-18-22, 10:20 AM
#11
WGB
Thread Starter
Join Date: Jul 2017
Location: Niagara Region
Posts: 2,917
Bikes: Panasonic PT-4500
Mentioned: 46 Post(s)
Tagged: 0 Thread(s)
Quoted: 1800 Post(s)
Liked 2,334 Times
in
1,378 Posts
,^^^^^^^^^^
I meant that a single pawl remained in place, held there by rust when I lifted the cog block off of the hub because the grease was no longer there. It's partner pawl fell out but I didn't lose it and it's now back in place.
The little springs are there as well where they should be....
I meant that a single pawl remained in place, held there by rust when I lifted the cog block off of the hub because the grease was no longer there. It's partner pawl fell out but I didn't lose it and it's now back in place.
The little springs are there as well where they should be....
Likes For WGB:
04-19-22, 06:55 AM
#12
Freewheel Medic
Join Date: Oct 2005
Location: An Island on the Coast of GA!
Posts: 12,885
Bikes: Snazzy* Schwinns, Classy Cannondales & a Super Pro Aero Lotus (* Ed.)
Mentioned: 140 Post(s)
Tagged: 0 Thread(s)
Quoted: 1453 Post(s)
Liked 2,196 Times
in
963 Posts
,^^^^^^^^^^
I meant that a single pawl remained in place, held there by rust when I lifted the cog block off of the hub because the grease was no longer there. It's partner pawl fell out but I didn't lose it and it's now back in place.
The little springs are there as well where they should be....
I meant that a single pawl remained in place, held there by rust when I lifted the cog block off of the hub because the grease was no longer there. It's partner pawl fell out but I didn't lose it and it's now back in place.
The little springs are there as well where they should be....
These Regina models are the only ones I use grease on the pawl pivot to help hold the pawl in place. The groove and hole which carries them are about as sloppy as ever machined. Even the Atom clones have better machining for the pivots.
Removing all the threaded sprockets is challenging and problematic, as Prowler mentions above. Regina did make a special tool to hold this model, which Prowler sourced for me from a friend of his in PA. However, since owning the tool, no one has sent me this model (or the Atom clone) to let me service.
IMO, the ORO Regina freewheels are great "lookers," especially when the sprockets are removed and polished. However, I'd find a different brand to ride.
__________________
Bob
Enjoying the GA coast all year long!
Thanks for visiting my website: www.freewheelspa.com
Bob
Enjoying the GA coast all year long!
Thanks for visiting my website: www.freewheelspa.com
04-19-22, 09:54 AM
#13

Senior Member
Join Date: Dec 2005
Posts: 17,159
Mentioned: 481 Post(s)
Tagged: 0 Thread(s)
Quoted: 3811 Post(s)
Liked 6,707 Times
in
2,613 Posts
This thread is reminding my why I've never had a desire to take apart a freewheel!
04-19-22, 11:07 AM
#14
WGB
Thread Starter
Join Date: Jul 2017
Location: Niagara Region
Posts: 2,917
Bikes: Panasonic PT-4500
Mentioned: 46 Post(s)
Tagged: 0 Thread(s)
Quoted: 1800 Post(s)
Liked 2,334 Times
in
1,378 Posts
pastorbobnlnh
It had the little folded brass springs.The one pawl was "held" in place by rust.
I only opened it up because the clicking sound got on my nerves when I was dialing in the rear derailleur.
I first tried the soak in oil for a few days trick but it still sounded wrong. I decided to open it up because it was a sunny day and I could sit in the sun. I was shocked by the state of the inside. I have always figured with a dry freewheel, just add oil and ride it and the oil will seep among the bearings and pawls and all will be good. Apparently I was very very wrong. I guess ignorance was bliss.....
I used to reload ammo and believe I still have a case tumbler filled with media and next time I will see how that polishes cogs.
Last edited by WGB; 04-19-22 at 11:18 AM.
04-19-22, 03:59 PM
#15
Senior Member
Join Date: Nov 2013
Location: Near Pottstown, PA: 30 miles NW of Philadelphia
Posts: 2,186
Bikes: 2 Trek Mtn, Cannondale R600 road, 6 vintage road bikes
Mentioned: 83 Post(s)
Tagged: 0 Thread(s)
Quoted: 472 Post(s)
Liked 1,028 Times
in
404 Posts
@Prowler "Rather I made a FW holder from a scrap steel R hub. Mounted that hub in a 2x4 wood block which I clamp in my bench vice". If you have a photo I'd appreciate seeing it, at $100 (if I"m lucky) for an FW vise a cheaper alternative isn't a bad idea.

BTW the SS BMX chain is much tougher than the 8spd chains we use on the bikes. Better for a whip.
Likes For Prowler:
04-19-22, 05:46 PM
#16
WGB
Thread Starter
Join Date: Jul 2017
Location: Niagara Region
Posts: 2,917
Bikes: Panasonic PT-4500
Mentioned: 46 Post(s)
Tagged: 0 Thread(s)
Quoted: 1800 Post(s)
Liked 2,334 Times
in
1,378 Posts
Very nice!
@Prowler - One last question. Did you just saw off the hub? I'm guessing so but but wanted to confirm that the axle wasn't still there drilled through the block for extra strength
@Prowler - One last question. Did you just saw off the hub? I'm guessing so but but wanted to confirm that the axle wasn't still there drilled through the block for extra strength
04-19-22, 06:09 PM
#17
se�or miembro

Join Date: Dec 2018
Location: Pac NW
Posts: 6,624
Bikes: '70s - '80s Campagnolo
Mentioned: 92 Post(s)
Tagged: 0 Thread(s)
Quoted: 3888 Post(s)
Liked 6,488 Times
in
3,211 Posts
04-19-22, 06:12 PM
#18
Full Member
Join Date: Dec 2008
Location: Denver Colorado
Posts: 271
Bikes: 70's Nuovo Record Jeunet Franche Compte, '88 105 Trek 1200, '85 Victory Bianchi Vittoria, '89 Exage Bianchi Strada LX, '11 Shimano Masi Partenza
Mentioned: 4 Post(s)
Tagged: 0 Thread(s)
Quoted: 109 Post(s)
Liked 19 Times
in
15 Posts
First rule of freewheel maintenance, never use a punch. As with all bicycle maintenance, always use the proper tools lest you ruin something. Also, the obvious stuff like do it on a towel, use sticky grease for ball bearing retention, and light oil on the pawls and youll be fine.
__________________
70's Nuovo Record Jeunet Franche Compte, '88 105 Trek 1200, '85 Victory Bianchi Vittoria, '89 Exage Bianchi Strada LX, & '11 Shimano Masi Partenza
70's Nuovo Record Jeunet Franche Compte, '88 105 Trek 1200, '85 Victory Bianchi Vittoria, '89 Exage Bianchi Strada LX, & '11 Shimano Masi Partenza

 04-19-22, 07:16 PM
#20
Senior Member
Join Date: Nov 2013
Location: Near Pottstown, PA: 30 miles NW of Philadelphia
Posts: 2,186
Bikes: 2 Trek Mtn, Cannondale R600 road, 6 vintage road bikes
Mentioned: 83 Post(s)
Tagged: 0 Thread(s)
Quoted: 472 Post(s)
Liked 1,028 Times
in
404 Posts
Very nice!
@Prowler - One last question. Did you just saw off the hub? I'm guessing so but but wanted to confirm that the axle wasn't still there drilled through the block for extra strength
@Prowler - One last question. Did you just saw off the hub? I'm guessing so but but wanted to confirm that the axle wasn't still there drilled through the block for extra strength
04-19-22, 08:16 PM
#21
se�or miembro
Join Date: Dec 2018
Location: Pac NW
Posts: 6,624
Bikes: '70s - '80s Campagnolo
Mentioned: 92 Post(s)
Tagged: 0 Thread(s)
Quoted: 3888 Post(s)
Liked 6,488 Times
in
3,211 Posts
Likes For SurferRosa:
04-19-22, 08:41 PM
#22
Senior Member
Join Date: Apr 2009
Posts: 940
Mentioned: 5 Post(s)
Tagged: 0 Thread(s)
Quoted: 380 Post(s)
Liked 541 Times
in
286 Posts
I know that this is heretical but I avoid all of these problems by binning the junk freewheels and using something of some quality. A modest expense that is more than compensated.
Likes For Steel Charlie:
04-19-22, 09:06 PM
#23
WGB
Thread Starter
Join Date: Jul 2017
Location: Niagara Region
Posts: 2,917
Bikes: Panasonic PT-4500
Mentioned: 46 Post(s)
Tagged: 0 Thread(s)
Quoted: 1800 Post(s)
Liked 2,334 Times
in
1,378 Posts
I get disposing of junk. My wish is simply to be able to say "I can rebuild that if I want to".
I have some very nice freewheels (Regina/Maillard etc). I'd like to rebuild the better ones. I'd rather learn on the rougher ones than those.
As an example of what recently got my attention. I was trying to source an accushift freewheel to fit in with an accushift group. Accushift rear derailleurs don't seem to like non-accushift freewheels, especially for indexed shifting. NOS accushift fw's are around $100+! That's more than an NOS Dura Ace. I see used ones for $20 all of the time. Why not rescue a used one and rebuild it and save a few bucks?
04-19-22, 09:18 PM
#24
Ride, Wrench, Swap, Race

Join Date: Jan 2010
Location: Northern California
Posts: 9,194
Bikes: Cheltenham-Pedersen racer, Boulder F/S Paris-Roubaix, Varsity racer, '52 Christophe, '62 Continental, '92 Merckx, '75 Limongi, '76 Presto, '72 Gitane SC, '71 Schwinn SS, etc.
Mentioned: 132 Post(s)
Tagged: 0 Thread(s)
Quoted: 1565 Post(s)
Liked 1,296 Times
in
866 Posts
Beware though, that the "locking cone" on many cheap modern freewheels may actually bend if you put a hammer and punch to it (as I've found out the hard way).
With modern ones, I alternate using both divots in the locking cone and with a more modest level of impact to loosen (and use Loctite on the threads during reassembly).
I've had to remove the locking cone on some Sunrace freewheels in order to sand away some of the cone's thickness (so as to eliminate excessive free-play in the bearings). Getting the Sunrace cog lockring loose requires home-made tooling (in the form of a modified chain whip handle) or adding external flats using a file.
Sanding away too much metal from the cone is of course irreversible and will leave the bearings tight, but I've used this same approach successfully on many lower-tier Fulcrum freehub bodies (so as to save the $90 cost of a new body).
Last edited by dddd; 04-19-22 at 09:22 PM.
Likes For dddd:
04-20-22, 07:08 AM
#25
Freewheel Medic
Join Date: Oct 2005
Location: An Island on the Coast of GA!
Posts: 12,885
Bikes: Snazzy* Schwinns, Classy Cannondales & a Super Pro Aero Lotus (* Ed.)
Mentioned: 140 Post(s)
Tagged: 0 Thread(s)
Quoted: 1453 Post(s)
Liked 2,196 Times
in
963 Posts

Come now Neal! Where's your sense of adventure and courage?
First rule of freewheel maintenance, never use a punch. As with all bicycle maintenance, always use the proper tools lest you ruin something. Also, the obvious stuff like do it on a towel, use sticky grease for ball bearing retention, and light oil on the pawls and youll be fine.
This applies to everyone--- DO NOT THROW AWAY vintage freewheels.
That's my approach as well.
Beware though, that the "locking cone" on many cheap modern freewheels may actually bend if you put a hammer and punch to it (as I've found out the hard way).
With modern ones, I alternate using both divots in the locking cone and with a more modest level of impact to loosen (and use Loctite on the threads during reassembly).
I've had to remove the locking cone on some Sunrace freewheels in order to sand away some of the cone's thickness (so as to eliminate excessive free-play in the bearings). Getting the Sunrace cog lockring loose requires home-made tooling (in the form of a modified chain whip handle) or adding external flats using a file.
Sanding away too much metal from the cone is of course irreversible and will leave the bearings tight, but I've used this same approach successfully on many lower-tier Fulcrum freehub bodies (so as to save the $90 cost of a new body).
__________________
Bob
Enjoying the GA coast all year long!
Thanks for visiting my website: www.freewheelspa.com
Bob
Enjoying the GA coast all year long!
Thanks for visiting my website: www.freewheelspa.com
Likes For pastorbobnlnh: