


How to remove downtube shifters prior to frame painting
 12-29-23, 04:19 PM
#1
Junior Member
Thread Starter
How to remove downtube shifters prior to frame painting
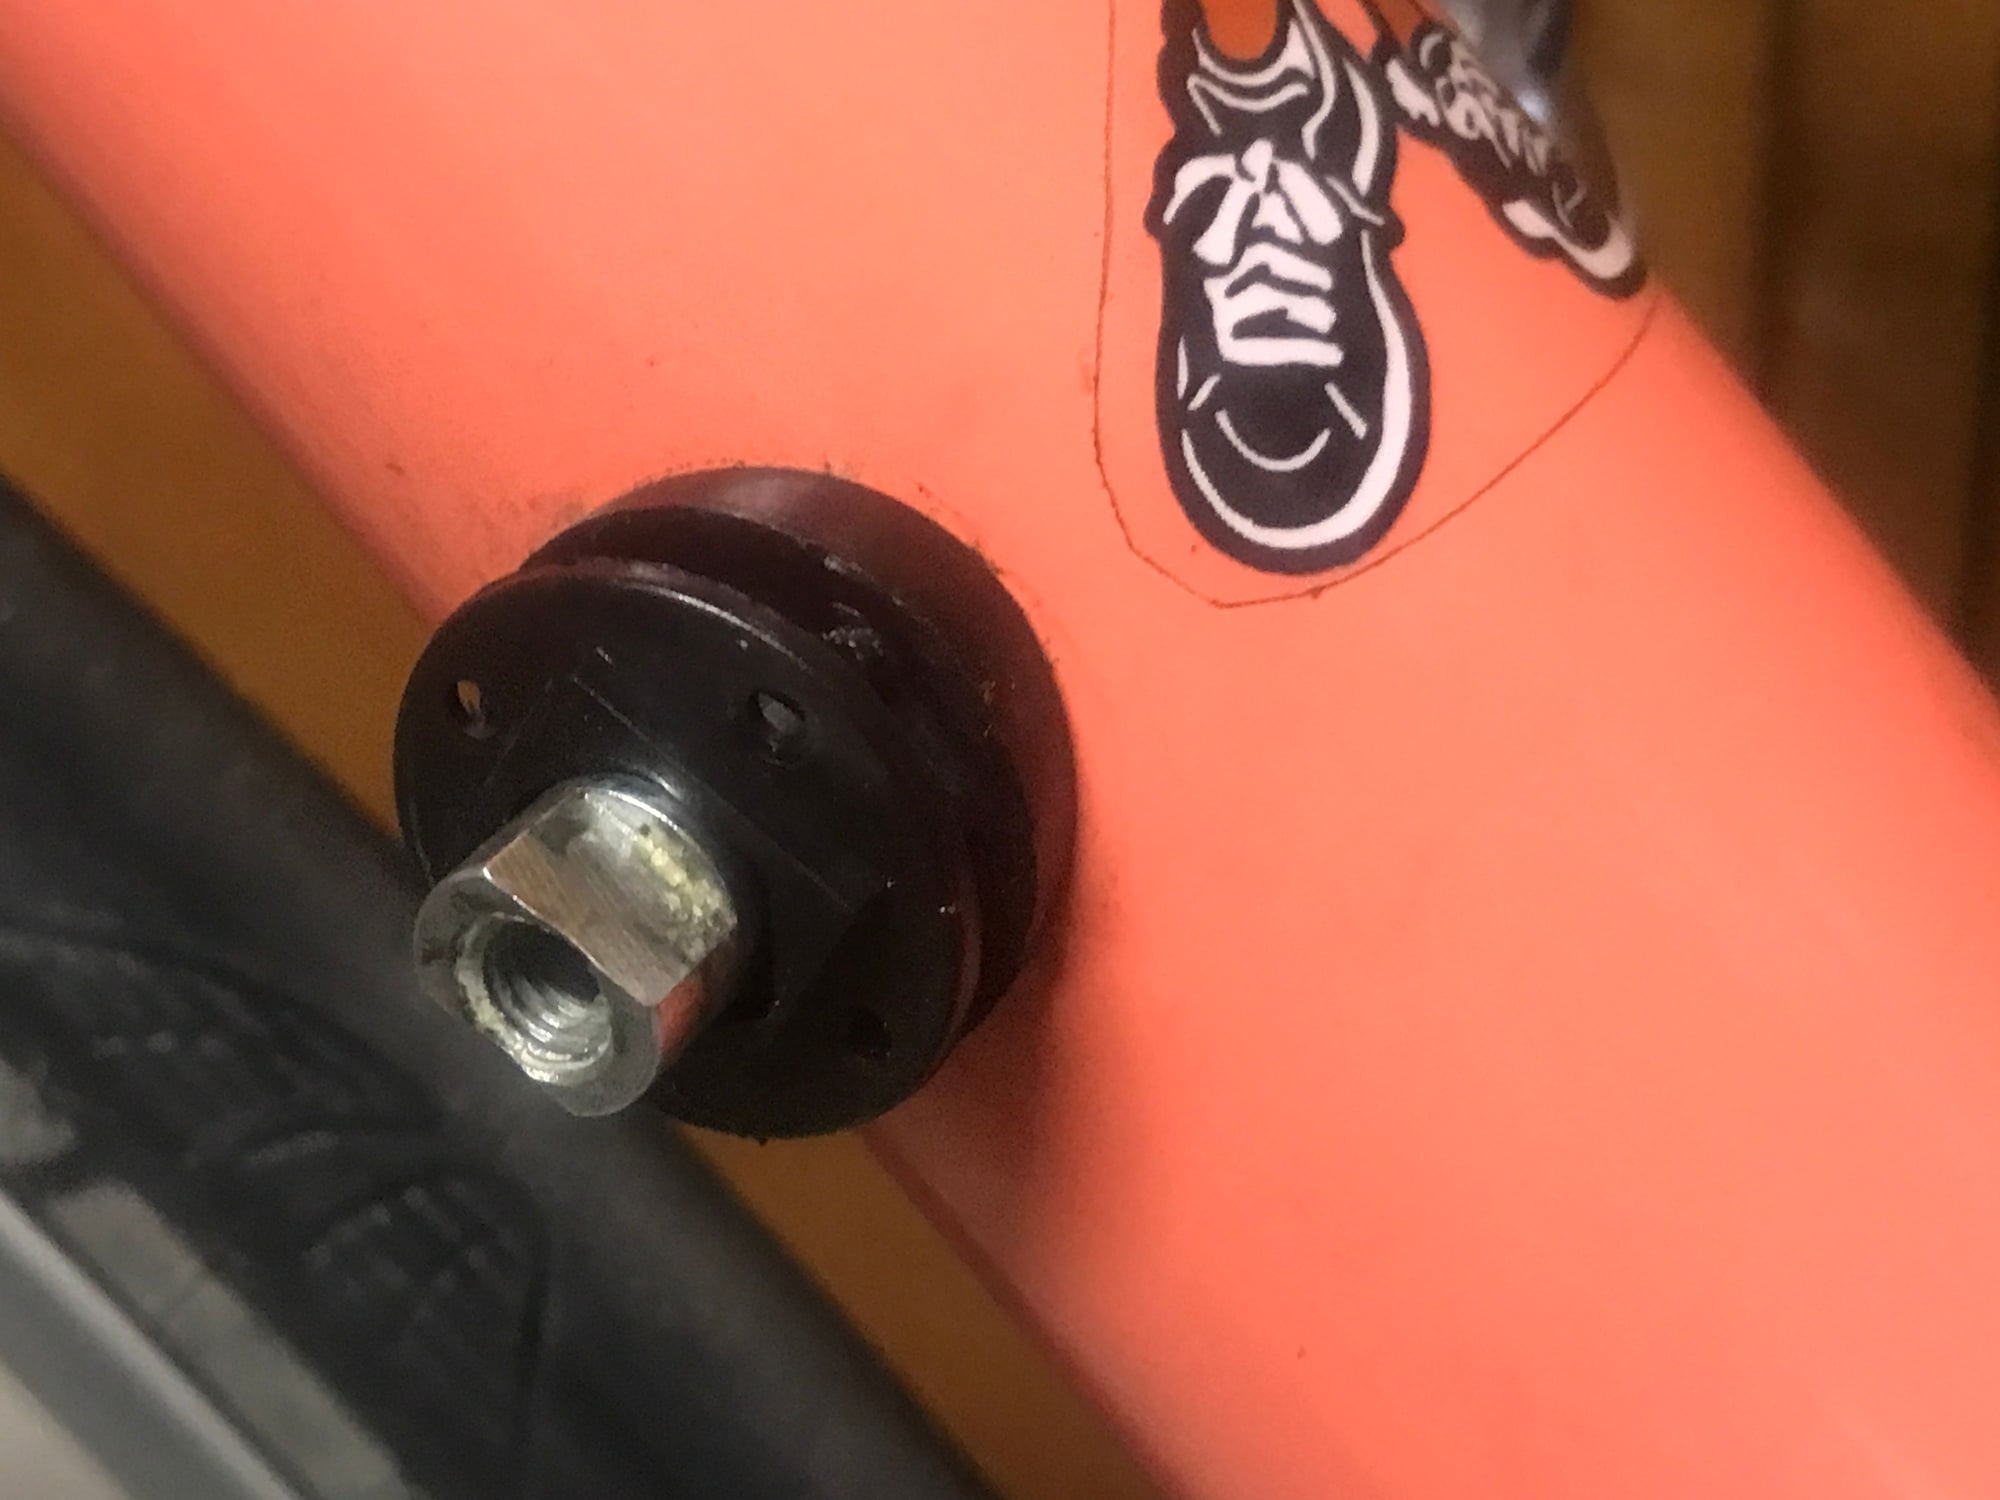
Older Cannondale frame. Have removed everything from the frame except:
Any advice on that?
What about the funky plastic pump peg? Cable guides? We removed one, which seemed like it was held in place with a couple of plastic pegs that were molded in. Are there replacements for those? For the pump peg? I assume not, but hoping it doesn't hurt to ask :-)

- pump peg
- top tube cable housing guides
- maybe some parts of the downtube shifters??
Any advice on that?
What about the funky plastic pump peg? Cable guides? We removed one, which seemed like it was held in place with a couple of plastic pegs that were molded in. Are there replacements for those? For the pump peg? I assume not, but hoping it doesn't hurt to ask :-)
 12-29-23, 04:43 PM
#2

Making up the numbers

Join Date: Jun 2022
Posts: 279
Mentioned: 3 Post(s)
Tagged: 0 Thread(s)
Quoted: 107 Post(s)
Liked 502 Times
in
161 Posts
Shine a light into the boss and look for a bolt or screw head.
Vitus frames of a similar era used bosses screwed and glued together. They fairly often came unstuck, more so after the introduction of Shimano Indexed Shifting, with the indexed down tube shifters perhaps causing more load to the boss.
If the Cannondale bosses are screwed I’d proceed slowly and carefully - once the bolt/screw head is wrecked drilling them out would probably become necessary…
__________________
Nothing quite says wall hanger like drillium toe straps
Nothing quite says wall hanger like drillium toe straps
12-29-23, 08:32 PM
#3
Senior Member
Join Date: Apr 2011
Posts: 7,067
Mentioned: 41 Post(s)
Tagged: 0 Thread(s)
Quoted: 4409 Post(s)
Liked 1,566 Times
in
1,028 Posts
I would mask the shaft and just paint the rest to match the frame.
There's a good chance these are screwed and glued and not meant to be removed and put back on. They are getting hard to find as replacements.
There's a good chance these are screwed and glued and not meant to be removed and put back on. They are getting hard to find as replacements.
Last edited by Kontact; 12-29-23 at 08:37 PM.
Likes For Kontact:
12-29-23, 08:56 PM
#4
aka: Dr. Cannondale
Join Date: Jul 2009
Posts: 7,735
Mentioned: 234 Post(s)
Tagged: 0 Thread(s)
Quoted: 2155 Post(s)
Liked 3,406 Times
in
1,206 Posts
They are meant to be removed for painting.
Use an X-Acto knife to carefully pry off the thinner outside piece- note orientation, take a camera picture Then unscrew the threaded metal part- lefty loosy. The rest just comes out. Keep all small,parts safely bagged for future use.
The pump peg unscrews, left loosy.
The top tube cable guide pegs should not be removed until the fork and headset are off. Then carefully press them down into the top tube using an awl and remove them by shaking the frame with the head tube down until they fall out onto the newspaper that you have thoughtfully placed on the floor so as not to lose them.
The cable hanger can be removed but sadly not replaced.
__________________
Hard at work in the Secret Underground Laboratory...
Hard at work in the Secret Underground Laboratory...
Likes For rccardr:
12-29-23, 09:27 PM
#5
Senior Member

Join Date: Jan 2015
Location: Los Angeles
Posts: 4,707
Bikes: 82 Medici, 2011 Richard Sachs, 2011 Milwaukee Road
Mentioned: 55 Post(s)
Tagged: 0 Thread(s)
Quoted: 1952 Post(s)
Liked 2,013 Times
in
1,112 Posts
Coral is not Pink
__________________
I don't do: disks, tubeless, e-shifting, or bead head nymphs.
I don't do: disks, tubeless, e-shifting, or bead head nymphs.
Likes For Classtime:
12-30-23, 03:18 PM
#6

Super Moderator

Join Date: Jul 2004
Location: Ffld Cnty Connecticut
Posts: 21,843
Bikes: Old Steelies I made, Old Cannondales
Mentioned: 12 Post(s)
Tagged: 0 Thread(s)
Quoted: 1173 Post(s)
Liked 927 Times
in
612 Posts
Correct.
But other versions were not meant to be removed, so the below advice applies to this frame, not necessarily others.
But other versions were not meant to be removed, so the below advice applies to this frame, not necessarily others.
They are meant to be removed for painting.
Use an X-Acto knife to carefully pry off the thinner outside piece- note orientation, take a camera picture Then unscrew the threaded metal part- lefty loosy. The rest just comes out. Keep all small,parts safely bagged for future use.
Use an X-Acto knife to carefully pry off the thinner outside piece- note orientation, take a camera picture Then unscrew the threaded metal part- lefty loosy. The rest just comes out. Keep all small,parts safely bagged for future use.
__________________
Bikes: Old steel race bikes, old Cannondale race bikes, less old Cannondale race bike, crappy old mtn bike.
FYI: https://www.bikeforums.net/forum-sugg...ad-please.html
Bikes: Old steel race bikes, old Cannondale race bikes, less old Cannondale race bike, crappy old mtn bike.
FYI: https://www.bikeforums.net/forum-sugg...ad-please.html
12-31-23, 01:58 PM
#7
Senior Member
Join Date: Jan 2004
Location: Madison, WI USA
Posts: 6,157
Mentioned: 50 Post(s)
Tagged: 0 Thread(s)
Quoted: 2364 Post(s)
Liked 1,750 Times
in
1,192 Posts
If you happen to break or lose any of the top tube cable guides, there's folks out there 3D-printing replacements.
12-31-23, 03:47 PM
#8
Senior Member

Join Date: Jun 2006
Location: NW Burbs, Chicago
Posts: 12,055
Mentioned: 201 Post(s)
Tagged: 0 Thread(s)
Quoted: 3015 Post(s)
Liked 3,804 Times
in
1,408 Posts
And Bob's yer uncle.
Likes For iab:
12-31-23, 05:49 PM
#9
Full Member
Join Date: Apr 2018
Location: NYC
Posts: 383
Bikes: '72 Raleigh Super Course; '90 Cannondale ST1000; '98/99 Cannondale T700; 2002 Cannondale CAAD5 R700; 2022 Cannondale Topstone 2L
Mentioned: 6 Post(s)
Tagged: 0 Thread(s)
Quoted: 166 Post(s)
Liked 348 Times
in
156 Posts
01-03-24, 12:14 PM
#10
Senior Member

Join Date: Apr 2007
Location: Thunder Bay, Ontario, Canada - burrrrr!
Posts: 11,674
Bikes: 1958 Rabeneick 120D, 1968 Legnano Gran Premio, 196? Torpado Professional, 2000 Marinoni Piuma
Mentioned: 210 Post(s)
Tagged: 0 Thread(s)
Quoted: 1372 Post(s)
Likes: 0
Liked 1,752 Times
in
939 Posts
The thin blade and careful prying will get the job done. Been there many times. Just be patient and go slow. Sooner or later, they will release.
__________________
"98% of the bikes I buy are projects".
"98% of the bikes I buy are projects".
