


hardwood for dimpling?
 01-08-23, 08:43 AM
#1

Senior Member
Thread Starter
Join Date: Jun 2021
Posts: 1,683
Bikes: '38 Schwinn New World, ’69 Peugeot PX-10, '72 Peugeot PX-10, ‘7? Valgan, '78 Raleigh Comp GS, ’79 Holdsworth Pro, ’80 Peugeot TH-8 tandem, '87 Trek 400T, ‘7? Raleigh Sports, ‘7? Raleigh Superbe, ‘6? Hercules
Mentioned: 16 Post(s)
Tagged: 0 Thread(s)
Quoted: 761 Post(s)
Liked 1,563 Times
in
757 Posts
hardwood for dimpling?
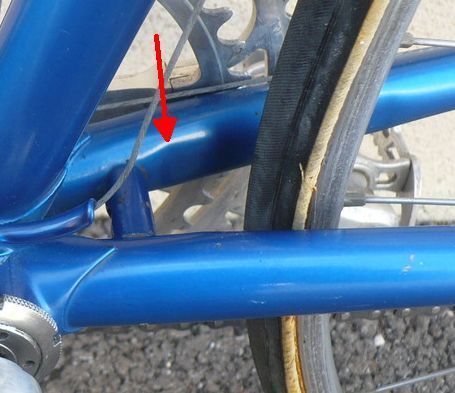
I have a couple frames I’d like to dimple the chain-stays on a wee bit for more tire clearance.* I don’t currently have access to welding or metal-working tools, etc, but I do have access to wood-working stuff. My thinking is to rig something up with a c-clamp with a long bit of wood drilled/formed to cradle the outer side of the CS and a piece of formed hard-wood, maybe a section of a halved large-ish oak dowel to do the dimpling. Question I’m wondering about is, should a piece of hardwood be sufficiently ‘hard’ to do the job? Most of the jigs I’ve seen in online photos/videos for this are using a piece of metal to do the dimpling.. It does seem to me that a hardwood should do the job.
*it would be nice if this doesn’t turn into a debate about how dimpling the stays is a crime against humanity, the frame is going to catastrophically fail, I should just buy a different bike, etc, etc, etc. These frames are not special, I understand the ‘risks’..
*it would be nice if this doesn’t turn into a debate about how dimpling the stays is a crime against humanity, the frame is going to catastrophically fail, I should just buy a different bike, etc, etc, etc. These frames are not special, I understand the ‘risks’..

Likes For ehcoplex:
01-08-23, 09:07 AM
#2
Senior Member

Join Date: Aug 2015
Posts: 3,299
Mentioned: 39 Post(s)
Tagged: 0 Thread(s)
Quoted: 1143 Post(s)
Liked 1,740 Times
in
961 Posts
What bike is going to get this defilement? The horror, Just kidding.
Wood should be just fine, less likely to scratch.
I have not done that task. I think if you have a stop on your clamp or a vise grip so it repeats identical clamping width, could be helpful.
Wood should be just fine, less likely to scratch.
I have not done that task. I think if you have a stop on your clamp or a vise grip so it repeats identical clamping width, could be helpful.
Likes For Mr. 66:
01-08-23, 09:14 AM
#3
Senior Member
Join Date: Oct 2022
Posts: 1,378
Bikes: a couple
Mentioned: 15 Post(s)
Tagged: 0 Thread(s)
Quoted: 563 Post(s)
Liked 863 Times
in
456 Posts
I have a couple frames I’d like to dimple the chain-stays on a wee bit for more tire clearance.* I don’t currently have access to welding or metal-working tools, etc, but I do have access to wood-working stuff. My thinking is to rig something up with a c-clamp with a long bit of wood drilled/formed to cradle the outer side of the CS and a piece of formed hard-wood, maybe a section of a halved large-ish oak dowel to do the dimpling. Question I’m wondering about is, should a piece of hardwood be sufficiently ‘hard’ to do the job? Most of the jigs I’ve seen in online photos/videos for this are using a piece of metal to do the dimpling.. It does seem to me that a hardwood should do the job.
*it would be nice if this doesn’t turn into a debate about how dimpling the stays is a crime against humanity, the frame is going to catastrophically fail, I should just buy a different bike, etc, etc, etc. These frames are not special, I understand the ‘risks’..
*it would be nice if this doesn’t turn into a debate about how dimpling the stays is a crime against humanity, the frame is going to catastrophically fail, I should just buy a different bike, etc, etc, etc. These frames are not special, I understand the ‘risks’..
Likes For Schweinhund:
01-08-23, 09:21 AM
#4

Senior Member
Join Date: Dec 2005
Posts: 17,158
Mentioned: 481 Post(s)
Tagged: 0 Thread(s)
Quoted: 3810 Post(s)
Liked 6,699 Times
in
2,611 Posts
I've used a block of oak on the outside and a screwdriver bit to create the dimple, all set up in my bench vise. It was a bit fiddly to set up and was successful because the chainstays were already somewhat flattened (rounded stays result in the bit easily slipping).


Likes For nlerner:
01-08-23, 10:17 AM
#5
Senior Member
Thread Starter
Join Date: Jun 2021
Posts: 1,683
Bikes: '38 Schwinn New World, ’69 Peugeot PX-10, '72 Peugeot PX-10, ‘7? Valgan, '78 Raleigh Comp GS, ’79 Holdsworth Pro, ’80 Peugeot TH-8 tandem, '87 Trek 400T, ‘7? Raleigh Sports, ‘7? Raleigh Superbe, ‘6? Hercules
Mentioned: 16 Post(s)
Tagged: 0 Thread(s)
Quoted: 761 Post(s)
Liked 1,563 Times
in
757 Posts
01-08-23, 01:21 PM
#6
Junior Member

I did this with a large pipe a number of years ago on an old steel racing frame. Simply hammered the pipe in from the rear toward the bb and then made sure the rear end was still aligned to the desired spacing. I got enough space to run cyclocross type knobbies on a fairly tight road frame with no problems.Canti studs were also brazed on. I used this bike off road for a few years- it was the fastest mountain bike on the trails!
Obviously this could compromise the chain stay brace joints (or whatever that is called down there) or even the bb to stay joint (if there is no brace), I didn't have any problems, and was more than happy with my off-road rocket.
Obviously this could compromise the chain stay brace joints (or whatever that is called down there) or even the bb to stay joint (if there is no brace), I didn't have any problems, and was more than happy with my off-road rocket.
Likes For robobike316:
01-08-23, 01:48 PM
#7
working on my sandal tan

Join Date: Aug 2011
Location: CID
Posts: 22,629
Bikes: 1991 Bianchi Eros, 1964 Armstrong, 1988 Diamondback Ascent, 1988 Bianchi Premio, 1987 Bianchi Sport SX, 1980s Raleigh mixte (hers), All-City Space Horse (hers)
Mentioned: 98 Post(s)
Tagged: 0 Thread(s)
Quoted: 3871 Post(s)
Liked 2,568 Times
in
1,579 Posts
01-08-23, 04:14 PM
#8
Senior Member
Thread Starter
Join Date: Jun 2021
Posts: 1,683
Bikes: '38 Schwinn New World, ’69 Peugeot PX-10, '72 Peugeot PX-10, ‘7? Valgan, '78 Raleigh Comp GS, ’79 Holdsworth Pro, ’80 Peugeot TH-8 tandem, '87 Trek 400T, ‘7? Raleigh Sports, ‘7? Raleigh Superbe, ‘6? Hercules
Mentioned: 16 Post(s)
Tagged: 0 Thread(s)
Quoted: 761 Post(s)
Liked 1,563 Times
in
757 Posts
Likes For ehcoplex:
01-08-23, 07:01 PM
#9
Senior Member
Thread Starter
Join Date: Jun 2021
Posts: 1,683
Bikes: '38 Schwinn New World, ’69 Peugeot PX-10, '72 Peugeot PX-10, ‘7? Valgan, '78 Raleigh Comp GS, ’79 Holdsworth Pro, ’80 Peugeot TH-8 tandem, '87 Trek 400T, ‘7? Raleigh Sports, ‘7? Raleigh Superbe, ‘6? Hercules
Mentioned: 16 Post(s)
Tagged: 0 Thread(s)
Quoted: 761 Post(s)
Liked 1,563 Times
in
757 Posts
I did this with a large pipe a number of years ago on an old steel racing frame. Simply hammered the pipe in from the rear toward the bb and then made sure the rear end was still aligned to the desired spacing. I got enough space to run cyclocross type knobbies on a fairly tight road frame with no problems.Canti studs were also brazed on. I used this bike off road for a few years- it was the fastest mountain bike on the trails!
Obviously this could compromise the chain stay brace joints (or whatever that is called down there) or even the bb to stay joint (if there is no brace), I didn't have any problems, and was more than happy with my off-road rocket.
Obviously this could compromise the chain stay brace joints (or whatever that is called down there) or even the bb to stay joint (if there is no brace), I didn't have any problems, and was more than happy with my off-road rocket.
01-08-23, 07:36 PM
#10
ambulatory senior
Join Date: Dec 2016
Location: Peoria Il
Posts: 5,998
Bikes: Austro Daimler modified by Gugie! Raleigh Professional and lots of other bikes.
Mentioned: 76 Post(s)
Tagged: 0 Thread(s)
Quoted: 1955 Post(s)
Liked 3,661 Times
in
1,679 Posts
I did this with a large pipe a number of years ago on an old steel racing frame. Simply hammered the pipe in from the rear toward the bb and then made sure the rear end was still aligned to the desired spacing. I got enough space to run cyclocross type knobbies on a fairly tight road frame with no problems.Canti studs were also brazed on. I used this bike off road for a few years- it was the fastest mountain bike on the trails!
Obviously this could compromise the chain stay brace joints (or whatever that is called down there) or even the bb to stay joint (if there is no brace), I didn't have any problems, and was more than happy with my off-road rocket.
Obviously this could compromise the chain stay brace joints (or whatever that is called down there) or even the bb to stay joint (if there is no brace), I didn't have any problems, and was more than happy with my off-road rocket.
Likes For 52telecaster:
01-09-23, 01:11 AM
#11
blahblahblah chrome moly

Join Date: Apr 2009
Location: Seattle
Posts: 1,989
Mentioned: 92 Post(s)
Tagged: 0 Thread(s)
Quoted: 1176 Post(s)
Liked 2,572 Times
in
1,074 Posts
I converted a Bridgestone road frame (recovered from the dumpster) to use 26" (559) balloon tires that way. Hammered an enormous piece of pipe in between the stays, which widened the dropout spacing. Then I clamped the pipe in position relative to the BB shell, and bent the stays back in at the dropout end to the correct OLD. Made very good clearance for what I seem to recall as a nominal 1.95" tire (not sure and I no longer have the bike). It was an awesome polo bike until a chainstay broke, at the indent. Admittedly, I made a deeper indent than most people would do on a road bike. I only needed it to work temporarily, and the frame being free meant the stakes were low.
Mark B
Likes For bulgie:
01-09-23, 03:36 AM
#12
Senior Member
Join Date: May 2019
Location: Burien WA
Posts: 512
Bikes: Cannondale Synapse, LeMond Victoire, Bianchi Campione d'Italia, Kona Hei Hei, Ritchey Ultra, Schwinn "Paramount" PDG, '83 Trek 640
Mentioned: 7 Post(s)
Tagged: 0 Thread(s)
Quoted: 268 Post(s)
Liked 325 Times
in
211 Posts
Hmm, that raises an interesting question... most dimpling of stays I've seen look like whatever made the dimple was small (like nlerner 's drive bit) oriented parallel to the stays. But there have been a few that looked like whatever did it was larger and oriented perpendicular to the stays (more or less like I understand the pipe to have been as robobike316 describes doing it). I wonder if the former is better as far as structural integrity... or if it doesn't significantly matter....?
Likes For mhespenheide:
01-09-23, 11:34 AM
#13
Senior Member

Join Date: May 2012
Location: Point Reyes Station, California
Posts: 4,528
Bikes: Indeed!
Mentioned: 92 Post(s)
Tagged: 0 Thread(s)
Quoted: 1507 Post(s)
Liked 3,478 Times
in
1,132 Posts
I recall a conversation, either here or in the framebuilders forum, in which it was stated that a longitudinal dent with a distinct crimp at the bottom of the dent is stronger than one with a gentler curved cross section.
Brent
Brent
Likes For obrentharris:
01-09-23, 03:03 PM
#14
blahblahblah chrome moly
Join Date: Apr 2009
Location: Seattle
Posts: 1,989
Mentioned: 92 Post(s)
Tagged: 0 Thread(s)
Quoted: 1176 Post(s)
Liked 2,572 Times
in
1,074 Posts

Just a gut feeling really, can't prove it, but the cracks I've seen in chainstays over the years does somewhat back that up. Confirmation bias is a real possibility though, like maybe I only notice the broken ones that match my pet theory?
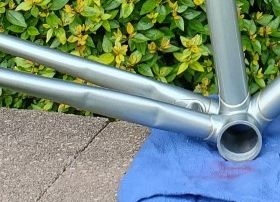
But here's my thinking: That sharp crease down the middle, which normally might be cause for alarm (stress-riser), is down closer to the neutral axis, both for bending and twisting loads, so stress in th part will tend to flow around that crease, not through it. The creases that matter more for fatigue endurance are the ones around the periphery of the indent. And if you make the bottom (or central) crease with a larger radius, it tends to make those peripheral creases sharper.

This is from a Reynolds brochure from the '70s. The "A" and "B" markups added by me.
I think you can see how, if you increased the radius of the crease at B (made it more gradual), that would tend to sharpen the bend at A, which is where durability matters more.
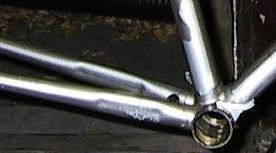
This is backed up by the observation that some brands of chainstays that had a sharp crease down the middle lasted a long time. Both in the sense of individual frames lasting, and in the sense of that design feature continuing to be used for decades of chainstay production. One example you might be familiar with is the sort of leaf-shape indent in Columbus SL and SP, in the decades before the round-oval-round took over in popularity.

Another good example is the aluminum Barra frames from the 1940s. A good example because those frequently broke — but not at the chainstay dimple! So even in fatigue-prone aluminum, this shape didn't cause cracks.


That second pic is of a 65 cm frame, so presumably a big rider. No telling how many miles though.
Contrast that to a style I see a lot in recent years, mostly China or Taiwan made, with a big-radius curve down in the bottom of the indent and sharper transitions around the periphery. I can see why they'd want to use a big-radius indenter, but I think it's misguided. Example, from a Crust bike:

Look how sharp the radius is above and below that chainring clearance indent, visible by the reflection lines.
I'm not saying Crust bikes are going to break there. So much more goes into whether a chainstay will last, like thickness, alloy, heat-treat, welding skill, rider weight mileage and riding style among others. Al I'm saying is I kinda hate this indent style!
Other bad style, that I know for sure caused cracks (saw plenty of them BITD) was the short-lived "flattened" style used by Reynolds on their 531 SL tubeset when it first came out. Any halfway-strong riders broke those so you don't see them much these days! R soon switched to a R-O-R style.
It's subtle, but you can see it's more an up-down shape, similar to what you'd get by hammering in a big pipe to add clearance on a finished frame. here's another pic showing this shape used as chainring clearance:
And another from a '70s Moto Le Champion:
Anyway without any numbers or other proof, all this amounts to is which ones I like and don't like. But after 50+ years of looking at broken frames, I think my gut feeling is hopefully based on some semblance of reality.
Mark B
Likes For bulgie:
01-09-23, 04:16 PM
#15
ambulatory senior
Join Date: Dec 2016
Location: Peoria Il
Posts: 5,998
Bikes: Austro Daimler modified by Gugie! Raleigh Professional and lots of other bikes.
Mentioned: 76 Post(s)
Tagged: 0 Thread(s)
Quoted: 1955 Post(s)
Liked 3,661 Times
in
1,679 Posts
That may have been a post of mine you remember, I've been harping on that for years.
Just a gut feeling really, can't prove it, but the cracks I've seen in chainstays over the years does somewhat back that up. Confirmation bias is a real possibility though, like maybe I only notice the broken ones that match my pet theory?
But here's my thinking: That sharp crease down the middle, which normally might be cause for alarm (stress-riser), is down closer to the neutral axis, both for bending and twisting loads, so stress in th part will tend to flow around that crease, not through it. The creases that matter more for fatigue endurance are the ones around the periphery of the indent. And if you make the bottom (or central) crease with a larger radius, it tends to make those peripheral creases sharper.
This is from a Reynolds brochure from the '70s. The "A" and "B" markups added by me.
I think you can see how, if you increased the radius of the crease at B (made it more gradual), that would tend to sharpen the bend at A, which is where durability matters more.
This is backed up by the observation that some brands of chainstays that had a sharp crease down the middle lasted a long time. Both in the sense of individual frames lasting, and in the sense of that design feature continuing to be used for decades of chainstay production. One example you might be familiar with is the sort of leaf-shape indent in Columbus SL and SP, in the decades before the round-oval-round took over in popularity.
Another good example is the aluminum Barra frames from the 1940s. A good example because those frequently broke — but not at the chainstay dimple! So even in fatigue-prone aluminum, this shape didn't cause cracks.
That second pic is of a 65 cm frame, so presumably a big rider. No telling how many miles though.
Contrast that to a style I see a lot in recent years, mostly China or Taiwan made, with a big-radius curve down in the bottom of the indent and sharper transitions around the periphery. I can see why they'd want to use a big-radius indenter, but I think it's misguided. Example, from a Crust bike:
Look how sharp the radius is above and below that chainring clearance indent, visible by the reflection lines.
I'm not saying Crust bikes are going to break there. So much more goes into whether a chainstay will last, like thickness, alloy, heat-treat, welding skill, rider weight mileage and riding style among others. Al I'm saying is I kinda hate this indent style!
Other bad style, that I know for sure caused cracks (saw plenty of them BITD) was the short-lived "flattened" style used by Reynolds on their 531 SL tubeset when it first came out. Any halfway-strong riders broke those so you don't see them much these days! R soon switched to a R-O-R style.
It's subtle, but you can see it's more an up-down shape, similar to what you'd get by hammering in a big pipe to add clearance on a finished frame. here's another pic showing this shape used as chainring clearance:
And another from a '70s Moto Le Champion:
Anyway without any numbers or other proof, all this amounts to is which ones I like and don't like. But after 50+ years of looking at broken frames, I think my gut feeling is hopefully based on some semblance of reality.
Mark B
01-09-23, 07:04 PM
#16
Senior Member
Thread Starter
Join Date: Jun 2021
Posts: 1,683
Bikes: '38 Schwinn New World, ’69 Peugeot PX-10, '72 Peugeot PX-10, ‘7? Valgan, '78 Raleigh Comp GS, ’79 Holdsworth Pro, ’80 Peugeot TH-8 tandem, '87 Trek 400T, ‘7? Raleigh Sports, ‘7? Raleigh Superbe, ‘6? Hercules
Mentioned: 16 Post(s)
Tagged: 0 Thread(s)
Quoted: 761 Post(s)
Liked 1,563 Times
in
757 Posts
Cheers, bulgie , that's some good and helpful information. And now has me thinking some kind of triangular cross-section slug might be better than a hardwood dowel...
Last edited by ehcoplex; 01-10-23 at 08:04 AM.
Likes For ehcoplex:
01-11-23, 05:06 PM
#17
Senior Member
Thread Starter
Join Date: Jun 2021
Posts: 1,683
Bikes: '38 Schwinn New World, ’69 Peugeot PX-10, '72 Peugeot PX-10, ‘7? Valgan, '78 Raleigh Comp GS, ’79 Holdsworth Pro, ’80 Peugeot TH-8 tandem, '87 Trek 400T, ‘7? Raleigh Sports, ‘7? Raleigh Superbe, ‘6? Hercules
Mentioned: 16 Post(s)
Tagged: 0 Thread(s)
Quoted: 761 Post(s)
Liked 1,563 Times
in
757 Posts
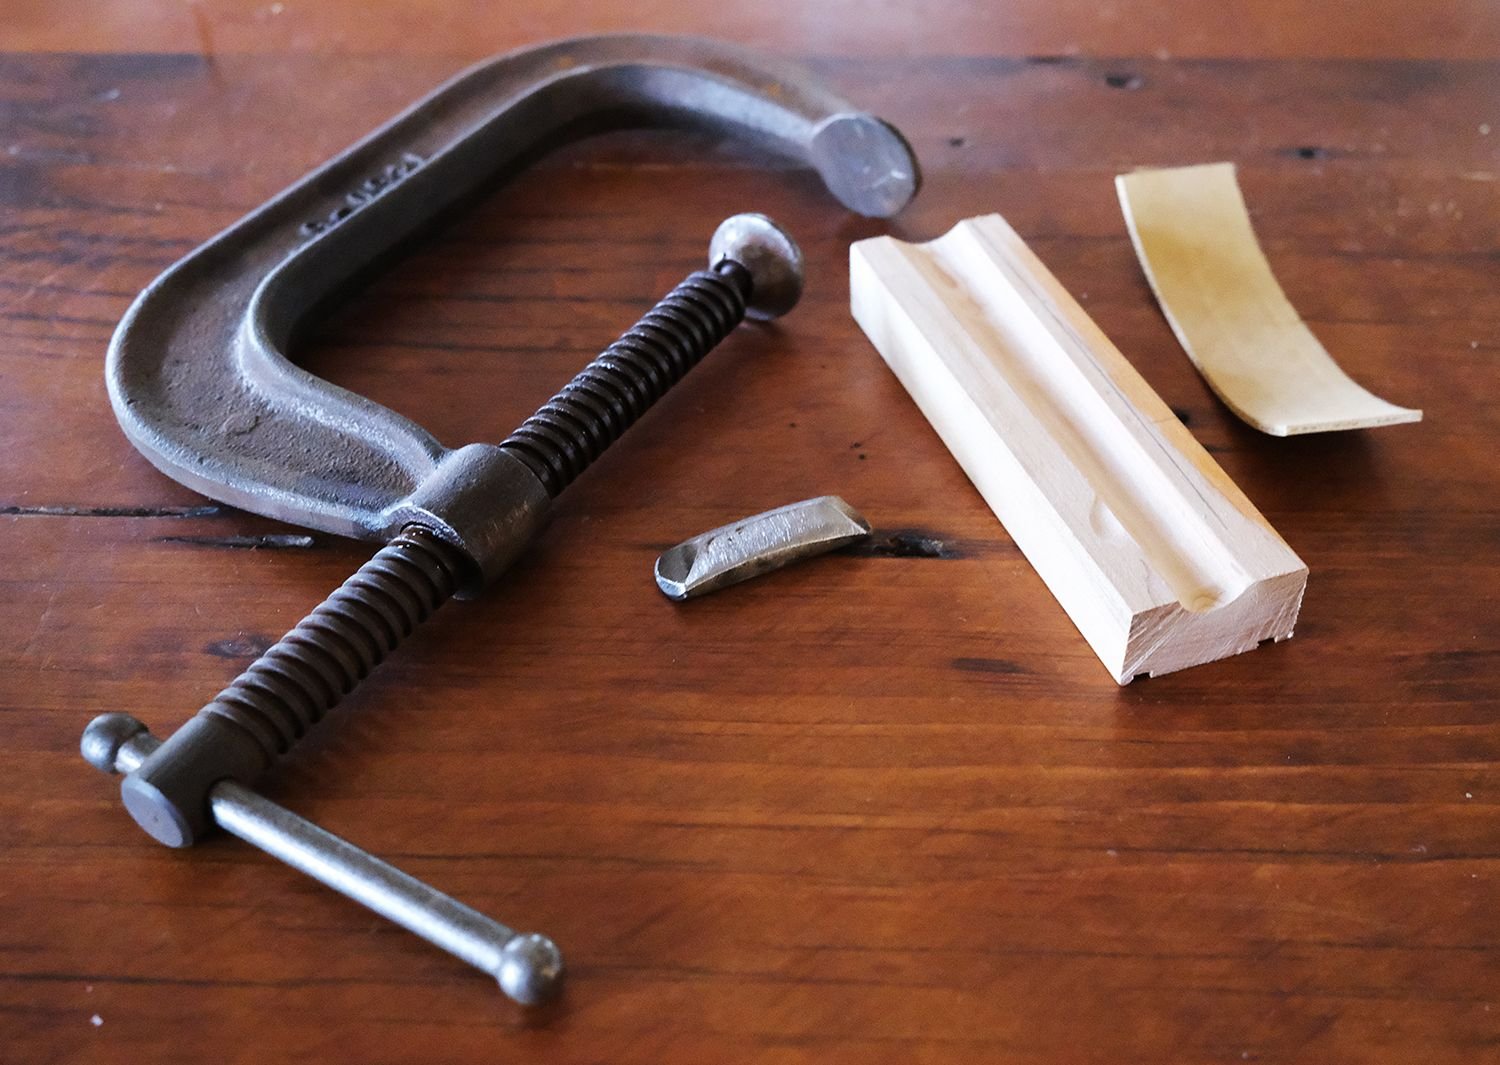
Bit of follow up.... I cut a section from a a 5/8" (I think..) bolt and ground it into a sort of rounded triangle cross section. Dremel'd & sanded a channel in a piece of scrap maple, cut a piece of leftover rubber webbing to line the channel. Ideally the 'dimple-bit' would've been tacked to the c-clamp, but I don't weld & my biking pal who does is enjoying warmer climes at the moment, so I used a bit of double stick to (kinda) keep it in position. Basically used a bunch of clamps to hold everything in place and then slowly tightened down. Seems to have done the trick. Looking more closely at the bikes I have that are factory-dimpled I probably cudda/shudda made the dimple-bit a little longer, maybe.. Didn't need to do much- I just wanted another couple millimeters clearance on each side for 35c tires. One frame down, one to go- but the 'one to go' is built up and I was too lazy to drop the wheel & take the crank off today.

Likes For ehcoplex:
Likes For Mr. 66:
