


overhauling campy record hubs
 07-27-12, 04:03 AM
#1
Junior Member
Thread Starter
Join Date: Jan 2012
Location: Brussels, Belgium
Posts: 22
Mentioned: 0 Post(s)
Tagged: 0 Thread(s)
Quoted: 1 Post(s)
Likes: 0
Liked 0 Times
in
0 Posts
overhauling campy record hubs
Hello all,
I have a set of campagnolo record hubs on my classic bike, but as it has been standing in a shed for a large part of its life, the hubs run a bit rough. I've never repacked the hubs, so i would like some advice. I'm not especcially clumsy, but if they are easy to destroy, please warn me about that too...
I don't have pictures of my hubs atm, but they look exactly like these:
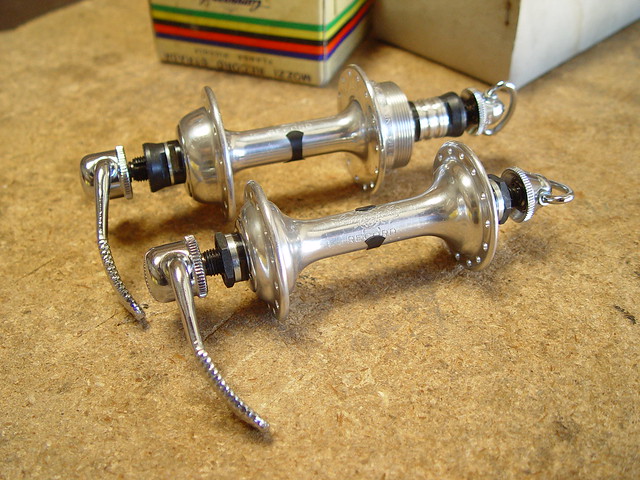
So, any advice on what tools i will need, which bearings i should use, etc, is very much appreciated!
I have a set of campagnolo record hubs on my classic bike, but as it has been standing in a shed for a large part of its life, the hubs run a bit rough. I've never repacked the hubs, so i would like some advice. I'm not especcially clumsy, but if they are easy to destroy, please warn me about that too...
I don't have pictures of my hubs atm, but they look exactly like these:
So, any advice on what tools i will need, which bearings i should use, etc, is very much appreciated!
 07-27-12, 06:46 AM
#2
Senior Member

Join Date: Dec 2009
Location: Melbourne, Oz
Posts: 9,547
Bikes: https://weightweenies.starbike.com/forum/viewtopic.php?f=10&t=152015&p=1404231
Mentioned: 15 Post(s)
Tagged: 0 Thread(s)
Quoted: 1528 Post(s)
Liked 718 Times
in
510 Posts
IMO if you can't find any pitting in the cups or cones, the bearings are very likely fine to re-use; I'd say there's a good chance they're just a bit tight, which causes a rough feeling.
The vast majority of hubs come like that from the factory, and often aren't properly set up before the bike's ridden (If they're really tight, carnage ensues after a while, but they're surprisingly tolerant of being a little over-tight).
Although it's a disappointing surprise that this applies to Campy Record... first, I'd expect the factory to send them out the door properly set up, and if not, then I'd expect some TLC from whoever first got hold of em.
Anyway, you just need an appropriate-sized cone wrench and a spanner for the locknuts. Actually, looking at the locknuts on the rear hub, you'll need two cone wrenches. That's a little odd... maybe those round locknuts are to make replacing the wheel a little easier.
As for the actual procedure, it's a breeze. If you can't figure it out for yourself you can just google hub overhaul or whatever... the only trick is to leave a tiny bit of play that should disappear when the QR lever is closed.
Last edited by Kimmo; 07-27-12 at 06:50 AM.
07-27-12, 08:48 AM
#3
Senior Member
1. Remove skewers.
2. Using cone wrench and normal wrench (front) or 2 cone wrenches (rear) tighten the locknut against the cone on one side of the hub.
3. Lay down an old sheet over the area you are working.
4. Using the tools from step 2, loosen and remove the locknut and cone from the other side of the hub.
5. Before removing axle, count and anotate how many bearing balls are on the side you removed the cone from (if this is the rear wheel also anotate if it is the drive side or non drive side.
6. Rear wheels sometimes use different size bearings on the two sides so turn the wheel over and lift the axle slightly so that you can see into the hub and count and anotate the number of bearings on this side too, (this is not typically necessary on a front hub).
7. Remove the axle while standing over the old sheet so that if any balls fall out they will not roll away to oblivion.
8. Seperate the balls by size/side of the hub the came from.
9. Buy new balls of appropriate quantity and size or clean old balls
10. Clean inside of hub shell, axle, cones, etc of all old grease.
11. Put a healthy amount of fresh grease in the bearing surfaces (Cups) of the hub).
12. Replace balls in hub by imbedding them in the fresh grease, the grease should hold them in position (make sure you are using correct size balls on each side of the rear hub and replace the correct number of balls perside).
13. put a very light coating of grease on the axle shaft and threads.
14. Carefully reinsert the axle back into the hub from the side which it was removed...be careful not to dislodge any balls.
15. Screw cone onto end of axle being careful not to dislodge any balls.
16. Scew locknut onto axle.
17. To adjust bearing pre-load adjust cone until it contacs the bearings fully then back it off slightly...then hand tighten locknut against the cone.
18. Use wrenches to hold cone in place and tighten locknut against cone.
19. graps end of axle and agressively wiggle up/down and in/out, and spin. You want the axle to spin smoothly with a small amount of movement when wiggling up/down and in/out.
20. If the axle is not smooth or there is no movement when trying to wiggle the axle then loosen the locknut slightly and back the cone up a tad and retighten.
21 Repeat adjustment until adjusted properly.
22. Reinstall skewers.
23. Reinstall wheel on bike
24. Check to see if the bearing adjustment is too loose by grapping wheel at rim and moving it side to side (perpendicular to the axis of rotation).
25. If there is any movement then the hub is too loose...remove the wheel and adjust the cone/locknut to remove some of the play.
26. Reinstall wheel to double check adjustment as in step 24.
27. If bearing pre-load adjustment is good then go for a ride.
The proper amount of play in the hub bearing is difficult to describe. Sheldon Brown's website recommends making a tool out of an old cone with a piece of axle in it and mounting it on the hub using the quick release to mimick the compressive force of mounting the wheel on the frame...using this tool you would then adjust the hub so that it spins freely and there is no play at all in the bearing when wiggling the axle...this takes the guess work and repeating the adjustment process out of the overhaul/adjustment process and speeds things up a bit.
-j
07-27-12, 09:08 AM
#4

Senior Member
Join Date: Apr 2009
Location: New Rochelle, NY
Posts: 38,716
Bikes: too many bikes from 1967 10s (5x2)Frejus to a Sumitomo Ti/Chorus aluminum 10s (10x2), plus one non-susp mtn bike I use as my commuter
Mentioned: 140 Post(s)
Tagged: 1 Thread(s)
Quoted: 5787 Post(s)
Liked 2,579 Times
in
1,430 Posts
The proper amount of play in the hub bearing is difficult to describe. Sheldon Brown's website recommends making a tool out of an old cone with a piece of axle in it and mounting it on the hub using the quick release to mimick the compressive force of mounting the wheel on the frame....j
But if you decide to open them up, follow the steps outlined by Greenfieldja, except you don't have to make anything special for final adjustment. You can simply use a stack of washers to simulate the dropout on the levers side of the QR skewer. You don't need anything on the nut end, but don't forget to remove that you don't want the conical springs at this time. As far as to how tight, you want the loosest setting with zero play. A hair tight is fine is better than loose, so focus on zero play, but materially tight is also no good.
I always suggest what I call the Goldilocks method. If you definitely feel play - too loose. If it definitely feels tight - too tight. If you can't decide and aren't sure you have it dialed in that's just right.
BTW- one trick for tweaking adjustments, but only if they're very close, is to work both cones against each other outwards against the locknuts to loosen a hair, or the locknuts inward to tighten a hair. Do not use this for more than a hair because it's easy to shear the tab off the lock washer if you do.
__________________
FB
Chain-L site
An ounce of diagnosis is worth a pound of cure.
Just because I'm tired of arguing, doesn't mean you're right.
�One accurate measurement is worth a thousand expert opinions� - Adm Grace Murray Hopper - USN
WARNING, I'm from New York. Thin skinned people should maintain safe distance.
FB
Chain-L site
An ounce of diagnosis is worth a pound of cure.
Just because I'm tired of arguing, doesn't mean you're right.
�One accurate measurement is worth a thousand expert opinions� - Adm Grace Murray Hopper - USN
WARNING, I'm from New York. Thin skinned people should maintain safe distance.
Last edited by FBinNY; 07-27-12 at 09:14 AM.
07-27-12, 09:41 AM
#5
Senior Member
Join Date: Dec 2009
Location: Melbourne, Oz
Posts: 9,547
Bikes: https://weightweenies.starbike.com/forum/viewtopic.php?f=10&t=152015&p=1404231
Mentioned: 15 Post(s)
Tagged: 0 Thread(s)
Quoted: 1528 Post(s)
Liked 718 Times
in
510 Posts
BTW- one trick for tweaking adjustments, but only if they're very close, is to work both cones against each other outwards against the locknuts to loosen a hair, or the locknuts inward to tighten a hair. Do not use this for more than a hair because it's easy to shear the tab off the lock washer if you do.
07-27-12, 09:56 AM
#6
Senior Member
Join Date: Apr 2009
Location: New Rochelle, NY
Posts: 38,716
Bikes: too many bikes from 1967 10s (5x2)Frejus to a Sumitomo Ti/Chorus aluminum 10s (10x2), plus one non-susp mtn bike I use as my commuter
Mentioned: 140 Post(s)
Tagged: 1 Thread(s)
Quoted: 5787 Post(s)
Liked 2,579 Times
in
1,430 Posts
This is correct for radial bearings, but angular contact bearings of the type on these hubs require zero (really zero) play. For these, within the range of adjustment, a hair tight is better than loose enough to detect play because of an effect some call axle drop, where by the cone can press down wedging the balls to the around side and jamming them against each other in the rest of the bearing.
However if the hubs are adjusted without the QRs compression, a trace of play may be OK since it'll be taken up when the wheel is installed and the QR tightened. But it's really only a hair.
As a general rule, I prefer to have hubs a bit tight before building which makes truing easier, then doing a final adjustment in a frame, where being able to test at the rim makes the feeling for play more sensitive.
To my knowledge Campy hubs of this vintage have tabbed washers, but you can verify by seeing the keyed axle on the rear in the photo. As I said, the cone jamming technique is limited to tiny tweaks only, but if the locknut is pretty tight, that's all you can get this way.
However if the hubs are adjusted without the QRs compression, a trace of play may be OK since it'll be taken up when the wheel is installed and the QR tightened. But it's really only a hair.
As a general rule, I prefer to have hubs a bit tight before building which makes truing easier, then doing a final adjustment in a frame, where being able to test at the rim makes the feeling for play more sensitive.
Hm, on axles with tabbed washers, that's a pretty fine hair alright... the pictured ones don't seem to have em though (no steel washers), and they're pretty rare IME. This technique is very useful for final fine adjustment in their absence. Works well as a quick-and-dirty fix from the get-go a lot of the time, too.
__________________
FB
Chain-L site
An ounce of diagnosis is worth a pound of cure.
Just because I'm tired of arguing, doesn't mean you're right.
�One accurate measurement is worth a thousand expert opinions� - Adm Grace Murray Hopper - USN
WARNING, I'm from New York. Thin skinned people should maintain safe distance.
FB
Chain-L site
An ounce of diagnosis is worth a pound of cure.
Just because I'm tired of arguing, doesn't mean you're right.
�One accurate measurement is worth a thousand expert opinions� - Adm Grace Murray Hopper - USN
WARNING, I'm from New York. Thin skinned people should maintain safe distance.
Last edited by FBinNY; 07-27-12 at 10:26 AM.
07-27-12, 10:03 AM
#7
Senior Member
Join Date: Dec 2009
Location: Melbourne, Oz
Posts: 9,547
Bikes: https://weightweenies.starbike.com/forum/viewtopic.php?f=10&t=152015&p=1404231
Mentioned: 15 Post(s)
Tagged: 0 Thread(s)
Quoted: 1528 Post(s)
Liked 718 Times
in
510 Posts
Definitely agree a little tight is far better than a little loose. I'd even say a really heavily-loaded hub should have a fraction more preload again; there's a bit of a range between where it starts to feel tight and when it gets notchy. I'd adjust such a hub to goldilocks with an open QR.
I picture bearing preload as sort of the reverse of spoke tension (compression vs tension); too loose is bad, and too tight is only bad if it causes carnage (drag aside).
Last edited by Kimmo; 07-27-12 at 10:09 AM.
07-27-12, 11:34 AM
#8
Old fart

Join Date: Nov 2004
Location: Appleton WI
Posts: 24,786
Bikes: Several, mostly not name brands.
Mentioned: 153 Post(s)
Tagged: 0 Thread(s)
Quoted: 3588 Post(s)
Liked 3,400 Times
in
1,934 Posts
One caveat about Campy hubs: if the cones need replacing, they are readily available on eBay. BUT they do not use the same thread as most other hub cones, so be sure to get Campagnolo cones to replace any worn parts.
07-27-12, 11:43 AM
#9

Senior Member
Join Date: Jul 2010
Posts: 5,791
Mentioned: 6 Post(s)
Tagged: 0 Thread(s)
Quoted: 1020 Post(s)
Liked 463 Times
in
293 Posts
If these are new out of the box hubs you really don't need to open them up. What you're feeling is probably dried hardened grease. If you inject a drop of heavy (non-detergent) oil like gear oil, Phil's Tenacious, or my stuff into the vent on the dust cap and work the axle in your hand, it'll refresh the grease and you'll be good to go with virtually zero effort.
07-27-12, 12:06 PM
#10
Senior Member

Those are so darn nice and pretty I would not recommend repacking them as your first effort. $0.02
I doubt a single shop would trust them to their new hire mechanic either.
I doubt a single shop would trust them to their new hire mechanic either.
07-27-12, 12:57 PM
#12
Junior Member
Thread Starter
Join Date: Jan 2012
Location: Brussels, Belgium
Posts: 22
Mentioned: 0 Post(s)
Tagged: 0 Thread(s)
Quoted: 1 Post(s)
Likes: 0
Liked 0 Times
in
0 Posts
Thanks for all the response.
I just took the front hub apart (sorry Ira B)
The bearings seem ok, but the grease is really dirty, so that was probably the issue.
What would you recommend for cleaning out the old grease? just regular degreaser and a bit of water?
And repacking with lithium grease?
I just took the front hub apart (sorry Ira B)
The bearings seem ok, but the grease is really dirty, so that was probably the issue.
What would you recommend for cleaning out the old grease? just regular degreaser and a bit of water?
And repacking with lithium grease?
07-27-12, 01:12 PM
#13
Banned
Degreasers , basic, Kerosene. to re grease, I use Boat trailer wheel bearing grease.
Oregon coast adaptation,Cyclocross & Mt Tam Marin MTB favorite,
A lithium grease was what <C> packaged back in the day..
should you strive for originality..
Pro support back in the day, had a spare set of dropouts to get the bearing adjustment 'goldilocks'
as tightening the skewer tightens the bearing adjustment pre load,
so a skosh loose is tightened up , when you close the QR skewer.
no reason to reuse bearing balls, top grade loose balls are cheap.
07-27-12, 01:20 PM
#14
Senior Member
Join Date: Apr 2009
Location: New Rochelle, NY
Posts: 38,716
Bikes: too many bikes from 1967 10s (5x2)Frejus to a Sumitomo Ti/Chorus aluminum 10s (10x2), plus one non-susp mtn bike I use as my commuter
Mentioned: 140 Post(s)
Tagged: 1 Thread(s)
Quoted: 5787 Post(s)
Liked 2,579 Times
in
1,430 Posts
I still use a marine grade lithium based grease because IMO it gives me the best lubrication and weather protection at the lowest viscous drag. A heavier automotive or marine grade axle grease is also fine but a bit stiffer than necessary. In reality, the total energy lost to viscous drag is so tiny that it really doesn't matter and so don't let it put you off using a decent grease.
__________________
FB
Chain-L site
An ounce of diagnosis is worth a pound of cure.
Just because I'm tired of arguing, doesn't mean you're right.
�One accurate measurement is worth a thousand expert opinions� - Adm Grace Murray Hopper - USN
WARNING, I'm from New York. Thin skinned people should maintain safe distance.
FB
Chain-L site
An ounce of diagnosis is worth a pound of cure.
Just because I'm tired of arguing, doesn't mean you're right.
�One accurate measurement is worth a thousand expert opinions� - Adm Grace Murray Hopper - USN
WARNING, I'm from New York. Thin skinned people should maintain safe distance.
07-27-12, 01:32 PM
#15
Junior Member
Thread Starter
Join Date: Jan 2012
Location: Brussels, Belgium
Posts: 22
Mentioned: 0 Post(s)
Tagged: 0 Thread(s)
Quoted: 1 Post(s)
Likes: 0
Liked 0 Times
in
0 Posts
Ok, I will probably use "wasbenzine" (dutch, litterally translates as "cleaning petrol")
It's something that gave me good results with cleaning pretty much everything greasy.
It's something that gave me good results with cleaning pretty much everything greasy.
07-27-12, 06:57 PM
#16
Senior Member
I did not realize you were in Belgium. I just moved here the middle of last month. I am in the Bernisart area...about 20km west of Mons. If you need any help in the future give me a shout, I will have a fairly full (toolwise) shop setup in the garage once we are fully unpacked. PM me for my contact info.
-j
07-28-12, 08:57 AM
#18
Senior Member
Join Date: Apr 2009
Location: New Rochelle, NY
Posts: 38,716
Bikes: too many bikes from 1967 10s (5x2)Frejus to a Sumitomo Ti/Chorus aluminum 10s (10x2), plus one non-susp mtn bike I use as my commuter
Mentioned: 140 Post(s)
Tagged: 1 Thread(s)
Quoted: 5787 Post(s)
Liked 2,579 Times
in
1,430 Posts
With so much clothing made of synthetics, it's hard to get decent rags these days.
__________________
FB
Chain-L site
An ounce of diagnosis is worth a pound of cure.
Just because I'm tired of arguing, doesn't mean you're right.
�One accurate measurement is worth a thousand expert opinions� - Adm Grace Murray Hopper - USN
WARNING, I'm from New York. Thin skinned people should maintain safe distance.
FB
Chain-L site
An ounce of diagnosis is worth a pound of cure.
Just because I'm tired of arguing, doesn't mean you're right.
�One accurate measurement is worth a thousand expert opinions� - Adm Grace Murray Hopper - USN
WARNING, I'm from New York. Thin skinned people should maintain safe distance.
07-28-12, 10:26 AM
#19
Senior Member
Join Date: Dec 2009
Location: Melbourne, Oz
Posts: 9,547
Bikes: https://weightweenies.starbike.com/forum/viewtopic.php?f=10&t=152015&p=1404231
Mentioned: 15 Post(s)
Tagged: 0 Thread(s)
Quoted: 1528 Post(s)
Liked 718 Times
in
510 Posts
I pretty much only wear cotton against my skin... although 100% cotton socks are bloody hard to come by these days.
Bedsheets are always good. Towels are great.
Bedsheets are always good. Towels are great.
07-31-12, 03:26 PM
#20
Junior Member
Thread Starter
Join Date: Jan 2012
Location: Brussels, Belgium
Posts: 22
Mentioned: 0 Post(s)
Tagged: 0 Thread(s)
Quoted: 1 Post(s)
Likes: 0
Liked 0 Times
in
0 Posts
I managed to clean and repack my front hub.
The rear one is ok for now (and i haven't got the right tool to remove the cassette), so I will leave it alone for now.
Thanks everyone for the advice!
Actually i lied a bit when i said the hubs looked exactly like the ones in the photograph, mine need a lot of polishing before they will come close, but that something for when I've got a lot of time (and a different thread)
Nice!
I'm originally from Antwerp, but live in Brussels now.
I know the berinsart area only for the festival in Dour, which is very nice...
If you don't mind some mud
The rear one is ok for now (and i haven't got the right tool to remove the cassette), so I will leave it alone for now.
Thanks everyone for the advice!
Actually i lied a bit when i said the hubs looked exactly like the ones in the photograph, mine need a lot of polishing before they will come close, but that something for when I've got a lot of time (and a different thread)
Jonas,
I did not realize you were in Belgium. I just moved here the middle of last month. I am in the Bernisart area...about 20km west of Mons. If you need any help in the future give me a shout, I will have a fairly full (toolwise) shop setup in the garage once we are fully unpacked. PM me for my contact info.
-j
I'm originally from Antwerp, but live in Brussels now.
I know the berinsart area only for the festival in Dour, which is very nice...
If you don't mind some mud
07-31-12, 04:10 PM
#21
Mechanic/Tourist
07-31-12, 06:25 PM
#22

Senior Member

Join Date: Mar 2005
Location: Pinole, CA, USA
Posts: 17,392
Mentioned: 24 Post(s)
Tagged: 0 Thread(s)
Quoted: 443 Post(s)
Likes: 0
Liked 27 Times
in
25 Posts
The dust caps on those hubs can be easily damaged by prying them out, so it's best to leave them in place. It makes the job a little more difficult, but not that bad. I don't think you'll easily find replacements if you damage them.
I use old 100% cotton T-shirts.
I use old 100% cotton T-shirts.
07-31-12, 07:37 PM
#23

Super Moderator

Join Date: Jul 2004
Location: Ffld Cnty Connecticut
Posts: 21,843
Bikes: Old Steelies I made, Old Cannondales
Mentioned: 12 Post(s)
Tagged: 0 Thread(s)
Quoted: 1173 Post(s)
Liked 927 Times
in
612 Posts
I never had a problem removing the dust caps. I pry them out with a small flat screwdriver. Much easier to clean inside with them out of the way. They go right back in with a few gentle taps. If they were museum pieces, maybe I would not remove them.
Now, C-Record dust caps on the other hand .... what a PIA !!
Now, C-Record dust caps on the other hand .... what a PIA !!
__________________
Bikes: Old steel race bikes, old Cannondale race bikes, less old Cannondale race bike, crappy old mtn bike.
FYI: https://www.bikeforums.net/forum-sugg...ad-please.html
Bikes: Old steel race bikes, old Cannondale race bikes, less old Cannondale race bike, crappy old mtn bike.
FYI: https://www.bikeforums.net/forum-sugg...ad-please.html
07-31-12, 07:45 PM
#24
Senior Member
Join Date: Apr 2009
Location: New Rochelle, NY
Posts: 38,716
Bikes: too many bikes from 1967 10s (5x2)Frejus to a Sumitomo Ti/Chorus aluminum 10s (10x2), plus one non-susp mtn bike I use as my commuter
Mentioned: 140 Post(s)
Tagged: 1 Thread(s)
Quoted: 5787 Post(s)
Liked 2,579 Times
in
1,430 Posts
I never had a problem removing the dust caps. I pry them out with a small flat screwdriver. Much easier to clean inside with them out of the way. They go right back in with a few gentle taps. If they were museum pieces, maybe I would not remove them.
Now, C-Record dust caps on the other hand .... what a PIA !!
Now, C-Record dust caps on the other hand .... what a PIA !!
__________________
FB
Chain-L site
An ounce of diagnosis is worth a pound of cure.
Just because I'm tired of arguing, doesn't mean you're right.
�One accurate measurement is worth a thousand expert opinions� - Adm Grace Murray Hopper - USN
WARNING, I'm from New York. Thin skinned people should maintain safe distance.
FB
Chain-L site
An ounce of diagnosis is worth a pound of cure.
Just because I'm tired of arguing, doesn't mean you're right.
�One accurate measurement is worth a thousand expert opinions� - Adm Grace Murray Hopper - USN
WARNING, I'm from New York. Thin skinned people should maintain safe distance.

