


Cyclone MK II RD - get spring back into place
 08-14-16, 01:21 PM
#1
Junior Member
Thread Starter
Join Date: Mar 2016
Posts: 5
Mentioned: 0 Post(s)
Tagged: 0 Thread(s)
Quoted: 3 Post(s)
Likes: 0
Liked 0 Times
in
0 Posts
Cyclone MK II RD - get spring back into place
Need help and tricks how to reinsert the RD tension spring.
I took it out for come cleaning and now I struggle to get it back in place.
Any advice?
I took it out for come cleaning and now I struggle to get it back in place.
Any advice?
 08-14-16, 03:38 PM
#2
Senior Member

Join Date: Feb 2008
Location: Peoria, IL
Posts: 4,476
Mentioned: 86 Post(s)
Tagged: 0 Thread(s)
Quoted: 1829 Post(s)
Liked 3,376 Times
in
1,580 Posts
this video might be useful to you...
If I had to guess, I would guess that you haven't removed the little screw that keeps the pulley cage from rotating too far clockwise.... but pictures would help clarify what you specific problem is.
Steve in Peoria
If I had to guess, I would guess that you haven't removed the little screw that keeps the pulley cage from rotating too far clockwise.... but pictures would help clarify what you specific problem is.
Steve in Peoria
08-14-16, 10:18 PM
#3

Bike Butcher of Portland

Join Date: Jul 2014
Location: Portland, OR
Posts: 11,639
Bikes: It's complicated.
Mentioned: 1299 Post(s)
Tagged: 0 Thread(s)
Quoted: 4682 Post(s)
Liked 5,800 Times
in
2,284 Posts
Thanks!
__________________
If someone tells you that you have enough bicycles and you don't need any more, stop talking to them. You don't need that kind of negativity in your life.
If someone tells you that you have enough bicycles and you don't need any more, stop talking to them. You don't need that kind of negativity in your life.
08-15-16, 05:36 AM
#4
Senior Member
Join Date: Feb 2008
Location: Peoria, IL
Posts: 4,476
Mentioned: 86 Post(s)
Tagged: 0 Thread(s)
Quoted: 1829 Post(s)
Liked 3,376 Times
in
1,580 Posts
Glad to be of service. 
With the Cyclone GT, the only hard part is getting the nut off of the back of the upper pulley. I've seen pictures of the official SunTour tool. RJ, the fellow who made the video, sort of glosses over the removal and reinstallation of this nut (he doesn't have a proper tool for it).
My dad, back in the day, made one for me from a bushing, which I still have. It might be easier to hack up a cheap screwdriver??
The rest of the overhaul is not bad, and similar to most other derailleurs of the era.
Steve in Peoria
08-15-16, 06:13 AM
#5
Senior Member
Join Date: Apr 2007
Location: Ottawa, Canada
Posts: 777
Bikes: Raleigh Classic 15, 84; Miyata 912, 85; Miyata Ridge Runner SE, 85; Miyata 610, 86; Miyata 100M, 86; Miyata Valley Runner, 88; Miyata Triple Cross, 89; GT Karakoram, 90; Miyata Elevation 300, 91; Marinoni Touring, 95; Long Haul Trucker, 2013
Mentioned: 9 Post(s)
Tagged: 0 Thread(s)
Quoted: 159 Post(s)
Liked 133 Times
in
80 Posts
Glad to be of service.
With the Cyclone GT, the only hard part is getting the nut off of the back of the upper pulley. I've seen pictures of the official SunTour tool...
My dad, back in the day, made one for me from a bushing, which I still have. It might be easier to hack up a cheap screwdriver??
With the Cyclone GT, the only hard part is getting the nut off of the back of the upper pulley. I've seen pictures of the official SunTour tool...
My dad, back in the day, made one for me from a bushing, which I still have. It might be easier to hack up a cheap screwdriver??
08-15-16, 06:43 AM
#6
Senior Member
Join Date: Feb 2008
Location: Peoria, IL
Posts: 4,476
Mentioned: 86 Post(s)
Tagged: 0 Thread(s)
Quoted: 1829 Post(s)
Liked 3,376 Times
in
1,580 Posts
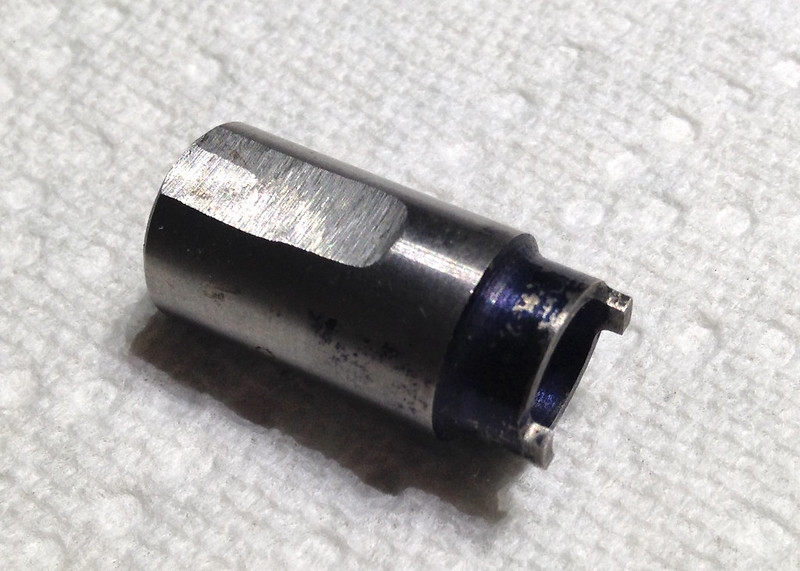

The tool is probably a bit more sophisticated than is essential... my dad was working as a machinist at the time.
Steve in Peoria
 08-15-16, 06:59 AM
#8
Senior Member
Join Date: Feb 2008
Location: Peoria, IL
Posts: 4,476
Mentioned: 86 Post(s)
Tagged: 0 Thread(s)
Quoted: 1829 Post(s)
Liked 3,376 Times
in
1,580 Posts
The shaft with the slots for the spring is threaded, and of course, threads into the pulley cage. I would guess that when the hole in the pulley cage is tapped, and when the die is used to cut the threads on the shaft, the rotational position of the threads aren't controlled. As such, the position of the spring slots relative to the pulley cage would be random. This would require some way to set the spring tension during assembly. (again, this is my guess).
Steve in Peoria
08-15-16, 07:16 AM
#9
Senior Member
Join Date: Apr 2007
Location: Ottawa, Canada
Posts: 777
Bikes: Raleigh Classic 15, 84; Miyata 912, 85; Miyata Ridge Runner SE, 85; Miyata 610, 86; Miyata 100M, 86; Miyata Valley Runner, 88; Miyata Triple Cross, 89; GT Karakoram, 90; Miyata Elevation 300, 91; Marinoni Touring, 95; Long Haul Trucker, 2013
Mentioned: 9 Post(s)
Tagged: 0 Thread(s)
Quoted: 159 Post(s)
Liked 133 Times
in
80 Posts
Likes For John Nolan:
08-15-16, 09:20 AM
#10
Junior Member
Thread Starter
Join Date: Mar 2016
Posts: 5
Mentioned: 0 Post(s)
Tagged: 0 Thread(s)
Quoted: 3 Post(s)
Likes: 0
Liked 0 Times
in
0 Posts
Thank you very much for the video.


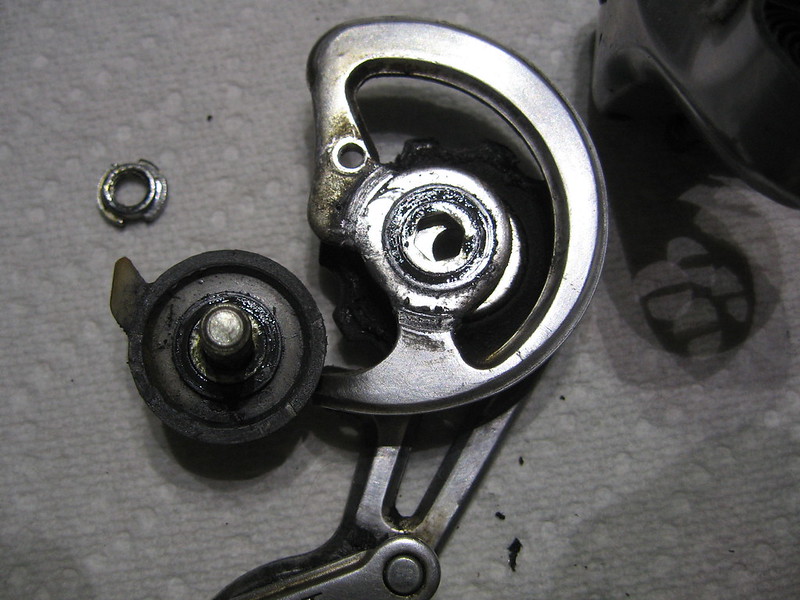
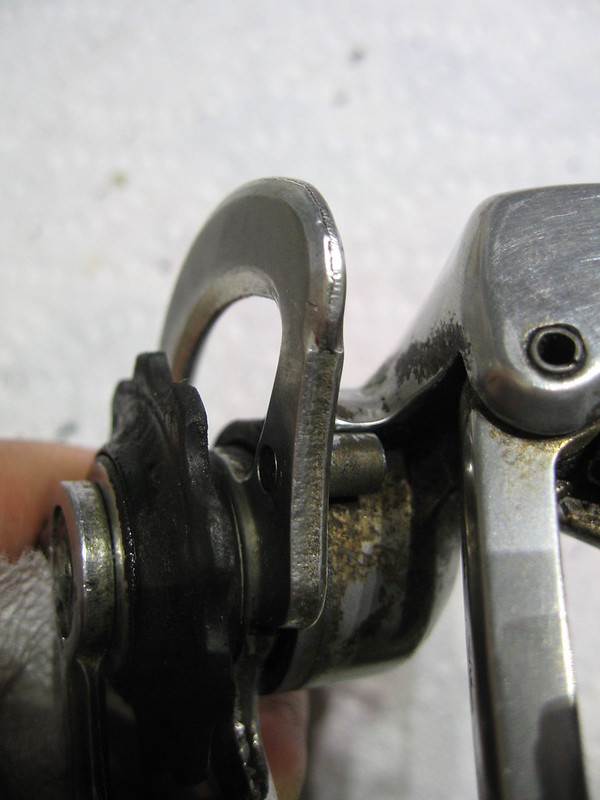
The issue I have is that the spring is out of its recess like in this picture (lifted from the interweb).
I cannot get the spring coiled up tight enough to reinsert into the recess.
The issue I have is that the spring is out of its recess like in this picture (lifted from the interweb).
I cannot get the spring coiled up tight enough to reinsert into the recess.
08-15-16, 09:46 AM
#11

Senior Member
Join Date: Jun 2006
Posts: 20,305
Mentioned: 130 Post(s)
Tagged: 0 Thread(s)
Quoted: 3464 Post(s)
Liked 2,829 Times
in
1,995 Posts
I think this is a three had job, I would secure the body to a bench.
08-15-16, 10:03 AM
#12
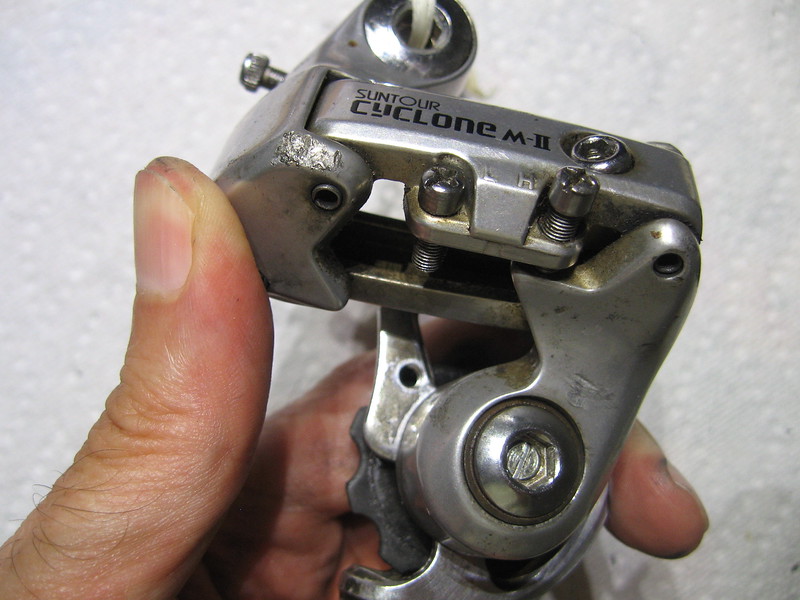
Senior Member
Do you have the stop screw removed from the cage? The derailleur goes together first, then tension the spring by winding the cage counterclockwise one rotation. Holding the derailleur with one hand reinstall the stop screw.
08-15-16, 11:23 AM
#13
Junior Member
Thread Starter
Join Date: Mar 2016
Posts: 5
Mentioned: 0 Post(s)
Tagged: 0 Thread(s)
Quoted: 3 Post(s)
Likes: 0
Liked 0 Times
in
0 Posts
Thank you Brian3069.
No - the stop screw is in place.
How does the unwinding the cage help me get the spring into the recess?
No - the stop screw is in place.
How does the unwinding the cage help me get the spring into the recess?
08-15-16, 11:41 AM
#14
Senior Member
08-15-16, 01:34 PM
#15
Senior Member

Join Date: Sep 2005
Location: Oakland, CA
Posts: 3,265
Bikes: '82 Univega Competizione, '72 Motobecane Grand Record, '83 Mercian KOM Touring, '85 Univega Alpina Uno, '76 Eisentraut Limited
Mentioned: 57 Post(s)
Tagged: 0 Thread(s)
Quoted: 1088 Post(s)
Liked 1,205 Times
in
701 Posts
When you disassembled, did you remove the stop screw and de-tension the cage before you removed the cage? You may need to reinstall the cage without the stop screw, then rotate the cage to tension it, then reinstall the stop screw.
I may be wrong, but it looks like tension is achieved by rotating the spring counterclockwise (as pictured there) so that it flexes into the stop and coils into itself. Just a guess -- please shoot down this idea if it is cuckoo.
I have taken apart a couple of derailleurs, but have yet to see a flat spring like this. I also have a Cyclone MKII that needs an overhaul, so I will be curious to see the result here.
EDIT: Reading Velocivixen's explanation below makes total sense to me...
Last edited by noobinsf; 08-15-16 at 02:12 PM.
08-15-16, 02:04 PM
#16
Senior Member

Just curious. Did this derailleur have spring tension prior to disassembly? I'm wondering if the other end of the spring is supposed to have a "hook" shaped end to fit into the slot you're referring to?
EDIT: I believe that what brian3069 said is correct. When you put the derailleur pulley section onto where that spring is, then then the pulley assembly counter clockwise that bare spring you see will sort of "unravel" if you will and the angled piece in the center will find its way into the slot. Hope this helps.
EDIT: I believe that what brian3069 said is correct. When you put the derailleur pulley section onto where that spring is, then then the pulley assembly counter clockwise that bare spring you see will sort of "unravel" if you will and the angled piece in the center will find its way into the slot. Hope this helps.
08-15-16, 02:23 PM
#17
Senior Member
Join Date: Feb 2008
Location: Peoria, IL
Posts: 4,476
Mentioned: 86 Post(s)
Tagged: 0 Thread(s)
Quoted: 1829 Post(s)
Liked 3,376 Times
in
1,580 Posts
fwiw, I'm working on photos of disassembling one of these GT Mk IIs.....
Steve in Peoria (should be doing something more useful... )
Steve in Peoria (should be doing something more useful...
)
08-15-16, 02:49 PM
#18
Senior Member
Join Date: Feb 2008
Location: Peoria, IL
Posts: 4,476
Mentioned: 86 Post(s)
Tagged: 0 Thread(s)
Quoted: 1829 Post(s)
Liked 3,376 Times
in
1,580 Posts
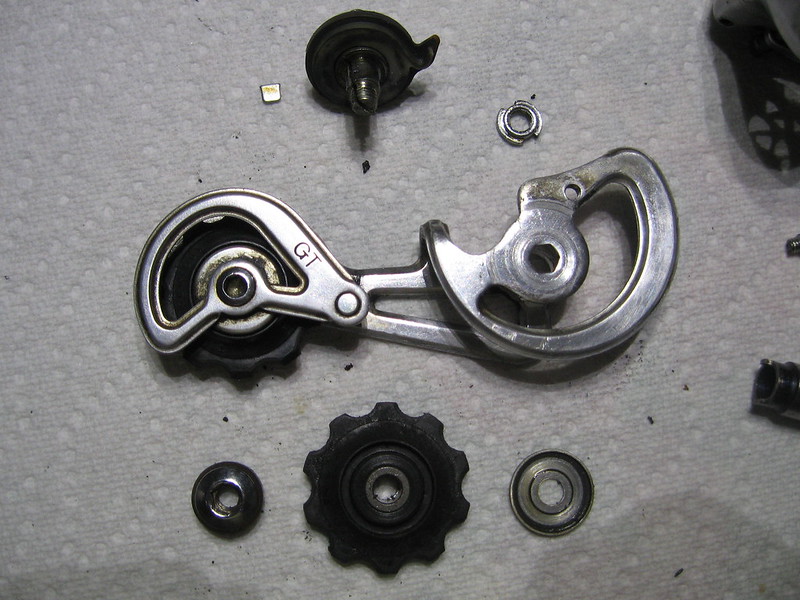
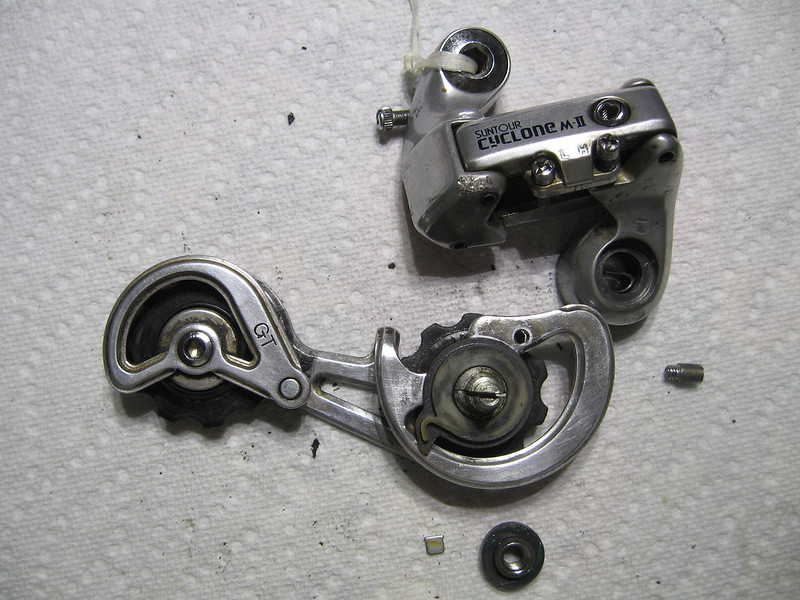
okay.... I took a ton of photos, so I'm going to post them a handful at a time... along with very brief descriptions. Feel free to ask questions.
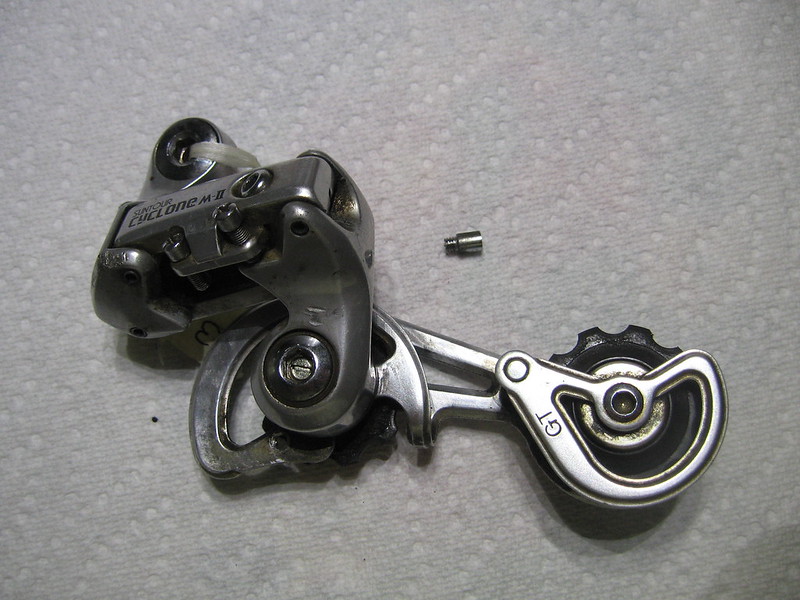
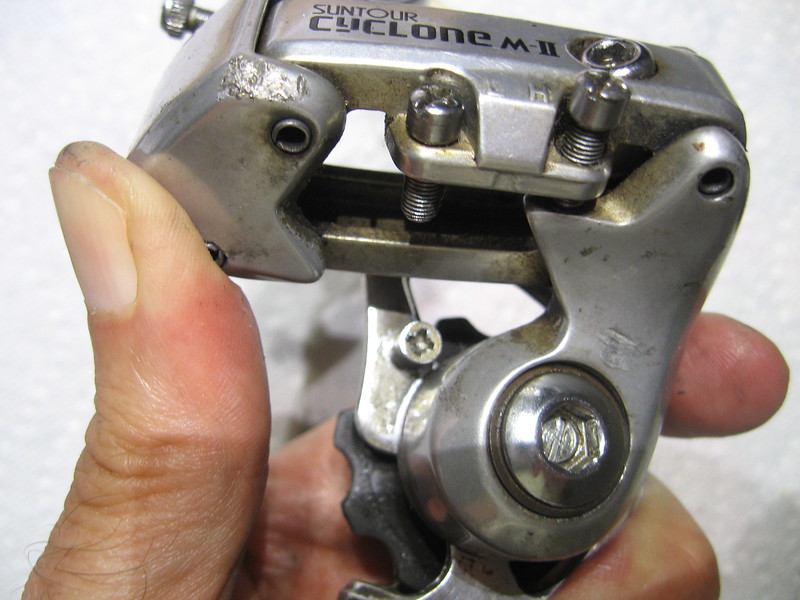
4765 start with the derailleur
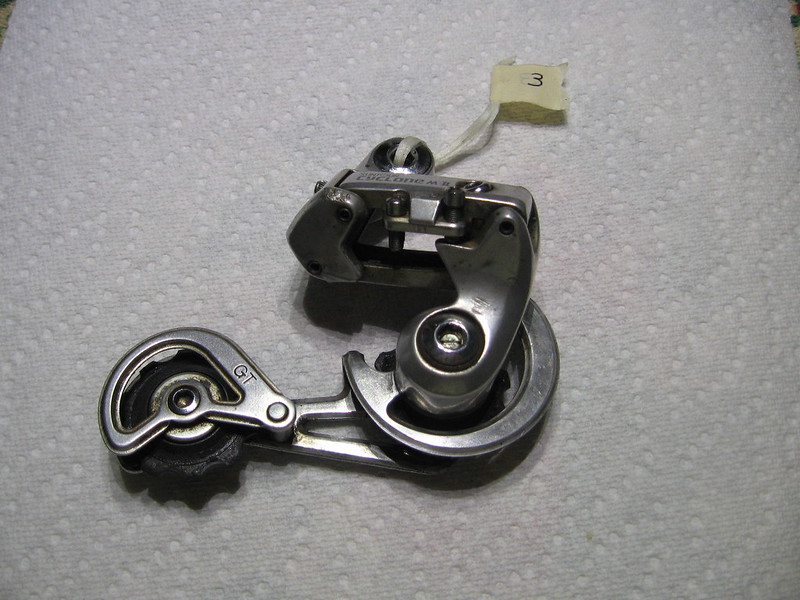
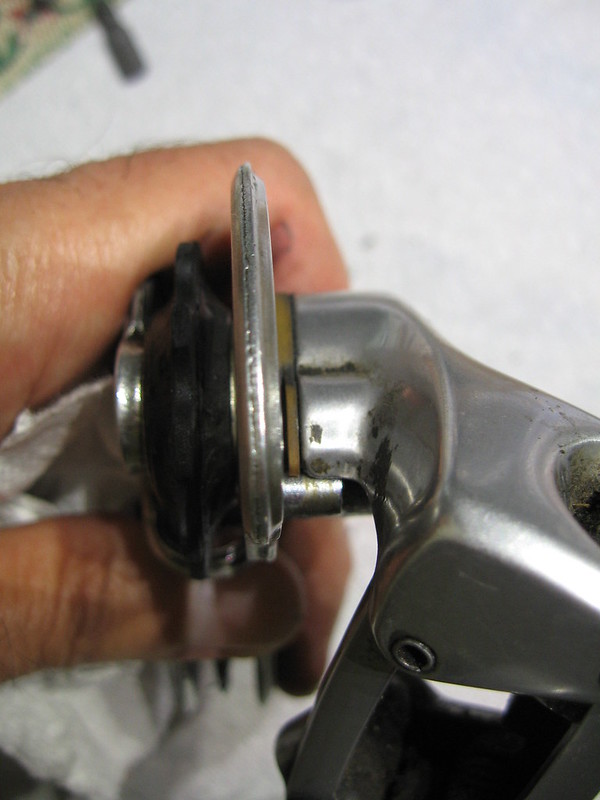
4766 rotate the cage counter-clockwise
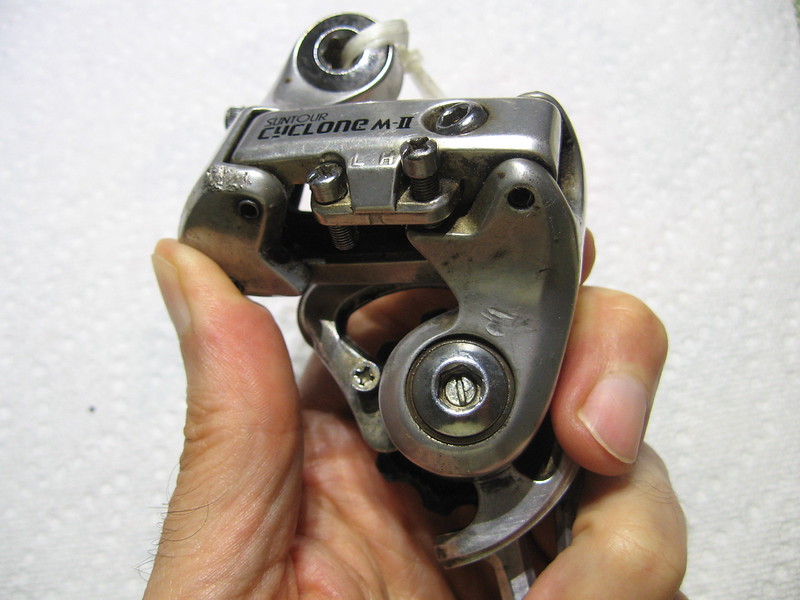
4767 remove the stop screw

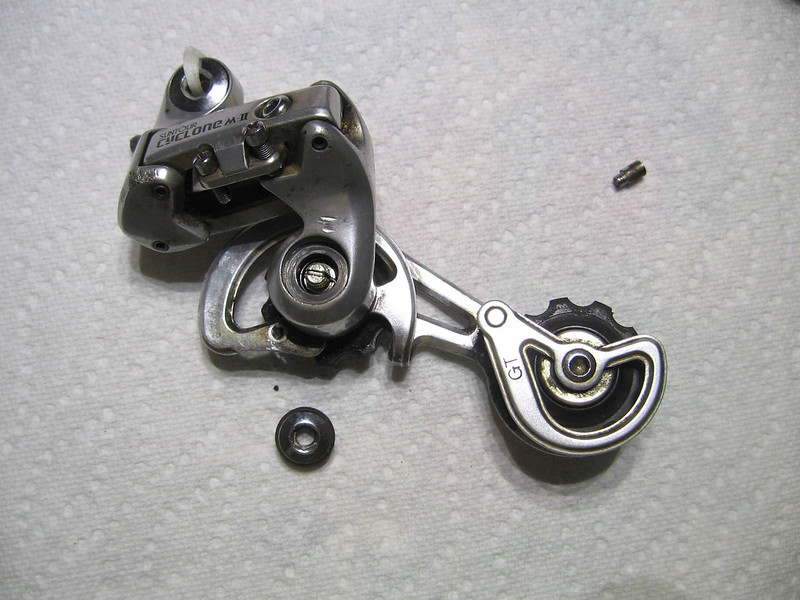
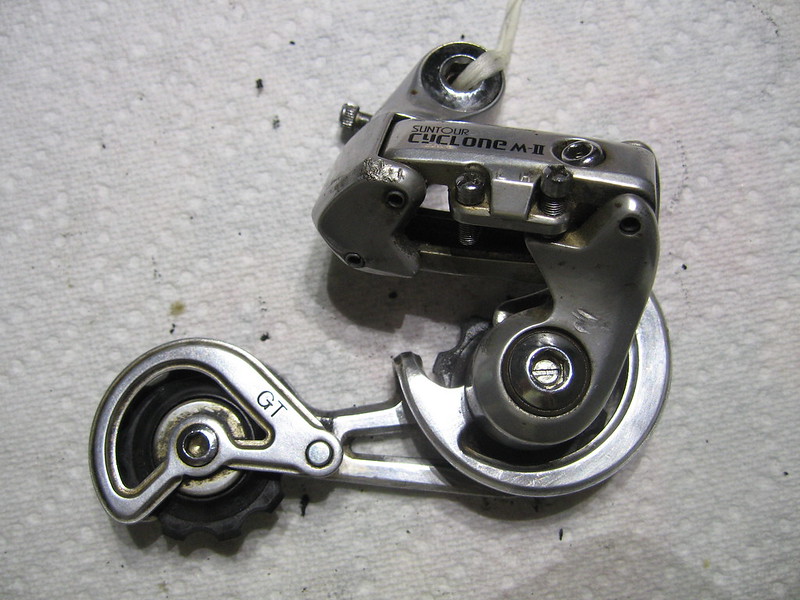
4769 allow the cage to rotate clockwise
4770 remove the allen nut
Steve in Peoria
4765 start with the derailleur
4766 rotate the cage counter-clockwise
4767 remove the stop screw
4769 allow the cage to rotate clockwise
4770 remove the allen nut
Steve in Peoria
Likes For steelbikeguy:
08-15-16, 03:00 PM
#19
Senior Member
Join Date: Feb 2008
Location: Peoria, IL
Posts: 4,476
Mentioned: 86 Post(s)
Tagged: 0 Thread(s)
Quoted: 1829 Post(s)
Liked 3,376 Times
in
1,580 Posts
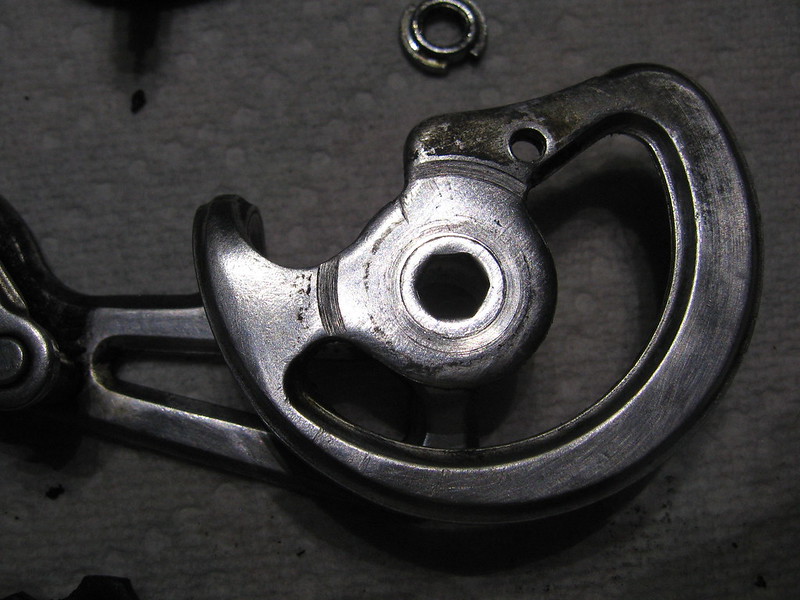
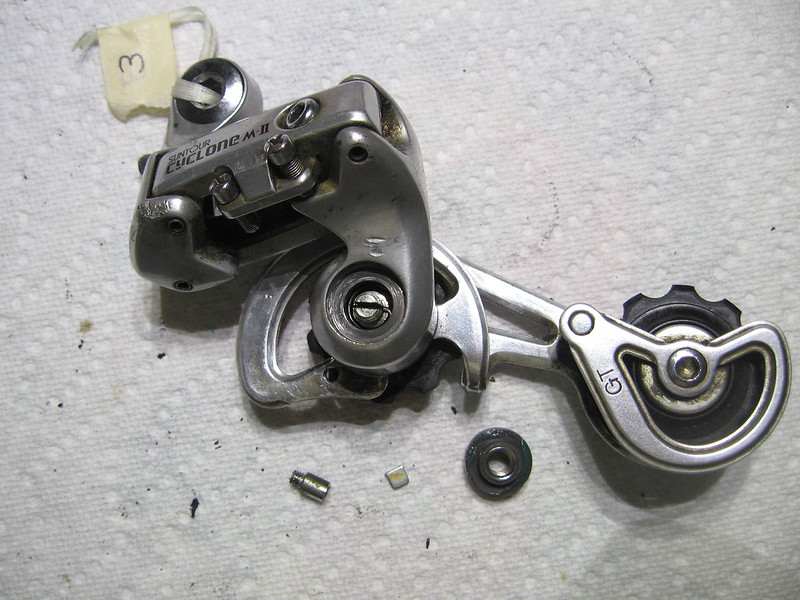
sequence of photos, part 2:
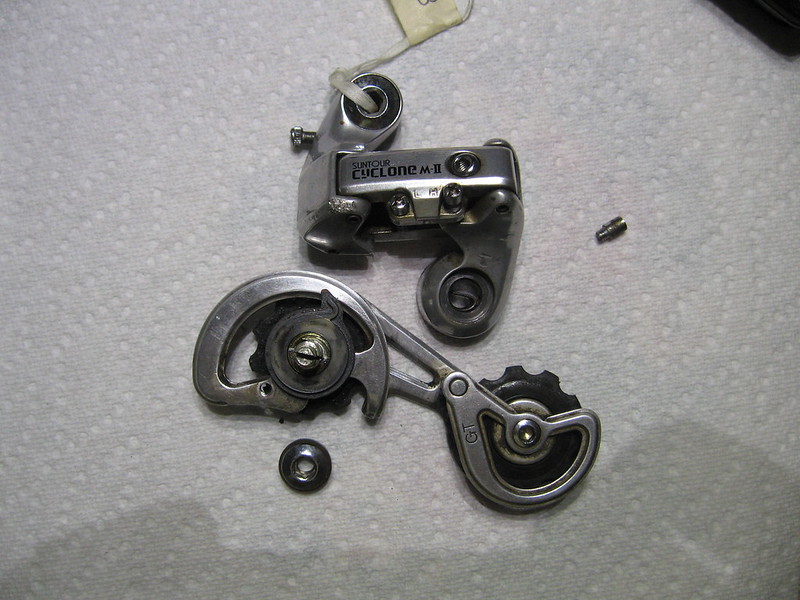
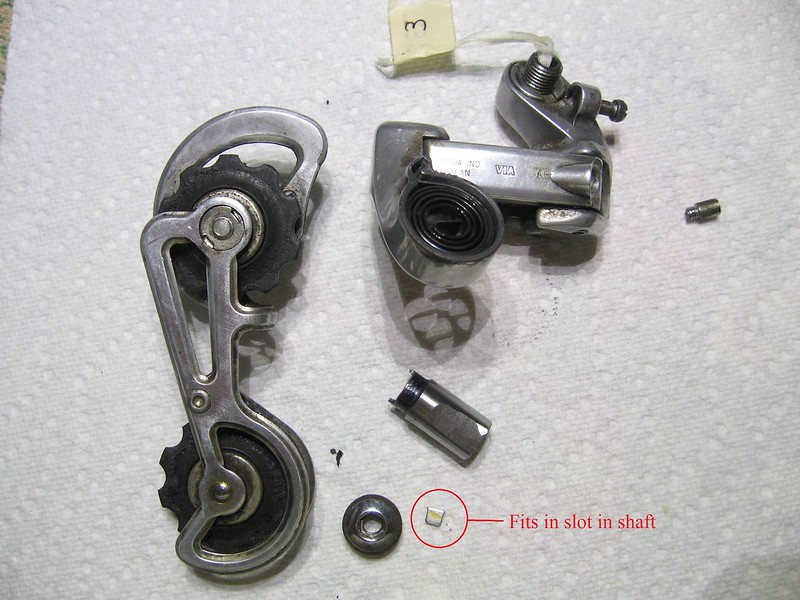
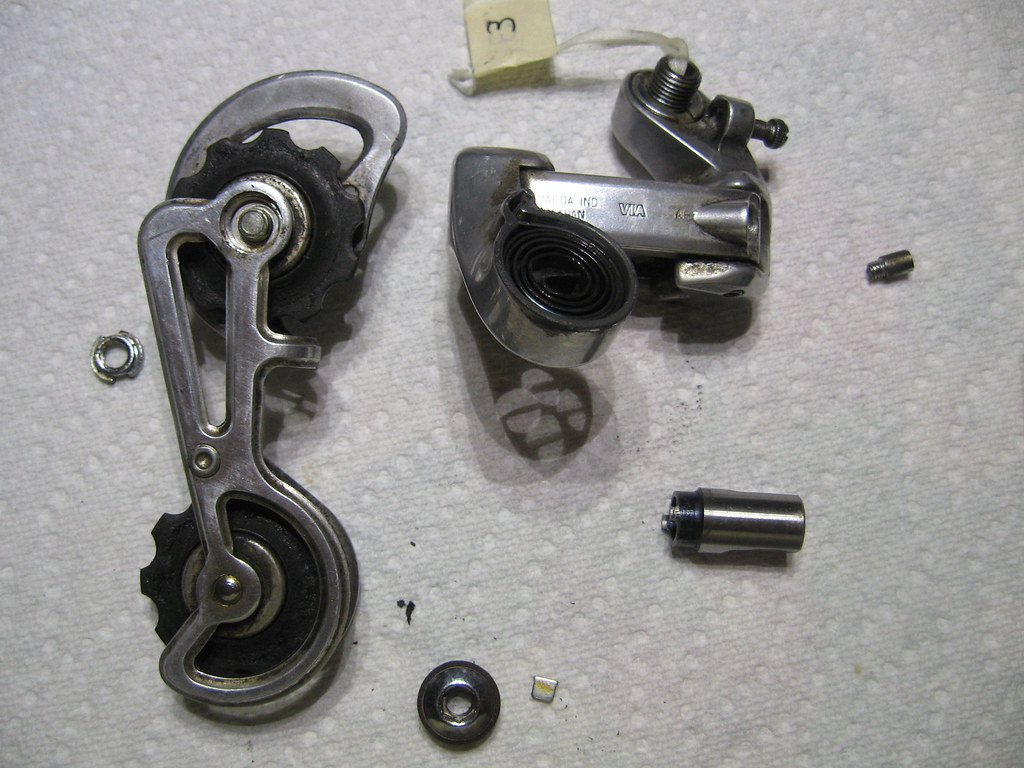
4771 slide the cage out the back. Note: there is a little wedge that is in the slot in the shaft and it will pop out when the spring comes out of the slot in the shaft. Don't lose the little wedge! You can see the wedge in a later photo.
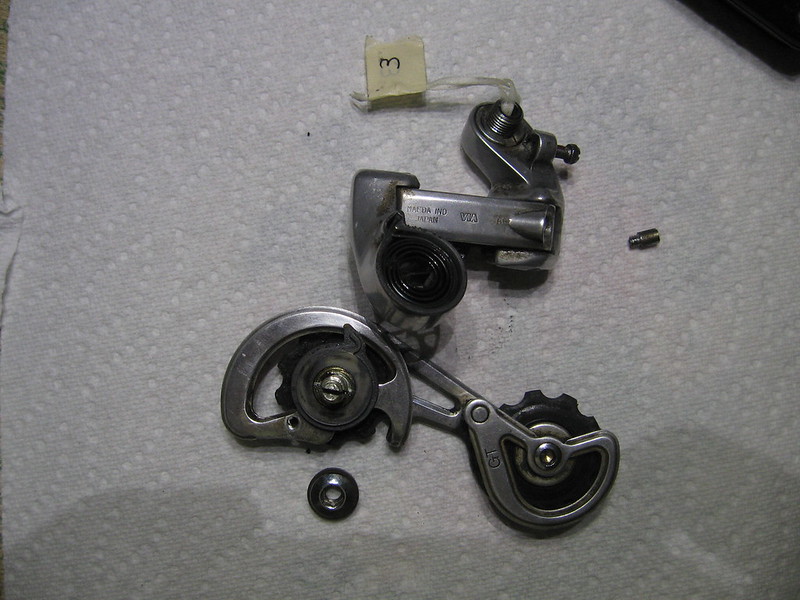
4772 backside of the derailleur body
4773 back of the body and cage. Note the little wedge in the lower right of the photo. This is what was in the slot of the shaft, and held the spring in place.
4774 remove the nut from the upper pulley
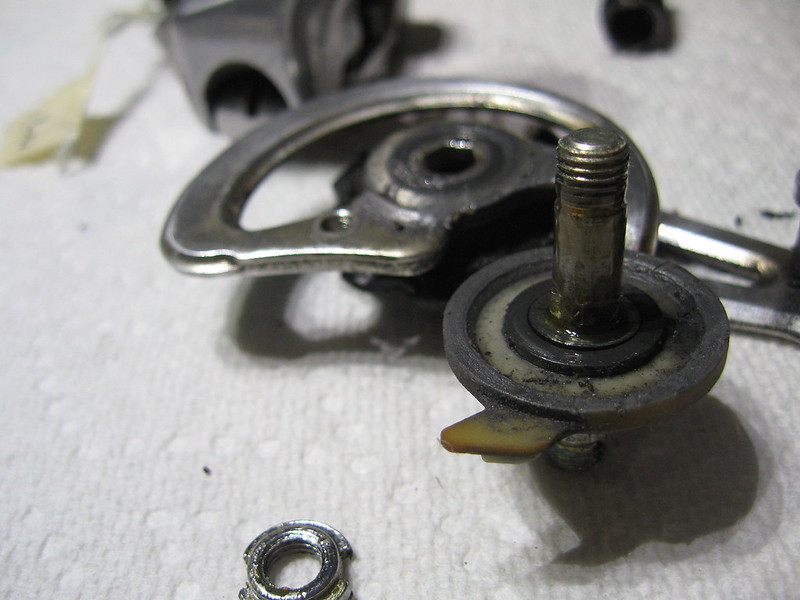
4775 remove the shaft from the cage
Steve in Peoria
4771 slide the cage out the back. Note: there is a little wedge that is in the slot in the shaft and it will pop out when the spring comes out of the slot in the shaft. Don't lose the little wedge! You can see the wedge in a later photo.
4772 backside of the derailleur body
4773 back of the body and cage. Note the little wedge in the lower right of the photo. This is what was in the slot of the shaft, and held the spring in place.
4774 remove the nut from the upper pulley
4775 remove the shaft from the cage
Steve in Peoria
Likes For steelbikeguy:
08-15-16, 03:05 PM
#20
Senior Member
Join Date: Feb 2008
Location: Peoria, IL
Posts: 4,476
Mentioned: 86 Post(s)
Tagged: 0 Thread(s)
Quoted: 1829 Post(s)
Liked 3,376 Times
in
1,580 Posts
sequence of photos, part 3:
4776 note the hex flats on the shaft that mate with the cage
4777 the cage and shaft
4778 the hex hole in the cage
4779 the cage and the shaft
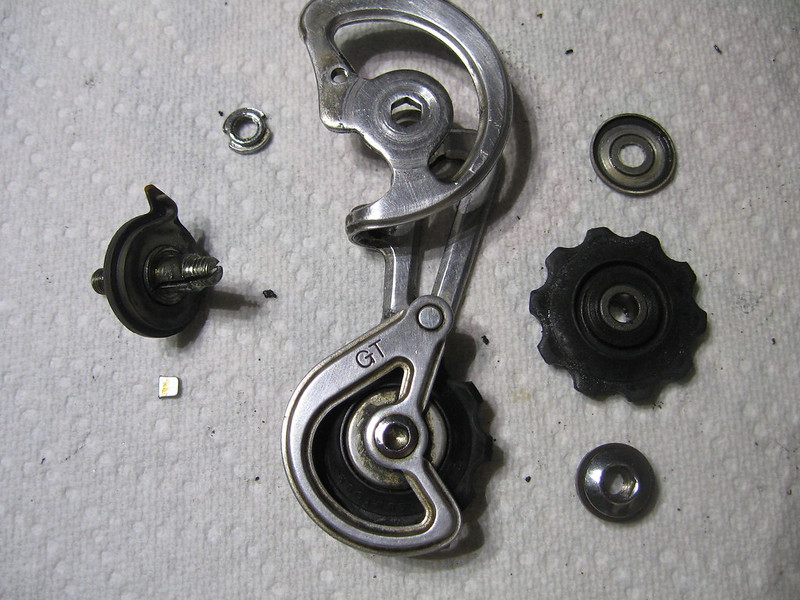
4780 the shaft and the spring cover
Steve in Peoria
4776 note the hex flats on the shaft that mate with the cage
4777 the cage and shaft
4778 the hex hole in the cage
4779 the cage and the shaft
4780 the shaft and the spring cover
Steve in Peoria
Likes For steelbikeguy:
08-15-16, 03:16 PM
#21
Senior Member
Join Date: Feb 2008
Location: Peoria, IL
Posts: 4,476
Mentioned: 86 Post(s)
Tagged: 0 Thread(s)
Quoted: 1829 Post(s)
Liked 3,376 Times
in
1,580 Posts
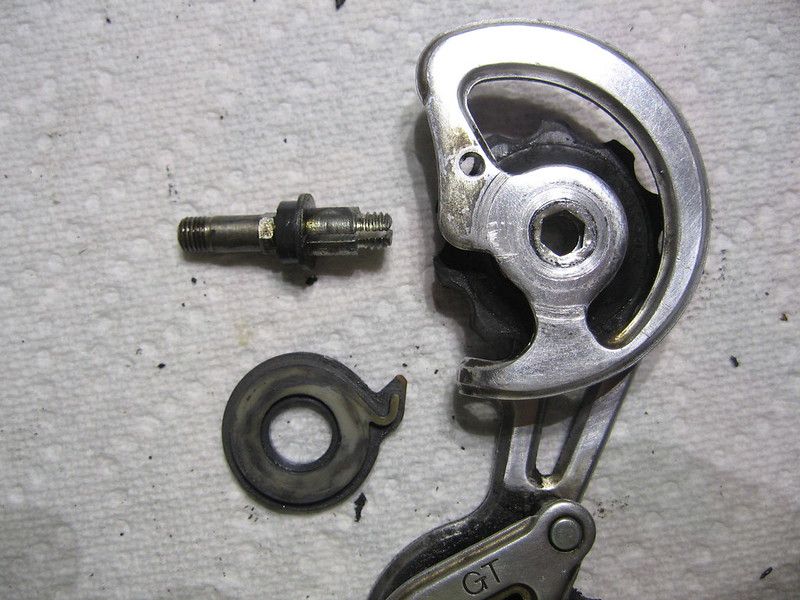
and the last sequence of photos....
4781 reassembling the shaft and cage.
note: I didn't show that I added a little grease between the plastic sleeve on the shaft and the spring cover. This rotating joint supports the inboard side of the shaft.
4782 inserting the cage assembly into the derailleur body
4783 put the wedge into the slot, and then the allen nut onto the shaft.
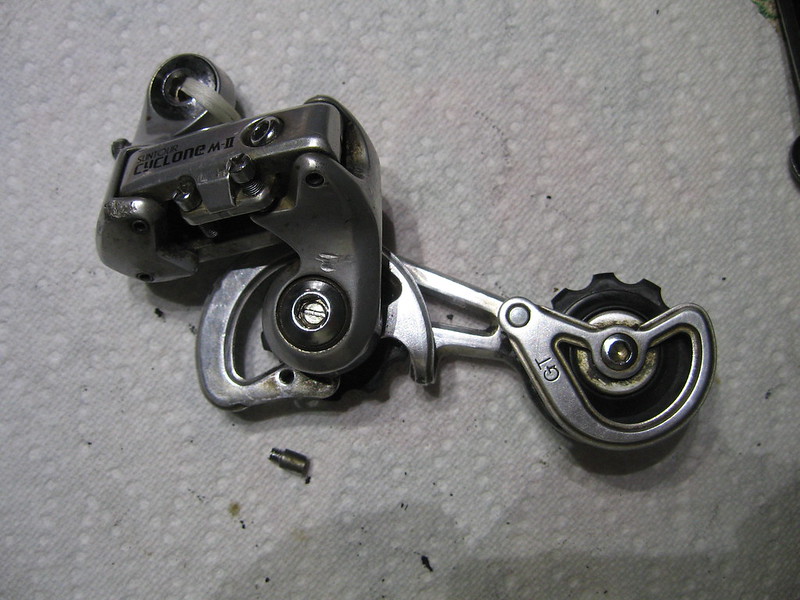
4784 rotate the cage counter-clockwise
4785 install the stop screw
4786 this is a view from above, showing the stop screw hitting the stop.
4787 another view, showing the stop screw hitting the stop.
4788 the reassembled derailleur
Steve in Peoria
4781 reassembling the shaft and cage.
note: I didn't show that I added a little grease between the plastic sleeve on the shaft and the spring cover. This rotating joint supports the inboard side of the shaft.
4782 inserting the cage assembly into the derailleur body
4783 put the wedge into the slot, and then the allen nut onto the shaft.
4784 rotate the cage counter-clockwise
4785 install the stop screw
4786 this is a view from above, showing the stop screw hitting the stop.
4787 another view, showing the stop screw hitting the stop.
4788 the reassembled derailleur
Steve in Peoria
Likes For steelbikeguy:
08-15-16, 03:26 PM
#22
Junior Member
Thread Starter
Join Date: Mar 2016
Posts: 5
Mentioned: 0 Post(s)
Tagged: 0 Thread(s)
Quoted: 3 Post(s)
Likes: 0
Liked 0 Times
in
0 Posts
Holy Derailleur
This thread is taking helpfulness to a totally new level.
You guys rock.
Plan for tonight:
Pizza & Beer, followed by some quality time with a Suntour derailleur while looking at the photos of steelbikeguy disassembling the best RD ever made.
This thread is taking helpfulness to a totally new level.
You guys rock.
Plan for tonight:
Pizza & Beer, followed by some quality time with a Suntour derailleur while looking at the photos of steelbikeguy disassembling the best RD ever made.
08-15-16, 03:27 PM
#23
Bike Butcher of Portland
Join Date: Jul 2014
Location: Portland, OR
Posts: 11,639
Bikes: It's complicated.
Mentioned: 1299 Post(s)
Tagged: 0 Thread(s)
Quoted: 4682 Post(s)
Liked 5,800 Times
in
2,284 Posts
grazie mille!
or, since this is SunTour,
Doumo arigatou!
or, since this is SunTour,
Doumo arigatou!
__________________
If someone tells you that you have enough bicycles and you don't need any more, stop talking to them. You don't need that kind of negativity in your life.
If someone tells you that you have enough bicycles and you don't need any more, stop talking to them. You don't need that kind of negativity in your life.
08-15-16, 03:32 PM
#24
Senior Member
Join Date: Feb 2008
Location: Peoria, IL
Posts: 4,476
Mentioned: 86 Post(s)
Tagged: 0 Thread(s)
Quoted: 1829 Post(s)
Liked 3,376 Times
in
1,580 Posts
glad to help.... besides, it was a learning experience for me. I've taken the 1st generation Cyclone GT's apart many times, but don't think I've ever taken a 2nd generation (i.e. Mark II) apart before. I generally prefer the 1st generation models, so wasn't surprised that this poor Mark II was hiding at the bottom of my box of derailleurs.
I like the fact that the shaft doesn't screw into the cage, but am not as fond of the use of the plastic as the bushing bearing for the shaft. Perhaps it tolerates neglect better??
Steve in Peoria
I like the fact that the shaft doesn't screw into the cage, but am not as fond of the use of the plastic as the bushing bearing for the shaft. Perhaps it tolerates neglect better??
Steve in Peoria
08-19-16, 09:05 PM
#25
Senior Member
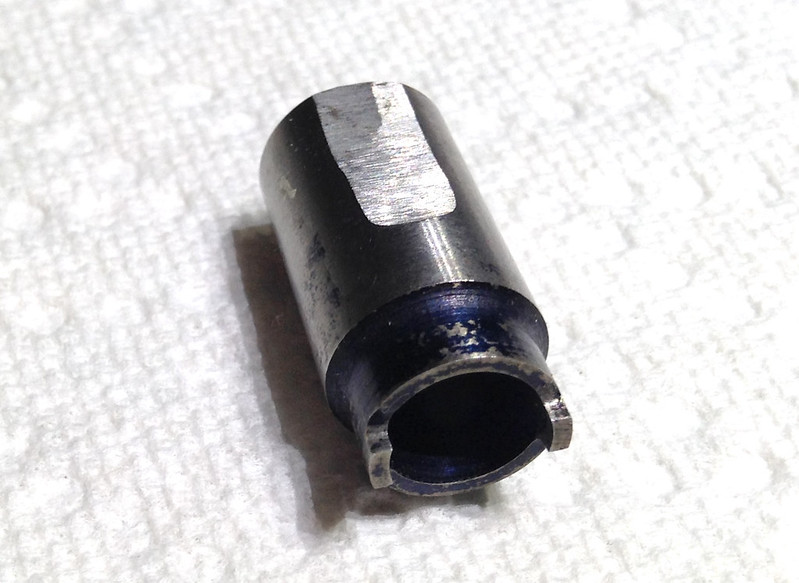
For posterity, I thought I might add a photo of the 'official' tool:
DSC00720.jpg
DSC00721.jpg