


Stronglight bottom bracket sanity check
 08-06-19, 04:40 AM
#26
Senior Member
It's a forty year old crank, and if the previous owners took good care of it, they may have overhauled the BB forty times or so if rhey did an annual overhaul. Forty tightenings might have bottomed out the crank. I wonder how much longer my 49D will be usable.
 08-06-19, 05:02 AM
#27
Senior Member
Join Date: Oct 2016
Location: Cambridge UK
Posts: 852
Bikes: 1903 24 spd Sunbeam, 1927 Humber, 3 1930 Raleighs, 2 1940s Sunbeams, 2 1940s Raleighs, Rudge, 1950s Robin Hood, 1958 Claud Butler, 2 1973 Colnago Supers, Eddie Merckx, 2 1980 Holdsworth, EG Bates funny TT bike, another 6 or so 1990s bikes
Mentioned: 15 Post(s)
Tagged: 0 Thread(s)
Quoted: 331 Post(s)
Liked 332 Times
in
185 Posts
 08-06-19, 05:55 AM
#28
Senior Member

Join Date: Sep 2014
Location: Irvine, CA
Posts: 604
Mentioned: 29 Post(s)
Tagged: 0 Thread(s)
Quoted: 140 Post(s)
Likes: 0
Liked 13 Times
in
12 Posts
I’ve had good luck using small aluminum shims (2 little squares - on adjacent faces) between the spindle and crank on a Stronglight that was bottoming out.
Likes For jcb3:
08-06-19, 06:20 AM
#29

www.theheadbadge.com

Join Date: Sep 2005
Location: Southern Florida
Posts: 28,514
Bikes: https://www.theheadbadge.com
Mentioned: 124 Post(s)
Tagged: 0 Thread(s)
Quoted: 2422 Post(s)
Liked 4,396 Times
in
2,093 Posts
@amillhench, the advice being given to you up above is well-meaning, but they're shooting darts to the wind without photos.
Can you install the cranks, take out the installer bolts, and take pictures of the taper inside after installation? If it's visibly bottomed out, we'll know - and not be guessing - whether the crank arms are bottomed out or not.
-Kurt
Can you install the cranks, take out the installer bolts, and take pictures of the taper inside after installation? If it's visibly bottomed out, we'll know - and not be guessing - whether the crank arms are bottomed out or not.
-Kurt
__________________


08-06-19, 07:50 AM
#30
aged to perfection

Join Date: Jun 2009
Location: PacNW
Posts: 1,817
Bikes: Dinucci Allez 2.0, Richard Sachs, Alex Singer, Serotta, Masi GC, Raleigh Pro Mk.1, Hetchins, etc
Mentioned: 24 Post(s)
Tagged: 0 Thread(s)
Quoted: 839 Post(s)
Liked 1,258 Times
in
663 Posts
What Cuda and others said above. You're getting lots of good advice but without pics or measurements the chances of us helping you solve the problem is small.
To me it sounds like the two possibilities are - you have the spindle in backwards or the arms are bottomed out on the tapers.
Stronglight cranks are tricky. The alloy is very soft, and the arms require a crank extractor that is unique to the brand. Use of other extractors will probably strip the threads. You also need to be careful to not over torque the bolt. That's a whole separate discussion.
Let's see a nice tight close up of the spindle's penetration inside the arm (take the bolt out). and let's see a pic of the drive side arm as it is installed now.
then, take the arms off (carefully, with the correct tool) and measure the spindle - how far it sticks out on both sides. And let's see a pic of the backside of the arms, showing the square where the spindle goes in.
With this information, we may be able to help.
Mark Petry
Bainbridge Island, WA USA
Likes For mpetry912:
08-06-19, 07:53 PM
#31
Phyllo-buster

Join Date: Jan 2010
Location: Nova Scotia
Posts: 8,847
Bikes: roadsters, club bikes, fixed and classic
Mentioned: 133 Post(s)
Tagged: 0 Thread(s)
Quoted: 2298 Post(s)
Liked 2,055 Times
in
1,255 Posts
Likes For clubman:
08-06-19, 09:01 PM
#32
TXHC
Thread Starter

Alright, folks. This is what I have for now.
I think it it is a cup issue as @Johno59 stated. With the bearings in, the NDS taper does not clear the cup, hence the bottoming out. The photo showing this is after I over tightened the bearings just to see if it would clear. Then I removed NDS bearings, reinstalled cup, and put on the NDS crank. I don’t believe the taper is bottoming out, but y’all have much more experience than me. Pictures attached.
I’ll have to mess around with additional testing tomorrow as familial duties call! All the wisdom and input is greatly a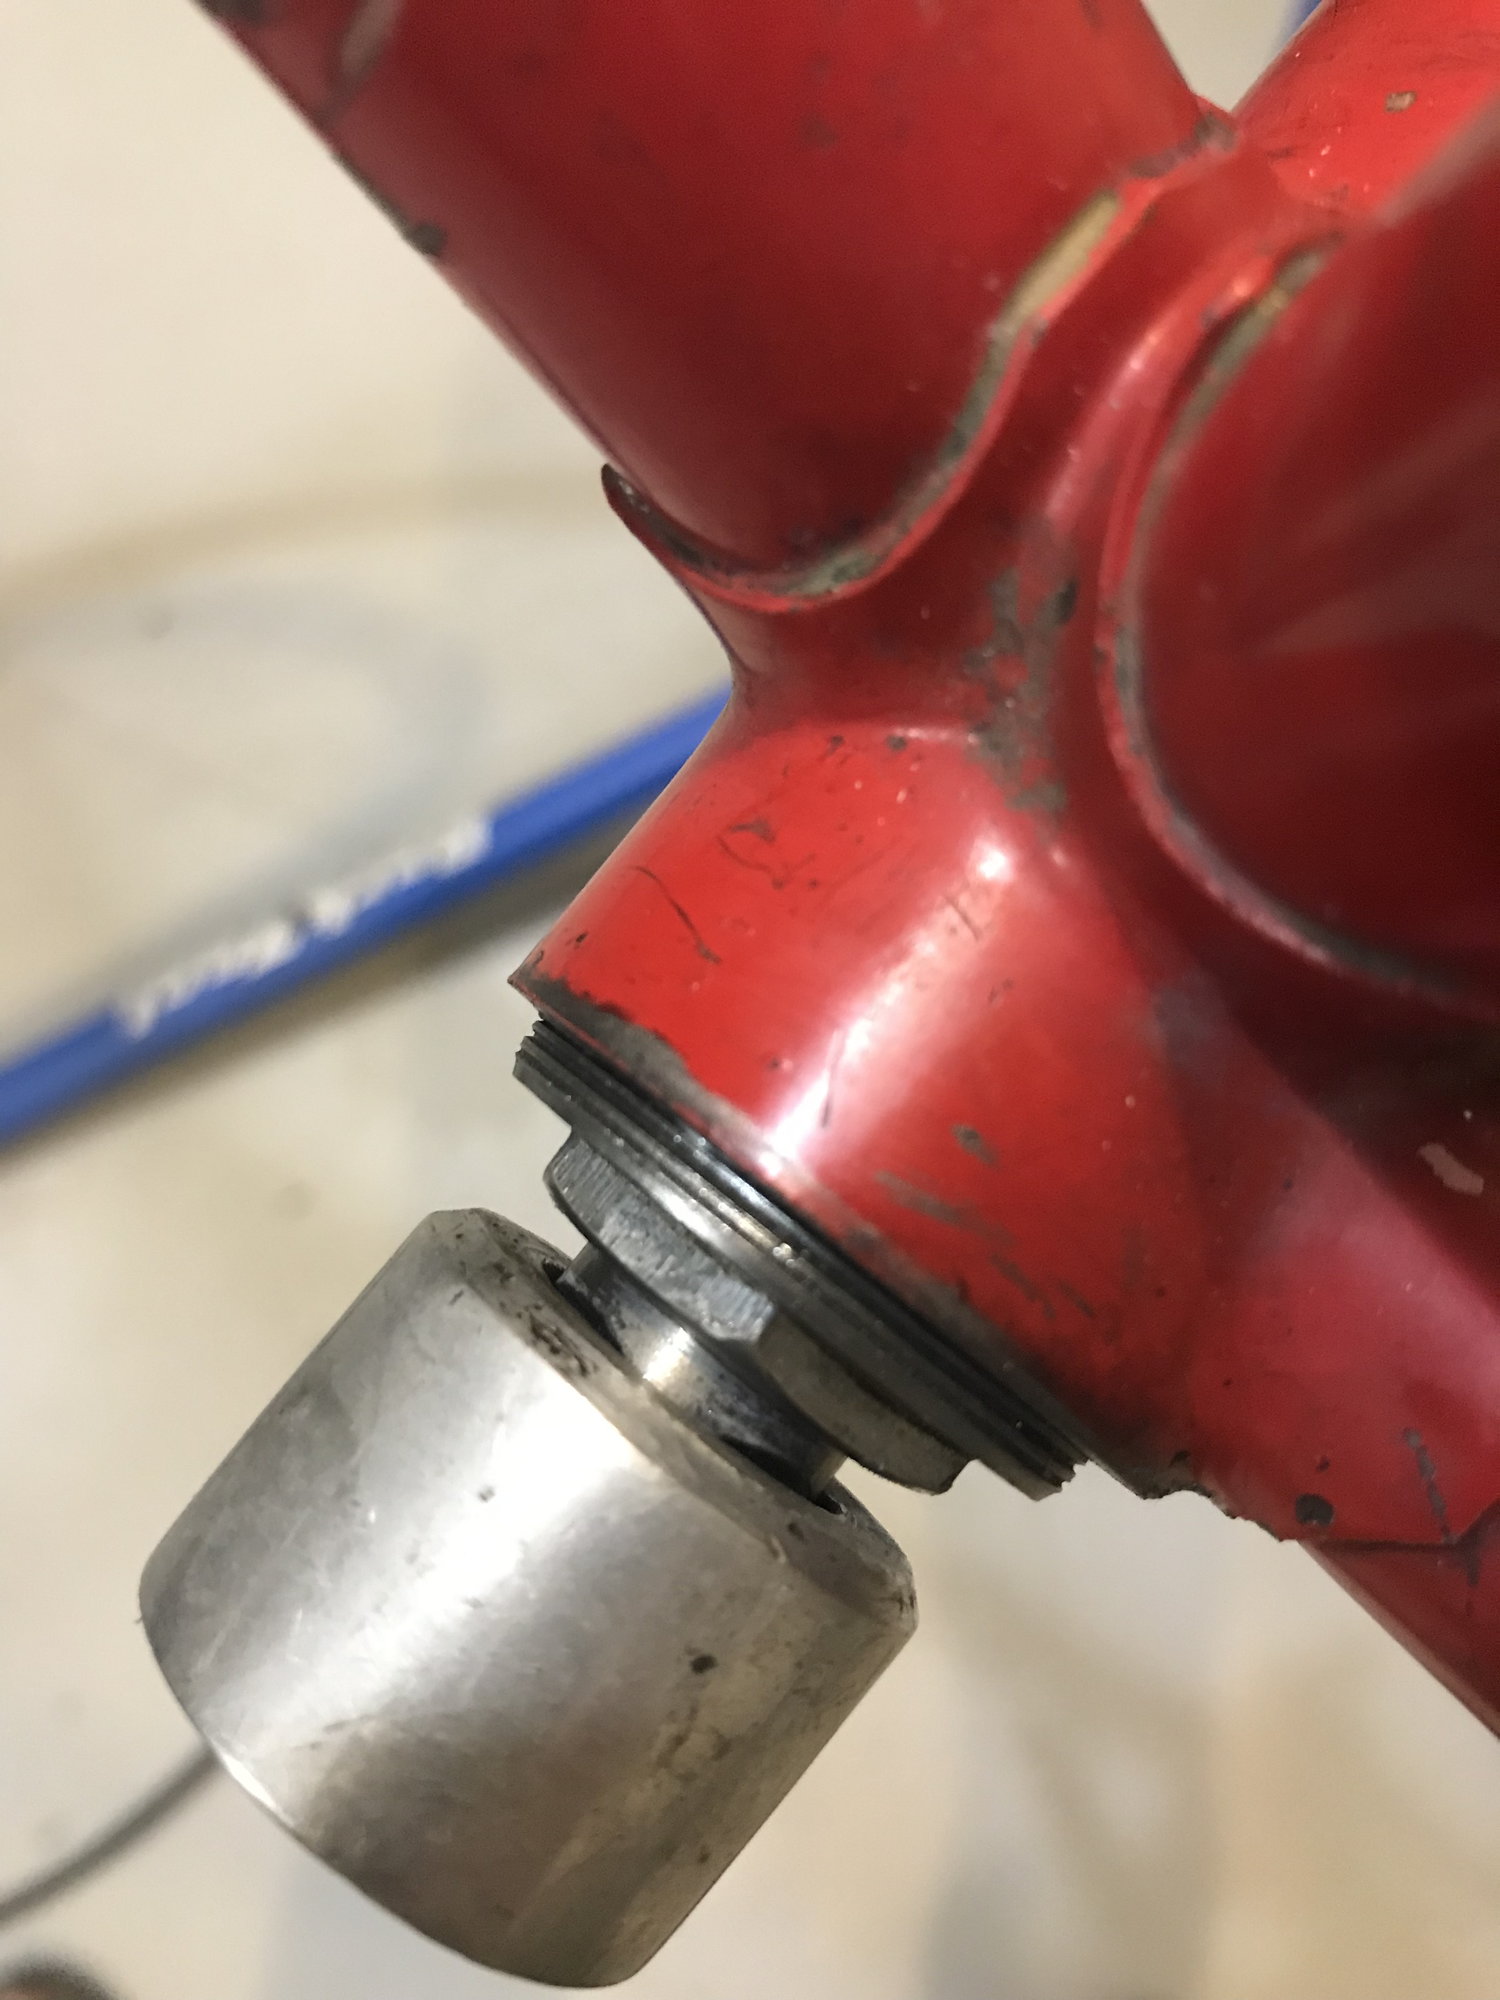
With NDS bearings removed.
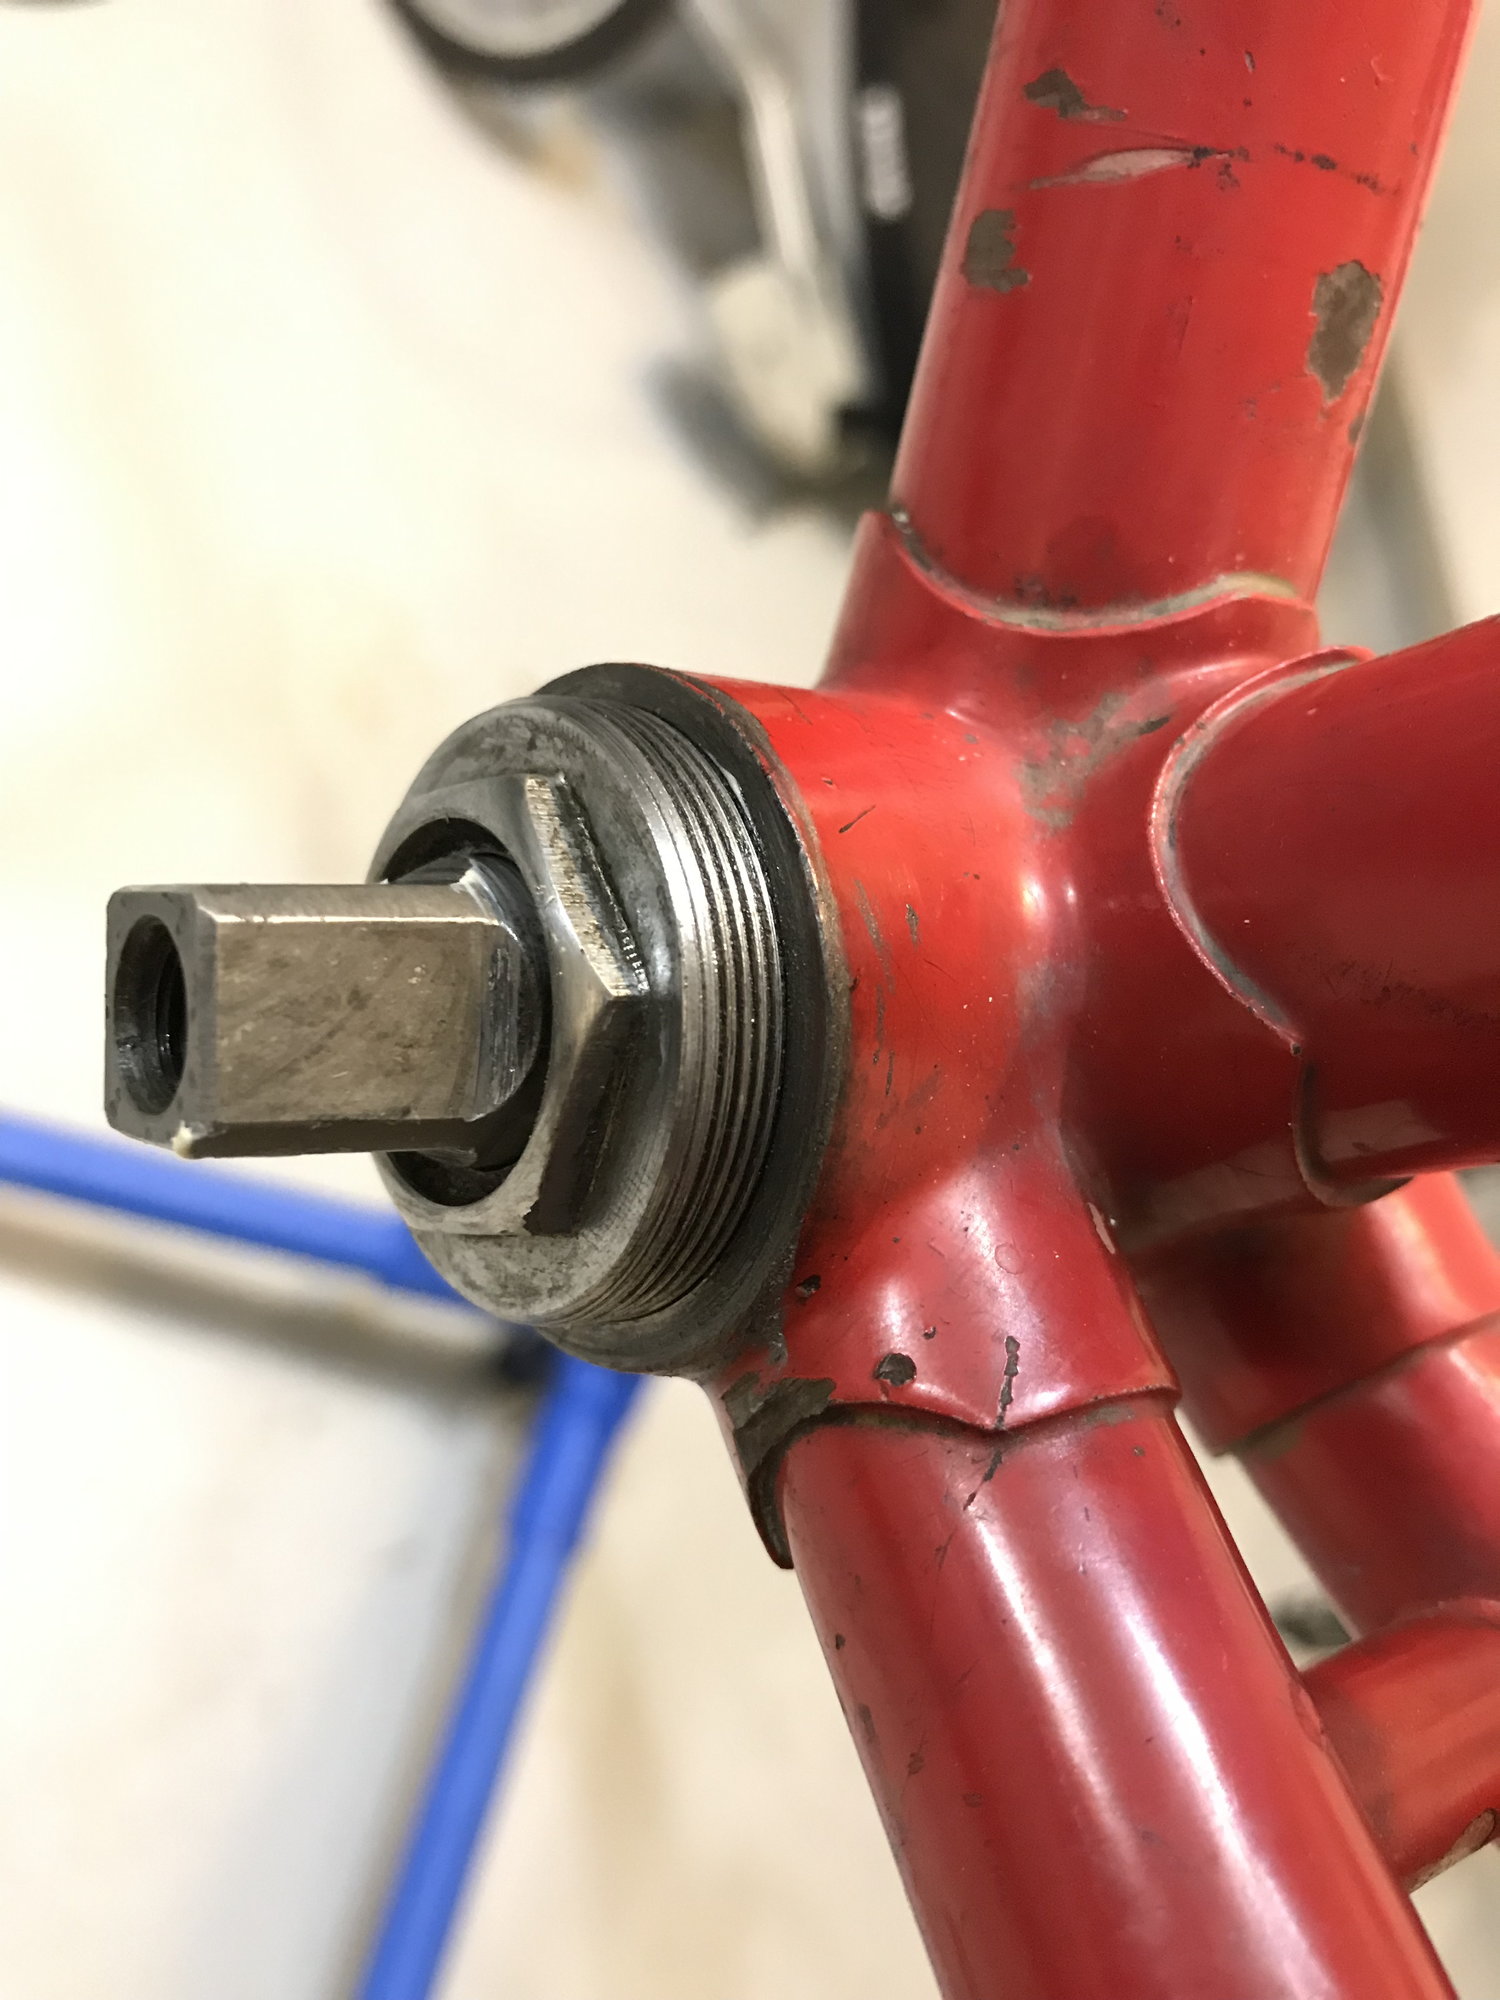
With both bearings in. Inadequate taper clearance.
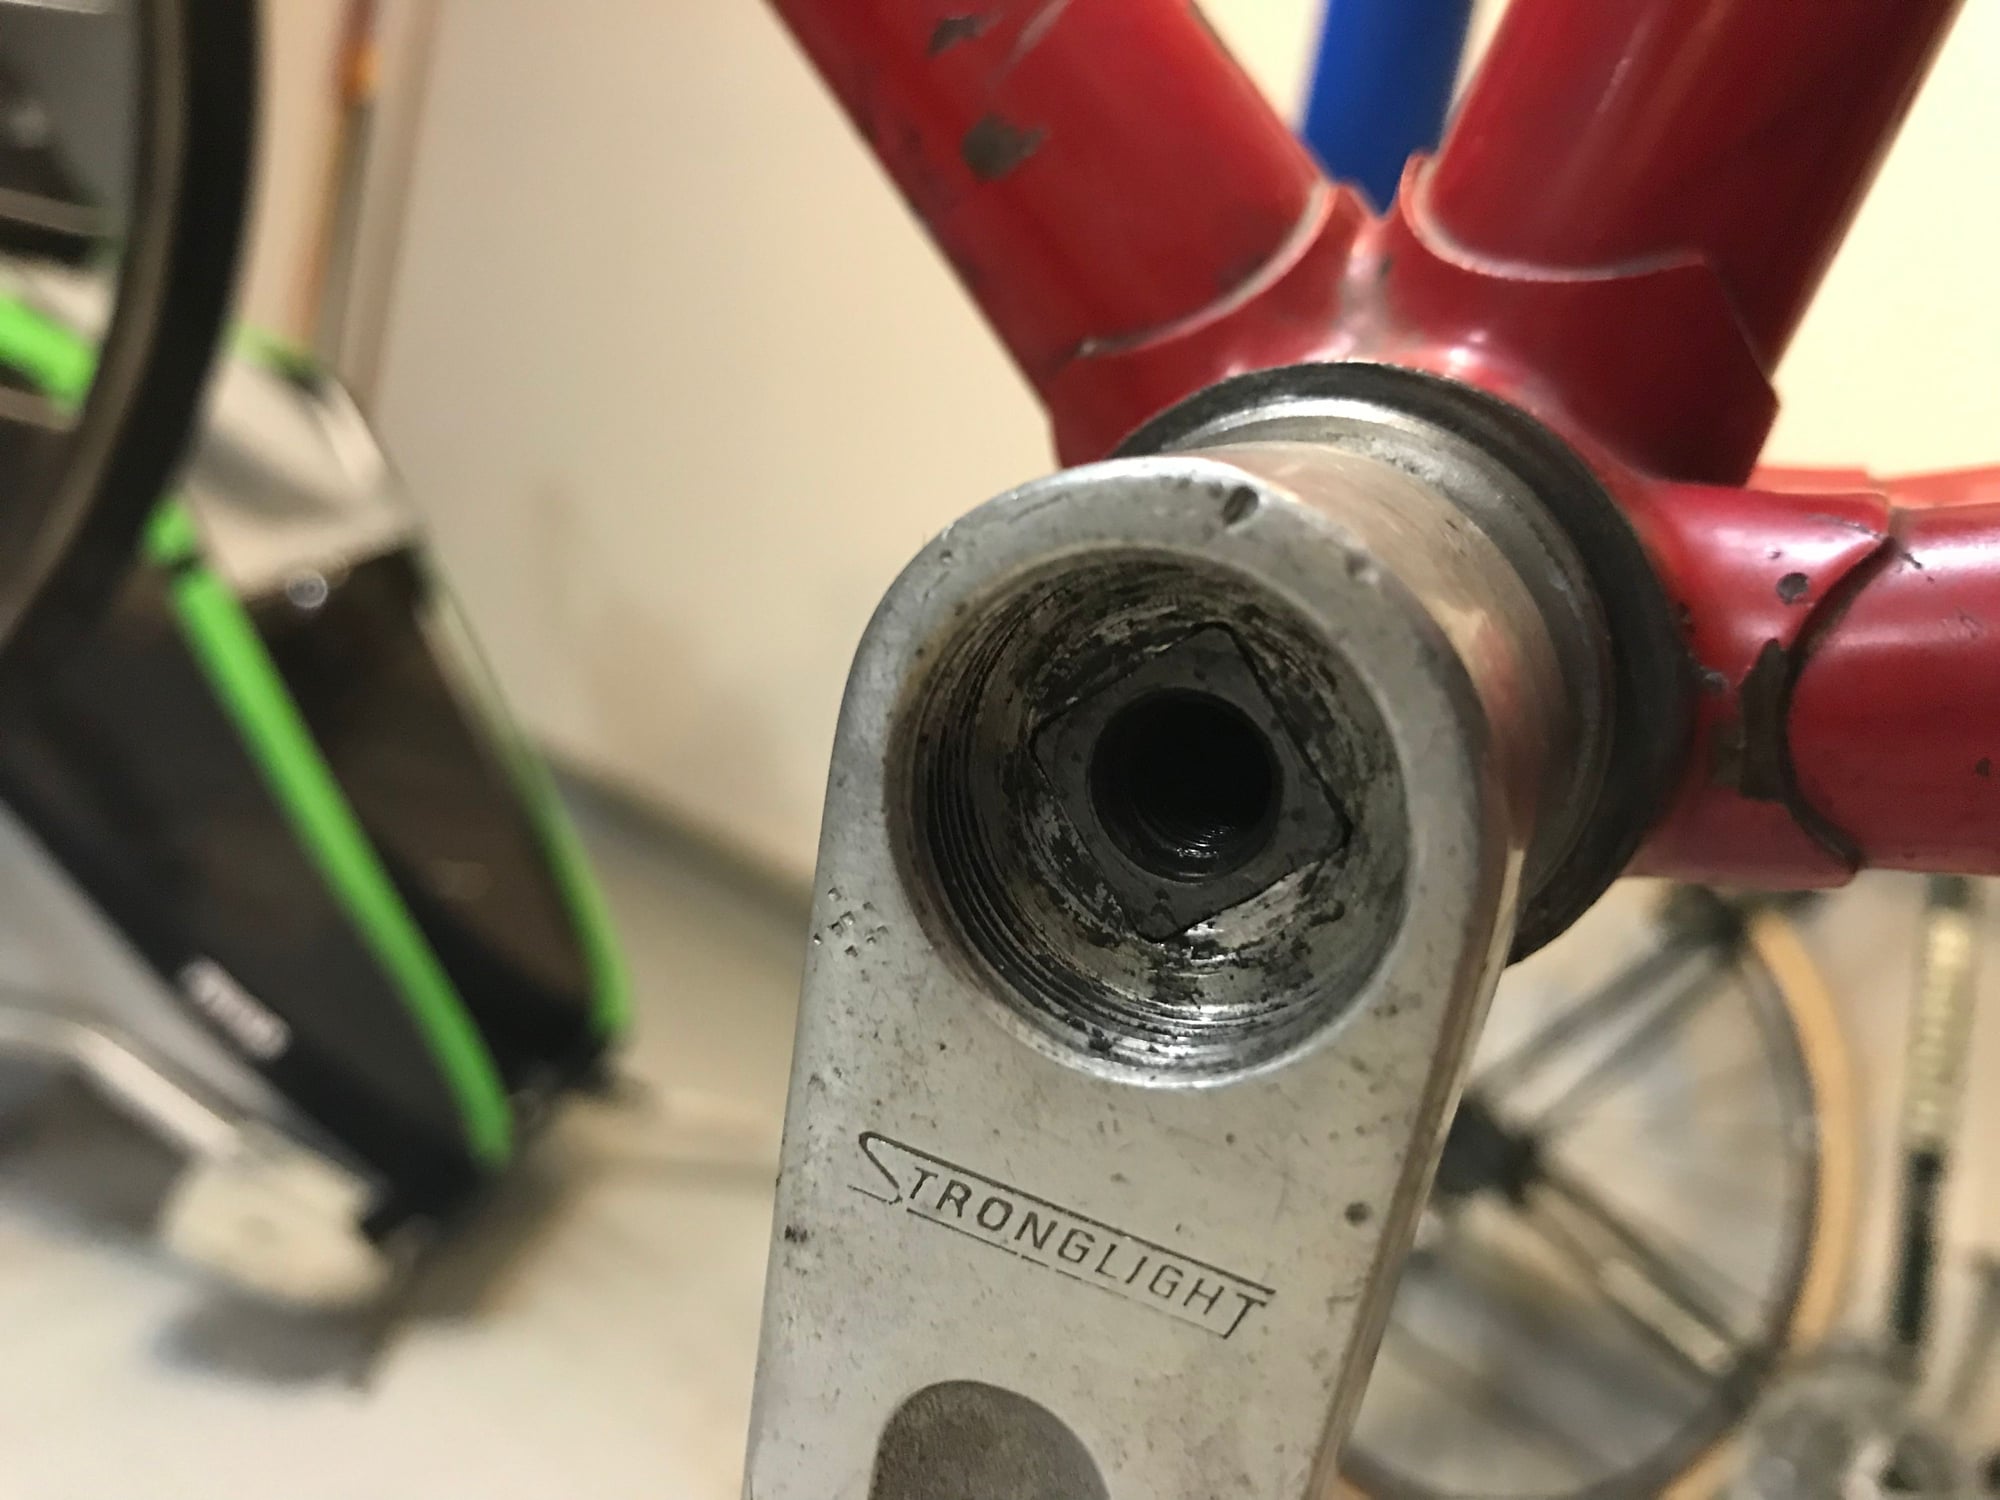
With NDS bearings removed, torqued, bolt removed.
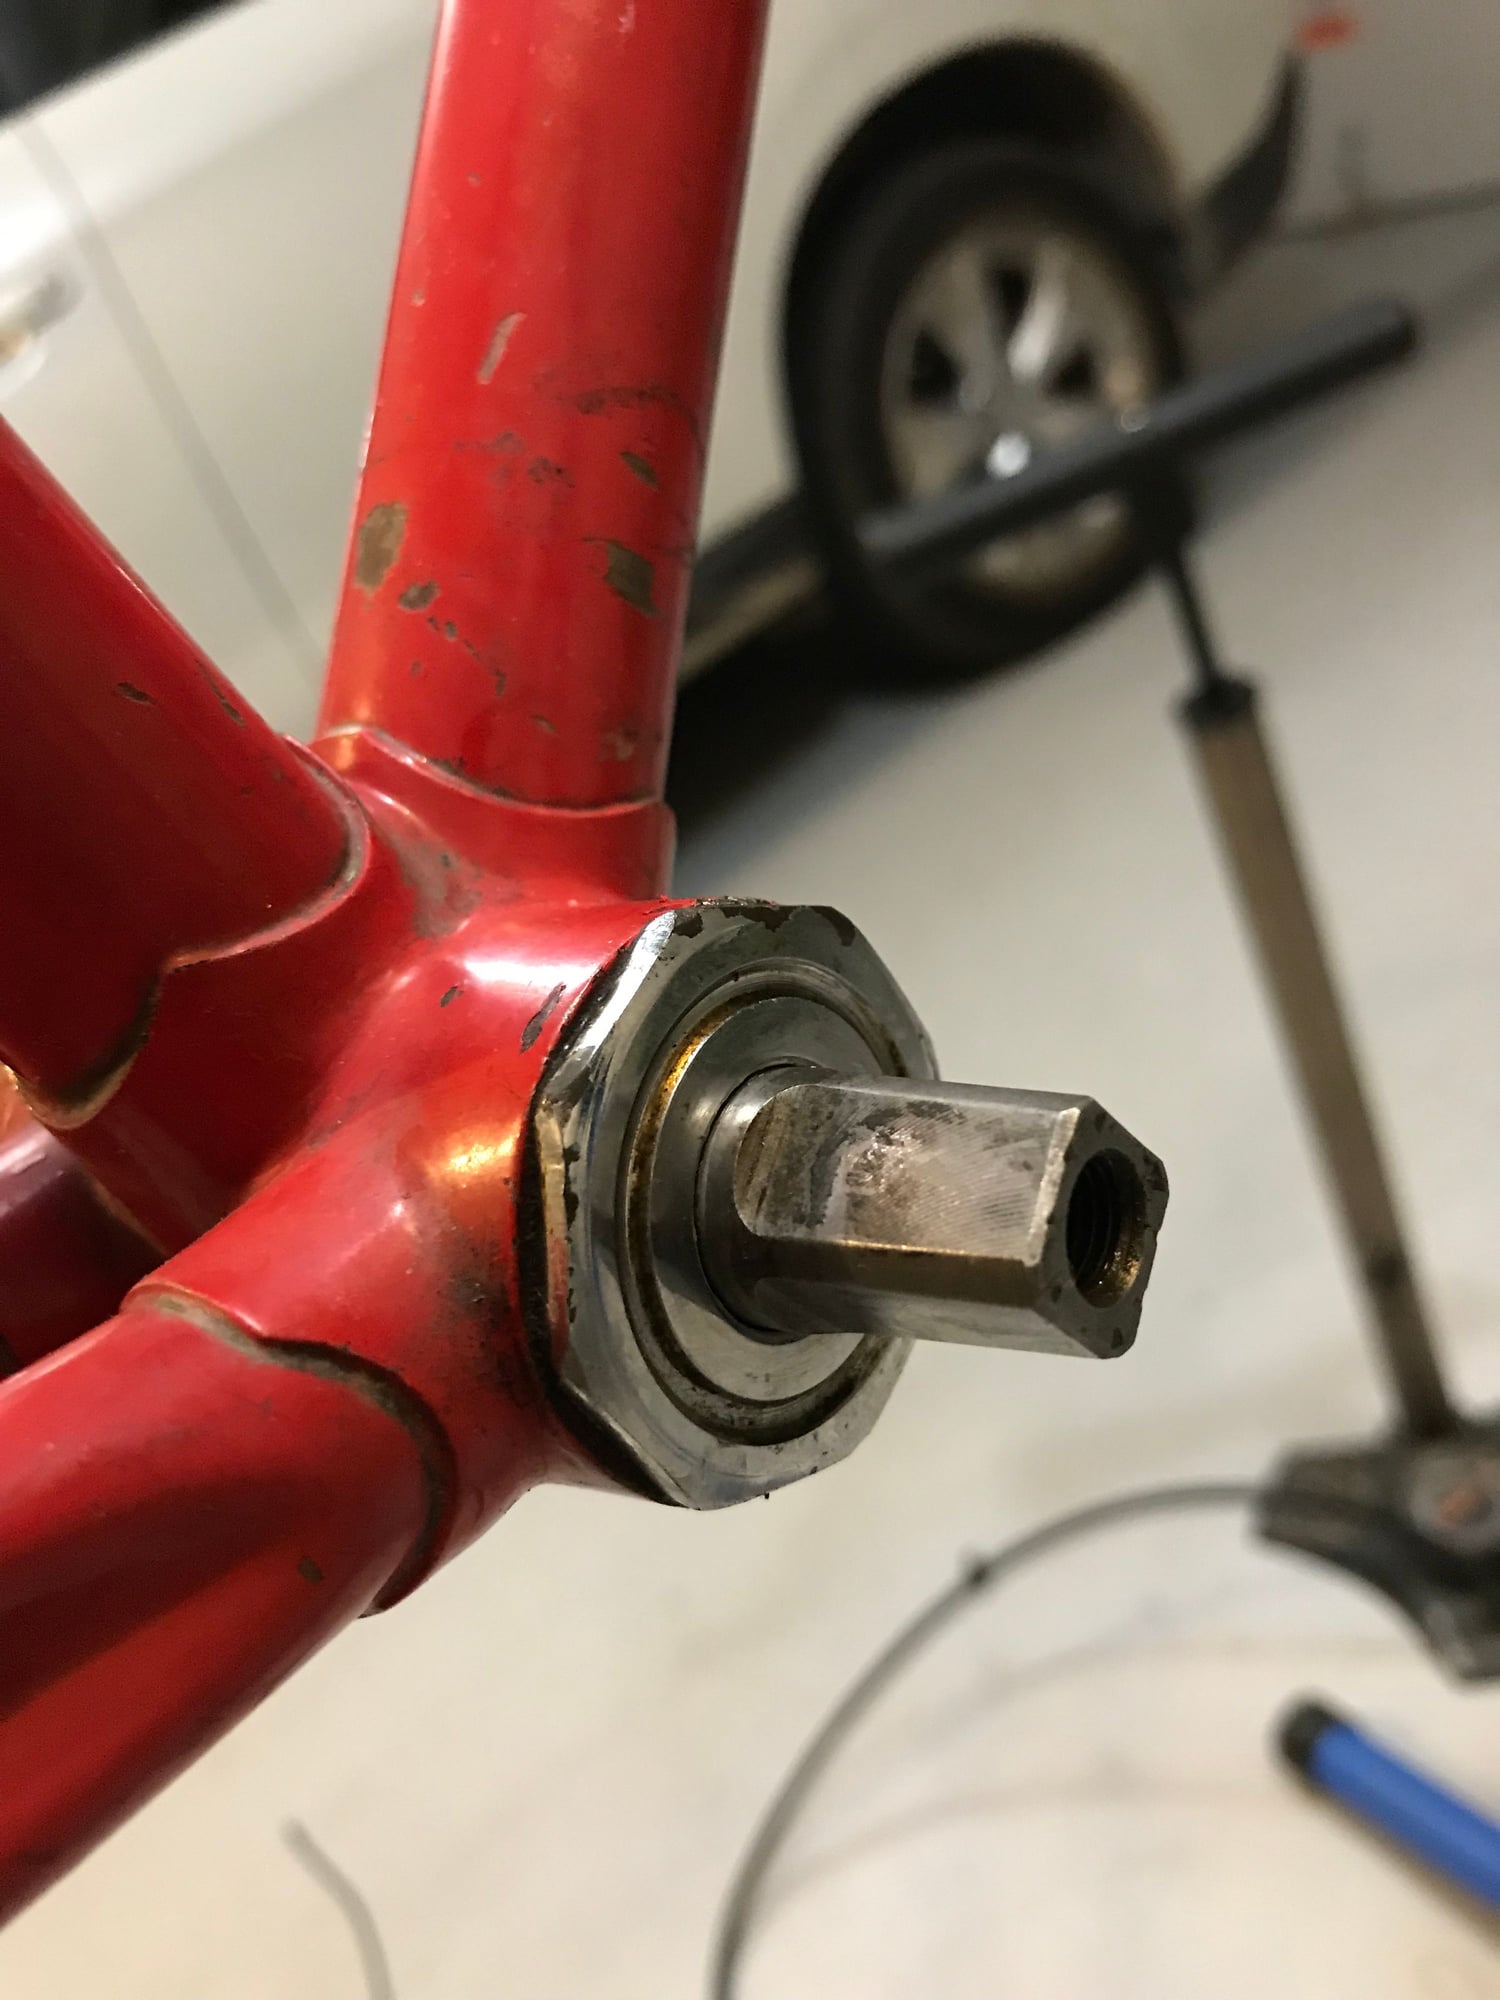
Fixed side with both bearings in.
ppreciated.
I think it it is a cup issue as @Johno59 stated. With the bearings in, the NDS taper does not clear the cup, hence the bottoming out. The photo showing this is after I over tightened the bearings just to see if it would clear. Then I removed NDS bearings, reinstalled cup, and put on the NDS crank. I don’t believe the taper is bottoming out, but y’all have much more experience than me. Pictures attached.
I’ll have to mess around with additional testing tomorrow as familial duties call! All the wisdom and input is greatly a
With NDS bearings removed.
With both bearings in. Inadequate taper clearance.
With NDS bearings removed, torqued, bolt removed.
Fixed side with both bearings in.
ppreciated.
08-07-19, 09:56 AM
#33
aged to perfection
Join Date: Jun 2009
Location: PacNW
Posts: 1,817
Bikes: Dinucci Allez 2.0, Richard Sachs, Alex Singer, Serotta, Masi GC, Raleigh Pro Mk.1, Hetchins, etc
Mentioned: 24 Post(s)
Tagged: 0 Thread(s)
Quoted: 839 Post(s)
Liked 1,258 Times
in
663 Posts
good pics, helpful. thank you. Are you QUITE sure you have the spindle in the right way? the "longer" side should go to the drive side of course. Usually the stampings on the spindle should be oriented so that "if you were looking down" from the saddle, they would be right side up. Make sense ?
also in the one pic of the spindle in the arm, it looks to me like the spindle is "just about bottomed out" on the tapers. From the diagram above, on the 118 mm spindle - there is only 2mm difference between the drive and NDS side.
These cranks look like they have had a hard life. How does the running torque feel as you tighten the bolt ?
Mark Petry
Bainbridge Island, WA USA
Last edited by mpetry912; 08-07-19 at 11:46 AM.
Likes For mpetry912:
08-07-19, 10:24 AM
#34
Senior Member
Join Date: Oct 2016
Location: Cambridge UK
Posts: 852
Bikes: 1903 24 spd Sunbeam, 1927 Humber, 3 1930 Raleighs, 2 1940s Sunbeams, 2 1940s Raleighs, Rudge, 1950s Robin Hood, 1958 Claud Butler, 2 1973 Colnago Supers, Eddie Merckx, 2 1980 Holdsworth, EG Bates funny TT bike, another 6 or so 1990s bikes
Mentioned: 15 Post(s)
Tagged: 0 Thread(s)
Quoted: 331 Post(s)
Liked 332 Times
in
185 Posts
Wrong size axle
Alright, folks. This is what I have for now.
I think it it is a cup issue as @Johno59 stated. With the bearings in, the NDS taper does not clear the cup, hence the bottoming out. The photo showing this is after I over tightened the bearings just to see if it would clear. Then I removed NDS bearings, reinstalled cup, and put on the NDS crank. I don’t believe the taper is bottoming out, but y’all have much more experience than me. Pictures attached.
I’ll have to mess around with additional testing tomorrow as familial duties call! All the wisdom and input is greatly a
With NDS bearings removed.
With both bearings in. Inadequate taper clearance.
With NDS bearings removed, torqued, bolt removed.
Fixed side with both bearings in.
ppreciated.
Likes For Johno59:
08-07-19, 11:28 AM
#35
Senior Member
Join Date: Jan 2004
Location: Madison, WI USA
Posts: 6,157
Mentioned: 50 Post(s)
Tagged: 0 Thread(s)
Quoted: 2364 Post(s)
Liked 1,750 Times
in
1,192 Posts
^^^^^^ I was thinking the same thing, but the OP says it's the original spindle, in post # 1.
08-07-19, 11:32 AM
#36
seńor miembro

Join Date: Dec 2018
Location: Pac NW
Posts: 6,625
Bikes: '70s - '80s Campagnolo
Mentioned: 92 Post(s)
Tagged: 0 Thread(s)
Quoted: 3889 Post(s)
Liked 6,488 Times
in
3,211 Posts
08-07-19, 12:06 PM
#37
www.theheadbadge.com
Join Date: Sep 2005
Location: Southern Florida
Posts: 28,514
Bikes: https://www.theheadbadge.com
Mentioned: 124 Post(s)
Tagged: 0 Thread(s)
Quoted: 2422 Post(s)
Liked 4,396 Times
in
2,093 Posts
This is a trifecta of every possible issue:
You've got to either replace the cups or the spindle. Then you've got to find yourself another left hand arm, though chances are the right side one has bottomed out too.
Even though everything appears to be original here, I'm entirely comfortable in saying that it isn't. Someone probably threw together whatever in their parts bin said "Stronglight" into something that, at first glance, looked like matching parts. Some bits may be original, but who knows which? Doesn't really matter at this point - all you need to get now are the correct bits.
-Kurt
- Spindle bearing races are too far apart.
- Cups are too thick
- Non-drive side crank is bottomed out
You've got to either replace the cups or the spindle. Then you've got to find yourself another left hand arm, though chances are the right side one has bottomed out too.
Even though everything appears to be original here, I'm entirely comfortable in saying that it isn't. Someone probably threw together whatever in their parts bin said "Stronglight" into something that, at first glance, looked like matching parts. Some bits may be original, but who knows which? Doesn't really matter at this point - all you need to get now are the correct bits.
-Kurt
__________________
Likes For cudak888:
08-07-19, 12:40 PM
#38
Senior Member
Join Date: Oct 2016
Location: Cambridge UK
Posts: 852
Bikes: 1903 24 spd Sunbeam, 1927 Humber, 3 1930 Raleighs, 2 1940s Sunbeams, 2 1940s Raleighs, Rudge, 1950s Robin Hood, 1958 Claud Butler, 2 1973 Colnago Supers, Eddie Merckx, 2 1980 Holdsworth, EG Bates funny TT bike, another 6 or so 1990s bikes
Mentioned: 15 Post(s)
Tagged: 0 Thread(s)
Quoted: 331 Post(s)
Liked 332 Times
in
185 Posts
MTB axle does not go into a road BB shell
This is a trifecta of every possible issue:
You've got to either replace the cups or the spindle. Then you've got to find yourself another left hand arm, though chances are the right side one has bottomed out too.
Even though everything appears to be original here, I'm entirely comfortable in saying that it isn't. Someone probably threw together whatever in their parts bin said "Stronglight" into something that, at first glance, looked like matching parts. Some bits may be original, but who knows which? Doesn't really matter at this point - all you need to get now are the correct bits.
-Kurt
- Spindle bearing races are too far apart.
- Cups are too thick
- Non-drive side crank is bottomed out
You've got to either replace the cups or the spindle. Then you've got to find yourself another left hand arm, though chances are the right side one has bottomed out too.
Even though everything appears to be original here, I'm entirely comfortable in saying that it isn't. Someone probably threw together whatever in their parts bin said "Stronglight" into something that, at first glance, looked like matching parts. Some bits may be original, but who knows which? Doesn't really matter at this point - all you need to get now are the correct bits.
-Kurt
08-07-19, 01:12 PM
#39
Senior Member
This is a trifecta of every possible issue:
You've got to either replace the cups or the spindle. Then you've got to find yourself another left hand arm, though chances are the right side one has bottomed out too.
Even though everything appears to be original here, I'm entirely comfortable in saying that it isn't. Someone probably threw together whatever in their parts bin said "Stronglight" into something that, at first glance, looked like matching parts. Some bits may be original, but who knows which? Doesn't really matter at this point - all you need to get now are the correct bits.
-Kurt
- Spindle bearing races are too far apart.
- Cups are too thick
- Non-drive side crank is bottomed out
You've got to either replace the cups or the spindle. Then you've got to find yourself another left hand arm, though chances are the right side one has bottomed out too.
Even though everything appears to be original here, I'm entirely comfortable in saying that it isn't. Someone probably threw together whatever in their parts bin said "Stronglight" into something that, at first glance, looked like matching parts. Some bits may be original, but who knows which? Doesn't really matter at this point - all you need to get now are the correct bits.
-Kurt
Also, the BB may have been faced down excessively at some point. I've seen this issue before. The BB shell should be measured, or else you're just flying blind.
Those crankarms might be salvageable by using a JIS BB, maybe. It will be close. Stronglight is just a hair smaller than JIS IME. Might be enough to mount without bottoming out, just. No grease and loctite on the bolts for sure.
Likes For Salamandrine:
06-16-23, 08:32 PM
#41
Newbie
I would take it all apart and start over, Make sure your ball bearings are the right size. Loose bearings are better than caged bearings. Make sure the drive side cup is fully seated all the way down into the bottom bracket shell. Tighten the adjustable side cup all the way down until the axle has significant resistance to turning before tightening the lock ring. I always assemble my loose cone bottom brackets way tighter than common sense would consider necessary. It's been my experience that if I don't overtighten this assembly at first, I'll have to come back and tighten it up later. Crankshaft forces are strong. Things can loosen up down there.
06-17-23, 04:57 AM
#42
Senior Member

Join Date: Apr 2012
Location: Middle Earth (aka IA)
Posts: 20,435
Bikes: A bunch of old bikes and a few new ones
Mentioned: 178 Post(s)
Tagged: 0 Thread(s)
Quoted: 5888 Post(s)
Liked 3,471 Times
in
2,079 Posts
It does seem as if the NDS crank arm taper is a bit shot as others have pointed out. I'd try a 120 mm Stronglight spindle since that too was used for doubles. I prefer going a bit longer with the axle for stronglight cranks.
Last edited by bikemig; 06-17-23 at 05:14 AM.
06-17-23, 06:24 AM
#43
Senior Member
I always use the proper wrench or spanner whenever possible.
But, bottom bracket NDS lock rings can be adjusted with a pair of channel lock pliers if necessary. Just don't start crying if you mar the pretty grooves a bit.
But, bottom bracket NDS lock rings can be adjusted with a pair of channel lock pliers if necessary. Just don't start crying if you mar the pretty grooves a bit.
Likes For ramzilla:
06-17-23, 11:33 AM
#44
Ride, Wrench, Swap, Race

Join Date: Jan 2010
Location: Northern California
Posts: 9,194
Bikes: Cheltenham-Pedersen racer, Boulder F/S Paris-Roubaix, Varsity racer, '52 Christophe, '62 Continental, '92 Merckx, '75 Limongi, '76 Presto, '72 Gitane SC, '71 Schwinn SS, etc.
Mentioned: 132 Post(s)
Tagged: 0 Thread(s)
Quoted: 1565 Post(s)
Liked 1,296 Times
in
866 Posts
Hey, y'all, this is a 4-year-old "necro"-thread!
The OP was clearly dealing with a case of a wallered-out left arm, seemingly nothing else to my eye.
I woulda shimmed it or used a symmetrical 115mm JIS bottom bracket (which worked splendidly in my own 1979 PX10 Super Competition after I "worked" the BSA alloy cups into my Swiss-threaded bb shell). That was over ten years ago and I've ridden the bike hard in these foothills several times per year since then without touching the bb.
Likes For dddd:
06-18-23, 08:22 PM
#45
Junior Member
Join Date: Sep 2016
Posts: 131
Mentioned: 2 Post(s)
Tagged: 0 Thread(s)
Quoted: 51 Post(s)
Likes: 0
Liked 0 Times
in
0 Posts
Hello All,
I am reinstalling a Stronglight 118 BB in it’s original home (70s Lejeune Pro) to spin the original Stronglight 93 crankset. I cleaned it up and replaced the bearings with fresh 1/4” from Wheels mfg. When I put everything back together, I have two indications of an improper install.
1: NDS spindle does not clear the shell enough to install crank arm when bearings are properly set. NDS crank arm bottoms out on BB.
2: When I set proper bearing clearance (no play in spindle, and spindle spins freely) I can hear the bearings rolling.
I’ve tried 10 and 11 ball bearings and neither fixed the issue. It doesn’t matter which direction the asymmetric spindle is set up; same issue.
The spindle races and cups all look good.
What am I doing wrong?
Thanks for for your help.
03-27-24, 07:45 AM
#46
Newbie
Join Date: Dec 2012
Posts: 2
Mentioned: 0 Post(s)
Tagged: 0 Thread(s)
Quoted: 0 Post(s)
Likes: 0
Liked 0 Times
in
0 Posts
i realize this thread originated about 5 years ago, but your problem is the bottom bracket threading on your frame.
i had the same model/era Lejeune Pro and the same problem. My frame threading wore out on the fixed cup side.
French and Italian bikes are vulnerable to this as the threads are clockwise instead of British/Swiss threading being counter-clockwise. Because of clockwise threading, there's a tendency for the fixed cup to loosen/back off and cause damage to the frame. It is suggested that new French and Italian bikes be locktited on the fixed side.hat is t
he meaning of the word tendency?
Evidence that your fixed cup is NOT original to the bb.is that it doesn't have a 12 point shape for wrench fitting. Instead, it has the later (campy style) double flats. Also, the coded circle around the cup indicates Italian. French fixed cups have no circle.
The forum won't allow me to add a photo or URL, but if you search "Stronglight 49 93 ITALIAN bottom on ebay," you should get a hit for it and can see the pics.
My Lejeune frame also wore out on the fixed cup side. It was repaired by (adding brass) and tapping the drive side from French to the larger diameter Italian threading. Perhaps when repaired, your bb was not aligned properly. I suppose the solution is to take your frame to a frame builder and have the repair repeated and done correctly--with added brass.
Scott
Last edited by francopedia; 03-27-24 at 08:22 AM.
03-27-24, 08:25 AM
#47
Newbie
Join Date: Dec 2012
Posts: 2
Mentioned: 0 Post(s)
Tagged: 0 Thread(s)
Quoted: 0 Post(s)
Likes: 0
Liked 0 Times
in
0 Posts
i realize this thread originally began about 5 years ago, but your problem is the bottom bracket on your frame. i had the same model/era Lejeune Pro and same problem. My BB threading on the frame wore out on the fixed cup. French bikes are vulnerable to this as the threading clockwise instead of British/Swiss being counter-clockwise. Because French threads are clockwise there's a tendency for the fixed cup to loosen/back off and cause damage to the frame hat is the meaning of the word tendency?
Your fixed cup is NOT original to the bb. It should have a 12 point shape for wrench fitting. And the coded circle around the cup indicates Italian. French has no circle.
My Lejeune frame threading also wore out on the fixed cup side. It was repaired by (adding brass) and tapping the drive side to Italian. Perhaps when repaired, the bb was not aligned properly. I suppose the solution is take your frame to a frame builder and have the repair repeated and done correctly--with added brass.
I attached a photo of bb Italian as coded with a circle

