


Bad Brazing Repair... Mine
 12-06-23, 10:27 PM
#1

Senior Member
Thread Starter
Join Date: Feb 2012
Location: Rochester, NY
Posts: 18,095
Bikes: Stewart S&S coupled sport tourer, Stewart Sunday light, Stewart Commuting, Stewart Touring, Co Motion Tandem, Stewart 3-Spd, Stewart Track, Fuji Finest, Mongoose Tomac ATB, GT Bravado ATB, JCP Folder, Stewart 650B ATB
Mentioned: 0 Post(s)
Tagged: 0 Thread(s)
Quoted: 4210 Post(s)
Liked 3,875 Times
in
2,315 Posts
Bad Brazing Repair... Mine
Yes, it is my bad brazing that I am repairing. Built this frame a few years ago. Wanted a drop bar but IGH townie bike with 559x1.5 tires. This bike had a fair amount going on with hub powered lights, spec made racks and wire clips on many tubes as well as my second disk brake set up. Did I mention the hand built lugs (more on this aspect later). I had a cheap wet paint job done, applied decals and rattle canned a clear coat. Here's the thread I posted on it before Lug making Part Dux - Page 3 - Bike Forums
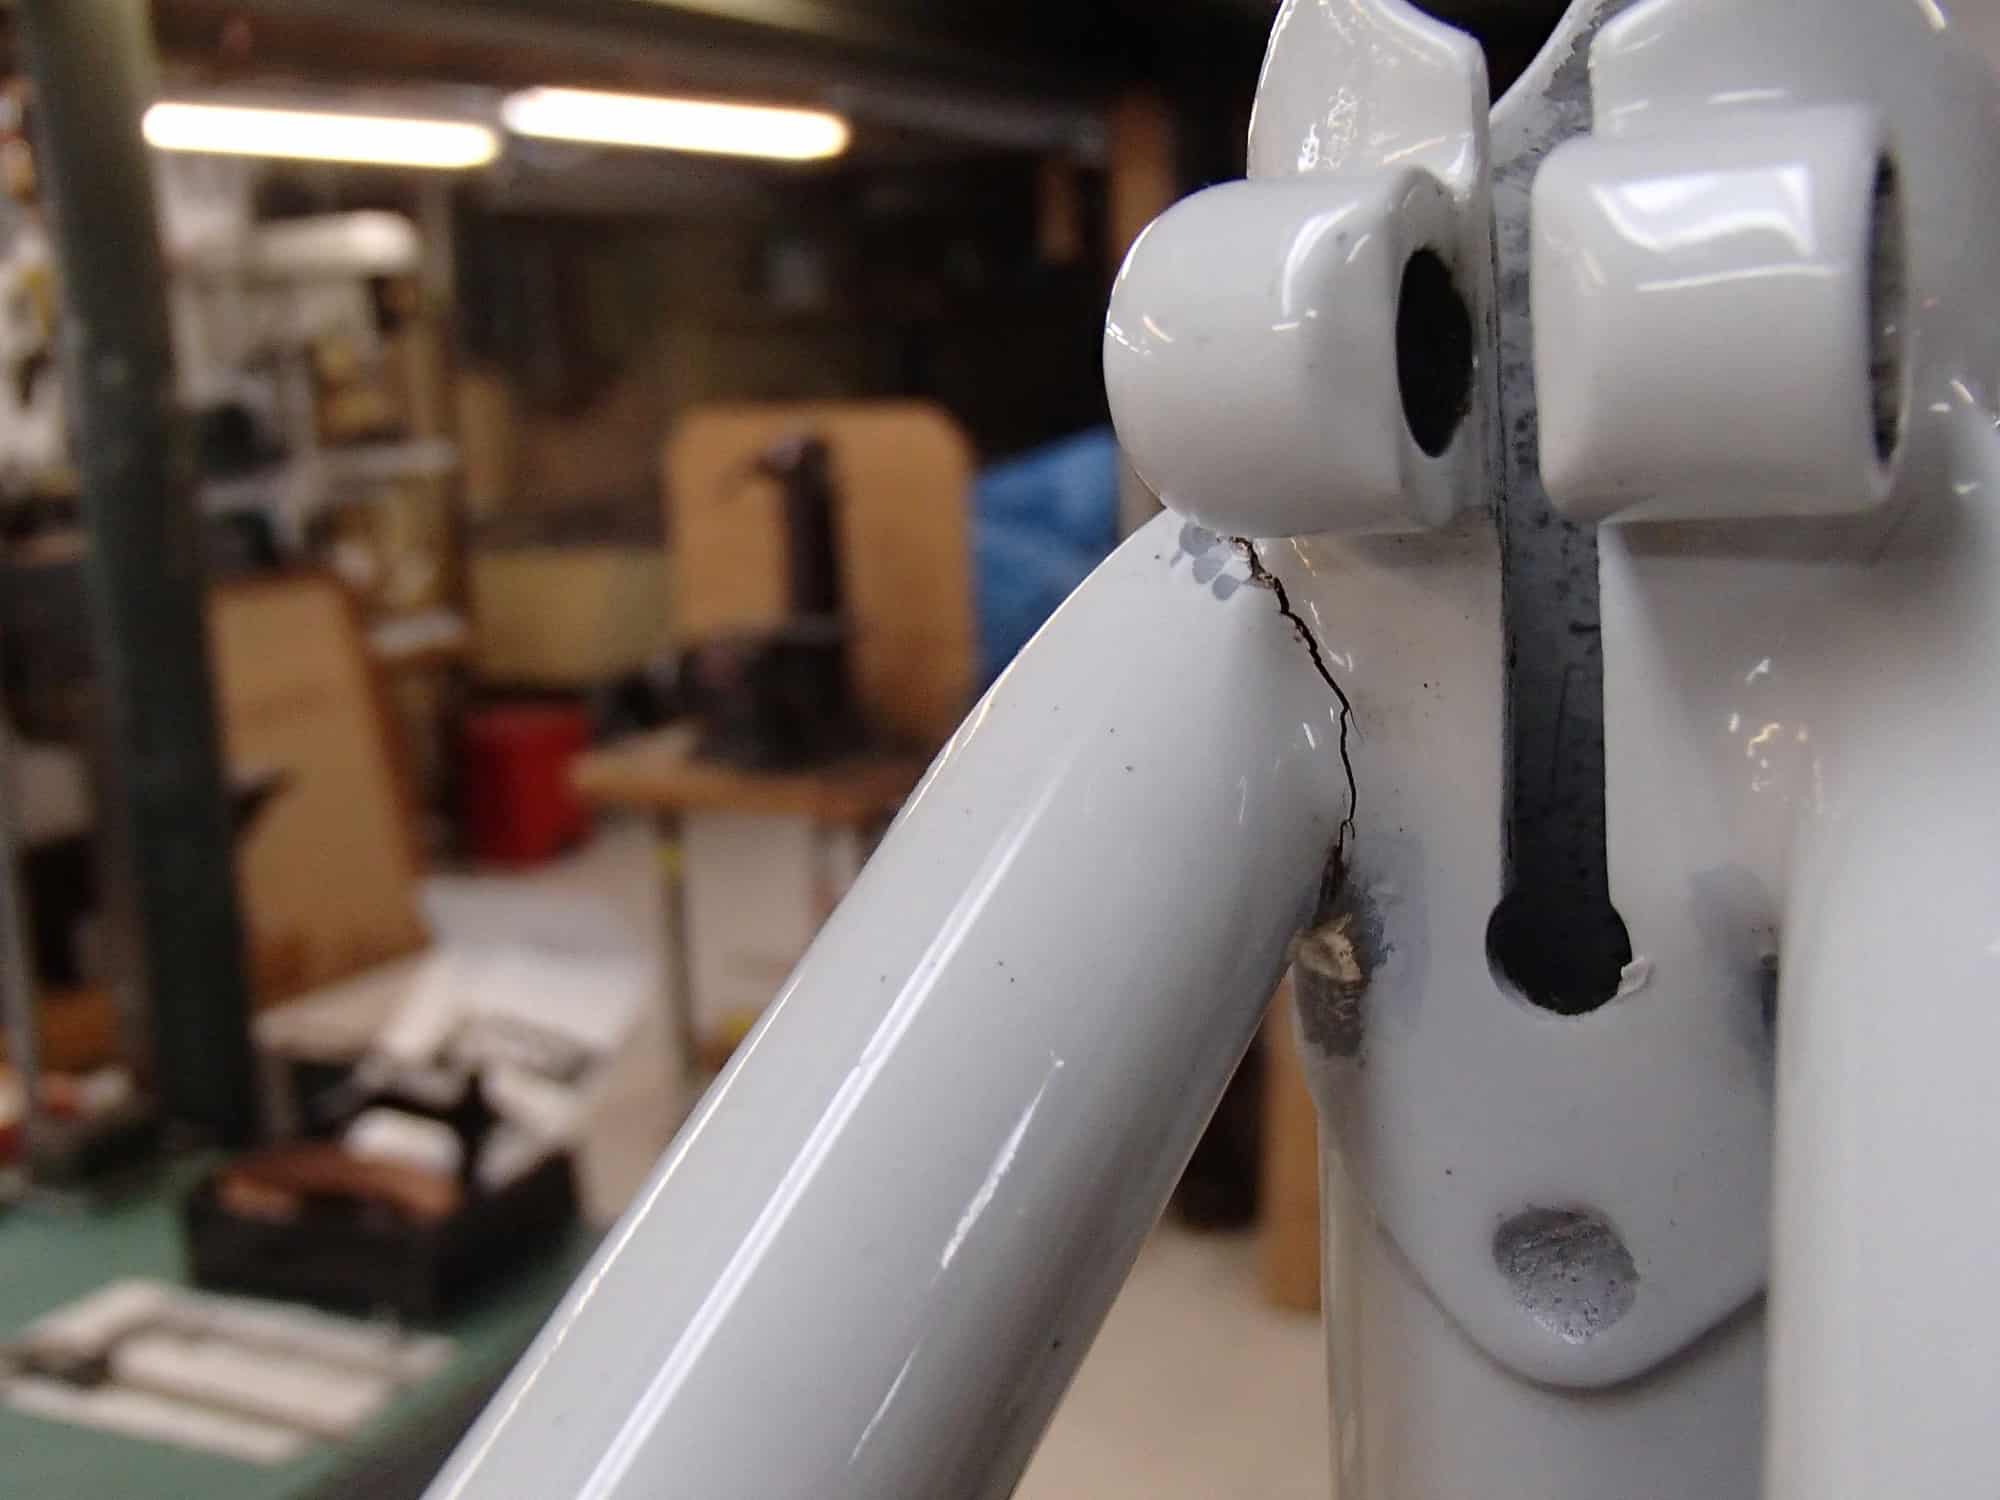
On building it up and riding I wasn't happy with the handling feel. Too chopper like in the steering, not nimble enough for city riding IMO. It weighed a ton and the SA 5 speed IGH didn't win this AW lover over. So I asked a friend to ride it. He liked it and I gifted the F&F to him. After a 3 person transaction of wheel and rims he did his own build up and put on nearly 1000 miles on it this season. About 3 months ago he noticed a crack at line/crack on the LH seat stay and seat lug.
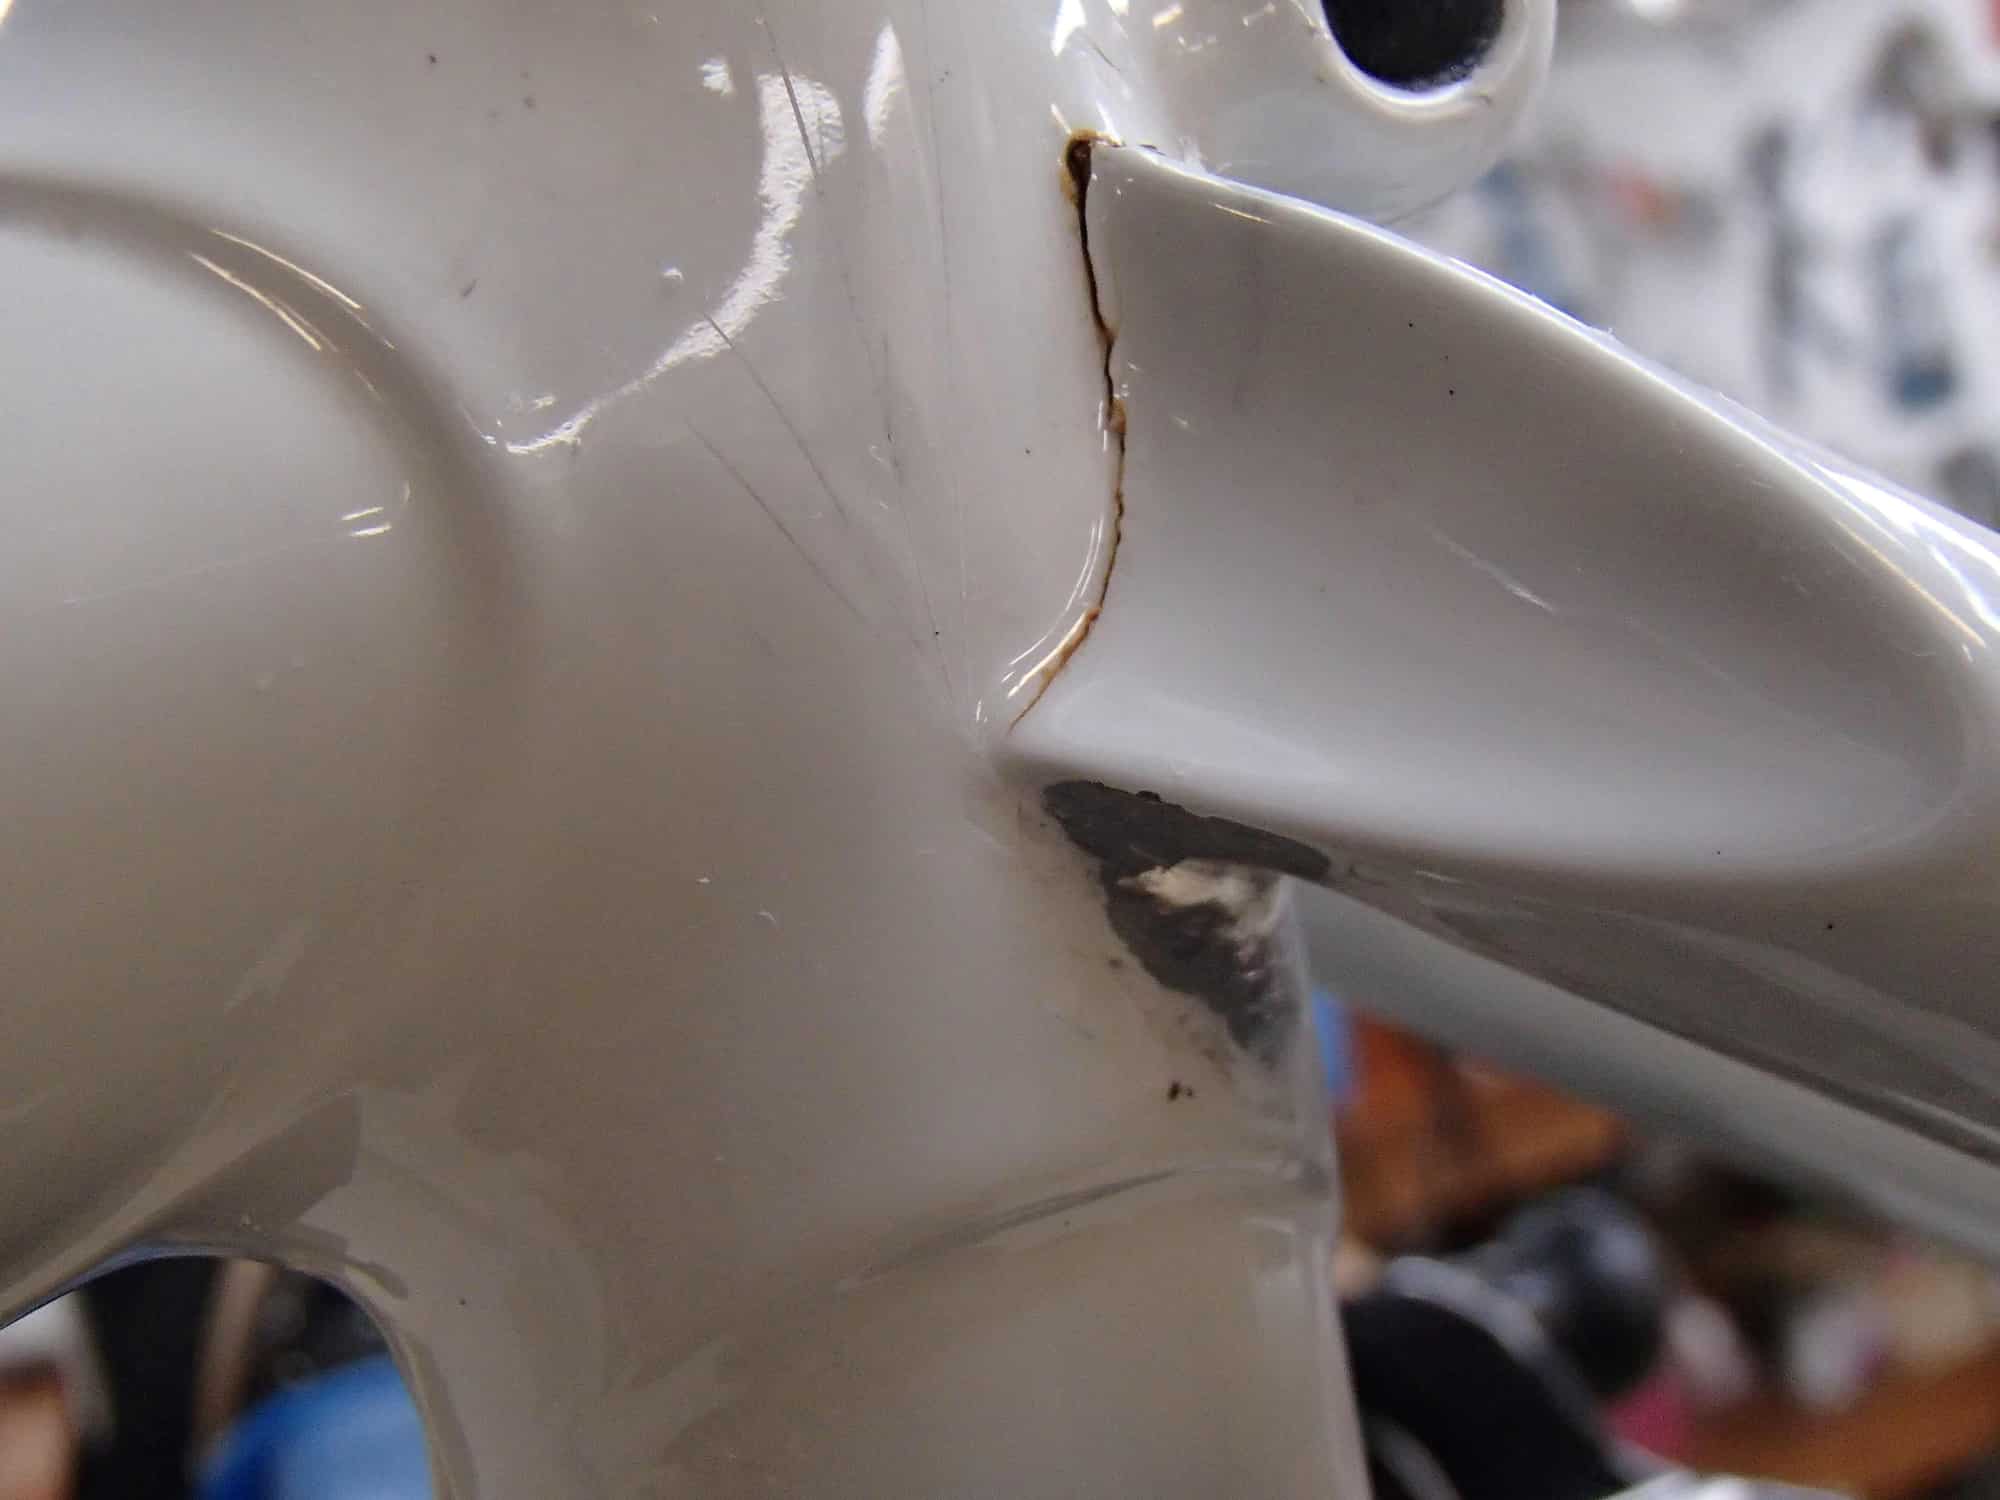
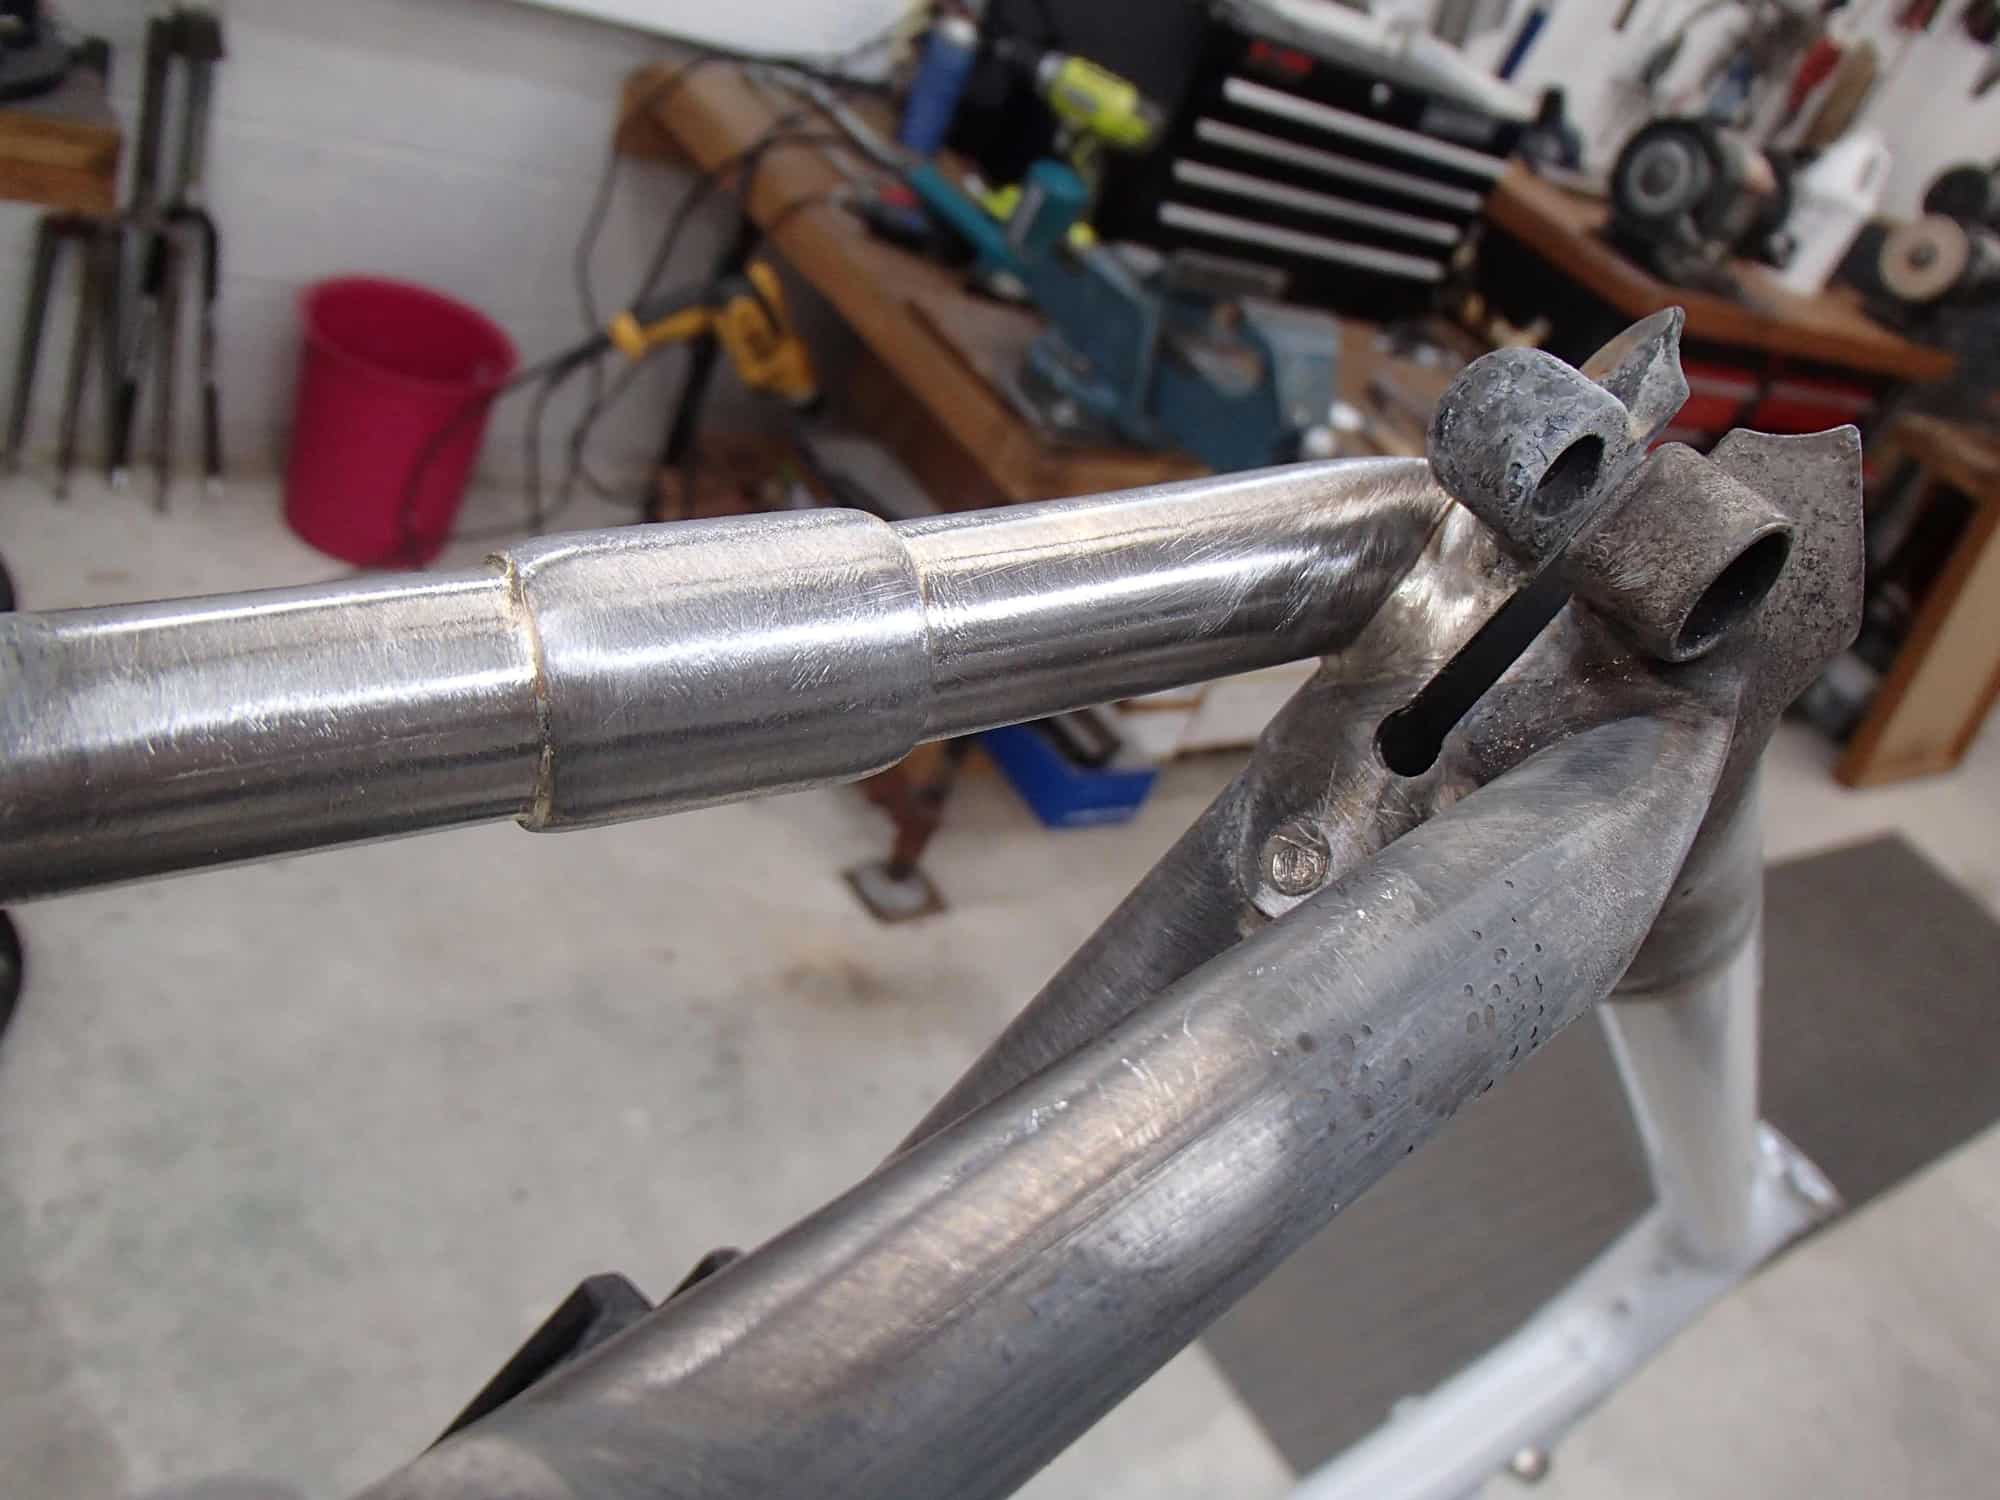
The line developed more, rust crept out and the crack traveled around the stay's attachment. Note that the stay's lower scallop tip is not yet cracked through. My friend and I have removed a bit of paint to check on the crack.
I had a good idea what had allowed the crack to form and even though I had not taken payment for the F&F the right thing to do was fix it. It took a bit more time before he had stripped off the parts, this would likely be already done if I had gotten the frame when we first talked about it...But that at least gave me a lot of time to mull over the likely repair. Today I started that. I cleaned off the frame of the road grime, hacksawed through the seat stay a few inched below the lug and began the clean up and prep. Removing paint is not my "preferred" job, I posted about this recently, and decided to burn off the bulk of the paint with Bernzomatic then sanding where the brazing will be.
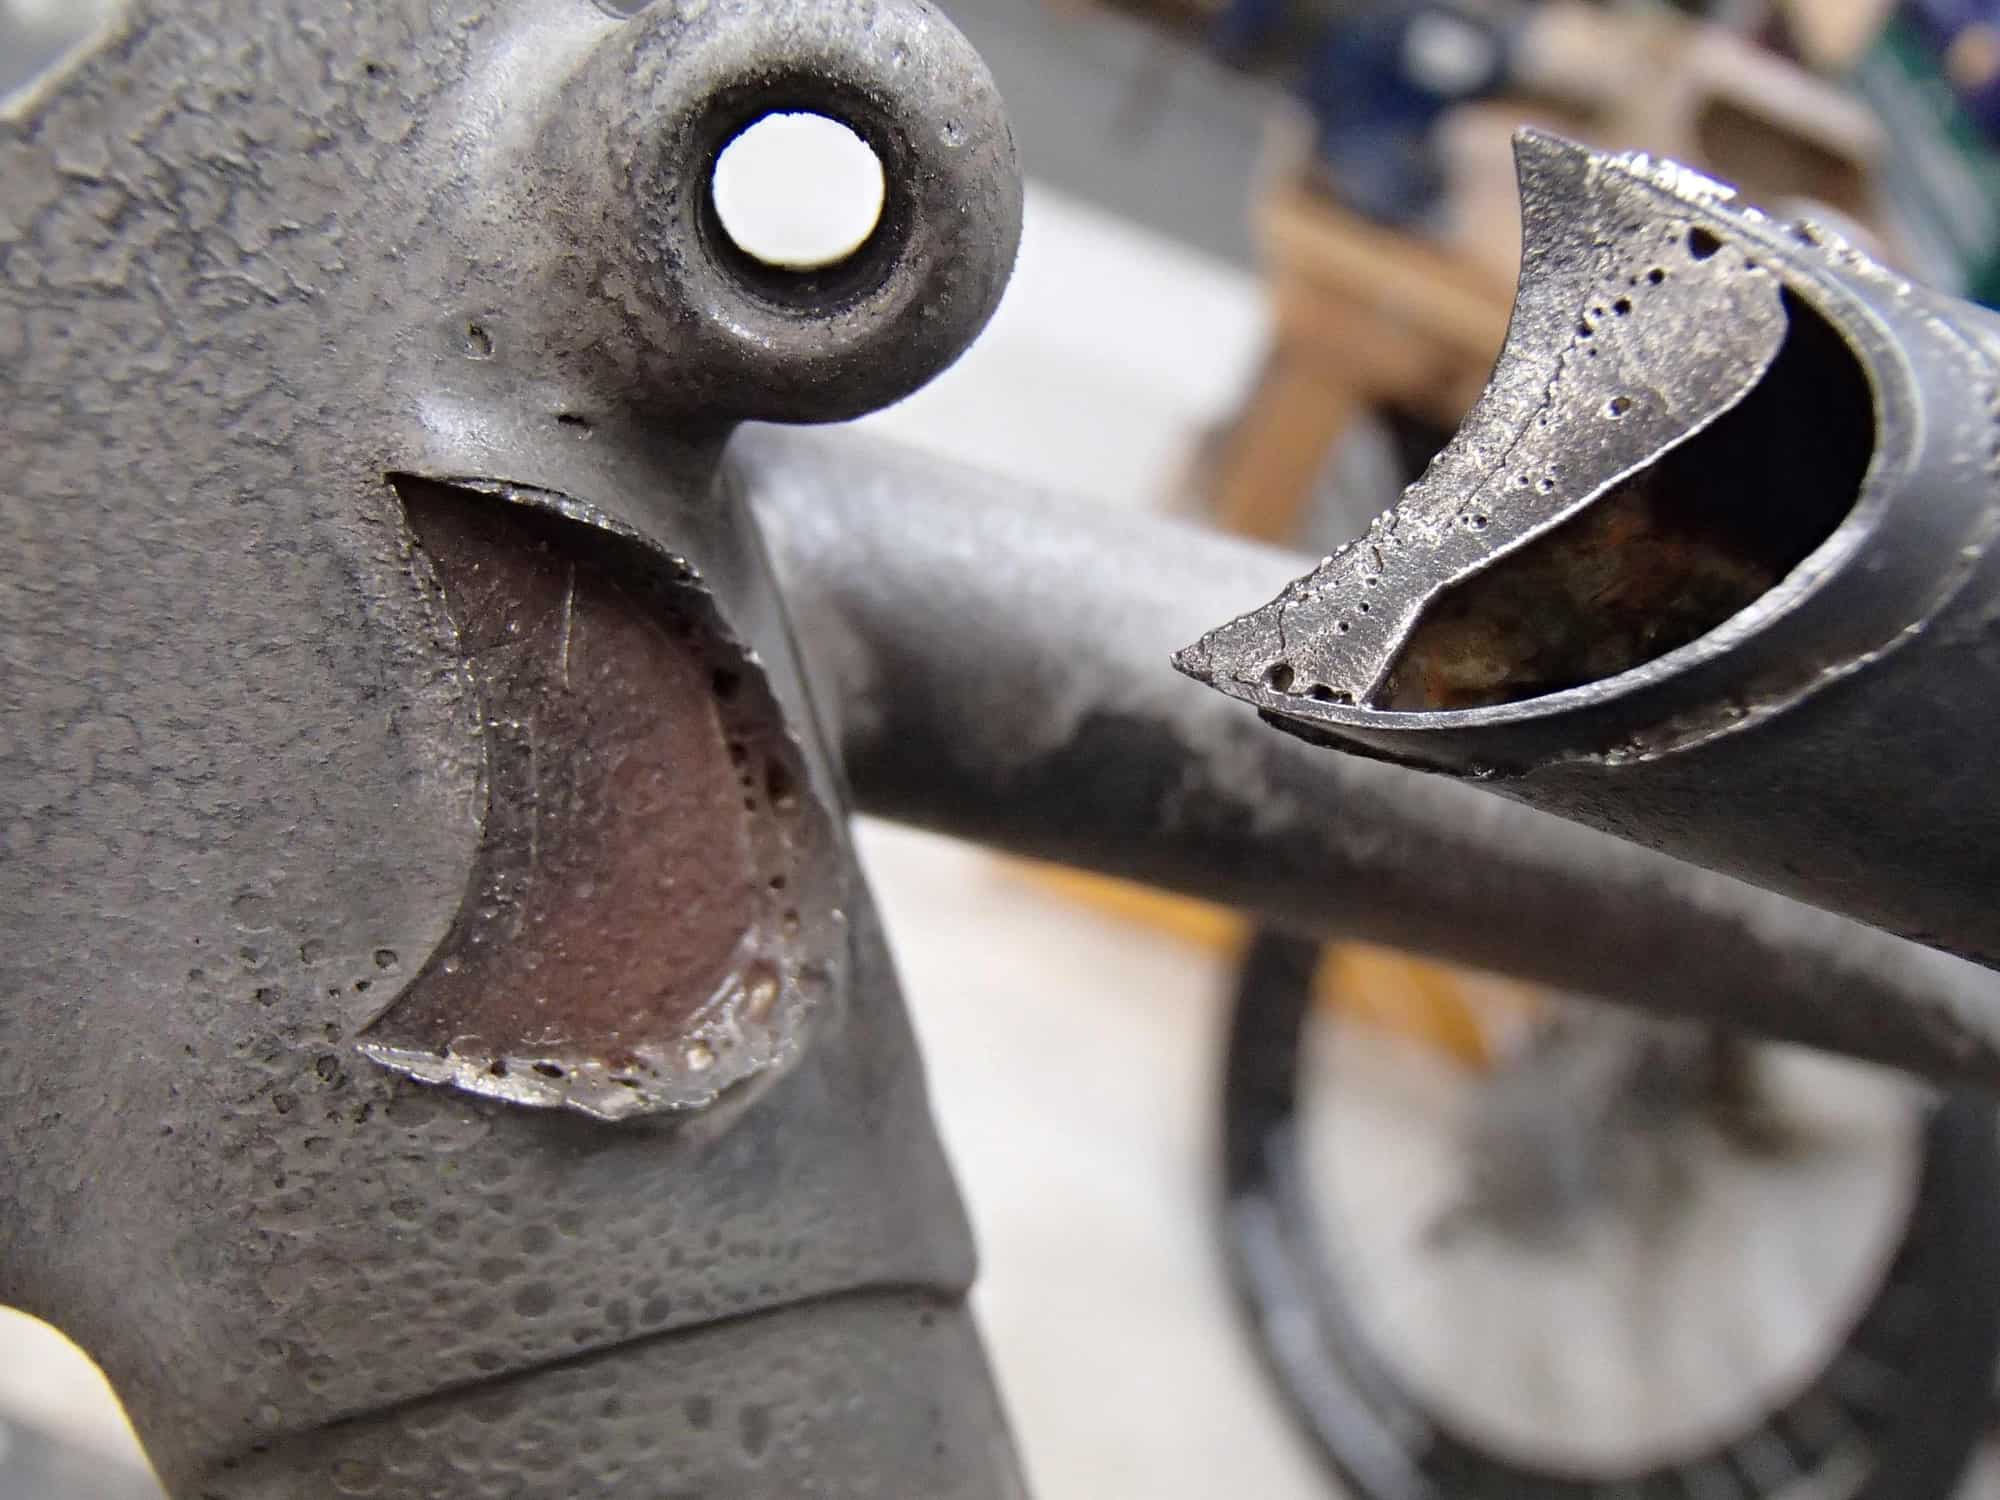
Pretty obvious on what was bad. Nearly zero silver filler flow between the stay and lug sides, only a slight fillet (which led me to think it was brazed fully at the time) that finally cracked through. The shinny filler in the stay top end is mostly brass from the attaching of the top eye/scalloped cap.
I had filleted the lug tubes with brass. Then I silvered the lug in the frame to not disturb the lug's brass work. On attaching the stays I went back to silver, again to reduce pre existing stay top's fillers from melting but didn't get the lug up to wetting out temps it seems.
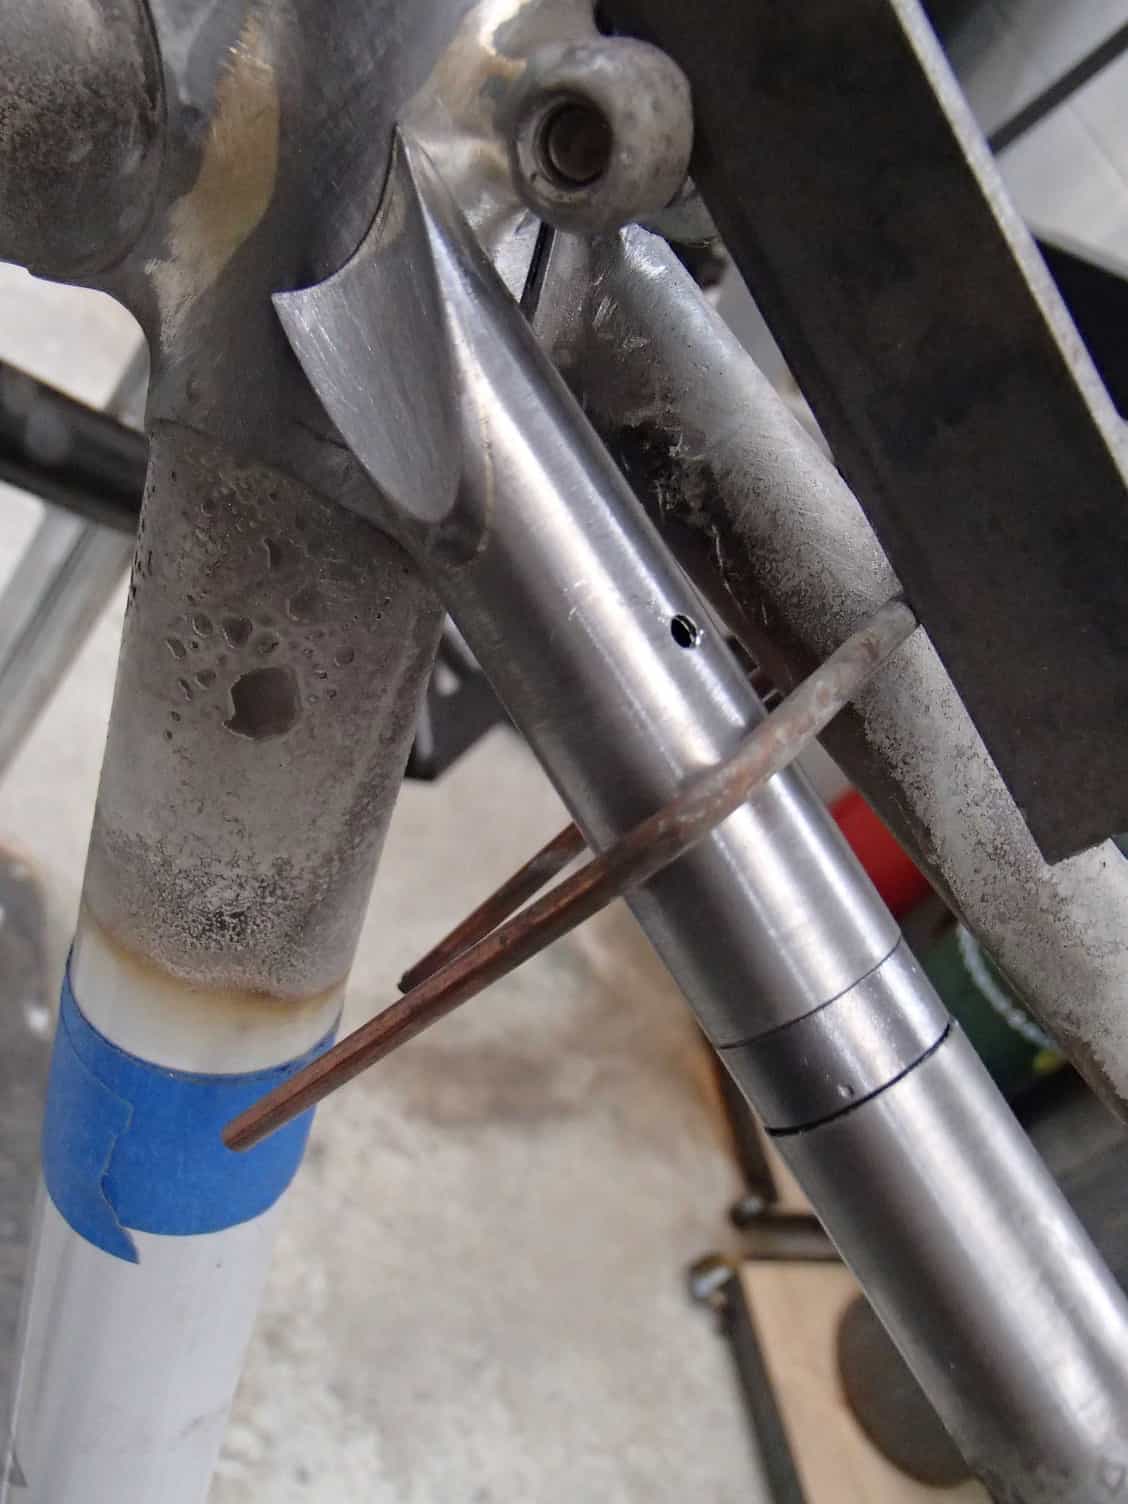
I've done most all the clean up. I made a plug to fit in the stay's cut ends. The stay top has been refitted to the lug side, minimal miter contour corrections. All is test assembled and "fixtured" waiting for the final prep. I need to add feed ports to the stay/plug, right at the edge of the stay's cut, get a vent hole plugging nail ready and collect myself for rebrazing better than I did before. Here's the initial repair set up. I've blocked the binder slot to hopefully retain the seat post's fit.
It will be a few days before I get back to this. Andy
On building it up and riding I wasn't happy with the handling feel. Too chopper like in the steering, not nimble enough for city riding IMO. It weighed a ton and the SA 5 speed IGH didn't win this AW lover over. So I asked a friend to ride it. He liked it and I gifted the F&F to him. After a 3 person transaction of wheel and rims he did his own build up and put on nearly 1000 miles on it this season. About 3 months ago he noticed a crack at line/crack on the LH seat stay and seat lug.
The line developed more, rust crept out and the crack traveled around the stay's attachment. Note that the stay's lower scallop tip is not yet cracked through. My friend and I have removed a bit of paint to check on the crack.
I had a good idea what had allowed the crack to form and even though I had not taken payment for the F&F the right thing to do was fix it. It took a bit more time before he had stripped off the parts, this would likely be already done if I had gotten the frame when we first talked about it...But that at least gave me a lot of time to mull over the likely repair. Today I started that. I cleaned off the frame of the road grime, hacksawed through the seat stay a few inched below the lug and began the clean up and prep. Removing paint is not my "preferred" job, I posted about this recently, and decided to burn off the bulk of the paint with Bernzomatic then sanding where the brazing will be.
Pretty obvious on what was bad. Nearly zero silver filler flow between the stay and lug sides, only a slight fillet (which led me to think it was brazed fully at the time) that finally cracked through. The shinny filler in the stay top end is mostly brass from the attaching of the top eye/scalloped cap.
I had filleted the lug tubes with brass. Then I silvered the lug in the frame to not disturb the lug's brass work. On attaching the stays I went back to silver, again to reduce pre existing stay top's fillers from melting but didn't get the lug up to wetting out temps it seems.
I've done most all the clean up. I made a plug to fit in the stay's cut ends. The stay top has been refitted to the lug side, minimal miter contour corrections. All is test assembled and "fixtured" waiting for the final prep. I need to add feed ports to the stay/plug, right at the edge of the stay's cut, get a vent hole plugging nail ready and collect myself for rebrazing better than I did before. Here's the initial repair set up. I've blocked the binder slot to hopefully retain the seat post's fit.
It will be a few days before I get back to this. Andy
__________________
AndrewRStewart
AndrewRStewart

Likes For Andrew R Stewart:
12-10-23, 08:23 PM
#2
Senior Member
Thread Starter
Join Date: Feb 2012
Location: Rochester, NY
Posts: 18,095
Bikes: Stewart S&S coupled sport tourer, Stewart Sunday light, Stewart Commuting, Stewart Touring, Co Motion Tandem, Stewart 3-Spd, Stewart Track, Fuji Finest, Mongoose Tomac ATB, GT Bravado ATB, JCP Folder, Stewart 650B ATB
Mentioned: 0 Post(s)
Tagged: 0 Thread(s)
Quoted: 4210 Post(s)
Liked 3,875 Times
in
2,315 Posts
Repairs seem to always produce challenges. This time the challenge was not what I expected.
From the last point shown I did a last clean up and prep for the brazing as usual. I decided to use a preform roll of brass on one side of the plug and to externally fill the other end. My theory was that I could flow out the preform side with it on top and let gravity help the flow out and then with a still hot plug reposition the joint to fill from a small cut away the other end. I had also drilled a flow check out hole opposite the filler one to help insure complete filling. Did a light fluxing of the preform and various surfaces and started to heat up and flow out the preform.
Balancing the flame's target, stay wall thickness and plug mass I was able to get up to preform flow out pretty close to what I thought the plug's temp should be. I could see the "shadow" of the melting/flowing brass through the glowing stay end. Usually once the preform flows a bit the two parts start to share the heat and equalize temps. But not this time. The preform did flow out and onto the plug with no wetting out on the end of the stay to "confirm" that the interior of the tube was also wetted. So the fight began to get the stay to join to the preform flow. I put a lot of heat and added some powdered flux here and there (I have some GasFlux B in powder form).
At some point of getting a bit of connection I moved onto to the other side of the plug. By now the brass had "balled up" on the plug's center ring so between this reservoir and hand held rod I tried to fill the second end. I had similar challenges with the brass wetting out on the stay. As I was doing this I wondered why this was, not remembering the same problem when I made the frame. By the time I had done as much as I was OK with I had some burned flux about and only a tad of boiled filler in a small spot.
Cleaning up I was unsure of the plug being completely joined so decided to use a belt too and made a jacket to surround the joint. This was made from a .058" wall .075" diameter 4130 tube. This time I spent even more tine detailing a the prep, sanding and cleaning with both lacquer thinner and acetone. Still on the brazing of the jacket it was not smooth and the wetting out issue wasn't a lot better. I did finally feel I got full flow through and enough fill in of the jacket's splits gaps. Finish filing showed acceptable jacket edge fill so I'm "happy".
Another aspect of this repair I had forgotten about was how stripping paint by heat goes. I had thought I had burned off and then sanded clean enough area to not burn off during the brazing later. Wrong! Thankfully the wife can be tolerant at times .
.
Here's the end result before any paint prep. Being so cold outside these days the touch up might be for a while. Andy
From the last point shown I did a last clean up and prep for the brazing as usual. I decided to use a preform roll of brass on one side of the plug and to externally fill the other end. My theory was that I could flow out the preform side with it on top and let gravity help the flow out and then with a still hot plug reposition the joint to fill from a small cut away the other end. I had also drilled a flow check out hole opposite the filler one to help insure complete filling. Did a light fluxing of the preform and various surfaces and started to heat up and flow out the preform.
Balancing the flame's target, stay wall thickness and plug mass I was able to get up to preform flow out pretty close to what I thought the plug's temp should be. I could see the "shadow" of the melting/flowing brass through the glowing stay end. Usually once the preform flows a bit the two parts start to share the heat and equalize temps. But not this time. The preform did flow out and onto the plug with no wetting out on the end of the stay to "confirm" that the interior of the tube was also wetted. So the fight began to get the stay to join to the preform flow. I put a lot of heat and added some powdered flux here and there (I have some GasFlux B in powder form).
At some point of getting a bit of connection I moved onto to the other side of the plug. By now the brass had "balled up" on the plug's center ring so between this reservoir and hand held rod I tried to fill the second end. I had similar challenges with the brass wetting out on the stay. As I was doing this I wondered why this was, not remembering the same problem when I made the frame. By the time I had done as much as I was OK with I had some burned flux about and only a tad of boiled filler in a small spot.
Cleaning up I was unsure of the plug being completely joined so decided to use a belt too and made a jacket to surround the joint. This was made from a .058" wall .075" diameter 4130 tube. This time I spent even more tine detailing a the prep, sanding and cleaning with both lacquer thinner and acetone. Still on the brazing of the jacket it was not smooth and the wetting out issue wasn't a lot better. I did finally feel I got full flow through and enough fill in of the jacket's splits gaps. Finish filing showed acceptable jacket edge fill so I'm "happy".
Another aspect of this repair I had forgotten about was how stripping paint by heat goes. I had thought I had burned off and then sanded clean enough area to not burn off during the brazing later. Wrong! Thankfully the wife can be tolerant at times
.Here's the end result before any paint prep. Being so cold outside these days the touch up might be for a while. Andy
__________________
AndrewRStewart
AndrewRStewart
12-10-23, 09:55 PM
#3
Senior Member

Join Date: Sep 2009
Location: EagleRiver AK
Posts: 1,306
Mentioned: 0 Post(s)
Tagged: 0 Thread(s)
Quoted: 28 Post(s)
Likes: 0
Liked 60 Times
in
33 Posts
Thanks for sharing your process. Why did you need to shorten the SS so much? Couldn't you have cut through the SS with just a single hacksaw blade width (rather than 0.5 cm length) and then used a much simpler internal plug to re-join the SS pieces back together? I am sure what you did is plenty strong, just seems like more work than necessary.
Ive never had much success with trying to load internal rings of braze inside the tube and then getting it to flow out, usually just results in loose rattling pieces of braze stuck inside the tube. Is the original problem of the SS miter to ST joint re-brazed now too?
Ive never had much success with trying to load internal rings of braze inside the tube and then getting it to flow out, usually just results in loose rattling pieces of braze stuck inside the tube. Is the original problem of the SS miter to ST joint re-brazed now too?
12-11-23, 07:43 AM
#4


Randomhead
Join Date: Aug 2008
Location: Happy Valley, Pennsylvania
Posts: 24,399
Mentioned: 0 Post(s)
Tagged: 0 Thread(s)
Quoted: 4 Post(s)
Liked 3,699 Times
in
2,519 Posts
The partially filled stay in the first picture has been bothering me, what is that?
12-11-23, 01:35 PM
#5
Senior Member
Thread Starter
Join Date: Feb 2012
Location: Rochester, NY
Posts: 18,095
Bikes: Stewart S&S coupled sport tourer, Stewart Sunday light, Stewart Commuting, Stewart Touring, Co Motion Tandem, Stewart 3-Spd, Stewart Track, Fuji Finest, Mongoose Tomac ATB, GT Bravado ATB, JCP Folder, Stewart 650B ATB
Mentioned: 0 Post(s)
Tagged: 0 Thread(s)
Quoted: 4210 Post(s)
Liked 3,875 Times
in
2,315 Posts
GJ- The stay gap was driven by a few factors. First was the desire to have the plug also fill the kerf, if no other reason than to reduce the amount of gap filling. I machined the plug's first end holding the stock in a collet (SB 9A lathe). I was going to flip the plug around and hold and machine the second end with the gap filling "rib" as narrow as I could. I had hoped the next size down collet would close up on the first end's diameter but no such luck so I held the plug by the rib OD. Hence cutting back a stay end to fit the now wider than first planned plug's rib. And I did rebraze the stay end to the seat lug, with the plug ready and fluxed for brass, with silver and seemed to better wet out and join than the brass did later.
Eric- The partially filled stay end is the remains of the inside flow/meniscus, from the brazing on of the stay top cap (in this case a piece of 1.125"x.058 tube). Attached is a shot that will be familiar to you in how I make my stay tops, although the bike being repaired has the concave top plate. When I do the brazing of the tops plates/tubes I really fill up the very tip top and the lowest edge on the outside of the stay as that's where I have found others have cracked at (can you say Raleigh?) and I want to be careful about not filing the stay's wall down if I can. But I didn't try to fill the top insides more than usual, were I to have not done a half across the stay miter to the seat lug That partial fill is what was left after the miter was cut and if I had flowed the silver properly the first time the amount of stay to lug side surface contact is more that enough to insure a long life. The photo has the partial fill's surface looking like silver because, I think, on the melting of the silver during removal the silver flowed across the partial fill's surface. Much of this skim layer was filed off as I refitted the stay end to the seat lug for the second time.
BTW that second fitting resulted in a bit of stay gap increase (although nowhere near as much as the machining of the plug required). The stays are True Temper RC2 16mm x .76mm IIRC.
I've shared all this with my friend and he's OK with things. The rattle can touch up will come in a while what with the winter and garage painting area. There's no rush and I'll be posting as I have more progress to show. Andy
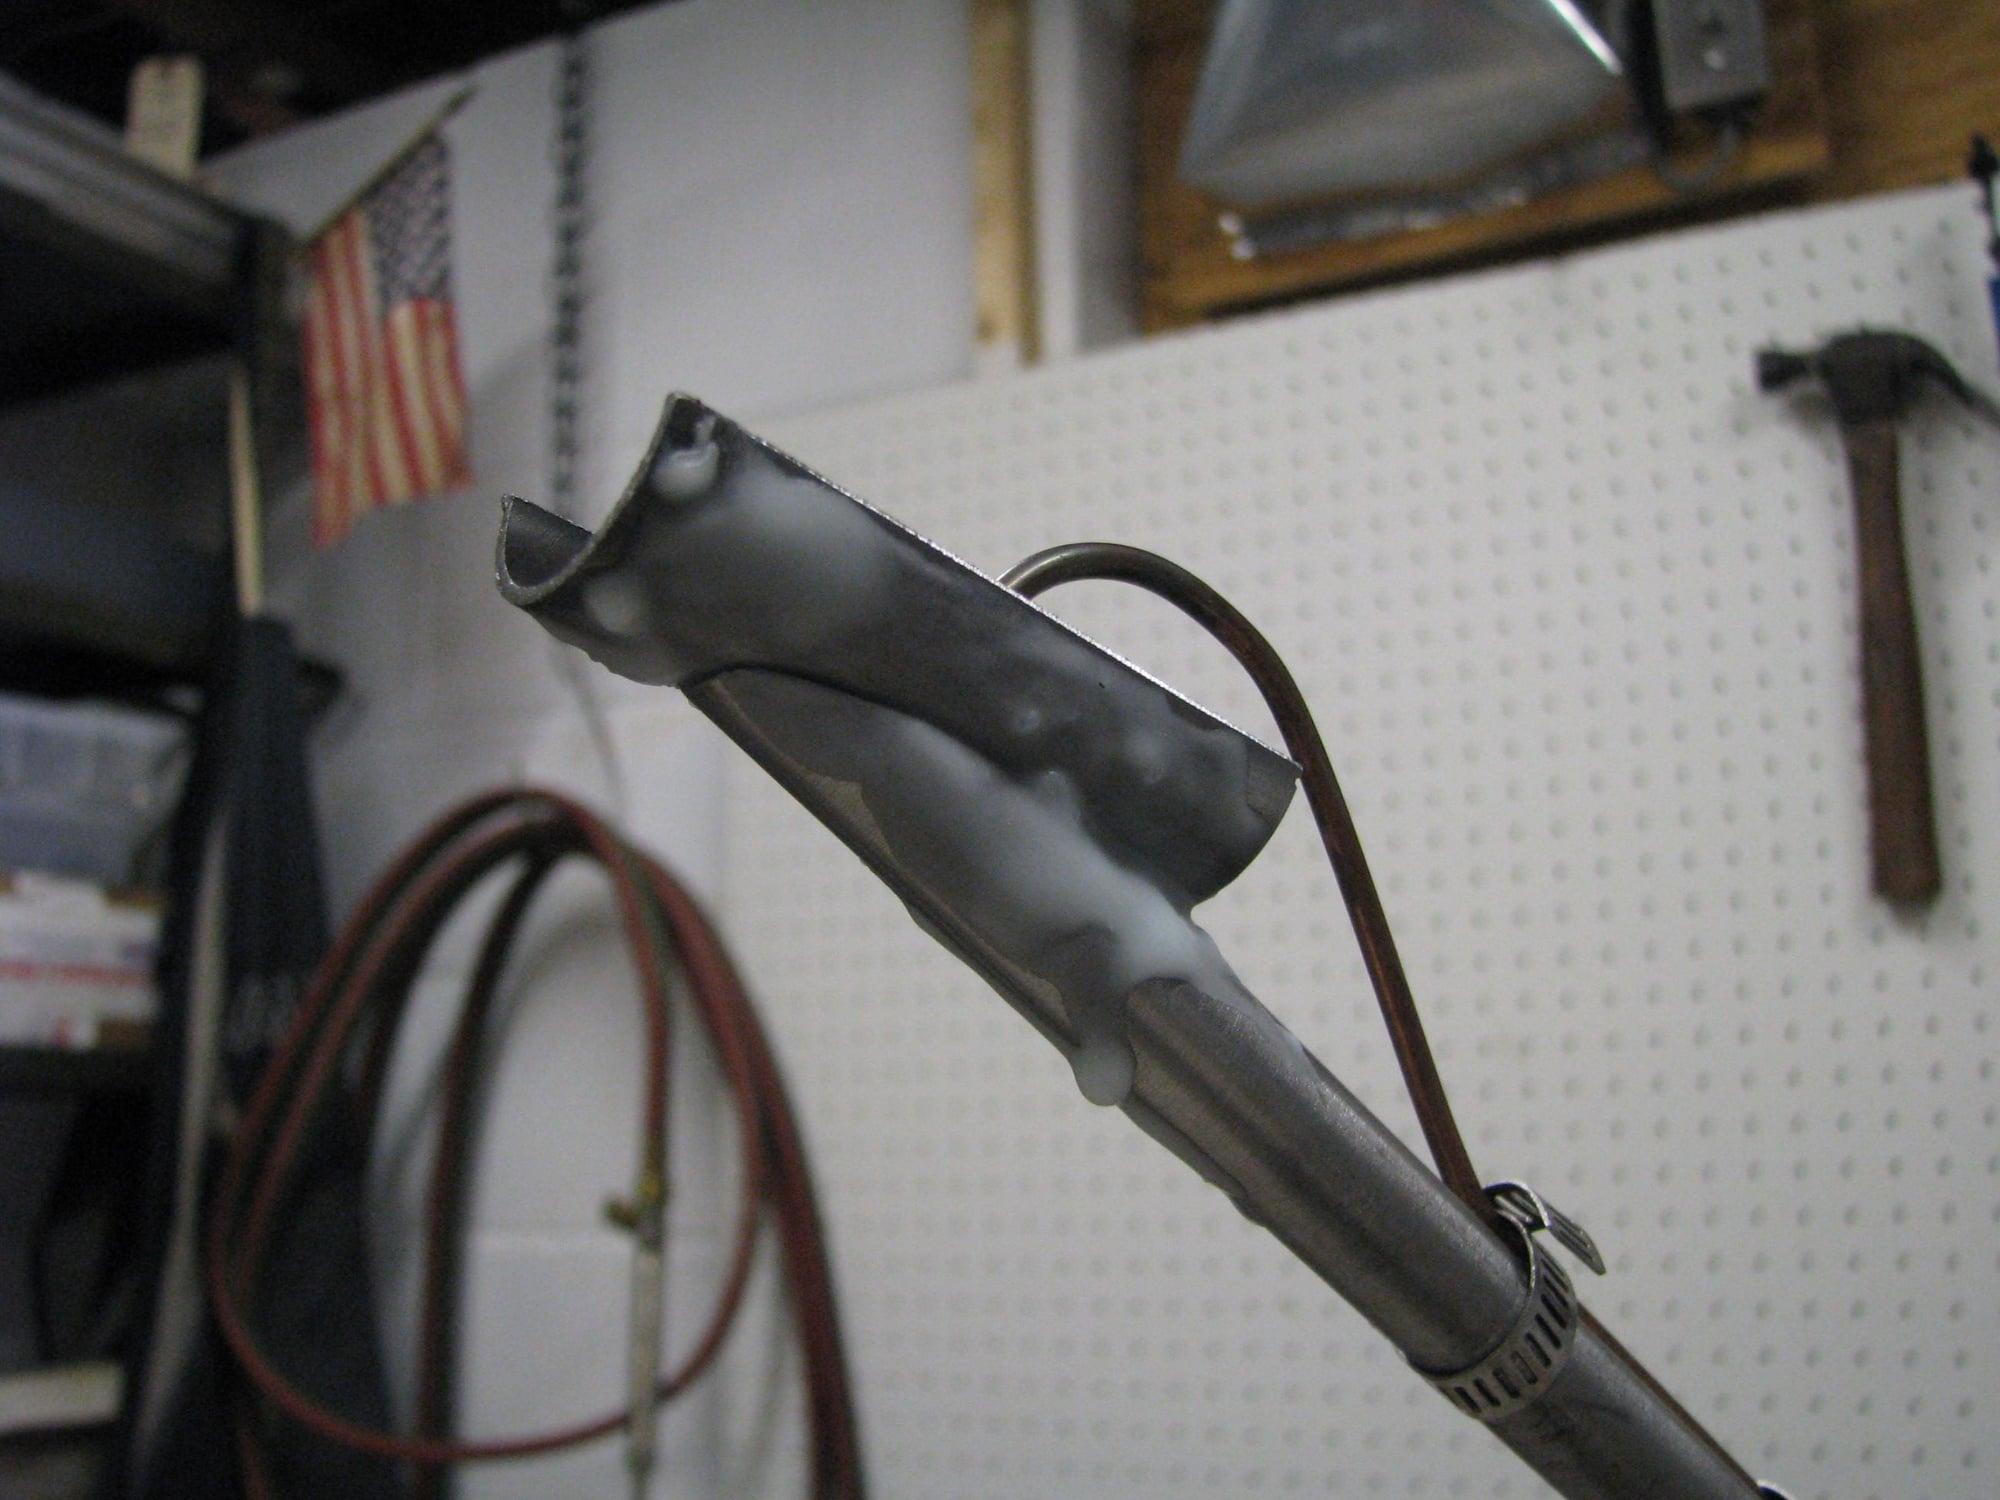
__________________
AndrewRStewart
AndrewRStewart
Last edited by Andrew R Stewart; 12-11-23 at 02:23 PM. Reason: Helps if you actually add the photo...
12-12-23, 08:17 PM
#6
Old fart

Join Date: Nov 2004
Location: Appleton WI
Posts: 24,790
Bikes: Several, mostly not name brands.
Mentioned: 153 Post(s)
Tagged: 0 Thread(s)
Quoted: 3590 Post(s)
Liked 3,401 Times
in
1,935 Posts
Rather than cut the seat stay, I would have cut out the brake bridge to allow the stay to end to be separated from the seat lug. I like to file a shallow trough into the seat lug, for the stay to fit. This increases surface area of the joint, which helps when using silver.

Likes For JohnDThompson:
12-13-23, 08:48 AM
#7
Senior Member
Thread Starter
Join Date: Feb 2012
Location: Rochester, NY
Posts: 18,095
Bikes: Stewart S&S coupled sport tourer, Stewart Sunday light, Stewart Commuting, Stewart Touring, Co Motion Tandem, Stewart 3-Spd, Stewart Track, Fuji Finest, Mongoose Tomac ATB, GT Bravado ATB, JCP Folder, Stewart 650B ATB
Mentioned: 0 Post(s)
Tagged: 0 Thread(s)
Quoted: 4210 Post(s)
Liked 3,875 Times
in
2,315 Posts
John- I did wonder how to clean out the stay end/seat lug side area w/o removing that end of the stay completely. Your idea of cutting the bridge and pulling back the stay while doing that cleaning is a good one. Although I hope I never have to try it
This partially mitered stay fitting against the lug won't gain from filing a small trough in the side of the lug. I do that with traditionally attached stays though. I have a photo of that method somewhere.
Having worked in a Raleigh shop in the 1970s I saw a number of stay tops with a flat plate brazed at an angle with the stay touching the side of the lug have issues with too aggressive filing or poor fill. Then there's the many stays that broke off of the lug from many brands I've looked at (and fixed a few). This joint is one that I have paid attention to yet my frame still wasn't well brazed there. That's what bothers me.
The rider, a good friend, is starting to have serious body/health issues and might not be riding like he has in the past. Were this bike never see the streets and trails again would be sad but at least now it can. Andy
__________________
AndrewRStewart
AndrewRStewart
Likes For Andrew R Stewart:
12-13-23, 11:40 AM
#8
Randomhead
Join Date: Aug 2008
Location: Happy Valley, Pennsylvania
Posts: 24,399
Mentioned: 0 Post(s)
Tagged: 0 Thread(s)
Quoted: 4 Post(s)
Liked 3,699 Times
in
2,519 Posts
I generally don't like an external reinforcement for a seat stay, but someone somewhere on the interwebs asked about replacing the dropouts and I immediately thought of that approach if the dropout couldn't be made to fit otherwise. It's a perfectly valid repair, but maybe not on a bike that has some value due to aesthetics.
12-13-23, 12:19 PM
#9
Senior Member

Join Date: May 2010
Location: Bastrop Texas
Posts: 4,481
Bikes: Univega, Peu P6, Peu PR-10, Ted Williams, Peu UO-8, Peu UO-18 Mixte, Peu Dolomites
Mentioned: 13 Post(s)
Tagged: 0 Thread(s)
Quoted: 967 Post(s)
Liked 1,631 Times
in
1,047 Posts
 No matter where you're at... There you are... Δf:=f(1/2)-f(-1/2)