


how to take apart a 1st gen uniglide freehub?
 04-06-15, 10:31 PM
#1

Sunshine
Thread Starter

Join Date: Aug 2014
Location: Des Moines, IA
Posts: 16,670
Bikes: '18 class built steel roadbike, '19 Fairlight Secan, '88 Schwinn Premis , Black Mountain Cycles Monstercross V4, '89 Novara Trionfo
Mentioned: 123 Post(s)
Tagged: 0 Thread(s)
Quoted: 11027 Post(s)
Liked 7,575 Times
in
4,225 Posts
how to take apart a 1st gen uniglide freehub?
Anyone able to help with this?
I am still using the original wheel set for an '80 Schwinn Vouageit 11.8 and the freehub is no longer spinning freely.
It's the original uniglide freehub and cassette.
I am hoping the inside can somehow be cleaned out. The wheel will spin when I hold the freehub, but on the bike it doesn't spin- it's like a fixie and keeps turning.
I can't find any step by steps online, probably because it's been dead technology that was short lived.
I've read that the original uniglide freehub is attached direct to the hub, and I've read that a 10mm hex will loosen knockoff freehubs.
I can't tell where a hex would go.
Last edited by mstateglfr; 04-06-15 at 10:34 PM.
 04-06-15, 10:53 PM
#2

Insane Bicycle Mechanic

Join Date: Mar 2008
Location: other Vancouver
Posts: 9,862
Mentioned: 34 Post(s)
Tagged: 0 Thread(s)
Quoted: 812 Post(s)
Liked 730 Times
in
388 Posts
The very first generation of Uniglide cassette hubs had a body that pressed on to the hub shell. There was a special tool that pulled the body off. It's probably on Velobase somewhere, but my cat is playing with the computer mouse and I can't click enough to find it.
__________________
Jeff Wills
Comcast nuked my web page. It will return soon..
Jeff Wills
Comcast nuked my web page. It will return soon..
04-06-15, 10:57 PM
#3
Insane Bicycle Mechanic
Join Date: Mar 2008
Location: other Vancouver
Posts: 9,862
Mentioned: 34 Post(s)
Tagged: 0 Thread(s)
Quoted: 812 Post(s)
Liked 730 Times
in
388 Posts
Moved the cat long enough to find this: Shimano Cassettes & Freehubs
__________________
Jeff Wills
Comcast nuked my web page. It will return soon..
Jeff Wills
Comcast nuked my web page. It will return soon..
04-07-15, 12:40 AM
#4
Senior Member
Join Date: Mar 2008
Posts: 8,688
Mentioned: 46 Post(s)
Tagged: 0 Thread(s)
Quoted: 1074 Post(s)
Liked 295 Times
in
222 Posts
Anyone able to help with this?
I am still using the original wheel set for an '80 Schwinn Vouageit 11.8 and the freehub is no longer spinning freely.
It's the original uniglide freehub and cassette.
I am hoping the inside can somehow be cleaned out. The wheel will spin when I hold the freehub, but on the bike it doesn't spin- it's like a fixie and keeps turning.
I can't find any step by steps online, probably because it's been dead technology that was short lived.
I've read that the original uniglide freehub is attached direct to the hub, and I've read that a 10mm hex will loosen knockoff freehubs.
I can't tell where a hex would go.
Finish it off like a regular hub overhaul.
04-07-15, 05:55 AM
#5
Really Old Senior Member

IF it's removable with a 10MM hex wrench, just stick the wrench in the hole.
IF it's that type, it'll engage "about" an inch or so deep.
IF it's that type, it'll engage "about" an inch or so deep.
04-07-15, 10:18 AM
#6
Sunshine
Thread Starter
Join Date: Aug 2014
Location: Des Moines, IA
Posts: 16,670
Bikes: '18 class built steel roadbike, '19 Fairlight Secan, '88 Schwinn Premis , Black Mountain Cycles Monstercross V4, '89 Novara Trionfo
Mentioned: 123 Post(s)
Tagged: 0 Thread(s)
Quoted: 11027 Post(s)
Liked 7,575 Times
in
4,225 Posts
thanks for the detail- I was thinking those notches were what would need to be engaged to unscrew, but wasn't sure.
Time to try a bunch of random tools the wrong way to open that bearing cup.
Time to try a bunch of random tools the wrong way to open that bearing cup.
04-07-15, 10:23 AM
#7
Senior Member
Join Date: Dec 2010
Location: Above ground, Walnut Creek, Ca
Posts: 6,681
Bikes: 8 ss bikes, 1 5-speed touring bike
Mentioned: 0 Post(s)
Tagged: 0 Thread(s)
Quoted: 86 Post(s)
Likes: 0
Liked 4 Times
in
4 Posts
some early uniglide freehubs need a special tool, that is hard to find, to remove the freehub, later models use the same design as current models do using a 10mm hex wrench.
if it's the newer model... to find out where the wrench goes, thoroughly clean the hole that travels through the hub shell. the one where the axle travels. then hold the wheel up to the light and sight through the hole. you will be surprised to find that the inside is six sided, not circular, as one would expect!
the threads are normal, left to loosen threads and need to be accessed from the freehub side, IIRC.
Last edited by hueyhoolihan; 04-07-15 at 10:26 AM.
04-07-15, 11:00 PM
#8
Insane Bicycle Mechanic
Join Date: Mar 2008
Location: other Vancouver
Posts: 9,862
Mentioned: 34 Post(s)
Tagged: 0 Thread(s)
Quoted: 812 Post(s)
Liked 730 Times
in
388 Posts
some early uniglide freehubs need a special tool, that is hard to find, to remove the freehub, later models use the same design as current models do using a 10mm hex wrench.
if it's the newer model... to find out where the wrench goes, thoroughly clean the hole that travels through the hub shell. the one where the axle travels. then hold the wheel up to the light and sight through the hole. you will be surprised to find that the inside is six sided, not circular, as one would expect!
the threads are normal, left to loosen threads and need to be accessed from the freehub side, IIRC.
if it's the newer model... to find out where the wrench goes, thoroughly clean the hole that travels through the hub shell. the one where the axle travels. then hold the wheel up to the light and sight through the hole. you will be surprised to find that the inside is six sided, not circular, as one would expect!
the threads are normal, left to loosen threads and need to be accessed from the freehub side, IIRC.
__________________
Jeff Wills
Comcast nuked my web page. It will return soon..
Jeff Wills
Comcast nuked my web page. It will return soon..
04-08-15, 06:56 PM
#9
Senior Member
If you open it up on the freehub you are going to find 50 3/32" balls, two pawls and a spring. It would be a difficult job to do while it's mounted to the wheel.
04-09-15, 02:29 AM
#10
Senior Member
Join Date: Mar 2008
Posts: 8,688
Mentioned: 46 Post(s)
Tagged: 0 Thread(s)
Quoted: 1074 Post(s)
Liked 295 Times
in
222 Posts
An how would you hold the freehub to unscrew the bearing cup if you take the freehub body off the wheel?
My preference is the "bus driver" freewheel removal technique - stick the tool in a vise, put wheel on tool, turn to break free. Then put wheel on towel/bucket/bowl etc and continue disassembly.
04-09-15, 06:08 AM
#11
Senior Member
Not particularly, as long as you have advance warning of what's about to happen. A tray, a discarded terry cloth towel etc under the wheel will do fine to catch the escapees.
An how would you hold the freehub to unscrew the bearing cup if you take the freehub body off the wheel?
My preference is the "bus driver" freewheel removal technique - stick the tool in a vise, put wheel on tool, turn to break free. Then put wheel on towel/bucket/bowl etc and continue disassembly.
An how would you hold the freehub to unscrew the bearing cup if you take the freehub body off the wheel?
My preference is the "bus driver" freewheel removal technique - stick the tool in a vise, put wheel on tool, turn to break free. Then put wheel on towel/bucket/bowl etc and continue disassembly.
04-09-15, 10:21 PM
#12
Senior Member

Join Date: Apr 2013
Location: Cascadia
Posts: 176
Mentioned: 0 Post(s)
Tagged: 0 Thread(s)
Quoted: 0 Post(s)
Likes: 0
Liked 0 Times
in
0 Posts
I believe you need a special tool. When I had this problem, I went to Wright Bros. in Seattle, WA - only place I could find.
Perhaps an old shop near you has one.
Perhaps an old shop near you has one.
04-10-15, 10:30 AM
#14
Senior Member
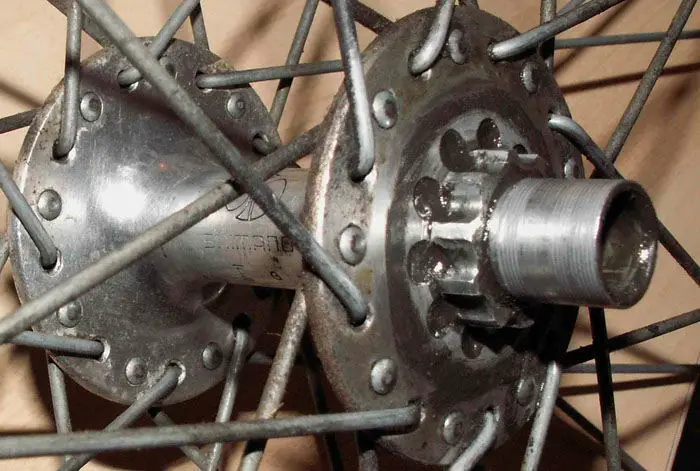
The earliest Shimano Freehubs, however, used a more primitive construction.
There was a set of splines to keep the body from rotating on the hub shell, but
instead of a hollow bolt to secure the body to the shell, there was a smooth
cylindrical projection past the splines, and the corresponding Freehub body was
a slip fit over this projection. The axle held the assembly from falling off,
but the design was not fully satisfactory. The Freehub body could burnish the
projecting sleeve, and loosen.
Replacement bodies are not available for these early hubs, which can
sometimes be identified by the narrow barrel, without the
characteristic bulge on the right end. (The bulge is to accommodate the
threading for the hollow bolt used on newer Shimano Freehubs) See the photos
below, kindly provided by David Landsberg.
Some of the older hubs have the bulge anyway -- see the additional photo
kindly provided by Laurence Yeandle.
https://www.sheldonbrown.com/k7.html#transplant

