


Weld Protrusion Into Seatpost Area?
 05-22-23, 07:08 PM
#1
Full Member
Thread Starter
Weld Protrusion Into Seatpost Area?
Hello,
I am in the process of replacing an aluminum seat tube shim in a titanium frame. I do have a replacement shim. The frame builder screwed it up and over reamed it so the seat post wouldn't hold.
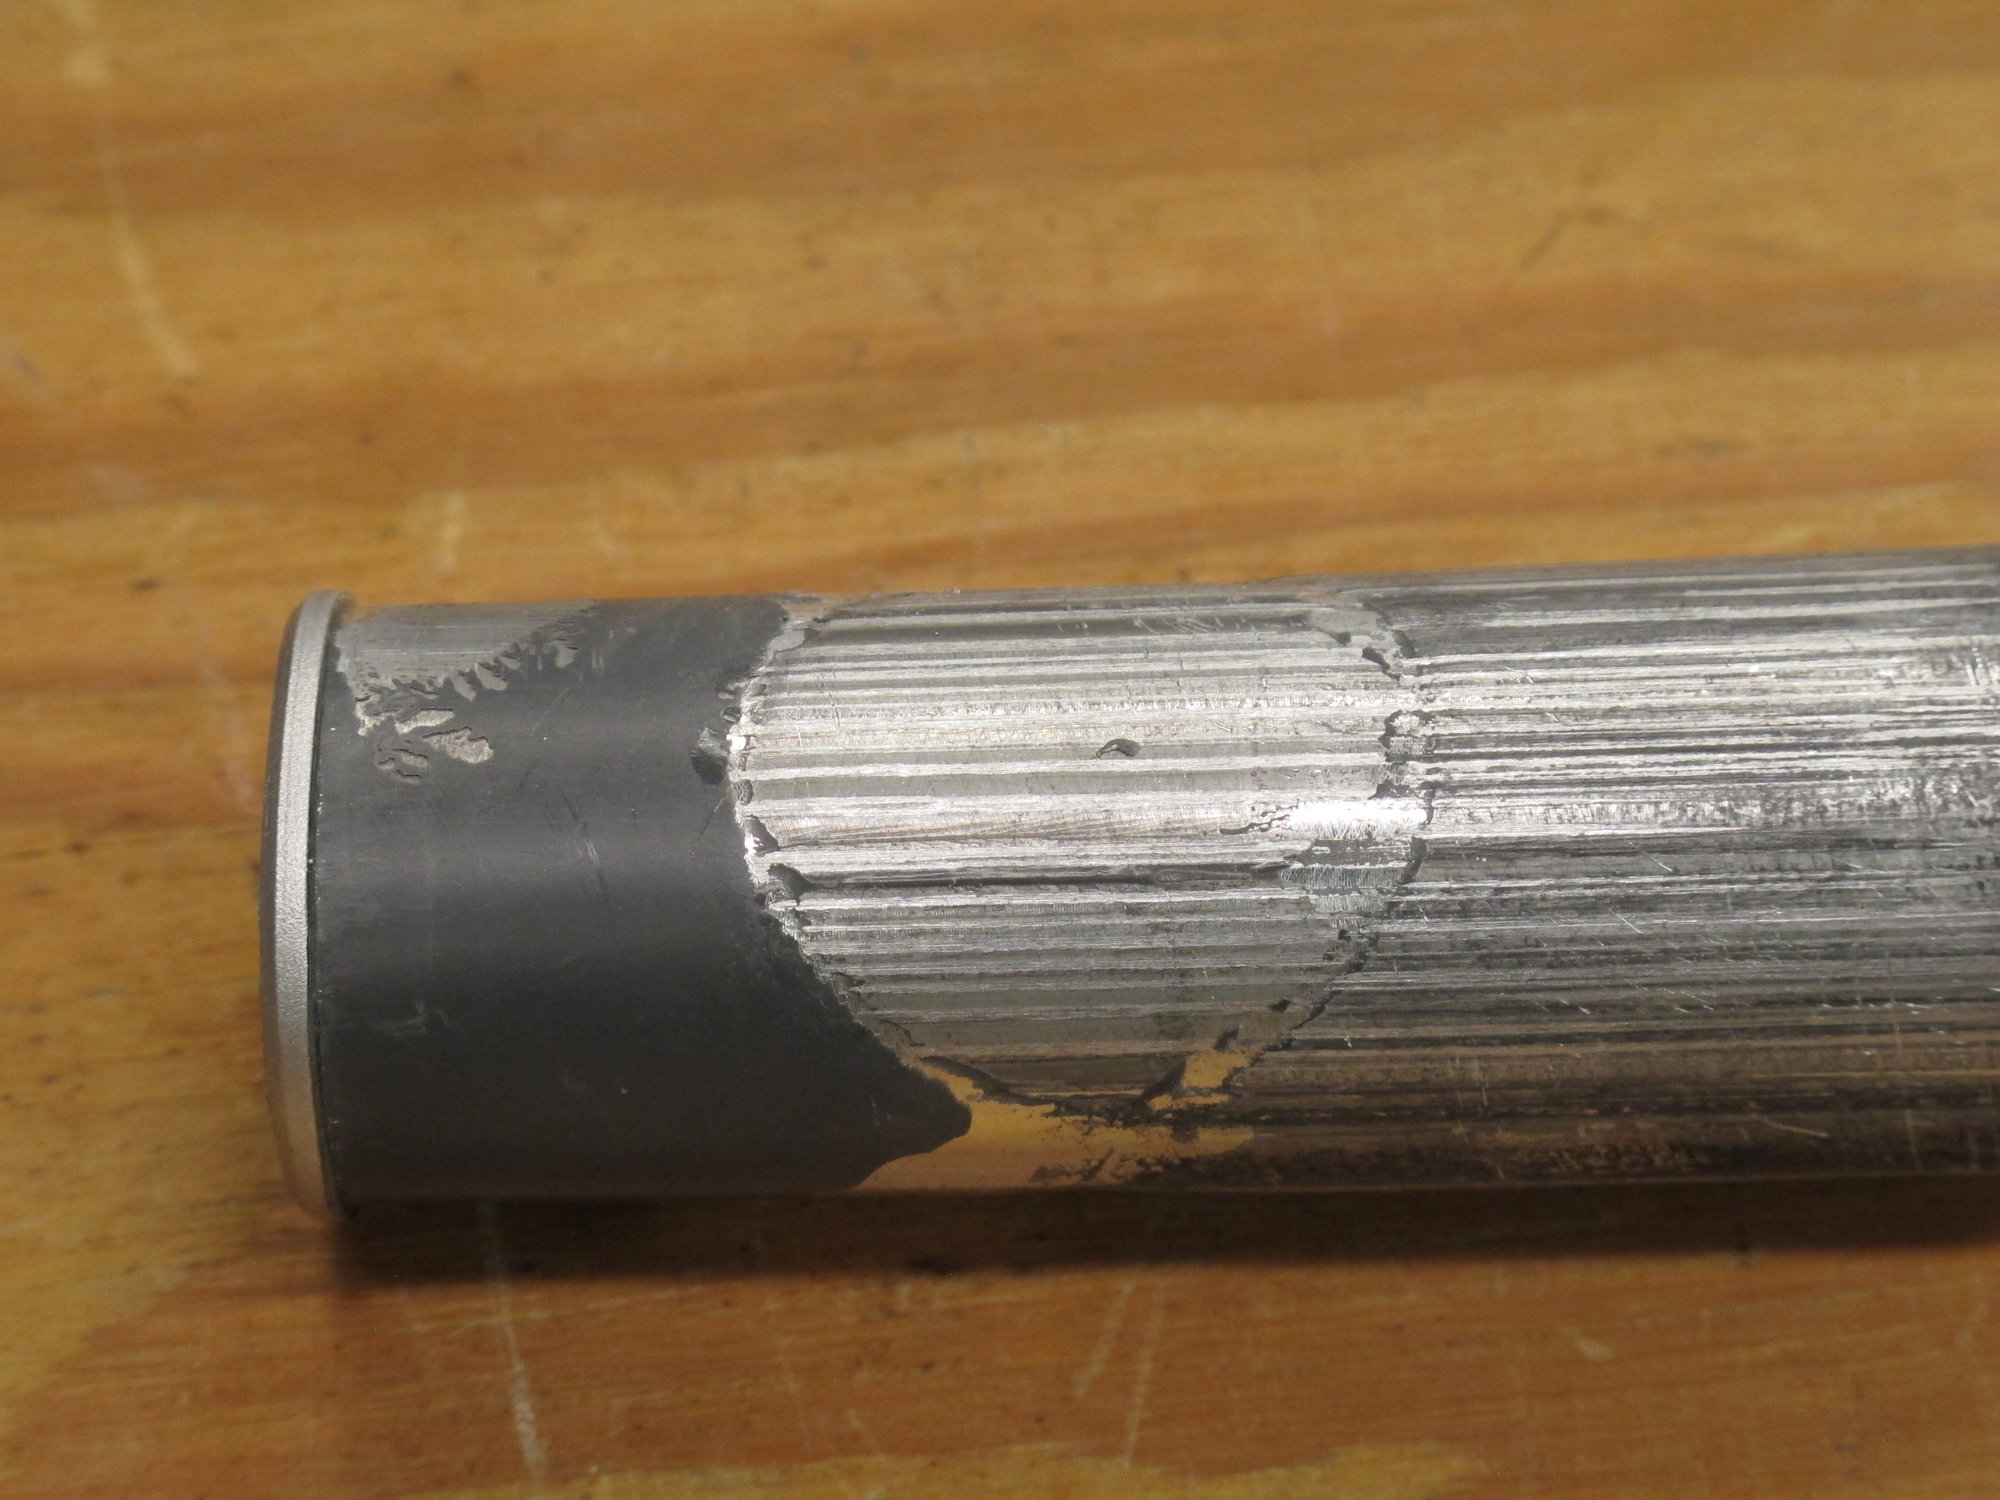
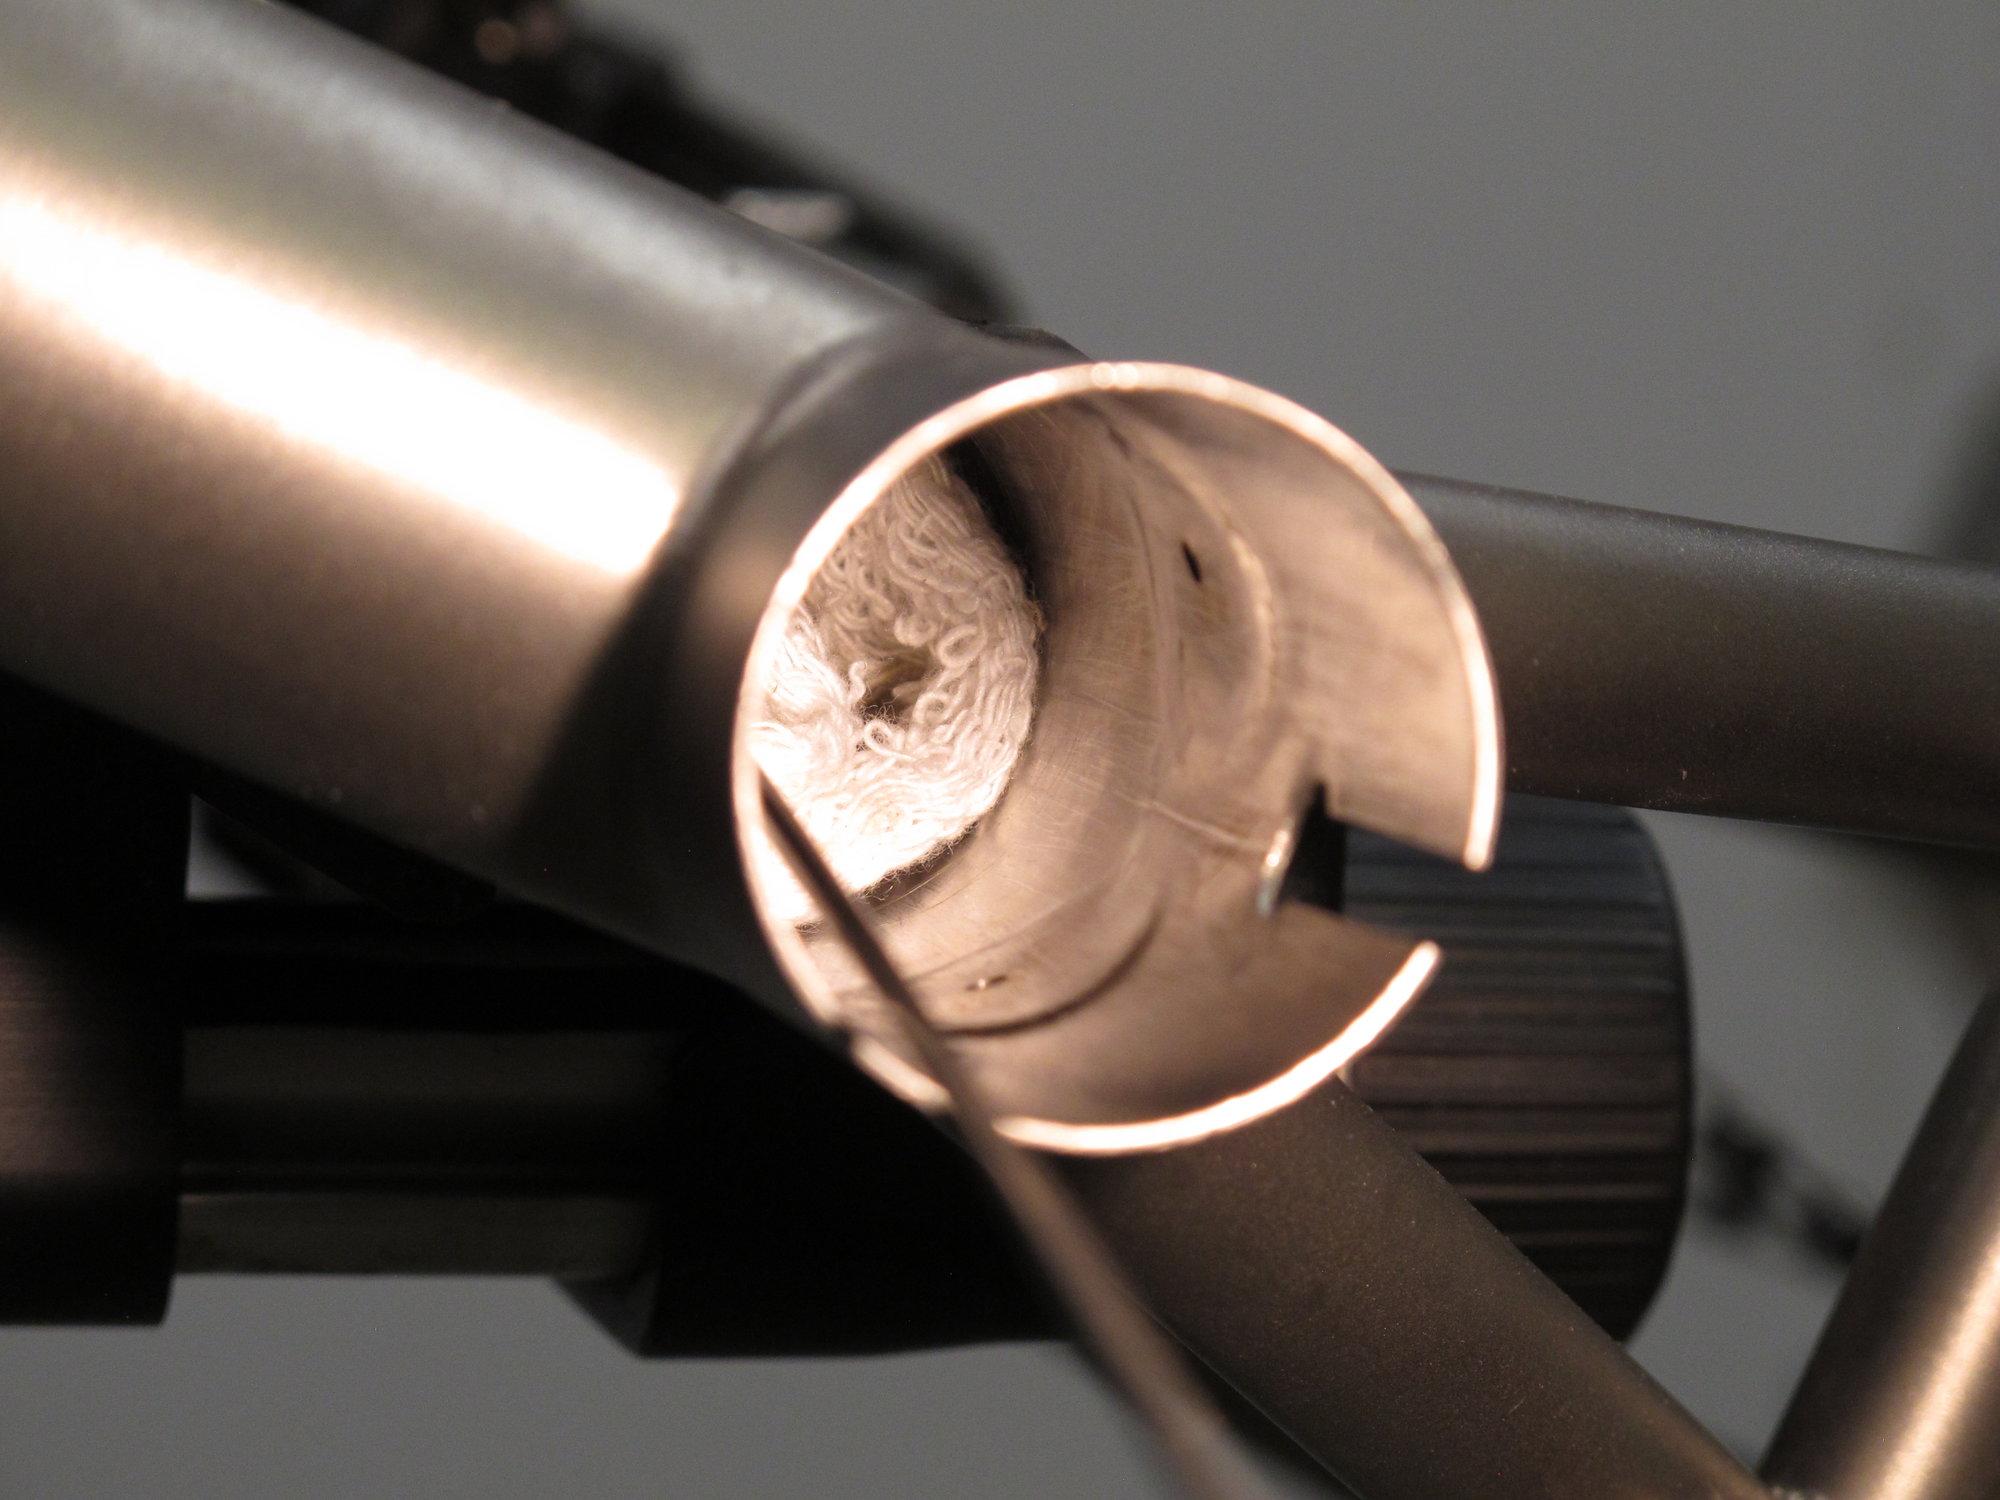
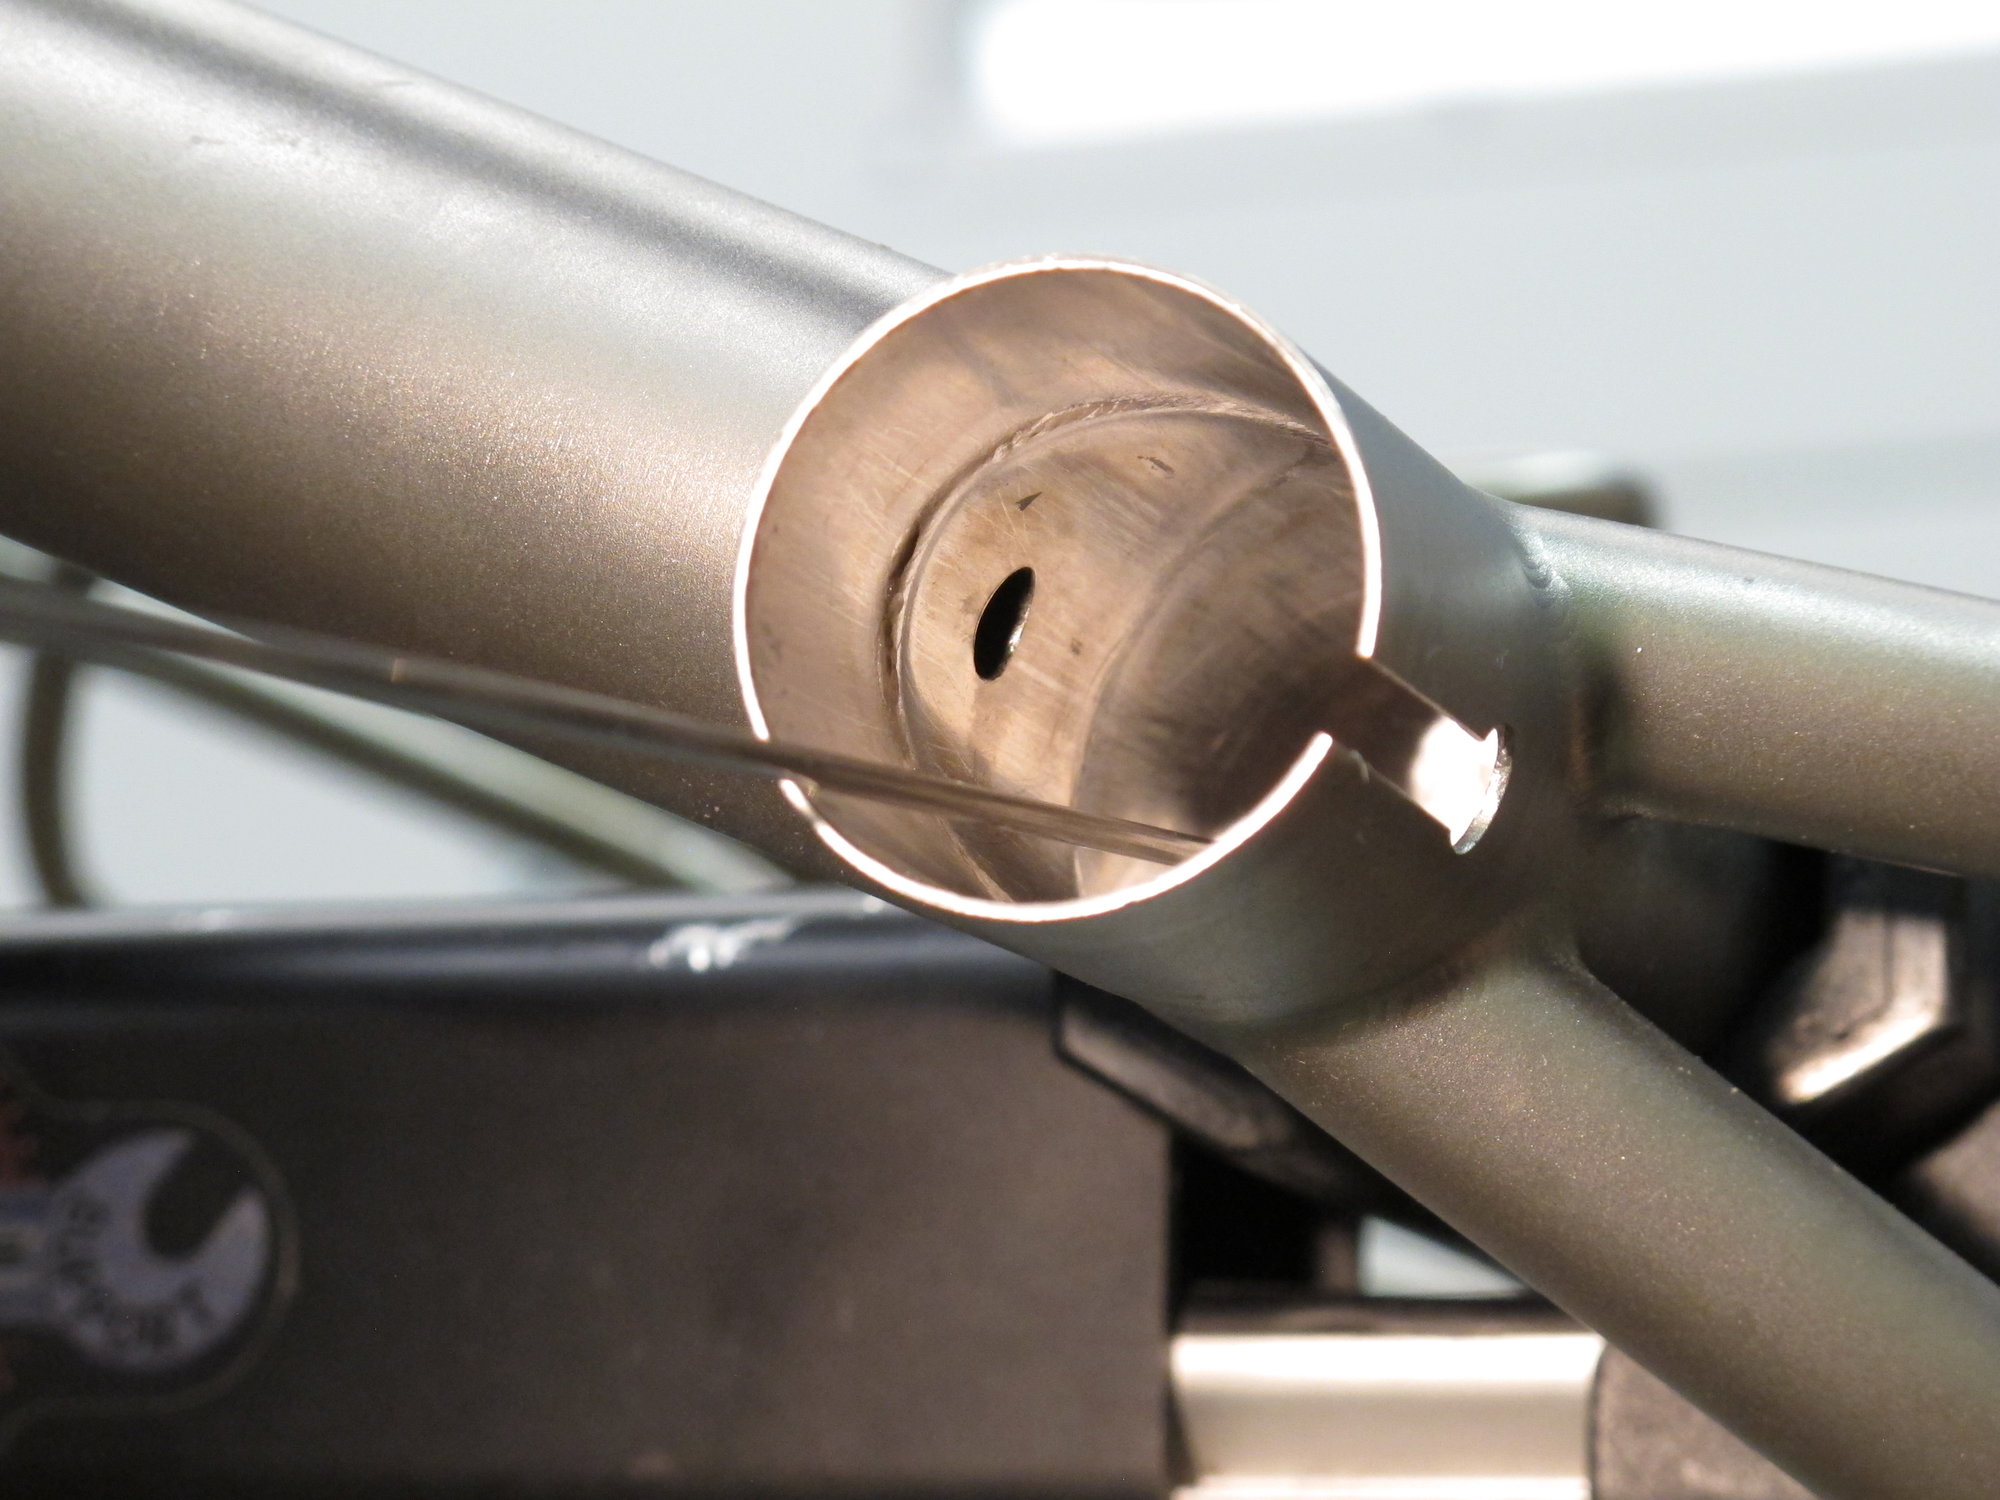
The seat tube is 34.9mm 0.9mm wall titanium. The seat post is standard 31.6mm and the shim has a thickness of about 0.7mm. The old shim has been removed and the seat tube cleaned up. This has revealed some rather significant weld protrusion from the top tube and seat stays into the seat tube. Using a crude telescoping bore gauge I am seeing .010-.020".
So my question is whether or not anything should be done to take off the high spots on the weld protrusions before fitting the new shim? If so, what is the best tool to use? What is the standard industry practice?
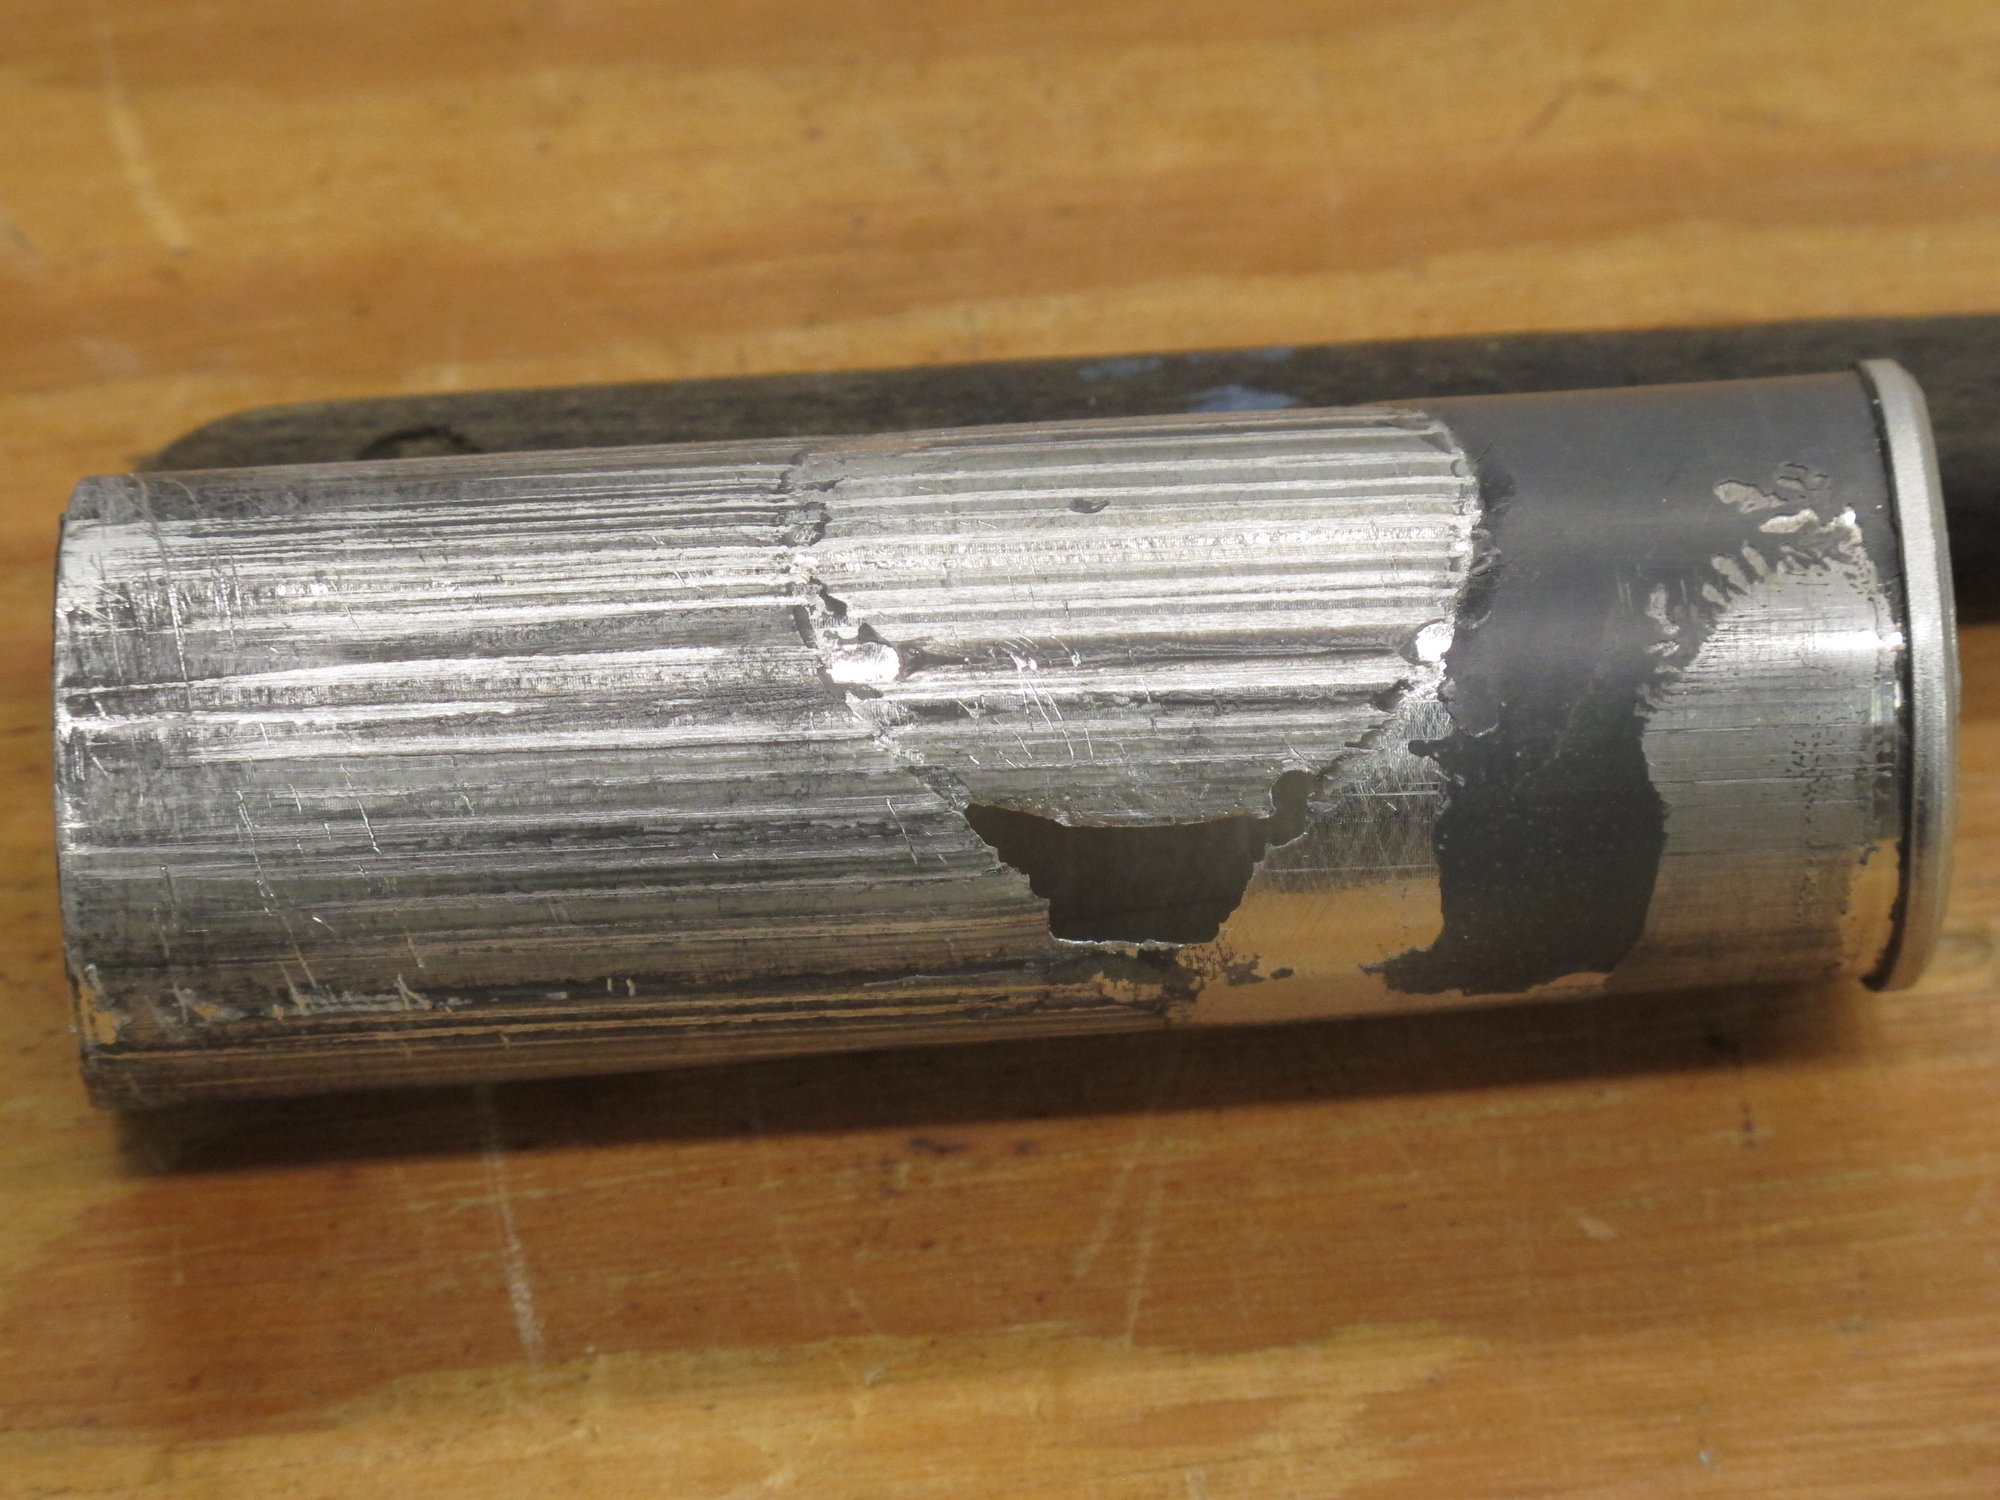
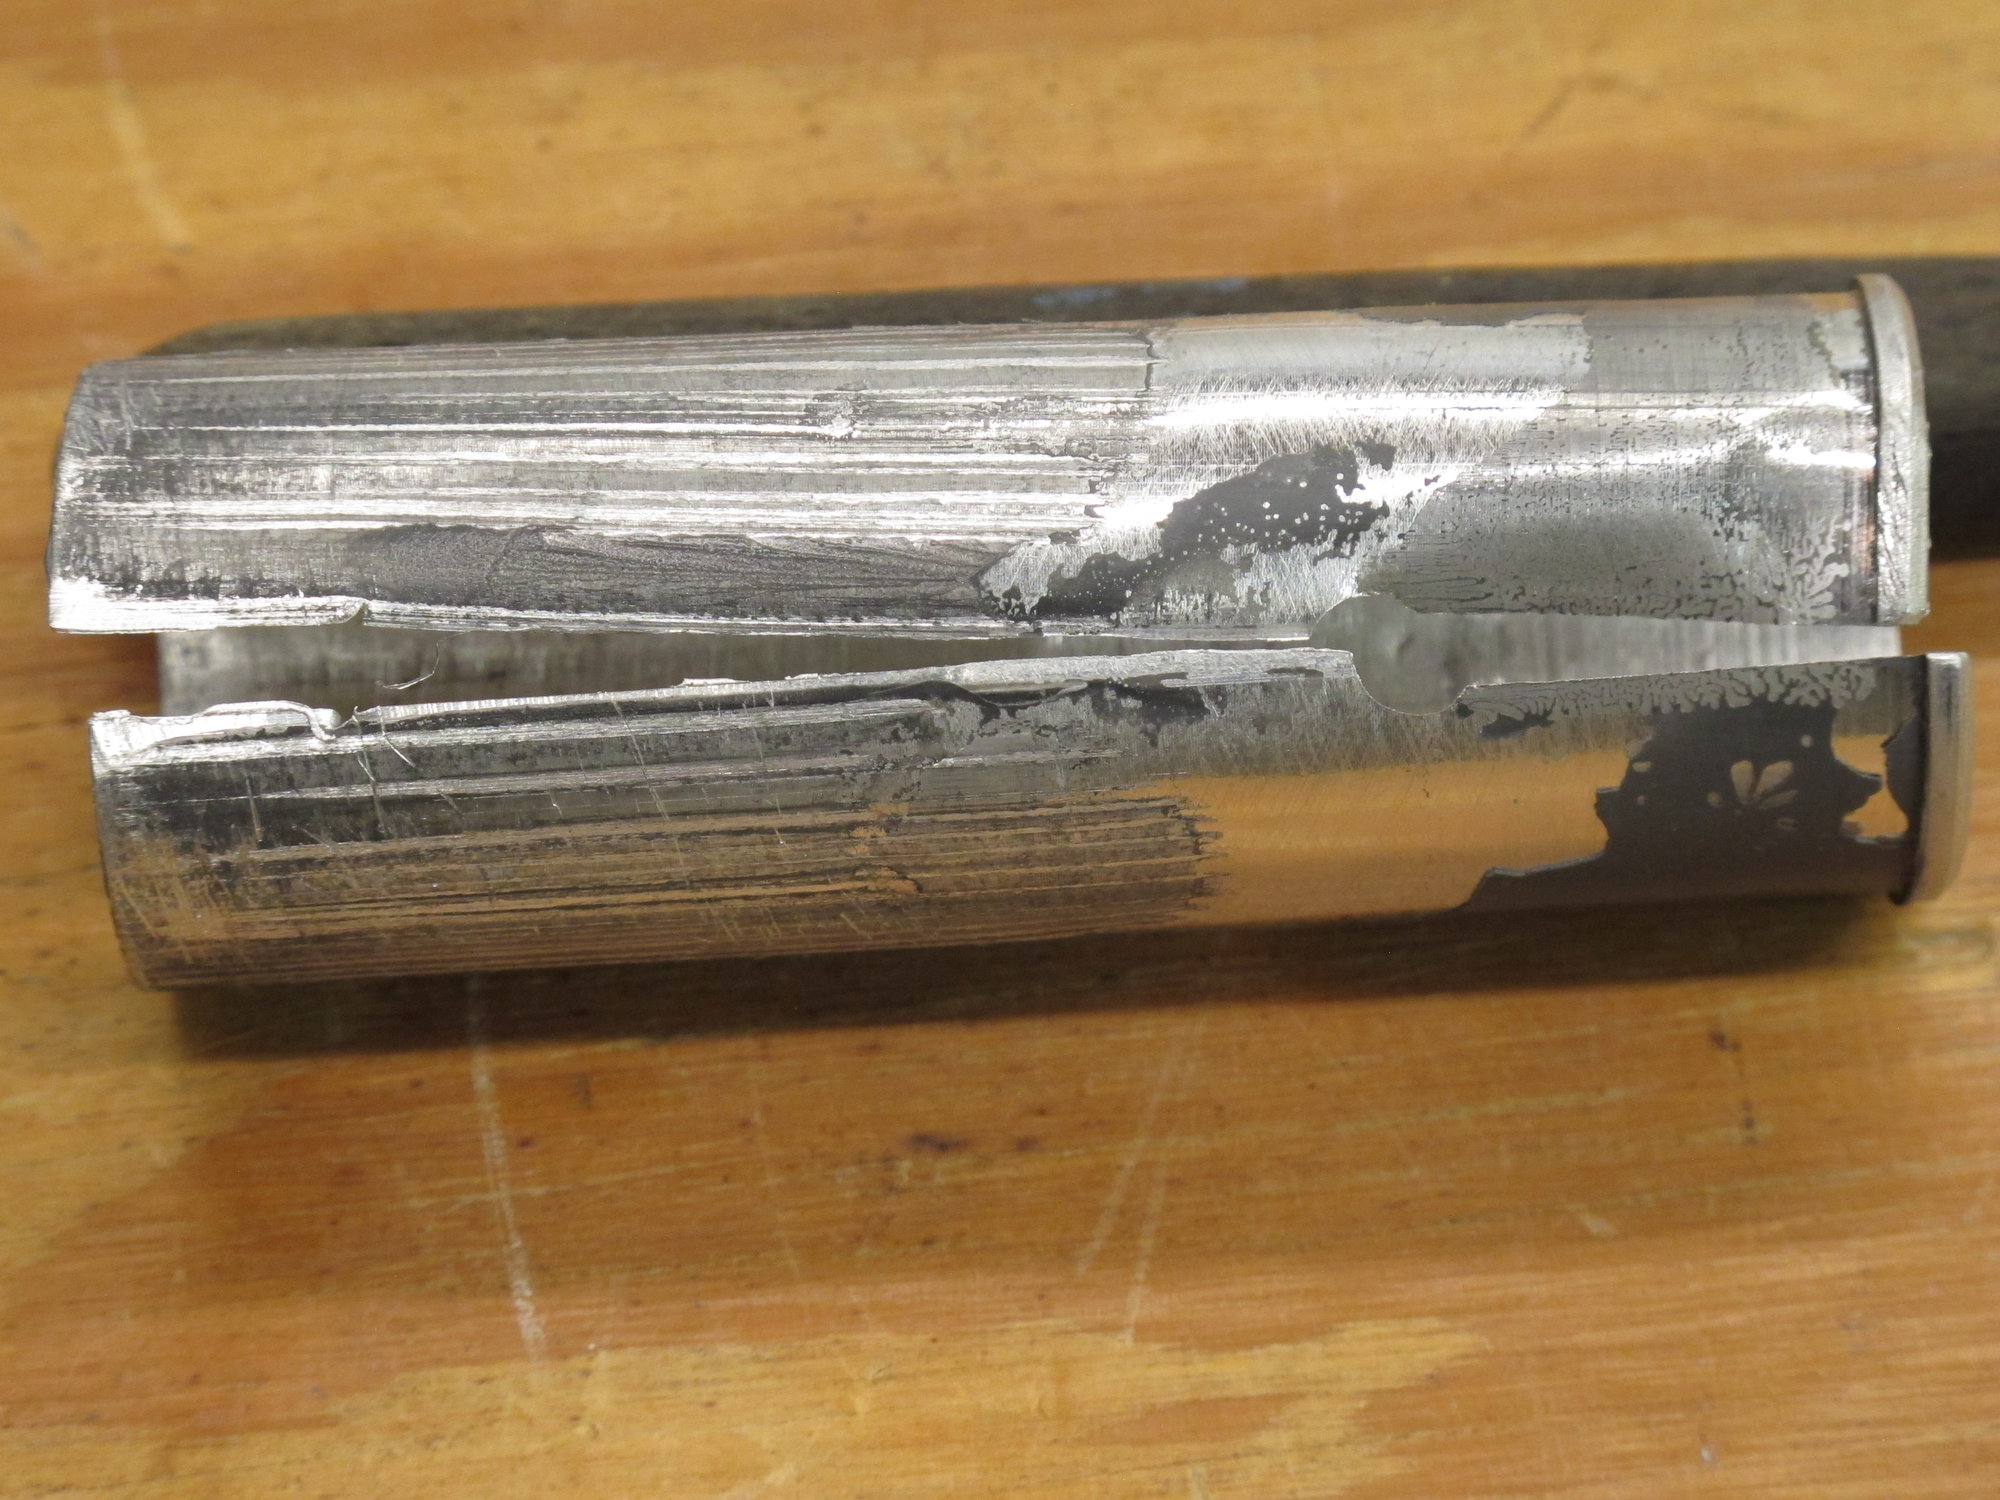
I am attaching some photos that show the remnants of the old shim and the weld protrusions into the seat tube bore. Looking at the old shim I am wondering if the weld protrusions interfered with the reaming of the original shim.
I am in the process of replacing an aluminum seat tube shim in a titanium frame. I do have a replacement shim. The frame builder screwed it up and over reamed it so the seat post wouldn't hold.
The seat tube is 34.9mm 0.9mm wall titanium. The seat post is standard 31.6mm and the shim has a thickness of about 0.7mm. The old shim has been removed and the seat tube cleaned up. This has revealed some rather significant weld protrusion from the top tube and seat stays into the seat tube. Using a crude telescoping bore gauge I am seeing .010-.020".
So my question is whether or not anything should be done to take off the high spots on the weld protrusions before fitting the new shim? If so, what is the best tool to use? What is the standard industry practice?
I am attaching some photos that show the remnants of the old shim and the weld protrusions into the seat tube bore. Looking at the old shim I am wondering if the weld protrusions interfered with the reaming of the original shim.
 05-22-23, 08:46 PM
#2


Randomhead
Join Date: Aug 2008
Location: Happy Valley, Pennsylvania
Posts: 24,399
Mentioned: 0 Post(s)
Tagged: 0 Thread(s)
Quoted: 4 Post(s)
Liked 3,699 Times
in
2,519 Posts
I think just suffering with the protrusions is best. I'm trying to wrap my head around over-reaming and also having weld protrusions.
Likes For unterhausen:
05-23-23, 08:07 AM
#4
Randomhead
Join Date: Aug 2008
Location: Happy Valley, Pennsylvania
Posts: 24,399
Mentioned: 0 Post(s)
Tagged: 0 Thread(s)
Quoted: 4 Post(s)
Liked 3,699 Times
in
2,519 Posts
Actually, it doesn't look reamed at all to me, or the tube would have holes in it, especially at the seat stays. The protrusions go almost all the way around the tube. I am thinking possibly the tubing doesn't fit normal size seat posts, that's not uncommon. Normally what builders do is use a welded collar that does fit seat posts. I would like to commend the OP on their beautifully done pictures. Often we see pictures that were apparently taken with a potato.
05-23-23, 03:34 PM
#5

blahblahblah chrome moly

Join Date: Apr 2009
Location: Seattle
Posts: 1,994
Mentioned: 92 Post(s)
Tagged: 0 Thread(s)
Quoted: 1181 Post(s)
Liked 2,576 Times
in
1,076 Posts
Absolutely, that was never reamed. Thanks for the great pics.
When I worked at Ti Cycles ('90s), we pressed in an alu sleeve that fit a standard seatpost, but we did ream the Ti first for a good fit on the shim. It may not be a popular solution ("shim" makes people think "kluge"), but it was 100% reliable as far as I could tell. Never saw a single problem from it while I was there or in the years since, and I do know people who own them and still ride them. I don't know if Dave still makes them that way, but if he does, that's another 25 years worth of proof that it works well.
One of the goopier varieties of Loctite that's good for filling larger gaps might be a good idea for the OP's bike, to stabilize the shim, which will have to be a somewhat loose fit to go around all those lumps'n'bumps. The shim will also distort from the lumps, so it should be machined a bit undersized for the post, then reamed to fit the post after the Loctite has cured. Al alloy is easy to ream.
Unless you need it to fit a certain post, maybe choose a smaller post so your shim is thicker, for integrity.
Don't worry about the Loctite being permanent, you can always get the shim out with heat if necessary. Unless the frame is painted (which is stupid with Ti, IMHO), you can easily even melt the aluminum out, which doesn't hurt the Ti any.
Mark B
05-23-23, 06:32 PM
#6
Full Member
Thread Starter
Correct, the seat tube was not reamed. The question is whether or not this is standard practice for these .035" thin wall tubes? I know that the thicker tubes can be reamed.
This is how this was intended to be with an aluminum shim to make up for the clearance between the seat post and frame tube. So the shim would be the perfect size if the weld protrusions weren't there. What was the wall thickness of the tubes that you were reaming at TI Cycles? Attempting to ream .035" wall titanium seems kind of scary!
I also have a Litespeed Ti bike with almost 100K miles with the same size tube and shim setup. However, I have no way of knowing if the seat tube was reamed before the shim inserted.
The "Lumps & Bumps" has me concerned that the new shim will get distorted as it passes this area and may cause reaming issues below the weld protrusions. With the old shim it almost looks like the reamer press formed the aluminum around the protrusions and actually the reamer broke through the shim near the top tube protrusion.
I already have the replacement shim and it is a good fit to the seat post and seat tube. It may be a few thousandths thin in wall thickness but this is not enough to make up for the thickness of the weld protrusions.
So would taking out some of the high spots with a half round file (instead of chancing a reamer) cause any frame / weld integrity / weakness issues? Since this is a high stress area I don't want to do anything to weaken the frame.
Any other thoughts on how to fix this given the situation and replacement shim?
Thanks,
Steve
When I worked at Ti Cycles ('90s), we pressed in an alu sleeve that fit a standard seatpost, but we did ream the Ti first for a good fit on the shim. It may not be a popular solution ("shim" makes people think "kluge"), but it was 100% reliable as far as I could tell. Never saw a single problem from it while I was there or in the years since, and I do know people who own them and still ride them. I don't know if Dave still makes them that way, but if he does, that's another 25 years worth of proof that it works well.
I also have a Litespeed Ti bike with almost 100K miles with the same size tube and shim setup. However, I have no way of knowing if the seat tube was reamed before the shim inserted.
One of the goopier varieties of Loctite that's good for filling larger gaps might be a good idea for the OP's bike, to stabilize the shim, which will have to be a somewhat loose fit to go around all those lumps'n'bumps. The shim will also distort from the lumps, so it should be machined a bit undersized for the post, then reamed to fit the post after the Loctite has cured. Al alloy is easy to ream.
So would taking out some of the high spots with a half round file (instead of chancing a reamer) cause any frame / weld integrity / weakness issues? Since this is a high stress area I don't want to do anything to weaken the frame.
Any other thoughts on how to fix this given the situation and replacement shim?
Thanks,
Steve
05-23-23, 06:46 PM
#7
Randomhead
Join Date: Aug 2008
Location: Happy Valley, Pennsylvania
Posts: 24,399
Mentioned: 0 Post(s)
Tagged: 0 Thread(s)
Quoted: 4 Post(s)
Liked 3,699 Times
in
2,519 Posts
I see that the old shim slipped and I didn't understand that it was the shim that was reamed, not the tube. Is there a remaining issue other than the unfortunate circumstance that you now know how ugly it is in there? You can pretty much see that the protrusions are the tube. So cutting them back is going to cut through the tube. I don't think you want to do that.
05-23-23, 08:06 PM
#8
blahblahblah chrome moly
Join Date: Apr 2009
Location: Seattle
Posts: 1,994
Mentioned: 92 Post(s)
Tagged: 0 Thread(s)
Quoted: 1181 Post(s)
Liked 2,576 Times
in
1,076 Posts
The "Lumps & Bumps" has me concerned that the new shim will get distorted as it passes this area and may cause reaming issues below the weld protrusions. With the old shim it almost looks like the reamer press formed the aluminum around the protrusions and actually the reamer broke through the shim near the top tube protrusion.
So would taking out some of the high spots with a half round file (instead of chancing a reamer) cause any frame / weld integrity / weakness issues?
I'd use an adjustable reamer, either new or freshly sharpened (the blades are replaceable and available as replacement parts on better brands. Avoid Chinese.) Use cutting oil, which will need to be washed out with solvent afterward, if you're going to use Loctite on the sleeve (recommended).
With an adjustable, the blades are usually parallel to the axis, which means they want to catch in the slit where the pinchbolt tightens. There are a couple tricks for avoiding that, which I don't have time to go into right now. But since you're reaming on the tops of those lumps, your reamer may not ever touch at the slit. I also have an adjustable reamer with helical blades, which avoids the catching problem, but those are more rare and expensive. I don't have the one for the size range you need, so mine won't help you. (mine does roughly 26.8 to 27.4)
Good luck, and let us know how it comes out. Oh also I'm curious, what's the brand/maker of this frame?
Mark B
05-24-23, 06:23 PM
#9
Full Member
Thread Starter
[QUOTE=unterhausen;22900146Is there a remaining issue other than the unfortunate circumstance that you now know how ugly it is in there?[/QUOTE]
Ugly doesn't really matter but the replacement shim is really intended to fit the seat post and the seat tube without all that extra weld protrusion in the seat tube. Squeezing the shim past all that extra material may have contributed to the problem reaming the original shim... Or the builder just didn't know what they were doing with a reamer.
So technically the protrusions are the tube and the welding material which should be solid titanium with no voids. So technically I would just be removing some of the melted titanium that is protruding into the seat tube bore. Does this sound correct or am I missing something?
05-24-23, 07:17 PM
#10
Full Member
Thread Starter
Ti Cycles were generally .035". Reaming wasn't scary at all, since we welded with a tight fitting (internally expanding) heatsink in the seat tube bore. Very little reaming was needed. The reamer needs to be sharp though � a slightly dull reamer just flexes the Ti outward, and doesn't cut.
I don't have a reamer but I did find a local bike shop that has one and can probably ream the new shim. However, I don't think that he has experience with ti frames and no telling how sharp his reamer is. For aluminum it doesn't really matter.
I think that I can add some thin spacers to make sure that the file never touches the inside of the seat tube
This is the "Nightmare On Elm Street" reincarnation of DEAN and Merlin Metalworks. They consider a 31.6mm post in a 32.1mm bore as "within tolerance" and refused to acknowledge any problem. Didn't seem to matter that the bike couldn't be ridden any appreciable distance without the seat post collapsing into the seat tube. Well, actually their "solution" was to send a better clamp... which was totally useless! So basically I have now been "ghosted" as a "problem customer" and left with a $7000 wall ornament that cannot be ridden unless I can figure out how to fix it myself. Unfortunately there are no local bike shops with the skills, experience, or special tools to work on ti frames. Jim Kish used to be in the area but closed up and moved away during Covid when he couldn't get parts to build complete bikes.
I am a retired engineer (electrical) but with good mechanical aptitude and unfortunately old eyes. At this point I would rather just fix this and move on. Thanks to Covid and a 3 month cross country tour this has almost been a 2 year ordeal and this is not the only think that they screwed up but it is definitely the deal-breaker.
Will do.
Another question... Am I going to need a press to insert the replacement shim? I am thinking that a hammer and a block of wood might be enough. My only other option would be to see if I could somehow get the frame under the drill press and rig up something to use the drill spindle as a press.
Thanks,
Steve
05-24-23, 07:22 PM
#11
Randomhead
Join Date: Aug 2008
Location: Happy Valley, Pennsylvania
Posts: 24,399
Mentioned: 0 Post(s)
Tagged: 0 Thread(s)
Quoted: 4 Post(s)
Liked 3,699 Times
in
2,519 Posts
You are definitely taking a risk removing part of the tube. I am not sure the best welders would guarantee the structural integrity of the frame after doing that, and your bike wasn't made by one of the best welders.
It's a little hard to judge from here how much you would have to take off and if there are places that are particularly bad. If there are some spots that would greatly improve the situation by removing only part of the thickness of the tube then it probably would be okay.
It's a little hard to judge from here how much you would have to take off and if there are places that are particularly bad. If there are some spots that would greatly improve the situation by removing only part of the thickness of the tube then it probably would be okay.
05-24-23, 09:13 PM
#12
blahblahblah chrome moly
Join Date: Apr 2009
Location: Seattle
Posts: 1,994
Mentioned: 92 Post(s)
Tagged: 0 Thread(s)
Quoted: 1181 Post(s)
Liked 2,576 Times
in
1,076 Posts
This is starting to make more sense. Obviously the builder didn't know about this technique and just welded the frame and and jammed a shim in to try to make everything fit after the fact.
I would be concerned that the reamer would want to catch on the protrusions and then there is that pesky slot in the seat tube that is already cut.
I don't have a reamer but I did find a local bike shop that has one and can probably ream the new shim. However, I don't think that he has experience with ti frames and no telling how sharp his reamer is. For aluminum it doesn't really matter.
I think that I can add some thin spacers to make sure that the file never touches the inside of the seat tube
This is the "Nightmare On Elm Street" reincarnation of DEAN and Merlin Metalworks. They consider a 31.6mm post in a 32.1mm bore as "within tolerance" and refused to acknowledge any problem. Didn't seem to matter that the bike couldn't be ridden any appreciable distance without the seat post collapsing into the seat tube. Well, actually their "solution" was to send a better clamp... which was totally useless! So basically I have now been "ghosted" as a "problem customer" and left with a $7000 wall ornament that cannot be ridden unless I can figure out how to fix it myself. Unfortunately there are no local bike shops with the skills, experience, or special tools to work on ti frames. Jim Kish used to be in the area but closed up and moved away during Covid when he couldn't get parts to build complete bikes.
I am a retired engineer (electrical) but with good mechanical aptitude and unfortunately old eyes. At this point I would rather just fix this and move on. Thanks to Covid and a 3 month cross country tour this has almost been a 2 year ordeal and this is not the only think that they screwed up but it is definitely the deal-breaker.
Will do.
Another question... Am I going to need a press to insert the replacement shim? I am thinking that a hammer and a block of wood might be enough. My only other option would be to see if I could somehow get the frame under the drill press and rig up something to use the drill spindle as a press.
Thanks,
Steve
Other than making you get a new shim and a new seatpost, this would be worthwhile because you'd have a fully functional, reliable bike.
Making the shim is trivial, if you can come up with reliable number for the OD of the thing. I'd make one in probably a half-hour, let's say $50 if I can source alu tubing that's close enough to keep the chip-making to a minimum. (More if it has to be made from a solid round bar.) But deciding on what the OD should be could be the tricky part. I could do it if I had the frame, but having to ship it back and forth makes that more of a big hairy deal. Maybe try to find someone closer to you who has a lathe and is willing to make a one-off part.
Oh and yes, pounding from above with a piece of wood over it to spread the hammer blows is probably just fine. The Loctite acts as lube, and the alu is soft enough to sort of flow out of the way of the worst of the bulges in the Ti. The biggest risk is if you guess wrong on the OD of the shim, in the too-tight direction. It would be pretty bad to get it partway installed only to have forward motion stop, completely siezed... it could be difficult to get back out. So I'd try to err on the loose side, and rely on the Loctite to fill the gaps.
Last edited by bulgie; 05-24-23 at 09:17 PM.
05-25-23, 07:26 AM
#13
Senior Member
Join Date: Feb 2012
Location: Rochester, NY
Posts: 18,094
Bikes: Stewart S&S coupled sport tourer, Stewart Sunday light, Stewart Commuting, Stewart Touring, Co Motion Tandem, Stewart 3-Spd, Stewart Track, Fuji Finest, Mongoose Tomac ATB, GT Bravado ATB, JCP Folder, Stewart 650B ATB
Mentioned: 0 Post(s)
Tagged: 0 Thread(s)
Quoted: 4210 Post(s)
Liked 3,875 Times
in
2,315 Posts
So this begs the question where's the OP and bike? Some of us here do have lathes and some experience making one off stuff. Andy
__________________
AndrewRStewart
AndrewRStewart
05-25-23, 10:11 AM
#14
Full Member
Thread Starter
05-25-23, 03:20 PM
#15
Senior Member
Join Date: Feb 2012
Location: Rochester, NY
Posts: 18,094
Bikes: Stewart S&S coupled sport tourer, Stewart Sunday light, Stewart Commuting, Stewart Touring, Co Motion Tandem, Stewart 3-Spd, Stewart Track, Fuji Finest, Mongoose Tomac ATB, GT Bravado ATB, JCP Folder, Stewart 650B ATB
Mentioned: 0 Post(s)
Tagged: 0 Thread(s)
Quoted: 4210 Post(s)
Liked 3,875 Times
in
2,315 Posts
Steve- Too bad this isn't 15 years ago when i was at the Falls of Neuse Allstar location. Even my (now moved onto another) then lathe, an Atlas 6", could have handled this. I had sort of established a relationship with a local to Raleigh older guy who had been a machinist before his retirement, for doing the few jobs i couldn't. But I'm sure he's either in a retirement home by now or passed on (he was close to 75 when I first met him).
You are fairly close to Cycle de Oro in Greensboro and Dale, the owner, has done some frame building and might possibly have his own machining service contacts. Andy
You are fairly close to Cycle de Oro in Greensboro and Dale, the owner, has done some frame building and might possibly have his own machining service contacts. Andy
__________________
AndrewRStewart
AndrewRStewart
05-25-23, 06:10 PM
#16
Full Member
Thread Starter
This is the same process that bulgie used at Ti Cycles only they used a reamer to remove this excess material on the same wall thickness tubes. So if it worked and was reliable for them I don't understand how it would be a risk to my frame integrity now.
I don't plan on removing anything that looks like the inside wall of the tubing.
It's a little hard to judge from here how much you would have to take off and if there are places that are particularly bad. If there are some spots that would greatly improve the situation by removing only part of the thickness of the tube then it probably would be okay.
05-25-23, 06:26 PM
#17
Full Member
Thread Starter
At the risk of repeating myself... if it were mine I'd quickly knock out a new shim that was quite a bit thicker, made to fit a smaller seatpost, maybe 27.2?. Get the OD of the shim to be a press-fit in the frame (maybe by trial and error), Loctite it, then ream the shim to true it up where it got pushed in by the bulges in the Ti.
Other than making you get a new shim and a new seatpost, this would be worthwhile because you'd have a fully functional, reliable bike.
Making the shim is trivial, if you can come up with reliable number for the OD of the thing. I'd make one in probably a half-hour, let's say $50 if I can source alu tubing that's close enough to keep the chip-making to a minimum. (More if it has to be made from a solid round bar.) But deciding on what the OD should be could be the tricky part. I could do it if I had the frame, but having to ship it back and forth makes that more of a big hairy deal. Maybe try to find someone closer to you who has a lathe and is willing to make a one-off part.
05-25-23, 06:40 PM
#18
Full Member
Thread Starter
Steve- Too bad this isn't 15 years ago when i was at the Falls of Neuse Allstar location. Even my (now moved onto another) then lathe, an Atlas 6", could have handled this. I had sort of established a relationship with a local to Raleigh older guy who had been a machinist before his retirement, for doing the few jobs i couldn't. But I'm sure he's either in a retirement home by now or passed on (he was close to 75 when I first met him).
You are fairly close to Cycle de Oro in Greensboro and Dale, the owner, has done some frame building and might possibly have his own machining service contacts. Andy
You are fairly close to Cycle de Oro in Greensboro and Dale, the owner, has done some frame building and might possibly have his own machining service contacts. Andy
Jeff Hutchinson sold All-Star and retired. The shop is now Conte's Bikes. One of the guys that I ride with lives across the street from Jeff. He say's that Jeff now spends his time fixing up old Porches.
05-25-23, 06:43 PM
#19
blahblahblah chrome moly
Join Date: Apr 2009
Location: Seattle
Posts: 1,994
Mentioned: 92 Post(s)
Tagged: 0 Thread(s)
Quoted: 1181 Post(s)
Liked 2,576 Times
in
1,076 Posts
I understand what you are saying about a new shim but am having trouble visualizing how this would fit better. The ID of the seat tube is 33.1mm so for a 27.2mm seatpost you would need a new shim with a nominal 2.95mm wall thickness, almost 1/8". With this wall thickness the shim would be inflexible and unable to pass the existing weld protrusions. So if you take down the OD of the new shim until it passes the weld protrusions it would then be considerably loose in the seat tube at the top and bottom of the shim. Supported only at the middle mainly by the weld protrusions I would think that it would rock back and forth considerably. Am I missing something?
Plenty of ways to skin this cat, but your original shim got reamed all the way through, so I consider it too thin.
EDIT: oh and yeah you don't have to go all the way down to 27.2, which is a very thick shim. Just something smaller than what it was built for originally, some post size you can get off the shelf. Remember to measure your post; they're almost always smaller than the nominal size stamped in them. Ream to fit the actual post, not the nominal size.
Last edited by bulgie; 05-25-23 at 06:49 PM.
05-25-23, 07:07 PM
#20
Senior Member
Join Date: Feb 2012
Location: Rochester, NY
Posts: 18,094
Bikes: Stewart S&S coupled sport tourer, Stewart Sunday light, Stewart Commuting, Stewart Touring, Co Motion Tandem, Stewart 3-Spd, Stewart Track, Fuji Finest, Mongoose Tomac ATB, GT Bravado ATB, JCP Folder, Stewart 650B ATB
Mentioned: 0 Post(s)
Tagged: 0 Thread(s)
Quoted: 4210 Post(s)
Liked 3,875 Times
in
2,315 Posts
Yea, a lot of this bike machining knowledge,skill, and equipment have pretty much gone by the wayside with everything now carbon. The way shops now deal with frame issues is to send it back to the manufacturer and get a new one. Dale seems to still be at cdO. I'll try giving him a call and see if he has any contacts for frame work.
Jeff Hutchinson sold All-Star and retired. The shop is now Conte's Bikes. One of the guys that I ride with lives across the street from Jeff. He say's that Jeff now spends his time fixing up old Porches.
Jeff Hutchinson sold All-Star and retired. The shop is now Conte's Bikes. One of the guys that I ride with lives across the street from Jeff. He say's that Jeff now spends his time fixing up old Porches.
Being that this frame is welded TI I am reluctant to offer my opinions on the specifics of this or that. But I will say that if the only ID deformations were the weld penetrations I would be surprised. The effort to remove the worst of the penetrations might also end up removing some tube wall where you didn't anticipate. One might try a very light amount of almost reaming and "feel" the best path from there. Andy
__________________
AndrewRStewart
AndrewRStewart
Likes For Andrew R Stewart:
05-26-23, 01:39 PM
#21
Full Member
Thread Starter
The original shim was over reamed by the builder by 0.5mm diameter. So either the builder didn't know what he was doing or possibly the shim was deformed by the weld protrusions. I am thinking that taking some off the weld protrusions and then reaming only to the correct post size would probably fix it and prevent tear-out of the new shim.
05-26-23, 02:00 PM
#22
Full Member
Thread Starter
I contacted Dale at CyclesDeOro and he didn't have any good references to any bike machinists. He has quit doing frames due to age and other priorities at the shop.
Thanks,
Steve
05-29-23, 09:37 AM
#23
I am potato.

Join Date: Jun 2015
Location: Pacific Northwest
Posts: 3,116
Bikes: Only precision built, custom high performance elitist machines of the highest caliber. 🍆
Mentioned: 29 Post(s)
Tagged: 0 Thread(s)
Quoted: 1789 Post(s)
Liked 1,629 Times
in
933 Posts
I still like the idea of taking a few good measurements and removing material in the area of the shim that interferes. The frame is unaffected because you didn't touch the frame with a tool of any kind. The shim is unaffected because the 0.1mm of shim that made a mismatch in fitment has been removed by the file or whatever hand too you used. The hard part will be installation; Pressing the unworked portion of shim past the frame protrusions. But the end result is the two parts will fit like an interlocking puzzle piece.
One good measurement is better than a thousand good guesses.
One good measurement is better than a thousand good guesses.
__________________
I shouldn't have to "make myself more visible;" Drivers should just stop running people over.
Car dependency is a tax.
I shouldn't have to "make myself more visible;" Drivers should just stop running people over.
Car dependency is a tax.
 05-29-23, 11:58 AM
#24
Randomhead
Join Date: Aug 2008
Location: Happy Valley, Pennsylvania
Posts: 24,399
Mentioned: 0 Post(s)
Tagged: 0 Thread(s)
Quoted: 4 Post(s)
Liked 3,699 Times
in
2,519 Posts
I thought the same thing about machining the outside of the shim. In particular, it would be pretty easy to make a groove that would fit around the seat stay and top tube protrusions. Then you would need a decent sized slot to insert, and possibly kerf the shim so it will bend enough for insertion. Just make the shim long and cut off the top. You really don't need full contact so you wouldn't miss the recess in practice. I don't know what the options are for seat posts that would fit this.
05-29-23, 07:11 PM
#25
Full Member
Thread Starter
I thought the same thing about machining the outside of the shim. In particular, it would be pretty easy to make a groove that would fit around the seat stay and top tube protrusions. Then you would need a decent sized slot to insert, and possibly kerf the shim so it will bend enough for insertion. Just make the shim long and cut off the top. You really don't need full contact so you wouldn't miss the recess in practice. I don't know what the options are for seat posts that would fit this.