


1976 Centurion Semi-Pro Restoration
 03-04-17, 01:07 AM
#1
Senior Member
Thread Starter

Join Date: May 2015
Location: San Marcos, CA
Posts: 550
Bikes: Too many, but sometimes not enough.
Mentioned: 32 Post(s)
Tagged: 0 Thread(s)
Quoted: 225 Post(s)
Likes: 0
Liked 18 Times
in
14 Posts
1976 Centurion Semi-Pro Restoration
All this talk about buying or not buying that Pro Tour with the dented top tube on Ebay has reminded me that I never got around to posting any photos of the restoration job I did on a 1976 Centurion Semi-Pro I picked up over the summer. I'd been looking for one ever since I saw some photos of Joe Bunik's Semi Pro, and/or Tim Fricker's orange Professional a few years ago. After I just missed one last year, I finally found this beauty nearby.
Cleaned up, but otherwise as purchased (I did swap the levers, It came with Dia Compe drilled levers.):
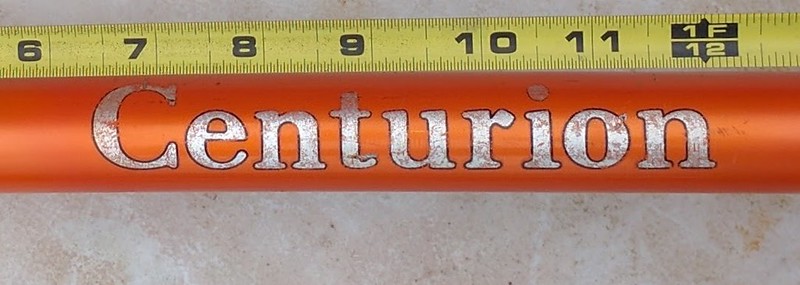
As purchased, the bike and components were dirty, but didn't show much wear, and the chrome was in decent shape. The biggest problem were hundreds of little, and several not so little chips and missing sections in the paint. They exposed the fully chromed frame underneath, and were pretty obvious up close. I tried touching it up, but with the pearlescent paint, even a very close match looked different depending on the light. Also, I wasn't happy with the main "Centurion" logo, as it was very thin paint, without any sort of clear coat, and was worn away in areas, and had some chips as well:
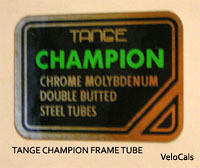
Tange Champion #1 decal was in pretty sad shape too:

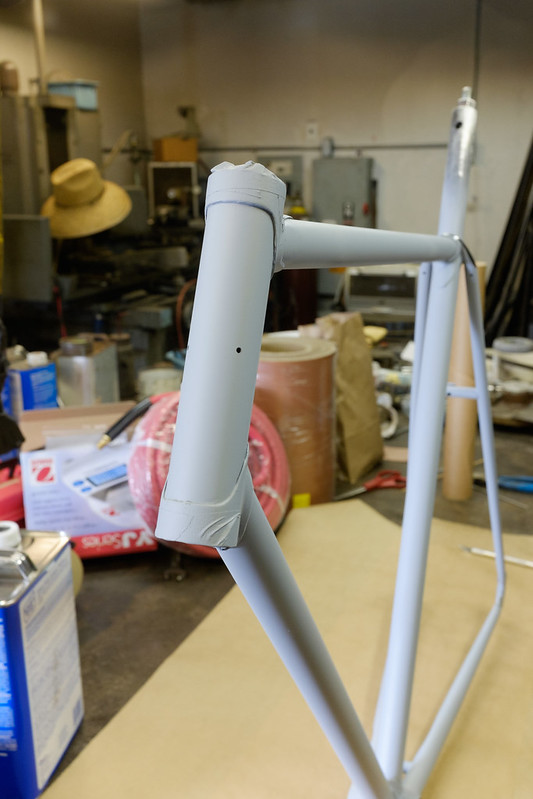
I took a bunch of photos for later decal reconstruction and placement, then set about stripping the frame. Unfortunately, I got carried away, and forgot to take any pictures of it in the stripped state. The chrome on the main tubes was decently shiny, but the 1/2"-1" around the lugs was pretty rough from the brazing cleanup, and wouldn't have looked that great as bare chrome.
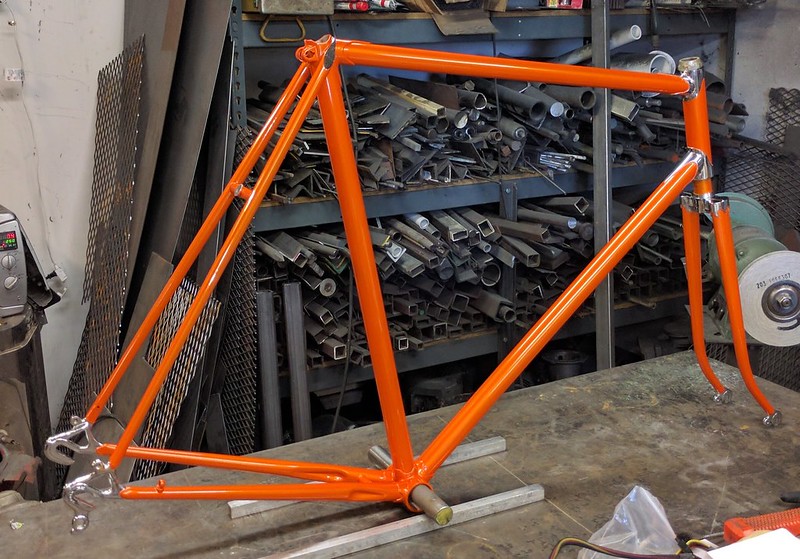
Here is the frame after carefully masking the chrome lugs, then scuffing the chrome areas to be painted with 100 grit paper, and shooting with House of Kolor KDS3000 epoxy primer / surfacer:
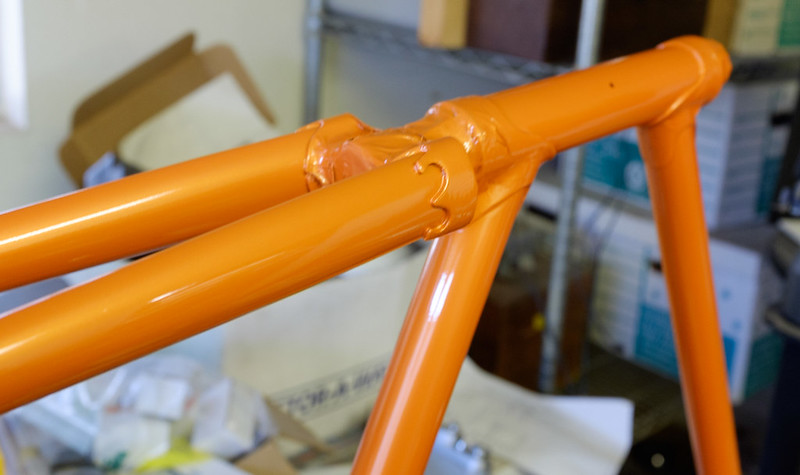
After carefully sanding everything with 320g paper, I then remasked all the lugs. (3-4 xacto blades, ~3 hours, and a lot of patience.) The basecoat color is 3-4 coats of a 50:50 mix of HOK (House of Kolor) Sunset Pearl Orange and HOK Tangelo Pearl Orange. That was the what I found to be an almost perfect match back when I tried touching it up. After the basecoats had flashed, I sprayed 2 medium heavy coats of PPG Omni clear. (Not the greatest clear, but I had some left over, and I was already about $150 into paint at this point.)
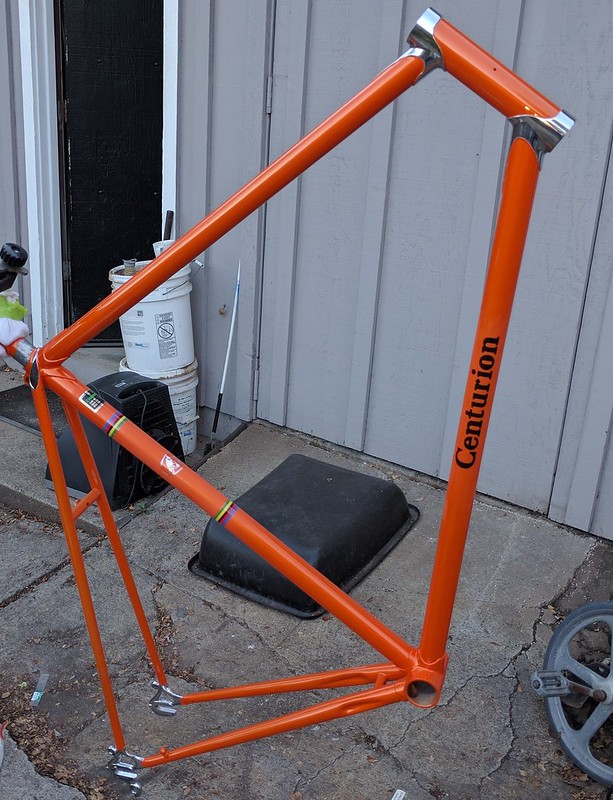
Here it is, ready for the decals / logo:
This is after the decals have been applied, and the black background for the "Centurion" logo has been shot. The tubing decal isn't right, but it's close. I've since recreated the graphics, but haven't had any decals made up. I couldn't find a source for the logo, so I had to cut vinyl stencils with my wife's craft cutter, and shoot the logo in paint:
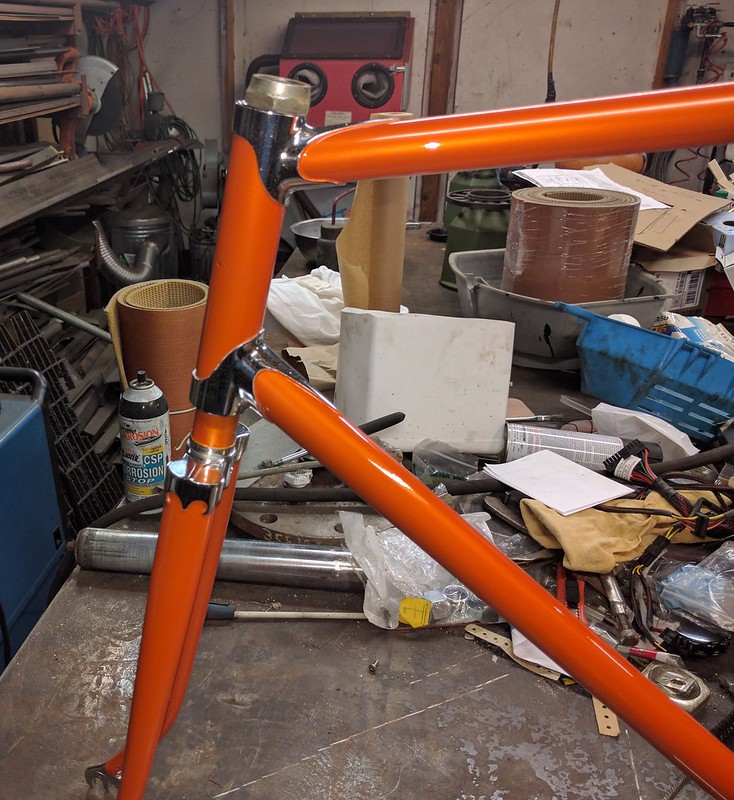
Once again, I got carried away and forgot to take any photos of the stencils while they were applied. Here is the finished logo:

Once the logo and decals were done, I shot two more coats of Omni clear, then wet sanded and polished everything. It isn't enough clear to bury the decals, but it will protect them, and takes the sharp edges off
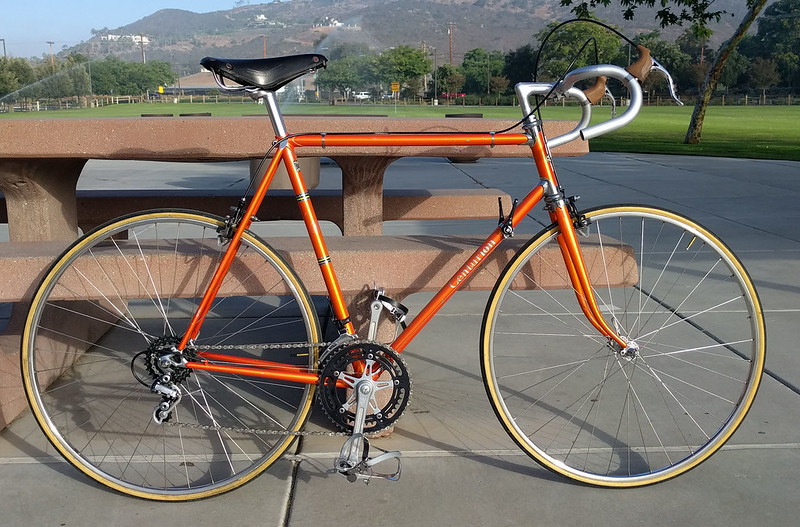
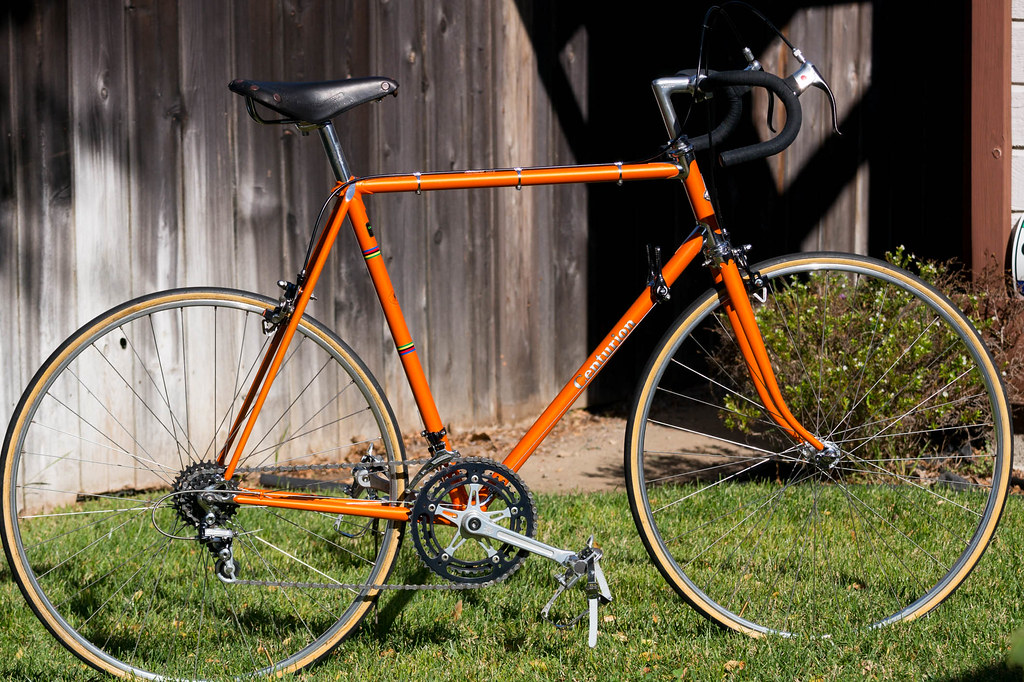
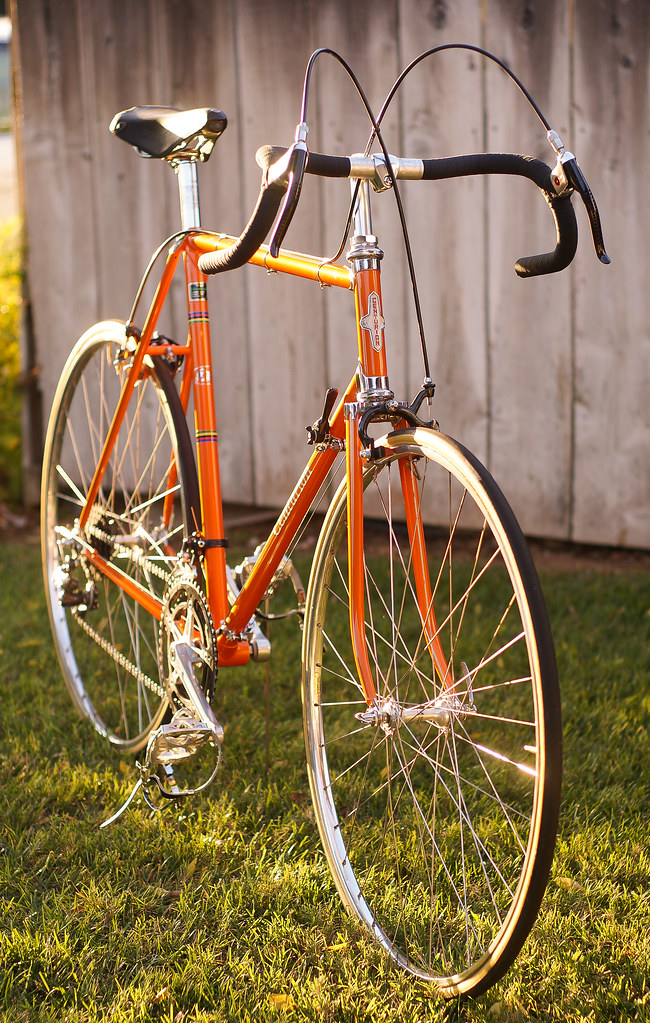
Here is the finished bike:
I've since added some NOS gum rubber hoods to the brake levers, and rebuilt the original hubs with new 700c rims. (The ones pictured here are some tubulars, on Dura Ace hubs.)
Cleaned up, but otherwise as purchased (I did swap the levers, It came with Dia Compe drilled levers.):
As purchased, the bike and components were dirty, but didn't show much wear, and the chrome was in decent shape. The biggest problem were hundreds of little, and several not so little chips and missing sections in the paint. They exposed the fully chromed frame underneath, and were pretty obvious up close. I tried touching it up, but with the pearlescent paint, even a very close match looked different depending on the light. Also, I wasn't happy with the main "Centurion" logo, as it was very thin paint, without any sort of clear coat, and was worn away in areas, and had some chips as well:
Tange Champion #1 decal was in pretty sad shape too:
I took a bunch of photos for later decal reconstruction and placement, then set about stripping the frame. Unfortunately, I got carried away, and forgot to take any pictures of it in the stripped state. The chrome on the main tubes was decently shiny, but the 1/2"-1" around the lugs was pretty rough from the brazing cleanup, and wouldn't have looked that great as bare chrome.
Here is the frame after carefully masking the chrome lugs, then scuffing the chrome areas to be painted with 100 grit paper, and shooting with House of Kolor KDS3000 epoxy primer / surfacer:
After carefully sanding everything with 320g paper, I then remasked all the lugs. (3-4 xacto blades, ~3 hours, and a lot of patience.) The basecoat color is 3-4 coats of a 50:50 mix of HOK (House of Kolor) Sunset Pearl Orange and HOK Tangelo Pearl Orange. That was the what I found to be an almost perfect match back when I tried touching it up. After the basecoats had flashed, I sprayed 2 medium heavy coats of PPG Omni clear. (Not the greatest clear, but I had some left over, and I was already about $150 into paint at this point.)
Here it is, ready for the decals / logo:
This is after the decals have been applied, and the black background for the "Centurion" logo has been shot. The tubing decal isn't right, but it's close. I've since recreated the graphics, but haven't had any decals made up. I couldn't find a source for the logo, so I had to cut vinyl stencils with my wife's craft cutter, and shoot the logo in paint:
Once again, I got carried away and forgot to take any photos of the stencils while they were applied. Here is the finished logo:
Once the logo and decals were done, I shot two more coats of Omni clear, then wet sanded and polished everything. It isn't enough clear to bury the decals, but it will protect them, and takes the sharp edges off
Here is the finished bike:
I've since added some NOS gum rubber hoods to the brake levers, and rebuilt the original hubs with new 700c rims. (The ones pictured here are some tubulars, on Dura Ace hubs.)
 03-04-17, 01:23 AM
#2
Senior Member

Join Date: Dec 2016
Location: Bush, Louisiana
Posts: 568
Bikes: 1984 Centurion Elite GT 15, 1985 Centurion Ironman Dave Scott, 1983 Diamond Back Ridge Runner, 1985 Mongoose ATB, 1987 Ross Centaur, 1986 Raleigh Marathon
Mentioned: 26 Post(s)
Tagged: 0 Thread(s)
Quoted: 190 Post(s)
Liked 76 Times
in
39 Posts
Wow!!!  You really did a HELL of a nice job on that! Beautiful work man
You really did a HELL of a nice job on that! Beautiful work man
03-04-17, 01:23 AM
#3
Senior Member
Thread Starter
Join Date: May 2015
Location: San Marcos, CA
Posts: 550
Bikes: Too many, but sometimes not enough.
Mentioned: 32 Post(s)
Tagged: 0 Thread(s)
Quoted: 225 Post(s)
Likes: 0
Liked 18 Times
in
14 Posts
I ran out of images in the last post, but let me finish with one more of the finished bike:
Here it is after a few months, enjoying a typical January day in California:

Finally, me last month, rocking a matching orange and black wool jersey. Yes, I rode ~40 miles with only one glove. Lost the other one before starting the ride, but it was cold enough that I'd rather wear it than toss it too.
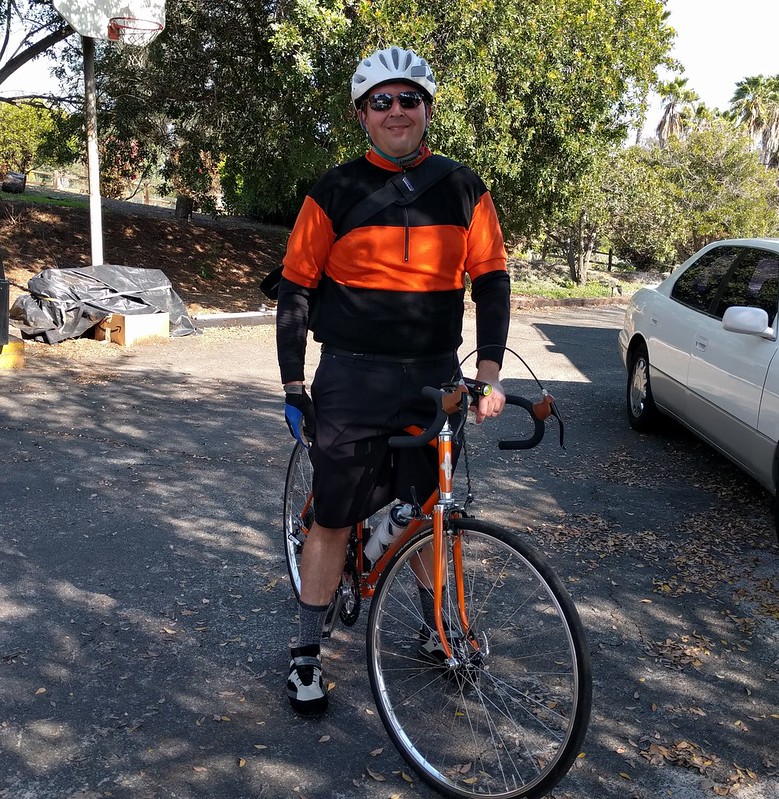
Here it is after a few months, enjoying a typical January day in California:
Finally, me last month, rocking a matching orange and black wool jersey. Yes, I rode ~40 miles with only one glove. Lost the other one before starting the ride, but it was cold enough that I'd rather wear it than toss it too.
03-04-17, 01:27 AM
#4

Senior Member
all the centurion nerds are out late tonight. very nice work!
this shot deserves repeating:
this shot deserves repeating:
03-04-17, 07:57 AM
#5
Senior Member
Join Date: Feb 2015
Location: Chicago
Posts: 93
Bikes: 1973 Jack Taylor ToB, 1974 or '75 LeJeune Champ du Monde (possibly from the Carre Shop), 1971 Motobecane Le Champion, 1980s Rodriguez frame (future 650b conversion project)
Mentioned: 2 Post(s)
Tagged: 0 Thread(s)
Quoted: 38 Post(s)
Liked 7 Times
in
6 Posts
03-04-17, 08:59 AM
#7
Senior Member
Thread Starter
Join Date: May 2015
Location: San Marcos, CA
Posts: 550
Bikes: Too many, but sometimes not enough.
Mentioned: 32 Post(s)
Tagged: 0 Thread(s)
Quoted: 225 Post(s)
Likes: 0
Liked 18 Times
in
14 Posts
I don't know about "Icy", but I would try the "sunrise pearl" It's the yellowest of their oranges. Sunset Pearl is a little darker and a little more red. Tangelo is very redish, and a lot more intense.
03-04-17, 09:14 AM
#8
Senior Member

Join Date: Oct 2013
Location: Connecticut
Posts: 3,448
Bikes: are fun!
Mentioned: 66 Post(s)
Tagged: 0 Thread(s)
Quoted: 466 Post(s)
Liked 864 Times
in
273 Posts
You know, when I got to that third image with the bike covered in primer my first thought was that the original paint really wasn't that bad. Never mind about that, this is better. Great job with the paint and decals. I take it this isn't your first rodeo with a paint gun. Looks like a really fun bike. Enjoy!
...huh, we can say paint gun on the forum now...
...huh, we can say paint gun on the forum now...
Last edited by Sir_Name; 03-04-17 at 09:17 AM.
03-04-17, 09:27 AM
#9
Senior Member
Join Date: Jul 2008
Location: Nampa Idaho
Posts: 1,081
Bikes: 76' Centrurion Pro-Tour, 86' Specialized Rock Hopper, 88' Centurion Iron Man, 89' Bruce Gordon "Hikari", 95' Rock Hopper Ultra.
Mentioned: 1 Post(s)
Tagged: 0 Thread(s)
Quoted: 14 Post(s)
Likes: 0
Liked 3 Times
in
3 Posts
Well done Sir!!! Absolutely beautiful!
Cheers!
Cheers!
03-04-17, 09:28 AM
#10
Senior Member
Join Date: Feb 2015
Location: Chicago
Posts: 93
Bikes: 1973 Jack Taylor ToB, 1974 or '75 LeJeune Champ du Monde (possibly from the Carre Shop), 1971 Motobecane Le Champion, 1980s Rodriguez frame (future 650b conversion project)
Mentioned: 2 Post(s)
Tagged: 0 Thread(s)
Quoted: 38 Post(s)
Liked 7 Times
in
6 Posts
Thanks, @cdmurphy, this is helpful. I know any one of those three oranges from KOLOR you mention would be great, and close enough to the color I'm seeking. Glad to have a report from someone who has sprayed two of them and seen them in person. Monitor-rendered colors only go so far.
Also, I'm a novice with the current U.S. paint terminology, but trying to understand if "pearl" is different than 70s British "flamboyant" paint, and if the pearl effect comes from the color of the metal flake in the paint, or is pearl a different substance than metal flake? I assumed pearl was a very fine metal flake, but that you could change the color of the flake and the reflected color in the light--say a white or bright silver flake (which I expect would produce more of the icy look of 80s pearls) vs. gold vs. blue or maybe black etc. Would love to better understand these distinctions and effects in paint finish. Finally, as I understand it, American "candy" paint jobs have more to do with the depth of clear and are not related to British flamboyant paint style.
Thanks, again.
03-04-17, 10:18 AM
#11
Banned
Join Date: Aug 2013
Posts: 6,480
Mentioned: 93 Post(s)
Tagged: 0 Thread(s)
Quoted: 1361 Post(s)
Likes: 0
Liked 424 Times
in
283 Posts
Congratulations on such a beautiful bike and mostly your artistry. Its a knockout and very well appreciate the level of quality and time put into that paint. For this high level, no doubt is a labor of love. I imagine its a keeper.
I don't mind occasionally to paint a bike frame but when ever ask to do, now roll eyes. Its almost as if one thinks it should be budget perhaps $100 as a powdercoat. Take in consideration just the paint, related and material cost alone, its easy to hit $150.
Decals, graphics cost/ pre-made are going to run another $40+ or if really high end custom work, triple that amount.
Then for labor / time, thats where it really goes. Prep, strip. The extra masking time in your project, multi-coat and sand between coats. etc. The clear application alone is lots of work. So when I see todays quotes running $600+ for a bike painted, I completely understand.
The build is really cool! Like the black accent components. Thanks for sharing and happy miles!
03-04-17, 10:24 AM
#12
52psi

Join Date: Aug 2013
Location: Tucson, AZ
Posts: 4,015
Bikes: Schwinn Volare ('78); Raleigh Competition GS ('79)
Mentioned: 29 Post(s)
Tagged: 0 Thread(s)
Quoted: 790 Post(s)
Liked 802 Times
in
391 Posts
I don't usually swear around here, but sometimes it's appropriate. And that is effing sweet. Gorgeous work.
Not to hijack, but I'm looking at a Semi-Pro bare frame (also '76) and am sorely tempted... The complete bike comes in right around 23lbs, yes?
Not to hijack, but I'm looking at a Semi-Pro bare frame (also '76) and am sorely tempted... The complete bike comes in right around 23lbs, yes?
__________________
A race bike in any era is a highly personal choice that at its "best" balances the requirements of fit, weight, handling, durability and cost tempered by the willingness to toss it and oneself down the pavement at considerable speed. ~Bandera
A race bike in any era is a highly personal choice that at its "best" balances the requirements of fit, weight, handling, durability and cost tempered by the willingness to toss it and oneself down the pavement at considerable speed. ~Bandera
Last edited by Fahrenheit531; 03-04-17 at 10:27 AM. Reason: "Not to hijack," etc.
03-04-17, 10:57 AM
#13
Senior Member
Wow, that is an outstanding restoration.  )
03-04-17, 11:26 AM
)
03-04-17, 11:26 AM
#14
Bike Butcher of Portland

Join Date: Jul 2014
Location: Portland, OR
Posts: 11,639
Bikes: It's complicated.
Mentioned: 1299 Post(s)
Tagged: 0 Thread(s)
Quoted: 4682 Post(s)
Liked 5,802 Times
in
2,286 Posts
Great Googly Moogly!
I second what @J.Oxley says, and add several other curse words as well under my breath! That paint job is worth about 10mph uphill!
The first time I saw one of those was in a bike shop in Fresno, California. The afternoon sun hit it on an upper tier bike stand, and I was blinded by the light! It was like when they opened the briefcase in Pulp Fiction - I just stood there in awe with slack jaw! I'm not a fan of black anodized parts, but this frame is perfect with them.
__________________
If someone tells you that you have enough bicycles and you don't need any more, stop talking to them. You don't need that kind of negativity in your life.
If someone tells you that you have enough bicycles and you don't need any more, stop talking to them. You don't need that kind of negativity in your life.
03-04-17, 03:15 PM
#15
Senior Member
Thread Starter
Join Date: May 2015
Location: San Marcos, CA
Posts: 550
Bikes: Too many, but sometimes not enough.
Mentioned: 32 Post(s)
Tagged: 0 Thread(s)
Quoted: 225 Post(s)
Likes: 0
Liked 18 Times
in
14 Posts
Thanks, @cdmurphy, this is helpful. I know any one of those three oranges from KOLOR you mention would be great, and close enough to the color I'm seeking. Glad to have a report from someone who has sprayed two of them and seen them in person. Monitor-rendered colors only go so far.
Also, I'm a novice with the current U.S. paint terminology, but trying to understand if "pearl" is different than 70s British "flamboyant" paint, and if the pearl effect comes from the color of the metal flake in the paint, or is pearl a different substance than metal flake? I assumed pearl was a very fine metal flake, but that you could change the color of the flake and the reflected color in the light--say a white or bright silver flake (which I expect would produce more of the icy look of 80s pearls) vs. gold vs. blue or maybe black etc. Would love to better understand these distinctions and effects in paint finish. Finally, as I understand it, American "candy" paint jobs have more to do with the depth of clear and are not related to British flamboyant paint style.
Thanks, again.
Also, I'm a novice with the current U.S. paint terminology, but trying to understand if "pearl" is different than 70s British "flamboyant" paint, and if the pearl effect comes from the color of the metal flake in the paint, or is pearl a different substance than metal flake? I assumed pearl was a very fine metal flake, but that you could change the color of the flake and the reflected color in the light--say a white or bright silver flake (which I expect would produce more of the icy look of 80s pearls) vs. gold vs. blue or maybe black etc. Would love to better understand these distinctions and effects in paint finish. Finally, as I understand it, American "candy" paint jobs have more to do with the depth of clear and are not related to British flamboyant paint style.
Thanks, again.
I don't think I've seen any of the flamboyant finishes in person, so I can't say for sure. I was under the impression that they were a metallic or candy finish, but I'm probably wrong :-) You are correct, in that you can use different color flakes, to change the color properties of the finish. Most metallics use a silver, or perhaps gold flake, so as to lighten the highlights when viewed at right angles. Light from a shallower angle doesn't hit as much of the flakes, and takes on more of the color of the base pigment. Some exotic finishes use copper or blue or green flakes to provide a complementary color to the base pigment, or even in some cases the flakes can change color with temperature or viewing angle. Lastly, "Candy" finishes are simply transparent or semi-transparent tinted coats that allow a silver or other reflective base coat to show through. They can either be done as layers of tinted base coat, or done as tinting of the clearcoat. From a distance, it's hard to tell the difference between "Candy" and other metallic finishes, but they do reflect differently, with the Candy finishes usually looking deeper, as the reflection happens below the translucent color, rather than in the suspended flakes.
Congratulations on such a beautiful bike and mostly your artistry. Its a knockout and very well appreciate the level of quality and time put into that paint. For this high level, no doubt is a labor of love. I imagine its a keeper.
I don't mind occasionally to paint a bike frame but when ever ask to do, now roll eyes. Its almost as if one thinks it should be budget perhaps $100 as a powdercoat. Take in consideration just the paint, related and material cost alone, its easy to hit $150.
Decals, graphics cost/ pre-made are going to run another $40+ or if really high end custom work, triple that amount.
Then for labor / time, thats where it really goes. Prep, strip. The extra masking time in your project, multi-coat and sand between coats. etc. The clear application alone is lots of work. So when I see todays quotes running $600+ for a bike painted, I completely understand.
The build is really cool! Like the black accent components. Thanks for sharing and happy miles!
I don't mind occasionally to paint a bike frame but when ever ask to do, now roll eyes. Its almost as if one thinks it should be budget perhaps $100 as a powdercoat. Take in consideration just the paint, related and material cost alone, its easy to hit $150.
Decals, graphics cost/ pre-made are going to run another $40+ or if really high end custom work, triple that amount.
Then for labor / time, thats where it really goes. Prep, strip. The extra masking time in your project, multi-coat and sand between coats. etc. The clear application alone is lots of work. So when I see todays quotes running $600+ for a bike painted, I completely understand.
The build is really cool! Like the black accent components. Thanks for sharing and happy miles!
All in all, I love how the bike turned out. I'd say it's a grail bike for me, hence all the effort on the repaint. It's not that I think it's the absolute best or fanciest bike around, but I think it's probably the best and fanciest bike I would feel comfortable riding and risking damaging. I think of it like a Cadillac -- Fancy and nice , but not so nice I would feel self conscious driving one. Sure, a Hetchins, or a Cinelli would be a fantastic bike, but I'd be too worried about scratching it to ride it. It would be like driving an AC Cobra, or a McLaren. Amazing cars, but not really practical for most people, even if they had the money.
03-04-17, 03:47 PM
#16
Senior Member
I have to add my Bravo's to the fantastic job you did with this Centurian! Everything, from the painted frame to the components really set this bike off. It is a fact that you are the standout in the bike crowd when you show up with this pearlescent orange machine.
I have one of the 77 Schwinn Le Tour II in the PO colour and always get asked about it. The shifters on the bar ends really stump most people around here.
What range of components do you have on the steed? Also, I noticed the use of a different tubing decal. Was this because of a lack of source or just a choice of yours? I have been trying to find one for a Sekine.
I enjoyed this build thread and the results. Have a great summer of riding in sunny Cali.
03-04-17, 03:52 PM
#17
Senior Member
I have to add my Bravo's to the fantastic job you did with this Centurian! Everything, from the painted frame to the components really set this bike off. It is a fact that you are the standout in the bike crowd when you show up with this pearlescent orange machine.
I have one of the 77 Schwinn Le Tour II in the PO colour and always get asked about it. The shifters on the bar ends really stump most people around here.
What range of components do you have on the steed? Also, I noticed the use of a different tubing decal. Was this because of a lack of source or just a choice of yours? I have been trying to find one for a Sekine.
I enjoyed this build thread and the results. Have a great summer of riding in sunny Cali.
I have one of the 77 Schwinn Le Tour II in the PO colour and always get asked about it. The shifters on the bar ends really stump most people around here.
What range of components do you have on the steed? Also, I noticed the use of a different tubing decal. Was this because of a lack of source or just a choice of yours? I have been trying to find one for a Sekine.
I enjoyed this build thread and the results. Have a great summer of riding in sunny Cali.
03-04-17, 10:43 PM
#18
Senior Member

Join Date: Nov 2011
Location: Port Angeles, WA
Posts: 7,922
Bikes: A green one, "Ragleigh," or something.
Mentioned: 194 Post(s)
Tagged: 0 Thread(s)
Quoted: 1627 Post(s)
Liked 630 Times
in
356 Posts
Whatta great job; kudos on the repaint skills. That looks amazingly well executed. Though I enjoy doing an occasional repaint myself, I'm not sure I've got the patience for that higher level stuff.
For those who are looking for a somewhat similar blazing orange, with only the effort of getting out the credit card, there's a nice shimmery orange in available in powdercoat. I can get the number from my PC guy if anyone wants it.
For those who are looking for a somewhat similar blazing orange, with only the effort of getting out the credit card, there's a nice shimmery orange in available in powdercoat. I can get the number from my PC guy if anyone wants it.
__________________
● 1971 Grandis SL ● 1972 Lambert Grand Prix frankenbike ● 1972 Raleigh Super Course fixie ● 1973 Nishiki Semi-Pro ● 1979 Motobecane Grand Jubile ●1980 Apollo "Legnano" ● 1984 Peugeot Vagabond ● 1985 Shogun Prairie Breaker ● 1986 Merckx Super Corsa ● 1987 Schwinn Tempo ● 1988 Schwinn Voyageur ● 1989 Bottechia Team ADR replica ● 1990 Cannondale ST600 ● 1993 Technium RT600 ● 1996 Kona Lava Dome ●
● 1971 Grandis SL ● 1972 Lambert Grand Prix frankenbike ● 1972 Raleigh Super Course fixie ● 1973 Nishiki Semi-Pro ● 1979 Motobecane Grand Jubile ●1980 Apollo "Legnano" ● 1984 Peugeot Vagabond ● 1985 Shogun Prairie Breaker ● 1986 Merckx Super Corsa ● 1987 Schwinn Tempo ● 1988 Schwinn Voyageur ● 1989 Bottechia Team ADR replica ● 1990 Cannondale ST600 ● 1993 Technium RT600 ● 1996 Kona Lava Dome ●
Last edited by Lascauxcaveman; 02-09-18 at 11:53 AM.
03-05-17, 01:19 AM
#19
Newbie

Join Date: Jan 2017
Location: Visalia, California
Posts: 27
Bikes: I like riding em'
Mentioned: 3 Post(s)
Tagged: 0 Thread(s)
Quoted: 14 Post(s)
Likes: 0
Liked 0 Times
in
0 Posts
Yo that's a gorgeous bicycle. It make's me miss my old 1979 stock sport dlx centurion that was stolen. Alas I miss it since it was the first bicycle to get me into C&V
03-05-17, 10:26 AM
#20
Bike Butcher of Portland
Join Date: Jul 2014
Location: Portland, OR
Posts: 11,639
Bikes: It's complicated.
Mentioned: 1299 Post(s)
Tagged: 0 Thread(s)
Quoted: 4682 Post(s)
Liked 5,802 Times
in
2,286 Posts
Want! I'll take your word for that orange, it's so hard to pick one out from a computer screen. Even looking at chips at the coater outdoors in the sunlight, it's difficult to know how it will turn out on the complex curves of a bicycle frame.
__________________
If someone tells you that you have enough bicycles and you don't need any more, stop talking to them. You don't need that kind of negativity in your life.
If someone tells you that you have enough bicycles and you don't need any more, stop talking to them. You don't need that kind of negativity in your life.
03-05-17, 10:43 AM
#21
Senior Member
Join Date: Feb 2015
Location: Chicago
Posts: 93
Bikes: 1973 Jack Taylor ToB, 1974 or '75 LeJeune Champ du Monde (possibly from the Carre Shop), 1971 Motobecane Le Champion, 1980s Rodriguez frame (future 650b conversion project)
Mentioned: 2 Post(s)
Tagged: 0 Thread(s)
Quoted: 38 Post(s)
Liked 7 Times
in
6 Posts
+1, I'd love to know this powder coat code and mfg., when you get the chance. Thanks, Lascauxcaveman!
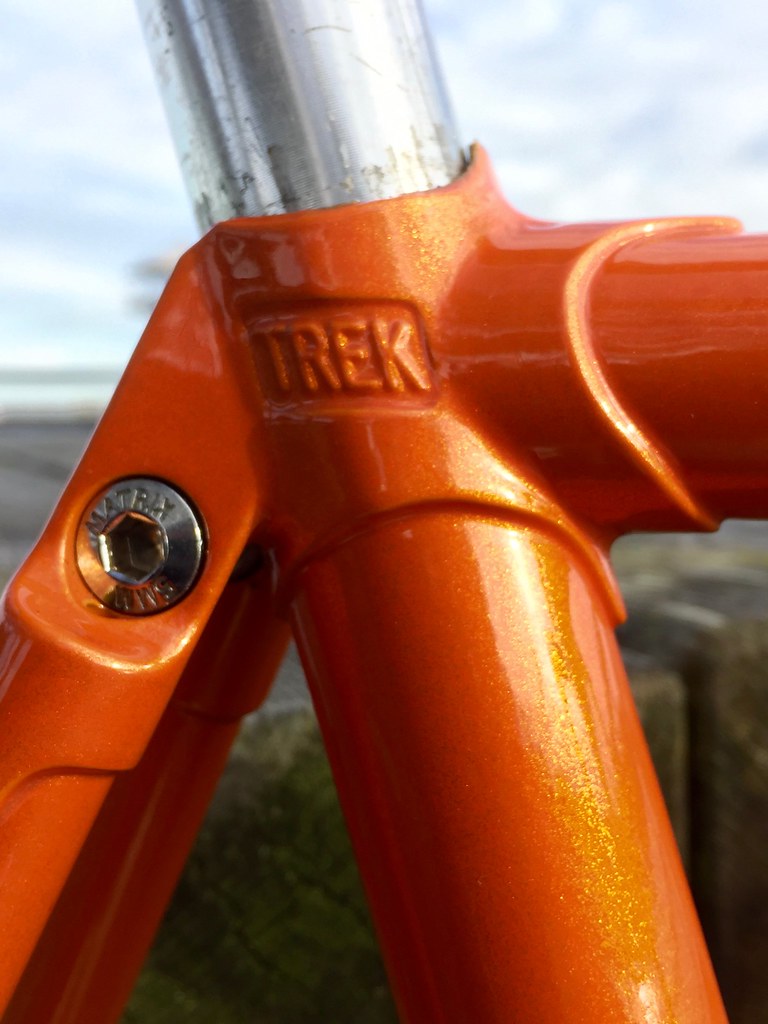
Also, thanks for the explanation of pearl finishes @cdmurphy, much appreciated. I've got a 1979 Trek that needs a repaint. Thought I'd either try DIY spray or powdercoat. Leaning toward powder for ease.
Also, thanks for the explanation of pearl finishes @cdmurphy, much appreciated. I've got a 1979 Trek that needs a repaint. Thought I'd either try DIY spray or powdercoat. Leaning toward powder for ease.
03-05-17, 11:12 AM
#22
Senior Member
Thread Starter
Join Date: May 2015
Location: San Marcos, CA
Posts: 550
Bikes: Too many, but sometimes not enough.
Mentioned: 32 Post(s)
Tagged: 0 Thread(s)
Quoted: 225 Post(s)
Likes: 0
Liked 18 Times
in
14 Posts
I have to add my Bravo's to the fantastic job you did with this Centurian! Everything, from the painted frame to the components really set this bike off. It is a fact that you are the standout in the bike crowd when you show up with this pearlescent orange machine.
I have one of the 77 Schwinn Le Tour II in the PO colour and always get asked about it. The shifters on the bar ends really stump most people around here.
What range of components do you have on the steed? Also, I noticed the use of a different tubing decal. Was this because of a lack of source or just a choice of yours? I have been trying to find one for a Sekine.
I enjoyed this build thread and the results. Have a great summer of riding in sunny Cali.
I have one of the 77 Schwinn Le Tour II in the PO colour and always get asked about it. The shifters on the bar ends really stump most people around here.
What range of components do you have on the steed? Also, I noticed the use of a different tubing decal. Was this because of a lack of source or just a choice of yours? I have been trying to find one for a Sekine.
I enjoyed this build thread and the results. Have a great summer of riding in sunny Cali.
The tubing sticker was just the closest I could find that was commercially available. It's a Tange Champion sticker, but from an early Miyata or Univega:
I've since generated the proper graphics in Adobe Illustrator, but haven't had any made up yet. (Velocals didn't seem interested)
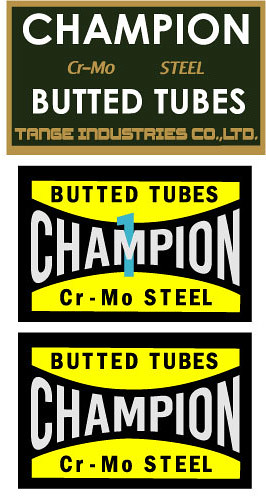
These are the three variations I've found on the 1975-78 Miki built Centurions (Semi Pros, Pro Tours, and the later Professionals) Also, they used them on the the top end Sekai bikes, also made by Miki.
03-07-17, 01:25 PM
#23
Senior Member
Join Date: Nov 2011
Location: Port Angeles, WA
Posts: 7,922
Bikes: A green one, "Ragleigh," or something.
Mentioned: 194 Post(s)
Tagged: 0 Thread(s)
Quoted: 1627 Post(s)
Liked 630 Times
in
356 Posts
As you can see from the pic I posted, it's not as subtle a shimmer as the lovely, smooth pearl of the OP. It's bigger and flakier, something that really jumps out in the direct sunlight.
__________________
● 1971 Grandis SL ● 1972 Lambert Grand Prix frankenbike ● 1972 Raleigh Super Course fixie ● 1973 Nishiki Semi-Pro ● 1979 Motobecane Grand Jubile ●1980 Apollo "Legnano" ● 1984 Peugeot Vagabond ● 1985 Shogun Prairie Breaker ● 1986 Merckx Super Corsa ● 1987 Schwinn Tempo ● 1988 Schwinn Voyageur ● 1989 Bottechia Team ADR replica ● 1990 Cannondale ST600 ● 1993 Technium RT600 ● 1996 Kona Lava Dome ●
● 1971 Grandis SL ● 1972 Lambert Grand Prix frankenbike ● 1972 Raleigh Super Course fixie ● 1973 Nishiki Semi-Pro ● 1979 Motobecane Grand Jubile ●1980 Apollo "Legnano" ● 1984 Peugeot Vagabond ● 1985 Shogun Prairie Breaker ● 1986 Merckx Super Corsa ● 1987 Schwinn Tempo ● 1988 Schwinn Voyageur ● 1989 Bottechia Team ADR replica ● 1990 Cannondale ST600 ● 1993 Technium RT600 ● 1996 Kona Lava Dome ●
03-07-17, 01:48 PM
#24
Senior Member
Join Date: Feb 2015
Location: Chicago
Posts: 93
Bikes: 1973 Jack Taylor ToB, 1974 or '75 LeJeune Champ du Monde (possibly from the Carre Shop), 1971 Motobecane Le Champion, 1980s Rodriguez frame (future 650b conversion project)
Mentioned: 2 Post(s)
Tagged: 0 Thread(s)
Quoted: 38 Post(s)
Liked 7 Times
in
6 Posts
Thanks, @Lascauxcaveman, like Gugie said, with all the PC choices it's really nice to get confirmation that a particular color will look good on bike tubes and in various lighting situations. It looks like your powder coater has a light touch. The lugs and stamping looks great. Mind sharing the Powder Coater's name/business? I might be moving further west in the next year, making a WA powdercoater local enough.
Apparently the Illusion powder coats require a special kind of clear top coat to activate. Sounds good to me.
best,
Apparently the Illusion powder coats require a special kind of clear top coat to activate. Sounds good to me.
best,
My PC guy says: "That is Prismatic Powder color illusions orange. PMS 4620 is the color code."
As you can see from the pic I posted, it's not as subtle a shimmer as the lovely, smooth pearl of the OP. It's bigger and flakier, something that really jumps out in the direct sunlight.
As you can see from the pic I posted, it's not as subtle a shimmer as the lovely, smooth pearl of the OP. It's bigger and flakier, something that really jumps out in the direct sunlight.
03-07-17, 02:45 PM
#25
Senior Member
Join Date: Nov 2011
Location: Port Angeles, WA
Posts: 7,922
Bikes: A green one, "Ragleigh," or something.
Mentioned: 194 Post(s)
Tagged: 0 Thread(s)
Quoted: 1627 Post(s)
Liked 630 Times
in
356 Posts
Thanks, @Lascauxcaveman, like Gugie said, with all the PC choices it's really nice to get confirmation that a particular color will look good on bike tubes and in various lighting situations. It looks like your powder coater has a light touch. The lugs and stamping looks great. Mind sharing the Powder Coater's name/business? I might be moving further west in the next year, making a WA powdercoater local enough.
Apparently the Illusion powder coats require a special kind of clear top coat to activate. Sounds good to me.
best,
Apparently the Illusion powder coats require a special kind of clear top coat to activate. Sounds good to me.
best,
__________________
● 1971 Grandis SL ● 1972 Lambert Grand Prix frankenbike ● 1972 Raleigh Super Course fixie ● 1973 Nishiki Semi-Pro ● 1979 Motobecane Grand Jubile ●1980 Apollo "Legnano" ● 1984 Peugeot Vagabond ● 1985 Shogun Prairie Breaker ● 1986 Merckx Super Corsa ● 1987 Schwinn Tempo ● 1988 Schwinn Voyageur ● 1989 Bottechia Team ADR replica ● 1990 Cannondale ST600 ● 1993 Technium RT600 ● 1996 Kona Lava Dome ●
● 1971 Grandis SL ● 1972 Lambert Grand Prix frankenbike ● 1972 Raleigh Super Course fixie ● 1973 Nishiki Semi-Pro ● 1979 Motobecane Grand Jubile ●1980 Apollo "Legnano" ● 1984 Peugeot Vagabond ● 1985 Shogun Prairie Breaker ● 1986 Merckx Super Corsa ● 1987 Schwinn Tempo ● 1988 Schwinn Voyageur ● 1989 Bottechia Team ADR replica ● 1990 Cannondale ST600 ● 1993 Technium RT600 ● 1996 Kona Lava Dome ●