


Botched repair- hole drilled in seat stay
 08-06-20, 03:04 AM
#1
Junior Member
Thread Starter
Join Date: Aug 2020
Posts: 7
Likes: 0
Liked 0 Times
in
0 Posts
Botched repair- hole drilled in seat stay
Hi. First timer.
i did something dumb and I’m asking a) if there’s a way to fix it and b) if I’ve compromised the frame to a point where it’s dangerous.
Bike is a Specialized Alibi, aluminum frame. Secondhand, a couple of years old. Use mainly commuting.
One of the rack mounts at the top of the seat stay had a stripped thread. I tried to drill and tap the thread. The tap got stuck and in working it out I widened the hole. There is now a ~ 7mm non-reinforced hole in the seat stay.
I realize that this was really stupid.
So: first, have I weakened the seat stay to the point where I shouldn’t ride the bike?
second, can it be repaired, by welding, epoxy, or otherwise?
Newbie so can’t post photo.
thanks.
 08-06-20, 04:47 AM
#2
Senior Member
7mm is the proper size for an M5 rivnut. See if you can find a shop that will install a rivnut in the hole, The original was probably a rivnut anyway.
08-06-20, 08:07 AM
#3
Generally bewildered

Join Date: Aug 2015
Location: Eastern PA, USA
Posts: 3,038
Bikes: 2014 Trek Domane 6.9, 1999 LeMond Zurich, 1978 Schwinn Superior
Liked 342 Times
in
252 Posts
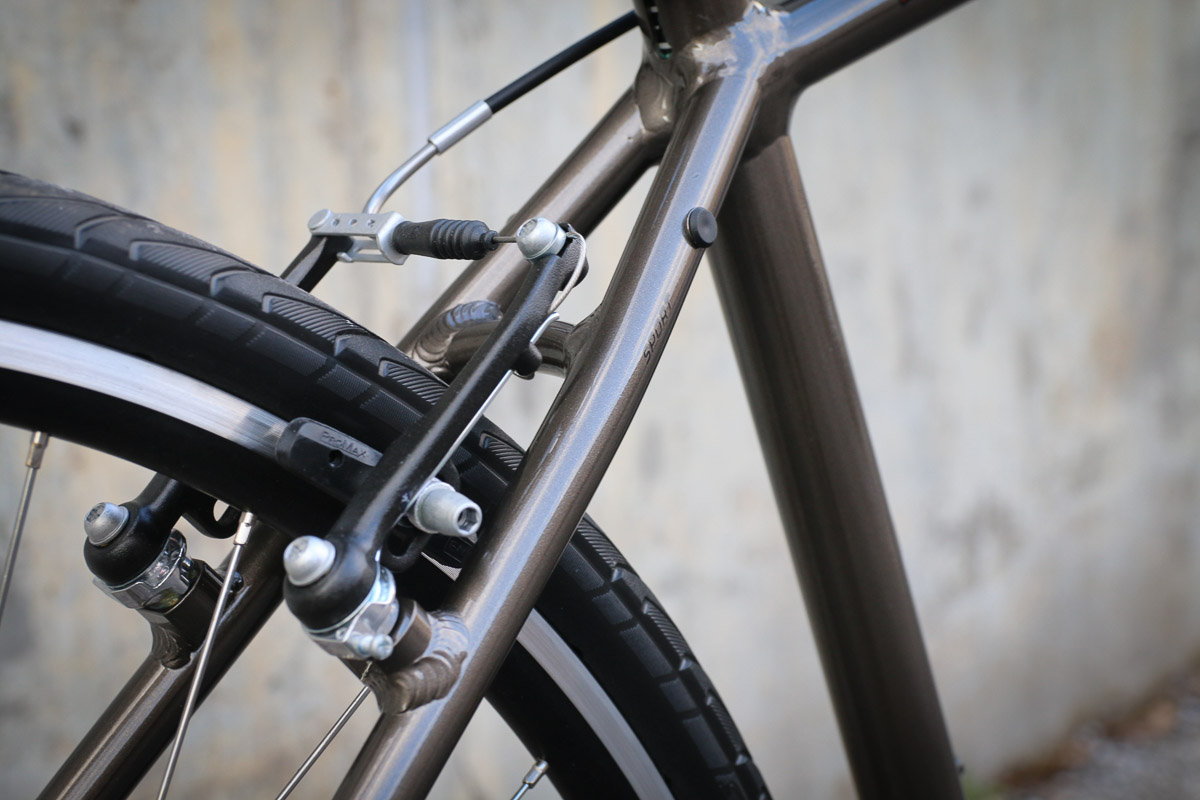
So, is the setup similar to that shown below (An Alibi Sport, I believe)? So the hole is in the seat stay and has no reinforcement?
08-06-20, 08:27 AM
#5
Generally bewildered
Join Date: Aug 2015
Location: Eastern PA, USA
Posts: 3,038
Bikes: 2014 Trek Domane 6.9, 1999 LeMond Zurich, 1978 Schwinn Superior
Liked 342 Times
in
252 Posts
In a set of "cow's already out of the barn, here's how you close the door" comments, tapping with a cutting tap has one certain outcome: you are removing metal. A possible outcome is that this cleans up the threads and leaves enough residual thread to allow a reasonably strong joint. Another outcome is that you remove enough metal so that the threads are so weak they'll pull out. A third possible (and frequently occurring) outcome is that the tap breaks off in the hole. Especially likely if you aren't used to tapping, especially in a difficult metal like aluminum. So a broken tap means you have a chunk of high speed (e.g. very hard ) steel or carbide (even harder) in the hole. Unless you are very lucky, removing that broken-off part by hand will mess up your hole (enlarging or bell-mouthing it, and almost certainly destroying usable threads). BTW, the usual way (in a machine shop, to fix a very expensive part in which a tap has broken) is to use something called wire EDM - look it up.
The fact that a drill is mentioned gives me the heebie-jeebies. Unless you create a proper fixture to hold the bike, and use a drill press or a milling machine, results can vary widely. Easy to create an oval oversized hole, or to drill the hole at an improper angle, or drill too far. Can you get good results with a hand-held drill? Yup. But unless you've a lot of experience and skill, or are insanely lucky, probably not. One other issue. If you have a threaded hole that is stripped, it already has less metal than is ideal left in the hole for that same size thread. So if you want to try to keep the same thread size, hands off the drill! The best tool to repair threads (especially in aluminum) is probably a form tap. That's a tap that squashes (cold forms) threads in a hole, with no cutting. This leaves as much of the metal in the holes as possible.
Welding or epoxy? Not in a structurally sound way. Aluminum frames are cold worked, then welded and then heat treated. If you weld aluminum, the heat affected zone is weakened. You have to heat-treat the whole frame to get the proper combination of strength and fatigue strength. Epoxy has about 1/10 the strength of aluminum.
If the hole has weakened the frame, you might be able to put a metal collar on the frame (ugly, but it could work) OR maybe... a carbon fiber repair? Does anyone do this?
08-06-20, 08:45 AM
#6
Junior Member
Thread Starter
Join Date: Aug 2020
Posts: 7
Likes: 0
Liked 0 Times
in
0 Posts
[MENTION=40859]wizard[/MENTION]: No worries, frankly I deserve it. I have successfully replaced a thread once before - wall anchor/plate securing heavy gym equipment in a basement gym - which gave me false confidence. I was really dumb not to consider that I might be weakening the frame, and that drilling into an irregularly shaped frame is harder than working on a concrete floor. Plus I could have paid ten bucks for a seat post bracket for the rear rack.
So yeah, feel free to hold me up as an example not to do this.
Getting back to the repair: I don't feel the need to get another thread in there, although I'm not opposed to it. I just want to make sure that the frame is as strong as possible and I won't have a catastrophic failure. Seems like a (still relatively small) hole in that part of the seat stay *shouldn't* be a big risk but I've already FUBAR'd this so I'm seeking help here.
BTW, I've tried to find help from frame builders and machinists near me and they're all slammed, either can't do it or not returning my call.
So thanks and yes for the third time I'm an idiot.
08-06-20, 09:46 AM
#7
Half way there

Join Date: Sep 2015
Location: North Carolina
Posts: 2,963
Bikes: Many, and the list changes frequently
Liked 890 Times
in
533 Posts
Seat stays are the least stressed tubes on your frame. They bear almost no torsional stress, only compressive. I really doubt that you have significantly affected the frame. Install another rivnut and go riding.
08-06-20, 09:57 AM
#8
Tortoise Wins by a Hare!
Join Date: Feb 2006
Location: Looney Tunes, IL
Posts: 7,398
Bikes: Wabi Special FG, Raleigh Roper, Nashbar AL-1, Miyata One Hundred, '70 Schwinn Lemonator and More!!
Liked 943 Times
in
505 Posts
Don't be too hard on yourself. You made a mistake and realized it right away. Lesson learned. Unless the hole is huge, and/or you're using the bike for dirt jumps, I agree with Moe... you are unlikely to suffer a catastrophic failure. Still, it would probably be wise to check it regularly.
08-06-20, 10:09 AM
#9

Mother Nature's Son

Join Date: Mar 2016
Location: Sussex County, Delaware
Posts: 3,206
Bikes: 2014 Orbea Avant MD30, 2004 Airborne Zeppelin TI, 2003 Lemond Poprad, 2001 Lemond Tourmalet, 2014? Soma Smoothie
Liked 1,569 Times
in
864 Posts
cs141, if I posted every time I have done something I consider stupid while working on a bike, I would have significantly more posts. People would probably have told me to stop working on my bikes, or at least, stop posting about the stupidity. I am really bad about beating up on myself, but working on bikes has helped me understand something, if you realize the error of your ways and learn a lesson from it, it has a good side. I am still working on the learning from my mistakes.
08-06-20, 10:23 AM
#10
I think I know nothing.
Sometimes, some of us seem to forget that we are talking about a bicycle and not a manned space vehicle.
08-06-20, 10:44 AM
#11
Junior Member
Thread Starter
Join Date: Aug 2020
Posts: 7
Likes: 0
Liked 0 Times
in
0 Posts
Given my meh DIY skills (if 1 is inability to hammer a nail and 10 is machinist for the space shuttle, I'm about a 4), is installing a rivnut something I can do? I don't want to screw this up too, but every frame builder and bike shop is completely swamped and I can't get it done for weeks.
Or - if I don't care about having a threaded hole there, can I just do a JB-Weld/Quicksteel patch so I don't have a hole open to the elements, sand it, paint it, and that's it?
Or - if I don't care about having a threaded hole there, can I just do a JB-Weld/Quicksteel patch so I don't have a hole open to the elements, sand it, paint it, and that's it?
08-06-20, 10:59 AM
#12
Senior Member
You just need the right tool to install a rivnut -- it's very similar to installing any rivet. You put it into the right sized hole, squeeze the handles of the tool, and release. If it expanded correctly and the hole was the right size, you're done.
There are examples all over the place of manufacturers drilling holes through frames for various reasons. That spot on the chainstay, as mentioned above, is pretty safe. I wouldn't worry about it. Epoxy is only going to be cosmetic here; you could just put tape over it.
There are examples all over the place of manufacturers drilling holes through frames for various reasons. That spot on the chainstay, as mentioned above, is pretty safe. I wouldn't worry about it. Epoxy is only going to be cosmetic here; you could just put tape over it.
08-06-20, 10:59 AM
#13
Tortoise Wins by a Hare!
Join Date: Feb 2006
Location: Looney Tunes, IL
Posts: 7,398
Bikes: Wabi Special FG, Raleigh Roper, Nashbar AL-1, Miyata One Hundred, '70 Schwinn Lemonator and More!!
Liked 943 Times
in
505 Posts
I'd look into going the riv nut route myself, but if you are unsure of your skills just seal the hole with tape, and wait for an opening in the shop. The epoxy would make future repair more difficult or impossible.
Likes For AlmostTrick:
08-06-20, 11:47 AM
#15
Senior Member

Join Date: Feb 2015
Location: Mission Viejo
Posts: 6,006
Bikes: 1986 Cannondale SR400 (Flat bar commuter), 1988 Cannondale Criterium XTR, 1992 Serotta T-Max, 1995 Trek 970
Liked 2,277 Times
in
1,393 Posts
Just have a riv-nut put in. It is not like you didn't already have a hole in the seatstay. Just be more careful threading next time and use grease. I guess the next question has to do with drilling out the hole in the rack.
John
John
08-06-20, 11:50 AM
#16
08-06-20, 12:24 PM
#17
Senior Member
Join Date: Feb 2015
Location: Mission Viejo
Posts: 6,006
Bikes: 1986 Cannondale SR400 (Flat bar commuter), 1988 Cannondale Criterium XTR, 1992 Serotta T-Max, 1995 Trek 970
Liked 2,277 Times
in
1,393 Posts
It's funny, but the early Cannondale aluminum frames had an unreinforced hole drilled through the downtube to allow for a threaded rod to install downtube shifters. It was just a hole, and I think a second locator hole on each side. I think some Trek and Raleigh aluminum frames did the same.
John
John
08-06-20, 02:11 PM
#18
SE Wis
Join Date: Apr 2005
Location: Milwaukee, WI
Posts: 10,821
Bikes: '68 Raleigh Sprite, '02 Raleigh C500, '84 Raleigh Gran Prix, '91 Trek 400, 2013 Novara Randonee, 1990 Trek 970
Liked 3,661 Times
in
2,205 Posts
Likes For dedhed:
08-06-20, 07:57 PM
#19
Generally bewildered
Join Date: Aug 2015
Location: Eastern PA, USA
Posts: 3,038
Bikes: 2014 Trek Domane 6.9, 1999 LeMond Zurich, 1978 Schwinn Superior
Liked 342 Times
in
252 Posts
I think that you're being too hard on yourself. I grew up working in a machine shop (and also have a PhD and MS in engineering, but the shop expereince is the more important here). So I have experience (experience = mistakes repeated many times).
So I don't think that you're an idiot at all. One thing you've learned is that tapping a large hole with coarse threads (which I'm assuming the gym equipment plate was) is less likely to break a tap than a small hole in "sticky" material like aluminum. Given your earlier experience your course of action was completely understandable.
Too, I read (for fun) stuff like "Carroll Smith's Nuts, Bolts, Fasteners and Plumbing Handbook". And I'm an extrovert who works out of my home and so I used this forum and a forum for professional machinists as my "water cooler". So I better know a bit about tapping!
And of course, I've never, ever broken a tap....
08-06-20, 09:03 PM
#20
Senior Member
Join Date: Feb 2012
Location: Rochester, NY
Posts: 18,344
Bikes: Stewart S&S coupled sport tourer, Stewart Sunday light, Stewart Commuting, Stewart Touring, Co Motion Tandem, Stewart 3-Spd, Stewart Track, Fuji Finest, Mongoose Tomac ATB, GT Bravado ATB, JCP Folder, Stewart 650B ATB
Liked 4,189 Times
in
2,472 Posts
So my question is the resulting hole diameter and whether a rivnut is available for that diameter. Or maybe is a bike sourced and tool supported rivnut available. Sure there are other thread specs rivnuts made but the M5 x.8 is pretty much the only size a bike shop tool will be able to compress into that stay.
My go to "hammer" is an OA torch so I see the "nail" as a frame repair with a small section of tubing brazed in place. This tubing bit would have an ID suitable for threading to M5. Of course this involves stuff like paint afterwards. Andy
My go to "hammer" is an OA torch so I see the "nail" as a frame repair with a small section of tubing brazed in place. This tubing bit would have an ID suitable for threading to M5. Of course this involves stuff like paint afterwards. Andy
__________________
AndrewRStewart
AndrewRStewart
 08-06-20, 10:55 PM
#21
Senior Member
Join Date: Jun 2014
Location: Ontario, Canada
Posts: 4,626
Bikes: iele Latina, Miele Suprema, Miele Uno LS, Miele Miele Beta, MMTB, Bianchi Model Unknown, Fiori Venezia, Fiori Napoli, VeloSport Adamas AX
Liked 934 Times
in
646 Posts
A Rivnut can be installed with a bolt and a nut. The bolt with the nut on it is inserted into the Rivnut until the threads of the bolt are past the small end of the Rivnut. Then this assembly is inserted into the hole. Then you simply make sure the Rivnut is tight against the part it's going into and you tighten the nut against the Rivnut. That expands the part of the Rivnut that's inside the tube. Once it's really tight you back off the nut a bit and then remove the bolt and nut.
Cheers
Cheers
08-08-20, 11:01 PM
#22
Senior Member
If you cant find a rivnut pack the hole full of PC-7 aluminum epoxy putty drill it out and try tapping it again.
08-09-20, 05:39 AM
#23
Junior Member
Thread Starter
Join Date: Aug 2020
Posts: 7
Likes: 0
Liked 0 Times
in
0 Posts
I'm going to tape over the hole with aluminum tape, try to find some touch-up paint for it, and mount the rack with a seatpost clamp with two threaded eyelets for mounting the rack.. I'm still a noob so I can't post links - it's at campfirecycling.com.
I like the rivnut as a thing, and from a curiosity standpoint I'm interested in playing with it. But at this point I'm going to take the easiest way out possible.
Thanks again everyone.
I like the rivnut as a thing, and from a curiosity standpoint I'm interested in playing with it. But at this point I'm going to take the easiest way out possible.
Thanks again everyone.
