


Removing French BB fixed cup
 06-29-21, 12:12 PM
#76

framebuilder
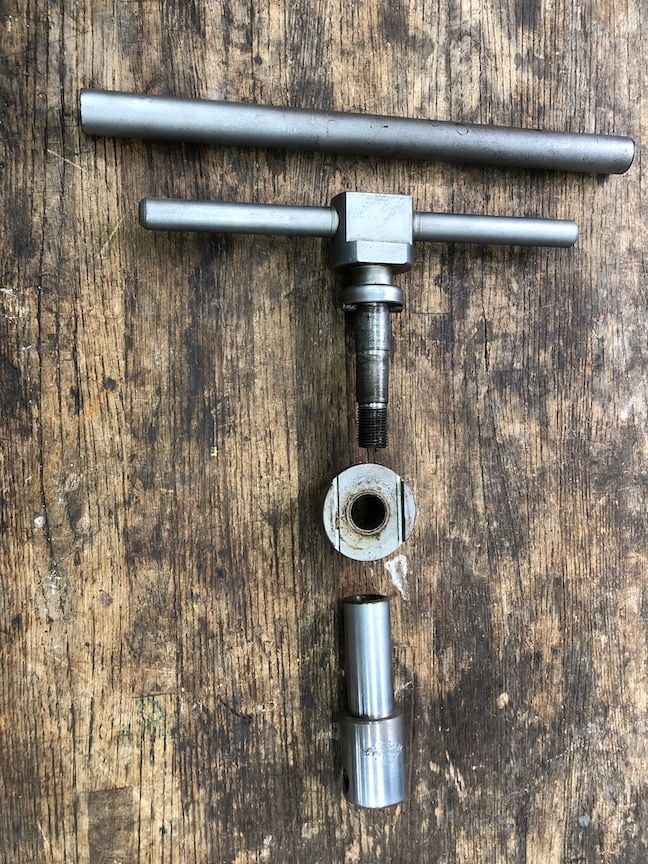
There are proper tools to remove classic era fixed cups and many LB stores won't have them unless they have been in business a very long time. Who is most likely to have them are frame builders and painters - especially if they do both. In the northwest Indiana and southwest Michigan area, bikes stores call me up or have their customers come to me for these tasks. Here is a picture of the superbly designed Campagnolo fixed cup removal tool. The way it works is that the insert goes over the fixed cup while the threaded piece goes into the BB hole. The nut screws onto the threads and holds the insert tight so it won't slip off. The hole in the back of the "nut' is for sticking something through and using leverage to tighten the nut very securely to the handle. This means there is no chance the insert can slip off. Campy also makes a cheater tube to lengthen the handle for more leakage. However the back of the handle has 2 long flats that can sit in a bench vise. This allows for the use of the whole frame to act as a very long lever to loosen the cup. Unless the cup as been brazed in, it will turn.
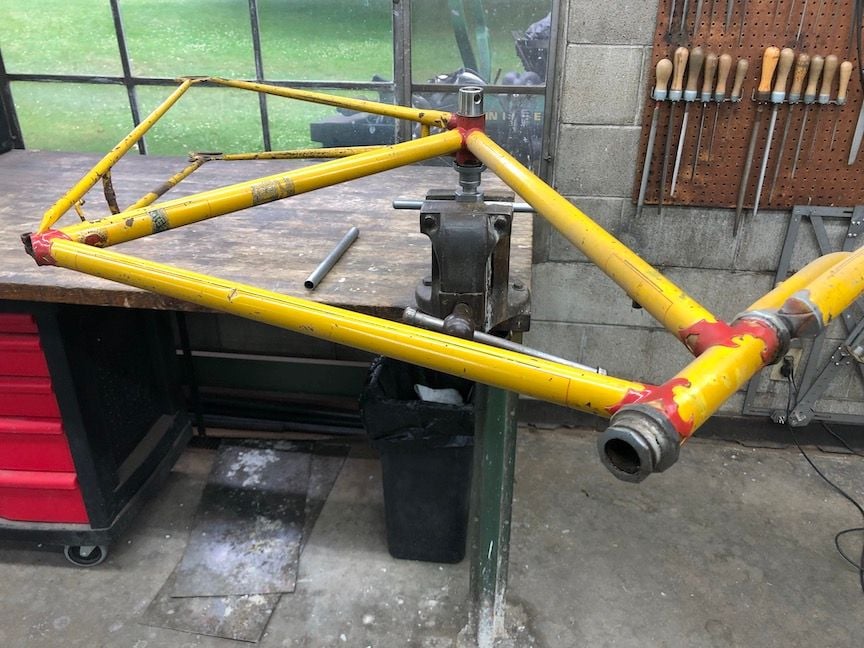
The 2nd picture shows the Campy fixed cup removal tool in action. I used an Ellis Briggs International frame for my example. I learned at EB in the 70's. I won't ever repaint this one because it is the original finish. They did painting there as well so I learned both. The International was their top model in the 50's. Blank lugs were shaped with a punch press that had 17 different dies. It was a pretty clever set up. I continuously give thanks that I was able to learn there.
The 2nd picture shows the Campy fixed cup removal tool in action. I used an Ellis Briggs International frame for my example. I learned at EB in the 70's. I won't ever repaint this one because it is the original finish. They did painting there as well so I learned both. The International was their top model in the 50's. Blank lugs were shaped with a punch press that had 17 different dies. It was a pretty clever set up. I continuously give thanks that I was able to learn there.
 06-29-21, 12:26 PM
#77
Senior Member
Thread Starter
...FWIW in your future endeavors, when you already know that you are going to strip and refinish a frame, and you want to pull the fixed cup that is really stuck in there, A Mapp gas or other torch used to heat it up just about to where the paint is starting to blister, followed by hitting it with Freeze Off, in several repeating cycles, usually works wonders. I'm sooorory I did not suggest that to you earlier.
It's not used more because people are trying t o save the paint. But even at lower heats, it often will free up a stuck cup.
It's not used more because people are trying t o save the paint. But even at lower heats, it often will free up a stuck cup.
06-29-21, 12:28 PM
#78
Senior Member
Thread Starter
There are proper tools to remove classic era fixed cups and many LB stores won't have them unless they have been in business a very long time. Who is most likely to have them are frame builders and painters - especially if they do both. In the northwest Indiana and southwest Michigan area, bikes stores call me up or have their customers come to me for these tasks. Here is a picture of the superbly designed Campagnolo fixed cup removal tool. The way it works is that the insert goes over the fixed cup while the threaded piece goes into the BB hole. The nut screws onto the threads and holds the insert tight so it won't slip off. The hole in the back of the "nut' is for sticking something through and using leverage to tighten the nut very securely to the handle. This means there is no chance the insert can slip off. Campy also makes a cheater tube to lengthen the handle for more leakage. However the back of the handle has 2 long flats that can sit in a bench vise. This allows for the use of the whole frame to act as a very long lever to loosen the cup. Unless the cup as been brazed in, it will turn.
The 2nd picture shows the Campy fixed cup removal tool in action. I used an Ellis Briggs International frame for my example. I learned at EB in the 70's. I won't ever repaint this one because it is the original finish. They did painting there as well so I learned both. The International was their top model in the 50's. Blank lugs were shaped with a punch press that had 17 different dies. It was a pretty clever set up. I continuously give thanks that I was able to learn there.
The 2nd picture shows the Campy fixed cup removal tool in action. I used an Ellis Briggs International frame for my example. I learned at EB in the 70's. I won't ever repaint this one because it is the original finish. They did painting there as well so I learned both. The International was their top model in the 50's. Blank lugs were shaped with a punch press that had 17 different dies. It was a pretty clever set up. I continuously give thanks that I was able to learn there.
06-29-21, 12:45 PM
#79
Senior Member

Join Date: May 2008
Location: Fredericksburg, Va
Posts: 9,711
Bikes: '65 Frejus TDF, '73 Bottecchia Giro d'Italia, '83 Colnago Superissimo, '84 Trek 610, '84 Trek 760, '88 Pinarello Veneto, '88 De Rosa Pro, '89 Pinarello Montello, '94 Burley Duet, 97 Specialized RockHopper, 2010 Langster, Tern Link D8
Liked 2,327 Times
in
1,162 Posts
[MENTION=541108]TullySteve[/MENTION] -
In my case, I did not heat the frame but the center of the assembly allowing the heat to conduct through the cup to the threads. It did not get hot enough to cause a color change in the steel. Sounds a bit defensive but I had nothing to loose and felt I did not have any other option at the time, 11 years ago.
Love the Campagnolo tools along with other marques. The hot oil was a good approach too. Did you just fill the cup or did it run into the tubes too?
__________________
Bikes don't stand alone. They are two tired.
Bikes don't stand alone. They are two tired.
06-29-21, 12:52 PM
#80
Senior Member
Thread Starter
[MENTION=541108]TullySteve[/MENTION] -
In my case, I did not heat the frame but the center of the assembly allowing the heat to conduct through the cup to the threads. It did not get hot enough to cause a color change in the steel. Sounds a bit defensive but I had nothing to loose and felt I did not have any other option at the time, 11 years ago.
Love the Campagnolo tools along with other marques. The hot oil was a good approach too. Did you just fill the cup or did it run into the tubes too?
In my case, I did not heat the frame but the center of the assembly allowing the heat to conduct through the cup to the threads. It did not get hot enough to cause a color change in the steel. Sounds a bit defensive but I had nothing to loose and felt I did not have any other option at the time, 11 years ago.
Love the Campagnolo tools along with other marques. The hot oil was a good approach too. Did you just fill the cup or did it run into the tubes too?
06-29-21, 12:58 PM
#81

Disraeli Gears

So, the Campagnolo tool is basically a professional-grade version of Sheldon Brown's tool, working by high compression on both sides of the flange of the fixed cup, and using friction only on the cup, not keying of any sort like a bolt or nut -- right?
Nice frame; about what year is it? Is that an Alatet headset or something else?
Nice frame; about what year is it? Is that an Alatet headset or something else?
06-29-21, 01:31 PM
#82
framebuilder
[MENTION=541108]TullySteve[/MENTION] -
In my case, I did not heat the frame but the center of the assembly allowing the heat to conduct through the cup to the threads. It did not get hot enough to cause a color change in the steel. Sounds a bit defensive but I had nothing to loose and felt I did not have any other option at the time, 11 years ago.
Love the Campagnolo tools along with other marques. The hot oil was a good approach too. Did you just fill the cup or did it run into the tubes too?
In my case, I did not heat the frame but the center of the assembly allowing the heat to conduct through the cup to the threads. It did not get hot enough to cause a color change in the steel. Sounds a bit defensive but I had nothing to loose and felt I did not have any other option at the time, 11 years ago.
Love the Campagnolo tools along with other marques. The hot oil was a good approach too. Did you just fill the cup or did it run into the tubes too?
06-29-21, 01:53 PM
#83
Senior Member
Thread Starter
There are proper tools to remove classic era fixed cups and many LB stores won't have them unless they have been in business a very long time. Who is most likely to have them are frame builders and painters - especially if they do both. In the northwest Indiana and southwest Michigan area, bikes stores call me up or have their customers come to me for these tasks. Here is a picture of the superbly designed Campagnolo fixed cup removal tool. The way it works is that the insert goes over the fixed cup while the threaded piece goes into the BB hole. The nut screws onto the threads and holds the insert tight so it won't slip off. The hole in the back of the "nut' is for sticking something through and using leverage to tighten the nut very securely to the handle. This means there is no chance the insert can slip off. Campy also makes a cheater tube to lengthen the handle for more leakage. However the back of the handle has 2 long flats that can sit in a bench vise. This allows for the use of the whole frame to act as a very long lever to loosen the cup. Unless the cup as been brazed in, it will turn.
The 2nd picture shows the Campy fixed cup removal tool in action. I used an Ellis Briggs International frame for my example. I learned at EB in the 70's. I won't ever repaint this one because it is the original finish. They did painting there as well so I learned both. The International was their top model in the 50's. Blank lugs were shaped with a punch press that had 17 different dies. It was a pretty clever set up. I continuously give thanks that I was able to learn there.
The 2nd picture shows the Campy fixed cup removal tool in action. I used an Ellis Briggs International frame for my example. I learned at EB in the 70's. I won't ever repaint this one because it is the original finish. They did painting there as well so I learned both. The International was their top model in the 50's. Blank lugs were shaped with a punch press that had 17 different dies. It was a pretty clever set up. I continuously give thanks that I was able to learn there.
Likes For TullySteve:
06-29-21, 02:06 PM
#84
Senior Member
Join Date: Oct 2015
Location: PDX
Posts: 13,509
Bikes: Merz x 5 + Specialized Merz Allez x 2, Strawberry/Newlands/DiNucci/Ti x3, Gordon, Fuso/Moulton x2, Bornstein, Paisley,1958-74 Paramounts x3, 3rensho, 74 Moto TC, 73-78 Raleigh Pro's x5, Marinoni x2, 1960 Cinelli SC, 1980 Bianchi SC, PX-10 X 2
Liked 6,823 Times
in
3,897 Posts
Count me in if so, $$$ support if need be.

Last edited by merziac; 06-29-21 at 03:43 PM.
06-29-21, 03:08 PM
#85
framebuilder
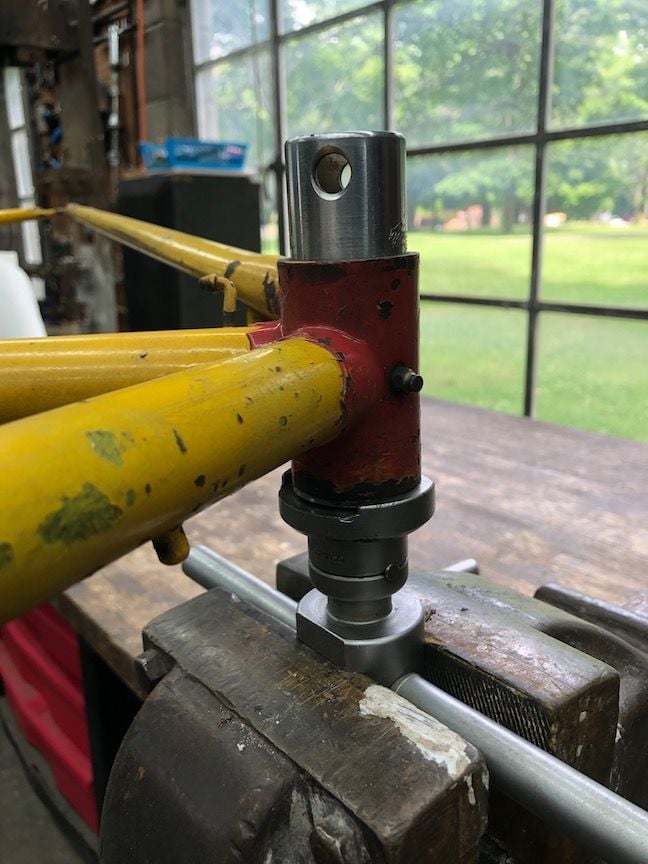
 The Campy tool does squeeze the cup very tight (especially if you tighten them hard together) but the hardened insert of the tool fits over the flats on the cup. I'll post a more close up picture below so you can see better how the tool fits over the cup and the flats of the tool match the flats on the cup. So 2 removing methods are in play with the Campy too.
Nice frame; about what year is it? Is that an Alatet headset or something else?
I have no idea what kind of headset it is and would love for someone to tell me!
 06-29-21, 03:49 PM
#86
Old fart

Join Date: Nov 2004
Location: Appleton WI
Posts: 25,052
Bikes: Several, mostly not name brands.
Liked 3,684 Times
in
2,080 Posts
Unlike the Sheldon Brown tool, neither the VAR-30 or the Campagnolo 793/A relies on friction; the pieces that thread together only need be tight enough to prevent the jaw from slipping when torque is applied. N.B., there were professional grade, friction-type fixed cup tools from Zeus, Kingsbridge, and perhaps others.
06-29-21, 03:55 PM
#87
Old fart
Join Date: Nov 2004
Location: Appleton WI
Posts: 25,052
Bikes: Several, mostly not name brands.
Liked 3,684 Times
in
2,080 Posts
You don't actually need an octagonal jaw for it to work with the Stronglight fixed cup, as long as you can secure the jaw to the cup so that it doesn't slip. E.g., VAR's 30/2 jaw for their professional grade fixed cup tool only has two flats 38mm apart (actually 37.8 on one side and 38.1 on the other to allow for manufacturing variations).
06-29-21, 05:51 PM
#88
Disraeli Gears
You made me look at Sheldon's method The Campy tool does squeeze the cup very tight (especially if you tighten them hard together) but the hardened insert of the tool fits over the flats on the cup. I'll post a more close up picture below so you can see better how the tool fits over the cup and the flats of the tool match the flats on the cup. So 2 removing methods are in play with the Campy too.
The Campy tool does squeeze the cup very tight (especially if you tighten them hard together) but the hardened insert of the tool fits over the flats on the cup. I'll post a more close up picture below so you can see better how the tool fits over the cup and the flats of the tool match the flats on the cup. So 2 removing methods are in play with the Campy too.I was also going to remark in my earlier post that the frame didn't have the oil/grease fitting on top of the BB shell that many pre-60s frames do; but I see it's on the bottom of the shell. Well, I'd ride it!
Now to go buy a 38 mm wrench for when I need to remove the fixed cup from my Peugeot.
Thanks for your help and photos!
Last edited by Charles Wahl; 06-29-21 at 05:54 PM.
06-29-21, 06:34 PM
#89
Full Member
Join Date: Sep 2007
Location: seoul korea
Posts: 469
Bikes: 3Rensho SuperRecord Export, Bridgestones MB1 RB1 XO2, Colnago Super, Medici GranTurismo, Schwinn Paramount, Olmo Competition, Raleigh Portage, Miyata 1000, Stumpjumper, Lotus Competition, Nishiki Maxima, Panasonic DX6000, Zeus Criterium
Likes: 0
Liked 102 Times
in
38 Posts
i'm wondering if there's a way to make a down and dirty DIY version of the campy / VAR fixed cup tool . if there's some hardware that could be put together that works similar (captures the fixed cup snug) with no chance of slipping
06-29-21, 06:47 PM
#90
Senior Member
Thread Starter
You don't actually need an octagonal jaw for it to work with the Stronglight fixed cup, as long as you can secure the jaw to the cup so that it doesn't slip. E.g., VAR's 30/2 jaw for their professional grade fixed cup tool only has two flats 38mm apart (actually 37.8 on one side and 38.1 on the other to allow for manufacturing variations).
Likes For TullySteve:
06-29-21, 07:57 PM
#91
framebuilder
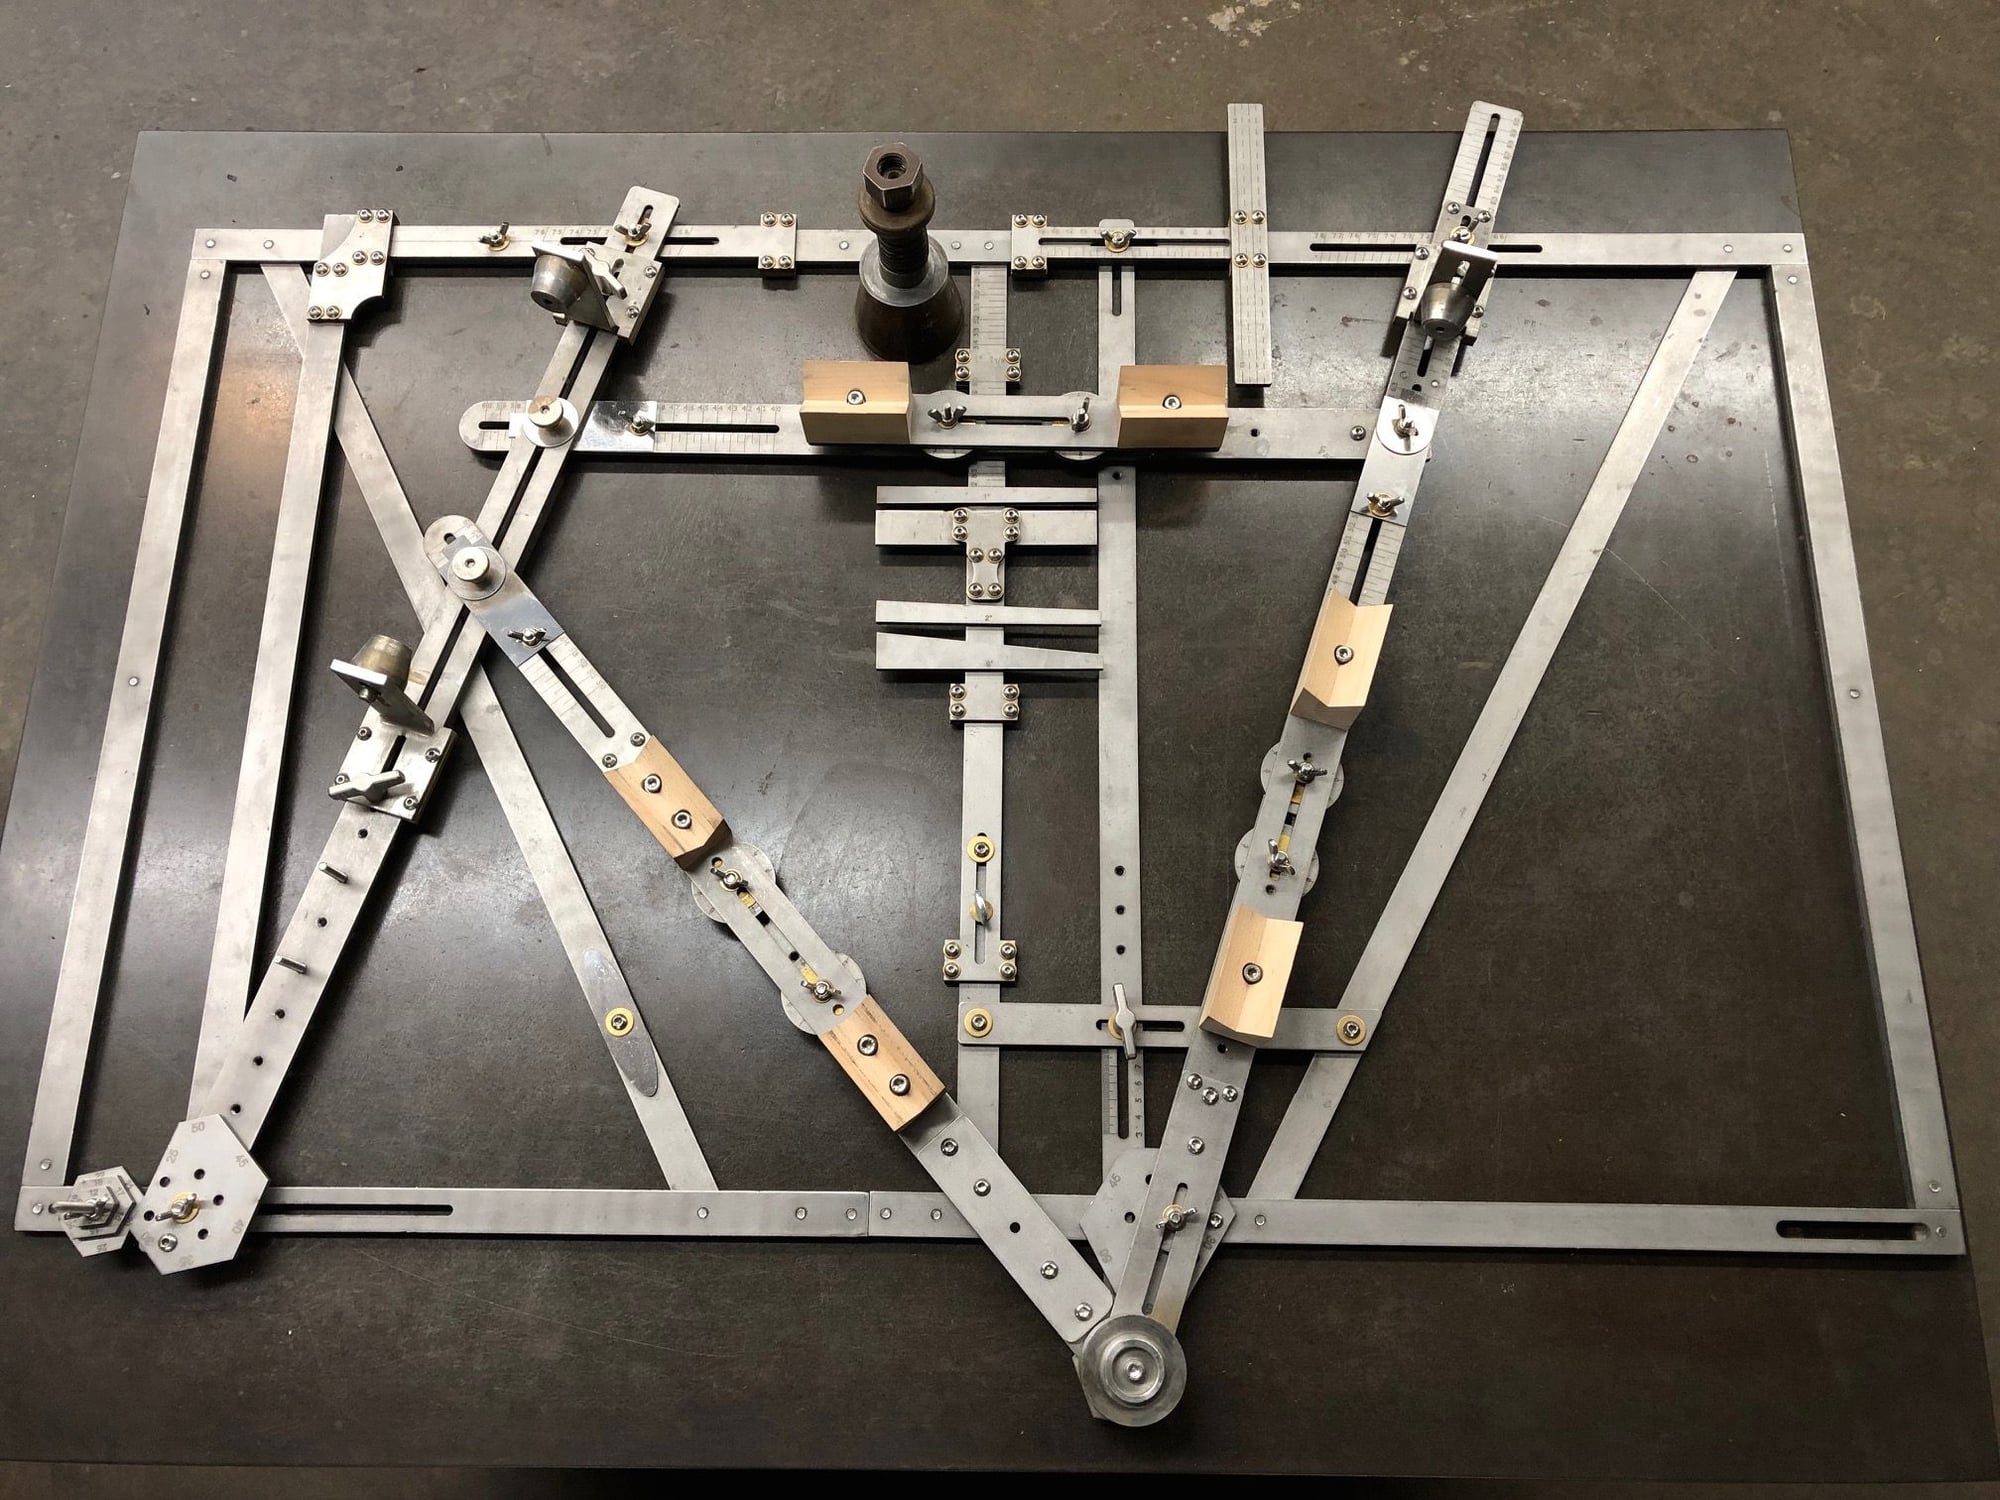
I don't know CAD and didn't take drafting in school. However I designed all the pieces on graph paper and the engineer at the company converted my drawings to CAD and then had them laser cut. The handle could be made to whatever length you wanted. 2 or more thicknesses could be bolted together for added strength. You can see in the "picture frame" of my jig, I have double thickness that bolt together to increase support and stability. in fact the several versions for different fixed cups could be made that bolted onto a longer handle. If you wanted to go crazy, they could be heat treated to increase durability. Of course the more you make, the cheaper each unit costs.
 08-04-21, 01:21 PM
#92
Senior Member
Thread Starter
spanner
For anyone who has followed or chimed in here: I have the bike back from powder coating (gorgeous) and found a local metal shop to make a purpose-built 8 sided spanner for not a lot of money. Even if it only gets used one time to put the bb cup back on, I will write in my will that this wrench has to go with the bike! IF ANYONE HERE WANTS ONE, he's going to charge me "$20-30" for one (I was ok with vague, a good guy) but much less if he makes multiples. So if anyone wants a purpose built spanner for the french bb (unique to 8-sided Stonglight?) I would be happy to get it, ship it and just recover actual costs. But let me know asap please so I can let him know. It will have plenty of meat around the 8 sides, and a handle that will fit inside a length of 3/4 inch pipe for leverage. You'll still have to rely on the Sheldon Brown hardware store solution to bolt it tight to the face, but the thickness will be nominal 1/8 inch so it will be a snug fit.
Likes For TullySteve:
08-04-21, 01:42 PM
#93
Senior Member
Join Date: Oct 2015
Location: PDX
Posts: 13,509
Bikes: Merz x 5 + Specialized Merz Allez x 2, Strawberry/Newlands/DiNucci/Ti x3, Gordon, Fuso/Moulton x2, Bornstein, Paisley,1958-74 Paramounts x3, 3rensho, 74 Moto TC, 73-78 Raleigh Pro's x5, Marinoni x2, 1960 Cinelli SC, 1980 Bianchi SC, PX-10 X 2
Liked 6,823 Times
in
3,897 Posts
For anyone who has followed or chimed in here: I have the bike back from powder coating (gorgeous) and found a local metal shop to make a purpose-built 8 sided spanner for not a lot of money. Even if it only gets used one time to put the bb cup back on, I will write in my will that this wrench has to go with the bike! IF ANYONE HERE WANTS ONE, he's going to charge me "$20-30" for one (I was ok with vague, a good guy) but much less if he makes multiples. So if anyone wants a purpose built spanner for the french bb (unique to 8-sided Stonglight?) I would be happy to get it, ship it and just recover actual costs. But let me know asap please so I can let him know. It will have plenty of meat around the 8 sides, and a handle that will fit inside a length of 3/4 inch pipe for leverage. You'll still have to rely on the Sheldon Brown hardware store solution to bolt it tight to the face, but the thickness will be nominal 1/8 inch so it will be a snug fit.
08-04-21, 02:18 PM
#94
Senior Member
Join Date: Apr 2011
Location: Maryland, USA
Posts: 2,657
Bikes: Drysdale/Gitane/Zeus/Masi/Falcon/Palo Alto/Raleigh/Legnano
Liked 757 Times
in
463 Posts
Wow, where do you attach the steam engine and the leather belt?
__________________
Larry:1958 Drysdale, 1961 Gitane Gran Sport, 1974 Zeus track, 1988 Masi Gran Corsa, 1974 Falcon, 1980 Palo Alto, 1973 Raleigh Gran Sport, 1974 Legnano. Susan: 1976 Windsor Profesional.
Larry:1958 Drysdale, 1961 Gitane Gran Sport, 1974 Zeus track, 1988 Masi Gran Corsa, 1974 Falcon, 1980 Palo Alto, 1973 Raleigh Gran Sport, 1974 Legnano. Susan: 1976 Windsor Profesional.
Likes For tiger1964:
08-04-21, 06:28 PM
#95
Le savonnier

Join Date: Sep 2016
Location: Oregon
Posts: 1,428
Bikes: I can count 'em on one hand
Liked 619 Times
in
281 Posts
For anyone who has followed or chimed in here: I have the bike back from powder coating (gorgeous) and found a local metal shop to make a purpose-built 8 sided spanner for not a lot of money. Even if it only gets used one time to put the bb cup back on, I will write in my will that this wrench has to go with the bike! IF ANYONE HERE WANTS ONE, he's going to charge me "$20-30" for one (I was ok with vague, a good guy) but much less if he makes multiples. So if anyone wants a purpose built spanner for the french bb (unique to 8-sided Stonglight?) I would be happy to get it, ship it and just recover actual costs. But let me know asap please so I can let him know. It will have plenty of meat around the 8 sides, and a handle that will fit inside a length of 3/4 inch pipe for leverage. You'll still have to rely on the Sheldon Brown hardware store solution to bolt it tight to the face, but the thickness will be nominal 1/8 inch so it will be a snug fit.
08-04-21, 06:46 PM
#96
Senior Member
Join Date: Oct 2015
Location: PDX
Posts: 13,509
Bikes: Merz x 5 + Specialized Merz Allez x 2, Strawberry/Newlands/DiNucci/Ti x3, Gordon, Fuso/Moulton x2, Bornstein, Paisley,1958-74 Paramounts x3, 3rensho, 74 Moto TC, 73-78 Raleigh Pro's x5, Marinoni x2, 1960 Cinelli SC, 1980 Bianchi SC, PX-10 X 2
Liked 6,823 Times
in
3,897 Posts
08-04-21, 06:53 PM
#97
Senior Member
Join Date: Oct 2015
Location: PDX
Posts: 13,509
Bikes: Merz x 5 + Specialized Merz Allez x 2, Strawberry/Newlands/DiNucci/Ti x3, Gordon, Fuso/Moulton x2, Bornstein, Paisley,1958-74 Paramounts x3, 3rensho, 74 Moto TC, 73-78 Raleigh Pro's x5, Marinoni x2, 1960 Cinelli SC, 1980 Bianchi SC, PX-10 X 2
Liked 6,823 Times
in
3,897 Posts
It requires a sound, tough wrench as the centerpiece but the rest is very simple everyday stuff you may already have, if not HD is your friend.
08-05-21, 11:57 AM
#98
Ride, Wrench, Swap, Race

Join Date: Jan 2010
Location: Northern California
Posts: 9,333
Bikes: Cheltenham-Pedersen racer, Boulder F/S Paris-Roubaix, Varsity racer, '52 Christophe, '62 Continental, '92 Merckx, '75 Limongi, '76 Presto, '72 Gitane SC, '71 Schwinn SS, etc.
Liked 1,392 Times
in
926 Posts
You had asked about grinding off the entrance bevel/countersink, and I finally looked at it this week.
It seems that the tool's previous owner used this tool on a very low-profile bolt head, since the wear marks extended barely 5/16" into the "jaws" (visible in my photo), and it looks like they also ground down the face of the socket as well, eliminating most of the entry bevel. The benefits of buying used tools!
