


‘82 Miyata 310 - extra parts after re-assembly - please help
 09-17-22, 02:25 PM
#1
‘82 Miyata 310 - extra parts after re-assembly - please help
Hello All - I bought this bike, and disassembled it down to the bare frame, even took apart the rear derailer and shifters. Figured it would be a good learning experience. RJ The Bike Guy on YouTube was a huge help. Anyways, I committed the cardinal sin of disassembly and did not take pictures. When I put it back together, I was left with a few extra parts. 2 square like nut looking things that have 2 “ears” and a slight curve , then these 4 metal tabs with a bend. Any idea what those might be, where the hey go & how, and if they are necessary? New to the forum, and guess I am not allowed to upload pictures yet. If anyone knows a work around, that would be great. My descriptions are not the best, I know. Thank you in advance.
 09-17-22, 02:54 PM
#2
Senior Member
You're gonna have to figure out a way to post photos. My magic 8 ball is down for maintenance.
Likes For cxwrench:
Likes For Pratt:
09-17-22, 03:58 PM
#4
Senior Member

Join Date: Feb 2015
Location: Mission Viejo
Posts: 6,006
Bikes: 1986 Cannondale SR400 (Flat bar commuter), 1988 Cannondale Criterium XTR, 1992 Serotta T-Max, 1995 Trek 970
Liked 2,277 Times
in
1,393 Posts
My blind guess of the 2 squares with ears might be downtube shifter stops.
John
John
09-17-22, 03:59 PM
#5

I'm good to go!
Join Date: Jul 2017
Location: Mississippi
Posts: 16,142
Bikes: Tarmac Disc Comp Di2 - 2020
Liked 5,404 Times
in
3,729 Posts
You can upload pics to the Gallery here on BF and just tell us they are there. Or upload them to https://imgur.com/ or some other hosting site and figure out how to obfuscate the URL from the SPAM filter and just type it in the plain text of your posts. It's sort of a test to see if we are getting good quality noobs! <grin>
Some pic hosting sites don't work as well with BF as others do.
Some pic hosting sites don't work as well with BF as others do.
09-17-22, 04:08 PM
#6
Senior Member
Hello All - I bought this bike, and disassembled it down to the bare frame, even took apart the rear derailer and shifters. Figured it would be a good learning experience. RJ The Bike Guy on YouTube was a huge help. Anyways, I committed the cardinal sin of disassembly and did not take pictures. When I put it back together, I was left with a few extra parts. 2 square like nut looking things that have 2 “ears” and a slight curve , then these 4 metal tabs with a bend. Any idea what those might be, where the hey go & how, and if they are necessary? New to the forum, and guess I am not allowed to upload pictures yet. If anyone knows a work around, that would be great. My descriptions are not the best, I know. Thank you in advance.
Hint: if you took the bike apart and put it back together with parts left over they were probably needed. Have you ridden the bike yet? One thing to do when you take something like a bicycle apart is to keep parts of various assemblies together. Brake parts stay with brake parts. Shifter parts stay with shifter parts. Derailleur parts(front or rear)stay with derailleur parts. This was how we did things before digital photography made taking pictures cheap. At least that way you would know where the extra parts came from and have an idea what to look for if something wasn't working properly
Last edited by alcjphil; 09-17-22 at 04:50 PM.
09-17-22, 04:16 PM
#7
Full Member
Hello All - I bought this bike, and disassembled it down to the bare frame, even took apart the rear derailer and shifters. Figured it would be a good learning experience. RJ The Bike Guy on YouTube was a huge help. Anyways, I committed the cardinal sin of disassembly and did not take pictures. When I put it back together, I was left with a few extra parts. 2 square like nut looking things that have 2 “ears” and a slight curve , then these 4 metal tabs with a bend. Any idea what those might be, where the hey go & how, and if they are necessary? New to the forum, and guess I am not allowed to upload pictures yet. If anyone knows a work around, that would be great. My descriptions are not the best, I know. Thank you in advance.
09-18-22, 03:03 AM
#8
Bikes are okay, I guess.

Join Date: Jan 2015
Location: Richmond, Virginia
Posts: 6,977
Bikes: Waterford Paramount Touring, Raleigh Sports 3-speeds in M23 & L23, Schwinn Cimarron oddball build, Marin Palisades Trail dropbar conversion, Nishiki Cresta GT
Liked 2,482 Times
in
1,575 Posts
Nesting pads for the brakes. Front wheel retainers.
09-18-22, 04:07 AM
#9
Senior Member
The best way to find out what the missing parts are is to find the biggest hill you can find, start at the top and........
__________________
09-18-22, 06:20 PM
#10
I am liking the humor on here, seem like a fun bunch a guys. Sound advice as well, so thank you. I’ll just wait till I hit the 10 posts, should only take a day or two. I need to put my wife’s bike back together anyways. That aside, I did take it for a spin this morning. If anyone one is from LA, you probably know how hilly it is. Certainly made things interesting. To recap, headset came a little lose. Might need some thread lock or something. Back tire shifted, and was rubbing again the seat stay. Tightening the skewer with a kung foo grip, seemed to address that. Old school bike, thought it would be cool to put on old school bar tape with no padding. That was a mistake. It reminded me that I was in my mid 30s, quite punishing. Last but not least, the breaks were very “squishy.” Front cable end popped off somehow, line frayed a bit. I saw Jesus when heading down one of those hills into an intersection. Leads me to believe those “extra” parts are in fact for the brakes, and necessary. All in all, I lived to bike another day. Y’all enjoy the rest of your weekend.
09-19-22, 03:51 PM
#11
Happy banana slug

Join Date: Sep 2015
Location: Arcata, California, U.S., North America, Earth, Saggitarius Arm, Milky Way
Posts: 3,940
Bikes: 1984 Araya MB 261, 1992 Specialized Rockhopper Sport, 1993 Hard Rock Ultra, 1994 Trek Multitrack 750, 1995 Trek Singletrack 930
Liked 1,758 Times
in
1,030 Posts
Hi, how's it going? (Only two more posts!)
PS Don't ride a bike with parts missing; even if you don't die, you could destroy the bike.
PS Don't ride a bike with parts missing; even if you don't die, you could destroy the bike.
I am liking the humor on here, seem like a fun bunch a guys. Sound advice as well, so thank you. I’ll just wait till I hit the 10 posts, should only take a day or two. I need to put my wife’s bike back together anyways. That aside, I did take it for a spin this morning. If anyone one is from LA, you probably know how hilly it is. Certainly made things interesting. To recap, headset came a little lose. Might need some thread lock or something. Back tire shifted, and was rubbing again the seat stay. Tightening the skewer with a kung foo grip, seemed to address that. Old school bike, thought it would be cool to put on old school bar tape with no padding. That was a mistake. It reminded me that I was in my mid 30s, quite punishing. Last but not least, the breaks were very “squishy.” Front cable end popped off somehow, line frayed a bit. I saw Jesus when heading down one of those hills into an intersection. Leads me to believe those “extra” parts are in fact for the brakes, and necessary. All in all, I lived to bike another day. Y’all enjoy the rest of your weekend.
09-20-22, 11:11 AM
#12
I had a motorcycle like that. Every time I took the motor down I had pieces left over after it was back together.
09-20-22, 12:23 PM
#13
Half way there

Join Date: Sep 2015
Location: North Carolina
Posts: 2,962
Bikes: Many, and the list changes frequently
Liked 890 Times
in
533 Posts
I use cloth bar tape on my bikes and find it quite comfortable. But then again, I'm close to twice your age and have many other pains to distract me.
09-20-22, 01:58 PM
#14
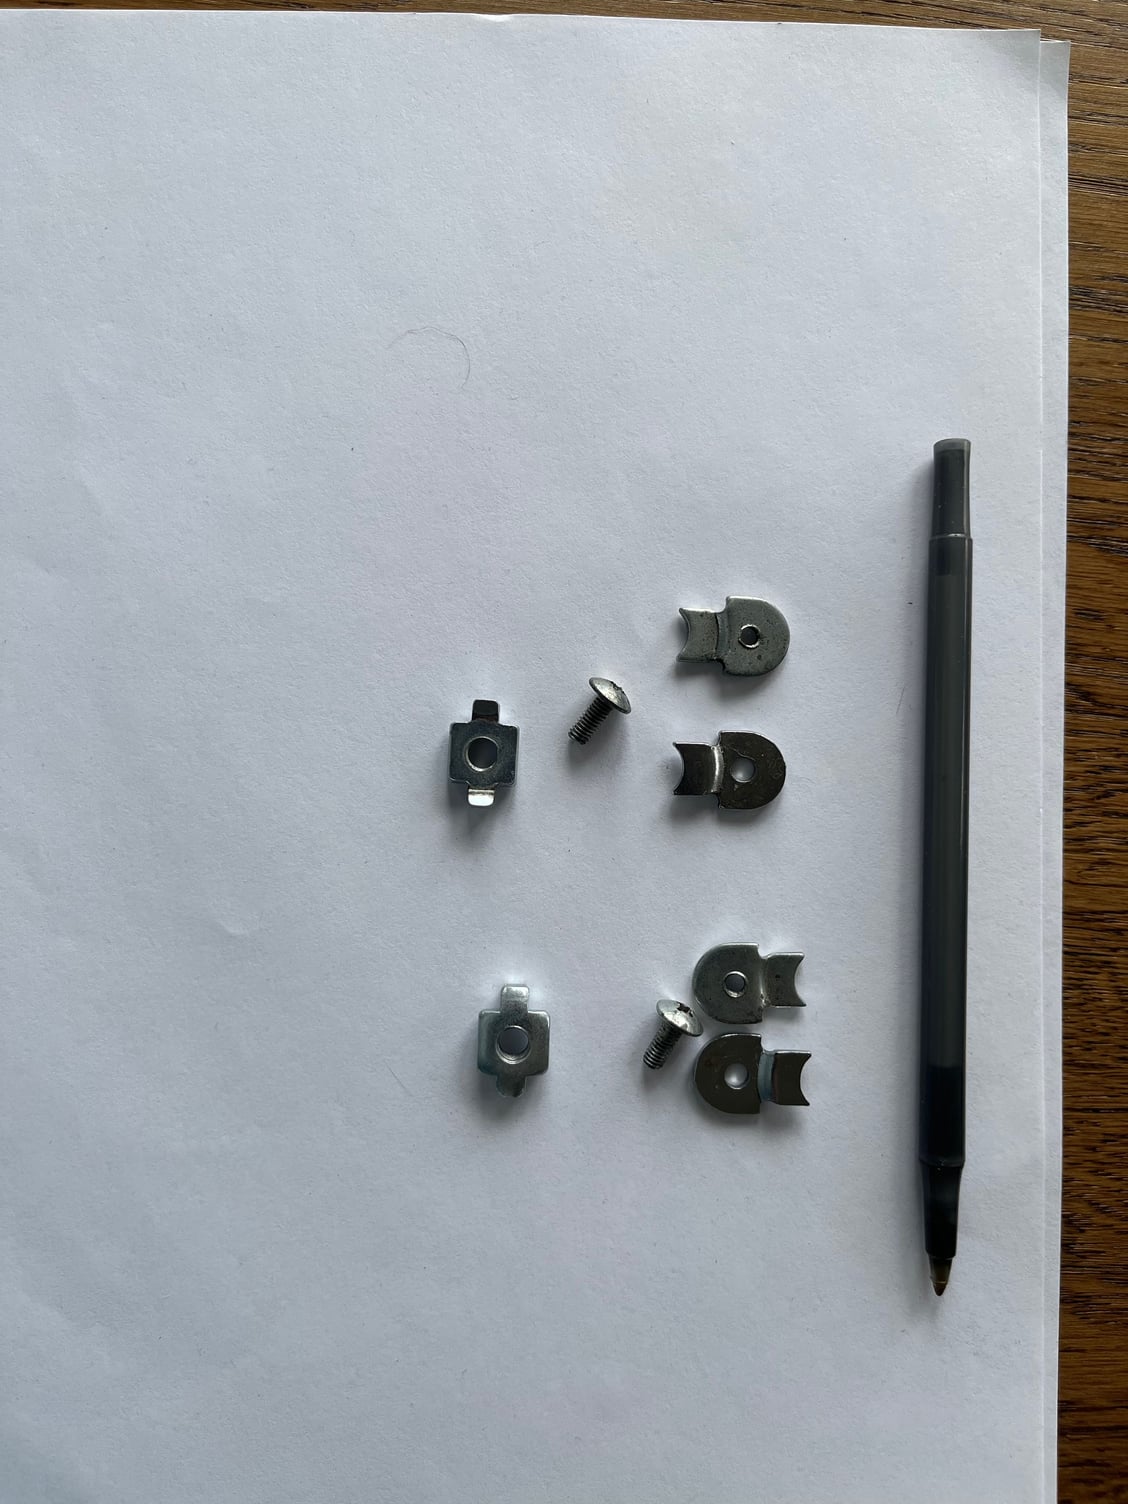
Drum roll . These little guys are the parts in question. I should mention that the brakes are dia comp, suntour vx front & tear derailer & suntour power shifters. I could not tell you how much time I spent looking for photos online, or at eBay listings and zooming into to see how this stuff went back together. All things considered, Think I did pretty good. That aside, Lesson learned.
Last edited by Random_bike_guy; 09-20-22 at 02:04 PM.
09-20-22, 02:05 PM
#15
Senior Member
The four parts that look like washers with teeth might be spacers to fill the back of the rear dropouts. The screws pass through the ones with larger holes and thread into the threaded holes on the other ones. The curved end of the 'tooth' goes against the axle.
The other parts look like the cleats that hold the band clamps that hold the brake levers on. If the brake levers are already on then I am wrong and these are something else.
The other parts look like the cleats that hold the band clamps that hold the brake levers on. If the brake levers are already on then I am wrong and these are something else.
Likes For ClydeClydeson:
09-22-22, 09:47 PM
#16
I see. Well I will do some searches in google images to confirm. The breaks are on and have been assembled, but it’s possible I forgot parts. Thank you everyone for responding. If you have any other thoughts, I would greatly appreciate it. Planning on giving it a second ride this weekend. Have a great night!
09-23-22, 06:25 AM
#17
...
Join Date: Oct 2021
Location: Whitestone and Rensselaerville, New York
Posts: 1,728
Bikes: Bicycles? Yup.
Liked 2,039 Times
in
869 Posts
Clyde's got it.
The dropout spacers are installed with the screwhead on the outside.
After a complete strip and rebuild of my VW bug in 1979, I had a coffee can with 3 or 4 leftovers.
The dropout spacers are installed with the screwhead on the outside.
After a complete strip and rebuild of my VW bug in 1979, I had a coffee can with 3 or 4 leftovers.
Last edited by BTinNYC; 09-23-22 at 06:30 AM.
09-23-22, 06:31 AM
#18
SE Wis
Join Date: Apr 2005
Location: Milwaukee, WI
Posts: 10,809
Bikes: '68 Raleigh Sprite, '02 Raleigh C500, '84 Raleigh Gran Prix, '91 Trek 400, 2013 Novara Randonee, 1990 Trek 970
Liked 3,653 Times
in
2,200 Posts
09-23-22, 02:36 PM
#19
Full Member
Assuming that your rear dropouts are horizontal. (if not never mind) Loosely assemble the dropout spacers/stops and slide them into the dropouts, big end towards the back. Install the wheel and make sure that its straight and not cocked to one side. Slide the spacer/stops against the axle and tighten the screws on the drop out spacers/stops. Otherwise you will be cursing yourself every time you remove and reinstall your rear wheel as you try to get the wheel straight in the frame. Also if you don't install them, your axle will slide in the dropouts and eventually the rim will rub the frame and/or brakes.
09-23-22, 10:20 PM
#20
Assuming that your rear dropouts are horizontal. (if not never mind) Loosely assemble the dropout spacers/stops and slide them into the dropouts, big end towards the back. Install the wheel and make sure that its straight and not cocked to one side. Slide the spacer/stops against the axle and tighten the screws on the drop out spacers/stops. Otherwise you will be cursing yourself every time you remove and reinstall your rear wheel as you try to get the wheel straight in the frame. Also if you don't install them, your axle will slide in the dropouts and eventually the rim will rub the frame and/or brakes.
09-24-22, 10:17 AM
#21
Assuming that your rear dropouts are horizontal. (if not never mind) Loosely assemble the dropout spacers/stops and slide them into the dropouts, big end towards the back. Install the wheel and make sure that its straight and not cocked to one side. Slide the spacer/stops against the axle and tighten the screws on the drop out spacers/stops. Otherwise you will be cursing yourself every time you remove and reinstall your rear wheel as you try to get the wheel straight in the frame. Also if you don't install them, your axle will slide in the dropouts and eventually the rim will rub the frame and/or brakes.
09-24-22, 11:58 AM
#22
Full Member
All of those that I have had experience with, including my personal touring steed, if you tighten the two halves together with the screw, the spacer will not be able to move in the dropout. This provides a physical stop that will prevent the axle from sliding backwards in the dropout preventing the wheel from canting off center. With everything installed, when you stand beside the bike and grab the wheel, the axle shifts and the wheel moves sideways? Stupid question, but you are installing one of each dropout, right?
09-25-22, 09:16 AM
#23
Half way there
Join Date: Sep 2015
Location: North Carolina
Posts: 2,962
Bikes: Many, and the list changes frequently
Liked 890 Times
in
533 Posts
Are you tightening the skewer properly? I don't mean to disparage your mechanic skill, but after years of volunteering at our local co-op I see many folks that don't do it right. If you use it like a wing nut, it will not adequately secure your wheel. This video may help:
09-25-22, 09:48 AM
#24
Are you tightening the skewer properly? I don't mean to disparage your mechanic skill, but after years of volunteering at our local co-op I see many folks that don't do it right. If you use it like a wing nut, it will not adequately secure your wheel. This video may help: https://www.youtube.com/watch?v=zHTyVSf8VlQ
Likes For Random_bike_guy:
09-25-22, 12:31 PM
#25
Senior Member
Join Date: Feb 2006
Location: Sin City, Nevada
Posts: 2,913
Bikes: Catrike 700, Greenspeed GTO trike, , Linear LWB recumbent, Haluzak Horizon SWB recumbent, Balance 450 MTB, Cannondale SM800 Beast of the East
Likes: 0
Liked 243 Times
in
191 Posts
Ha Ha! None of us were born with the innate ability to put things back together the way they came apart. Taking a picture before you disassemble something sure helps. YouTube videos can be a pretty good guide. If you are lucky it will work out as easily as the YouTube video shows but don't always count on it. Learning by doing is much more effective than watching someone else do a task. You are on your way to being skilled.
