


Test your wits - Suntour Symmetric reassembly challenge! With pics!
 06-09-19, 08:44 AM
#76

Senior Member
 06-09-19, 10:18 AM
#77
Senior Member
 06-09-19, 11:08 AM
#78
se�or miembro

Join Date: Dec 2018
Location: Pac NW
Posts: 6,713
Bikes: '70s - '80s Campagnolo
Mentioned: 93 Post(s)
Tagged: 0 Thread(s)
Quoted: 3954 Post(s)
Liked 6,642 Times
in
3,287 Posts
No need to be intimidated. These are easy to fully overhaul. You just have to be meticulous and deliberate in your focus. It may help to take photos along the way.
And they work with both normal front derailleurs and reverse-normal ones like the Spirt.
And they work with both normal front derailleurs and reverse-normal ones like the Spirt.
06-16-19, 02:04 PM
#79
Senior Member
Join Date: May 2011
Location: Seattle WA
Posts: 2,841
Bikes: 2009 Handsome Devil, 1987 Trek 520 Cirrus, 1978 Motobecane Grand Touring, 1987 Nishiki Cresta GT, 1989 Specialized Allez Former bikes; 1986 Miyata Trail Runner, 1979 Miyata 912, 2011 VO Rando, 1999 Cannondale R800, 1986 Schwinn Passage
Mentioned: 72 Post(s)
Tagged: 0 Thread(s)
Quoted: 796 Post(s)
Liked 523 Times
in
367 Posts
My FD went wonky on my Symmetric shifters and despite having the diagram I could not get it back together without have a ton of lateral play in the shift lever however I came up with a solution...
Thanks Ebay
Thanks Ebay
01-18-20, 09:49 PM
#80
Full Member

Join Date: Sep 2008
Location: Santa Cruz, CA
Posts: 309
Bikes: Miyata six-ten, Miyata Grand Touring, Univega Sport Tour, Univega Gran Turismo, 80's Trek MTB, 2008 Dahon Mariner
Mentioned: 3 Post(s)
Tagged: 0 Thread(s)
Quoted: 85 Post(s)
Liked 83 Times
in
58 Posts
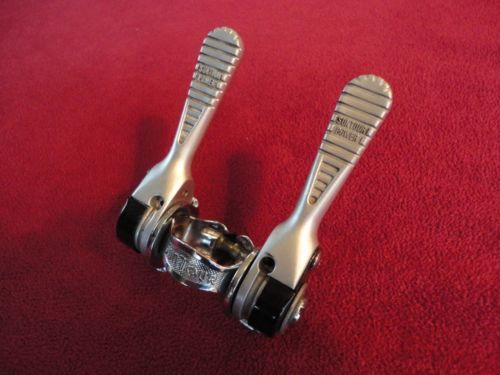
My schematic breakdown is slightly different than the OP's. It appears my levers are missing 1 thin washer and the lock washers under the outer bolts. My lever are a different version of the OP's which may explain the difference. Regardless assembly is the same.

A few random notes:
1. The thin metal washers are alwayd placed against the lever handles. One on the inside, one on the outside.
2. There are 3 thick notched washers. The 2 matching washers are for the left side and the single is for the right side.
Assembly of the housing base requires 6 parts:
Base-1
Bosses-2
Thick Washer-1
Clips-2
Keep your orientation correct as the following picture is viewed from below!!!!
1. Install left boss with 2 retaining clips. The boss is offset so be sure to intall it so that the boss is offset towards the BB.
2. Place thick washer on right boss and slide down so the pin recesses into the slot on the left boss.

Begin assembly of left lever.
Nylon washer is placed first with notch towards BB shell. Place the notched chrome washer so that 'sharp' edge is on the inside and the notches are above. Place thin washer. Edge of nylon washer must be aligned with edge of notch on notched washer

Install left lever and washers. Thin metal metal first, notched washer with sharp edge to the inside

Install small notched washer followed by chrome outer cover:

Begin assembly of right lever.
Install small metal washer:

Install lever followed by small metal washer on the inside and notched washer on top. Sharp edges of notched washer go to the outside:

Placement of small washer with tang. Fllow with placement od chrome cover and bolt:

A few random notes:
1. The thin metal washers are alwayd placed against the lever handles. One on the inside, one on the outside.
2. There are 3 thick notched washers. The 2 matching washers are for the left side and the single is for the right side.
Assembly of the housing base requires 6 parts:
Base-1
Bosses-2
Thick Washer-1
Clips-2
Keep your orientation correct as the following picture is viewed from below!!!!
1. Install left boss with 2 retaining clips. The boss is offset so be sure to intall it so that the boss is offset towards the BB.
2. Place thick washer on right boss and slide down so the pin recesses into the slot on the left boss.
Begin assembly of left lever.
Nylon washer is placed first with notch towards BB shell. Place the notched chrome washer so that 'sharp' edge is on the inside and the notches are above. Place thin washer. Edge of nylon washer must be aligned with edge of notch on notched washer
Install left lever and washers. Thin metal metal first, notched washer with sharp edge to the inside
Install small notched washer followed by chrome outer cover:
Begin assembly of right lever.
Install small metal washer:
Install lever followed by small metal washer on the inside and notched washer on top. Sharp edges of notched washer go to the outside:
Placement of small washer with tang. Fllow with placement od chrome cover and bolt:
Nubra
__________________
Give thanks, for unknown blessings are already on their way.
~Native American Prayer
Give thanks, for unknown blessings are already on their way.
~Native American Prayer
05-13-20, 10:20 PM
#81
Full Member
Join Date: Sep 2008
Location: Santa Cruz, CA
Posts: 309
Bikes: Miyata six-ten, Miyata Grand Touring, Univega Sport Tour, Univega Gran Turismo, 80's Trek MTB, 2008 Dahon Mariner
Mentioned: 3 Post(s)
Tagged: 0 Thread(s)
Quoted: 85 Post(s)
Liked 83 Times
in
58 Posts
THANKS so much for these directions. I am replacing a symmetric shifter for a friends bike and I didnt know they existed till I saw hers (it was not funcional at all, many pieces were missing).
This makes all the difference in the set up.
Cheers!
This makes all the difference in the set up.
Cheers!
To set up the shifter correctly, you want to first set up the rear.
Then:
Shift the rear to the biggest cog.
Put the chain on the inner chainring in front.
Set the inner limit stop to the appropriate spot.
Pull the cable and secure.
Doing these steps sets the inner limit...and the innermost trim...with the chain at its innermost possibility. In other words, with the right arm fully pulled, the left is slid aft on the downtube, but is still laying flat. After you set up like this, after you un-pull or flatten the right arm to move the chain to successively smaller rear cogs, the left arm will move forward on the downtube and will pull cable to move the cage outboard as well.
And then vice versa.
It's really a neat system, and I'm kinda sorry they don't make them anymore.
__________________
Give thanks, for unknown blessings are already on their way.
~Native American Prayer
Give thanks, for unknown blessings are already on their way.
~Native American Prayer
04-26-21, 06:41 AM
#82
Senior Member

Join Date: Apr 2012
Location: Middle Earth (aka IA)
Posts: 20,563
Bikes: A bunch of old bikes and a few new ones
Mentioned: 179 Post(s)
Tagged: 0 Thread(s)
Quoted: 5938 Post(s)
Liked 3,660 Times
in
2,158 Posts
Updating an old thread. I have a set of these that I'd like to use. This is a very useful.
 04-26-21, 09:18 AM
#83
2k miles from the midwest
Join Date: Feb 2005
Location: Washington
Posts: 1,964
Bikes: ~'75 Colin Laing, '80s Schwinn SuperSport 650b, ex-Backroads ti project...
Mentioned: 18 Post(s)
Tagged: 0 Thread(s)
Quoted: 525 Post(s)
Liked 932 Times
in
447 Posts
As long as we're pumping new life into this old thread, I'll add a little tidbit.
These old Symmetry shifters combined with a top-pull FD are the hot-ticket for setting up a cable-driven suicide front shifter. I had purchased a cheap modern singlespeed and decided it needed more gears. With no braze-ons for anything and an oversized downtube, I tried this and it works really well. Clean and surprisingly more natural than I'd expected.

These old Symmetry shifters combined with a top-pull FD are the hot-ticket for setting up a cable-driven suicide front shifter. I had purchased a cheap modern singlespeed and decided it needed more gears. With no braze-ons for anything and an oversized downtube, I tried this and it works really well. Clean and surprisingly more natural than I'd expected.
Likes For Dylansbob:
04-26-21, 09:35 AM
#84
(rhymes with spook)

Join Date: Aug 2009
Location: Winslow, AR
Posts: 2,788
Bikes: '83 univega gran turismo x2, '85 schwinn super le tour,'89 miyata triple cross, '91 GT tequesta, '90 yokota grizzly peak, '94 GT backwoods, '95'ish scott tampico, '98 bonty privateer, '93 mongoose crossway 625, '98 parkpre ariel, 2k'ish giant fcr3
Mentioned: 26 Post(s)
Tagged: 0 Thread(s)
Quoted: 919 Post(s)
Liked 745 Times
in
546 Posts
will ferrell voice with tranquilizer dart in his neck "you crazy. i like you, man, but ..hehe...you crazy"
(i kid, of course. it's a pretty clever set up)
(i kid, of course. it's a pretty clever set up)
Likes For thook:
08-11-21, 10:20 AM
#85
Newbie
Join Date: Aug 2021
Location: US Gulf Coast
Posts: 52
Bikes: 1984 Miyata 710 resto-modded to 1x11 townie, 1987 Bianchi Brava resto-modded to 1x11 fitness/events
Mentioned: 0 Post(s)
Tagged: 0 Thread(s)
Quoted: 15 Post(s)
Liked 48 Times
in
17 Posts
Joined the forum so I could say thanks to everyone who contributed to this thread over the years.
I'm rebuilding my old racing bike - 1984 Miyata 710 - and, you guessed it, the Symmetric Shifters needed replacing. I found a NOS pair, but they still needed 30+ year old grease cleaned out. This thread gave me the confidence to take them apart.
I'm rebuilding my old racing bike - 1984 Miyata 710 - and, you guessed it, the Symmetric Shifters needed replacing. I found a NOS pair, but they still needed 30+ year old grease cleaned out. This thread gave me the confidence to take them apart.
Likes For Prunesquallor:
08-11-21, 10:39 AM
#86
Senior Member
Join Date: Oct 2005
Location: Upper Left, USA
Posts: 1,915
Mentioned: 50 Post(s)
Tagged: 0 Thread(s)
Quoted: 634 Post(s)
Liked 444 Times
in
298 Posts
Joined the forum so I could say thanks to everyone who contributed to this thread over the years.
I'm rebuilding my old racing bike - 1984 Miyata 710 - and, you guessed it, the Symmetric Shifters needed replacing. I found a NOS pair, but they still needed 30+ year old grease cleaned out. This thread gave me the confidence to take them apart.
I'm rebuilding my old racing bike - 1984 Miyata 710 - and, you guessed it, the Symmetric Shifters needed replacing. I found a NOS pair, but they still needed 30+ year old grease cleaned out. This thread gave me the confidence to take them apart.
 08-11-21, 11:02 AM
#87
Newbie
Join Date: Aug 2021
Location: US Gulf Coast
Posts: 52
Bikes: 1984 Miyata 710 resto-modded to 1x11 townie, 1987 Bianchi Brava resto-modded to 1x11 fitness/events
Mentioned: 0 Post(s)
Tagged: 0 Thread(s)
Quoted: 15 Post(s)
Liked 48 Times
in
17 Posts
It would appear so. No parts left over. 
I haven’t road tested the bike yet, but it’s cabled up (no chain) and I’m seeing some of the behavior noted above:
Left shifter back (big chainring), right shifter pulled back (toward big sprocket), left shifter slides toward BB. Right shifter pushed forward, left shifter slides away from BB. If the left shifter is not bolted in tight, it will also rotate forward when the right shifter is pushed forward.
BTW, there was no plastic washer on the NOS shifter.
Likes For Prunesquallor:
08-17-23, 11:51 AM
#89
Newbie
Join Date: Aug 2023
Location: Finland
Posts: 1
Mentioned: 0 Post(s)
Tagged: 0 Thread(s)
Quoted: 0 Post(s)
Likes: 0
Liked 0 Times
in
0 Posts
Make your own nylon washer for 20 cents
It's the future.
As a thank you for helping me put my shifter back together I wanted to share how I made the nylon washer which many seem to be missing, me included.
This is a step-by-step guide on how to modify a regular nylon/plastic washer, bought from a hardware store, to fit your Suntour Symmetric shifter. You'll find an illustration of the plastic washer in the exploded diagrams, which you can find in this thread.
I had originally snapped some nice pictures showing the process, but the forum wont allow me to include pictures or links as I'm new here. I'll do my best in words:
1. Buy a normal plastic washer from your favorite hardware store. A washer cost me 20 cents. The correct measurements are 11x16x2mm. The washer could be a tad slimmer, but 2mm is fine. Do not use anything slimmer than 1.5mm, as that won't be enough to remove the play. Anything over 2mm will be too thick, preventing proper assembly.
2. Place the washer in the recess of your shift lever. This is where it belongs. Notice that the notch in the recess prevents the washer from going all the way in. Using cutting pliers (or whatever you have available), cut off a notch-sized chunk from your washer.
3. Congratulations, you now have a fitting washer.
4. Install according to the exploded diagram which you can find posted earlier in this thread.
5. The play in the lever is now gone and the shifter should feel super duper smooth.
Last edited by VelocityVeteran; 08-17-23 at 11:57 AM. Reason: Add clariity
08-22-23, 05:58 PM
#90
Bike wrench volunteer
Join Date: Feb 2023
Location: Arizona
Posts: 70
Bikes: 1971 Schwinn Suburan, 1971 Peugoet UO8, 1984 Nishiki Cresta, 1984 Nishiki Olympic, 1987 Schwinn Super Sport, 1996 Waterford 1250, 2018 Cannondale Synaspe Carbon
Mentioned: 0 Post(s)
Tagged: 0 Thread(s)
Quoted: 19 Post(s)
Liked 55 Times
in
22 Posts
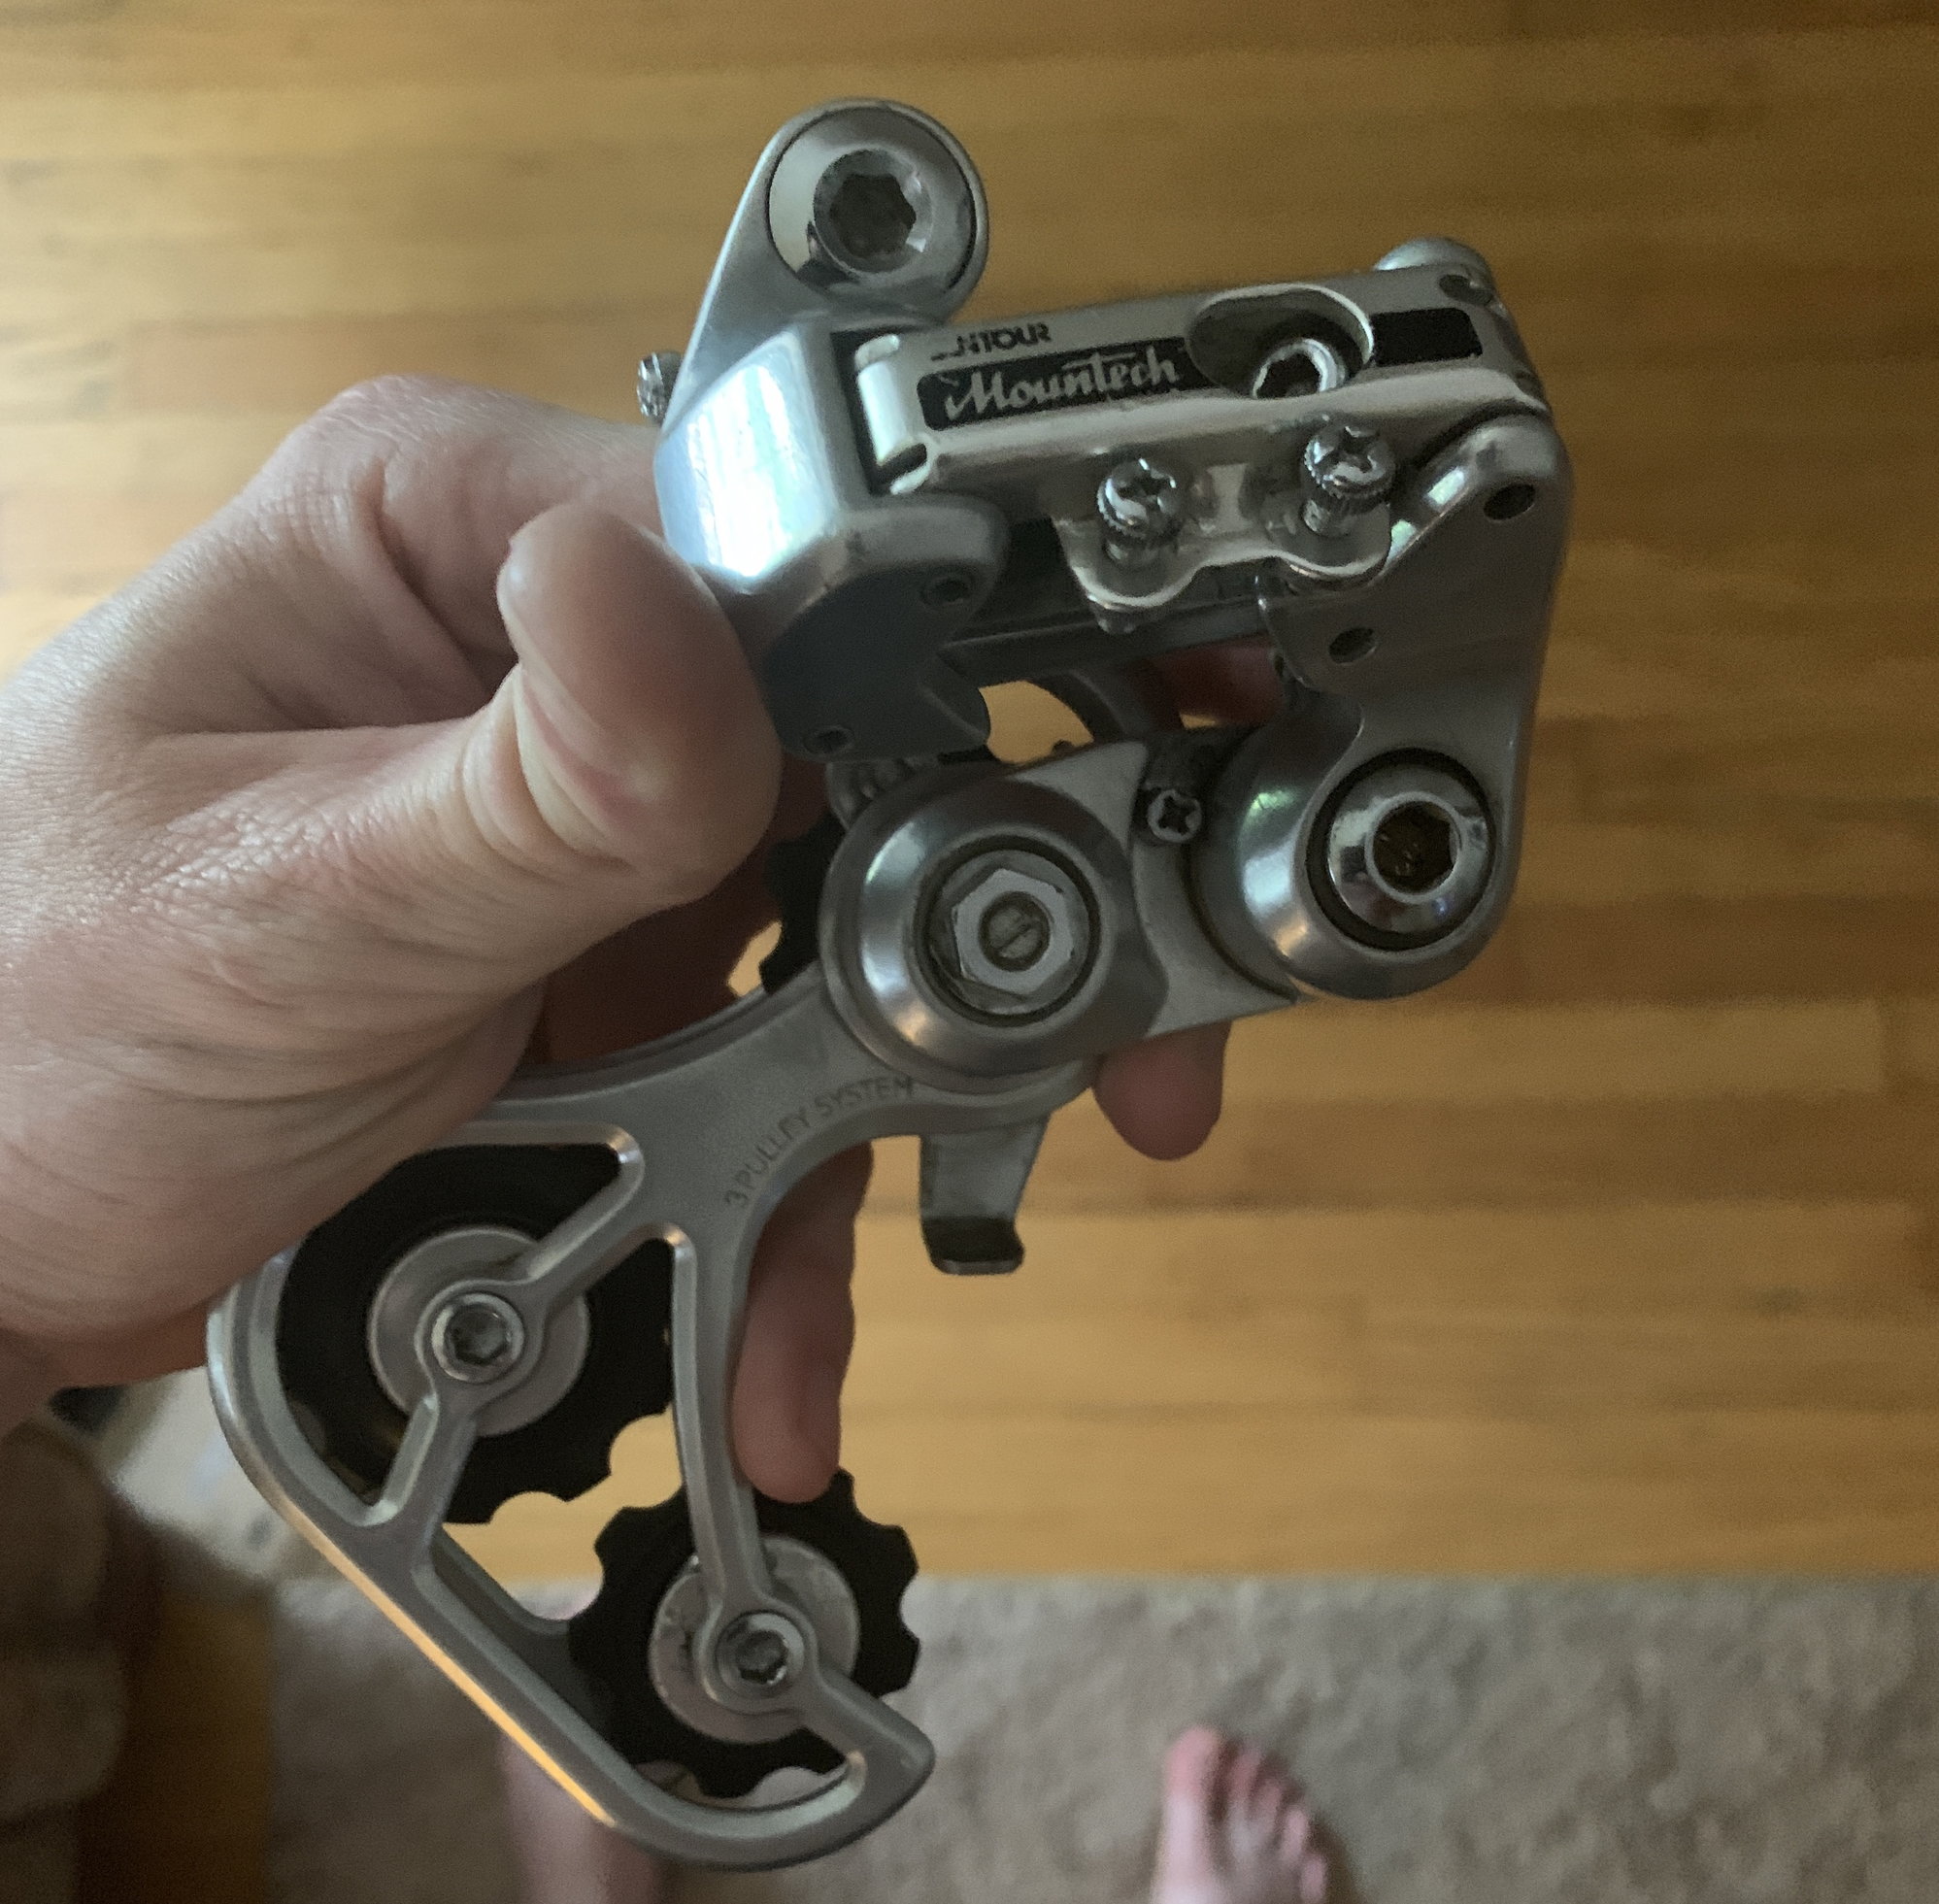
This photo just saved me a lot of grief. Restoring a Nishiki Cresta which has the Symmetric shifters with Cyclone MII GT RD and Cyclone MII FD. The bike was siting outside before I picked it up last March and required a complete teardown.


Thread
Thread Starter
Forum
Replies
Last Post
Vintage Raleigh
Classic & Vintage
8
08-14-16 09:39 AM
3speed
Classic & Vintage
14
10-02-10 06:39 PM
