


How to tighten bottom bracket - drivetrain side [preferably without special tool(s)]?
 09-29-23, 07:02 PM
#1
How to tighten bottom bracket - drivetrain side [preferably without special tool(s)]?
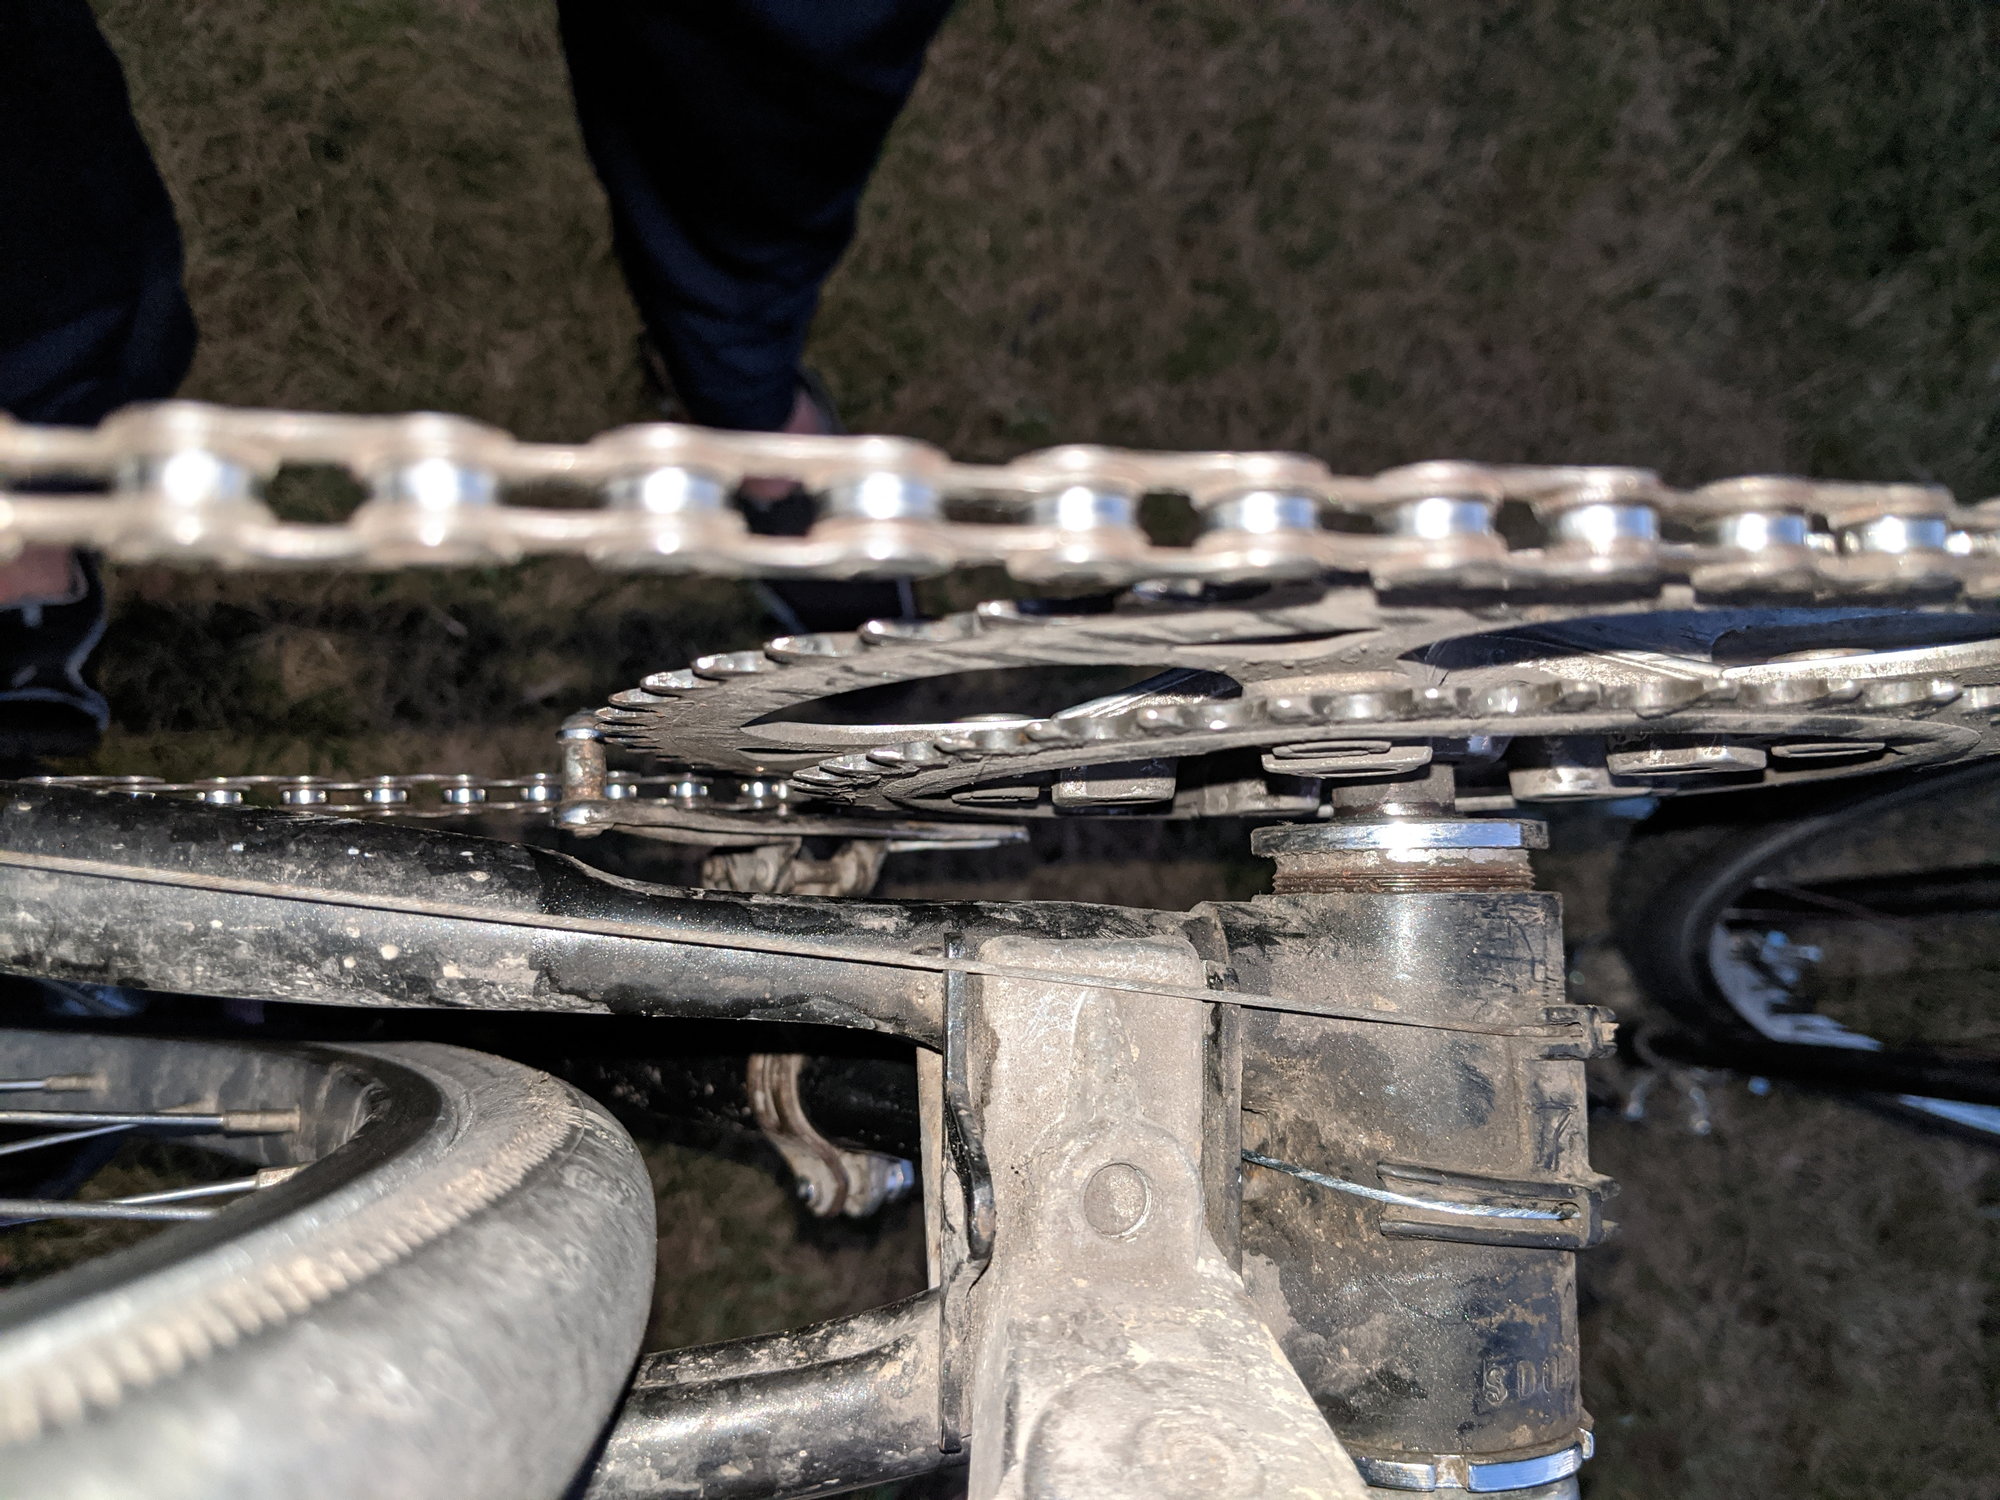
Hello Gurus, my 1980-90s Schwinn World Sport bike's chain is rubbing the front derailleur, slightly and intermittently, and that rubbing noise is bothering me, on my bike rides. I tried to fix the rubbing noise by rotating the limit screws, unsuccessfully. Then I noticed a slight play in the crank arm, and then also noticed the bottom bracket is out by a few threads, which could be the reason for the rubbing noise.
From the below pictures, does my bottom bracket, on the drivetrain side, need to be tightened? Is that possibly the reason for the chain rubbing the front derailleur? If so, how do I tighten the bottom bracket? I do not have any special tool for the bike bottom bracket, but I do have all kinds wrenches, screw drivers, and a mechanical toolset that I use to do repairs to my car.
Thank you in advance for any advice and help. 🙏
Last edited by Eyes Roll; 09-29-23 at 07:21 PM.
 09-29-23, 07:10 PM
#2

Senior Member

You can see the cup has wrench flats. If you can get a wrench in there without removing the drive side crankset you could probably tighten it down with a large adjustable wrench. Keep in mind on this frame the drive side cup will have left-hand threads, so go counter-clockwise to tighten.
However based on the photos the drivetrain does really need a disassembly, cleaning, re-packing with grease, and re-assembly. For this you will need a crank puller to pull the cranks off the bottom bracket spindle, and a hooked spanner for removing the non-driveside bottom bracket lockring. Both bicycle-specific tools unfortunately.
If you don't do this, you run the risk of ruining your bottom bracket bearings and cups, which will be a more expensive repair than simple disassembly and cleaning of your existing BB. If there is a bike coop nearby you can borrow the tools mentioned above and look up the Park Tools video on bottom bracket install and removal. Otherwise please bring it to a bike shop for service.
On a separate note, there is some rust on the frame that you should remove. And PLEASE spray some lubricant into the bottle bosses on the downtube and plug them with the appropriate M5 or M6 bolt. Letting the internal and external rust continue will eventually cause the tubes to fracture which could result in a catastrophic road accident.
Last edited by TenGrainBread; 09-29-23 at 07:22 PM.
Likes For TenGrainBread:
09-29-23, 07:18 PM
#3
Senior Member

Join Date: Nov 2010
Location: Sacramento, CA
Posts: 22,995
Bikes: old ones
Liked 10,458 Times
in
7,255 Posts
.
...yes, you shouldn't see any exposed threads like you have. But just tightening it without disassembly and service is a bad idea, because the bearing clearance in the BB is set from the other side (the adjustable cup.) No, there's no way to do this without at least a couple of special bicycle tools.
...yes, you shouldn't see any exposed threads like you have. But just tightening it without disassembly and service is a bad idea, because the bearing clearance in the BB is set from the other side (the adjustable cup.) No, there's no way to do this without at least a couple of special bicycle tools.
Likes For 3alarmer:
09-29-23, 07:36 PM
#4
You can see the cup has wrench flats. If you can get a wrench in there without removing the drive side crankset you could probably tighten it down with a large adjustable wrench. Keep in mind on this frame the drive side cup will have left-hand threads, so go counter-clockwise to tighten.
However based on the photos the drivetrain does really need a disassembly, cleaning, re-packing with grease, and re-assembly. For this you will need a crank puller to pull the cranks off the bottom bracket spindle, and a hooked spanner for removing the non-driveside bottom bracket lockring. Both bicycle-specific tools unfortunately.
If you don't do this, you run the risk of ruining your bottom bracket bearings and cups, which will be a more expensive repair than simple disassembly and cleaning of your existing BB. If there is a bike coop nearby you can borrow the tools mentioned above and look up the Park Tools video on bottom bracket install and removal. Otherwise please bring it to a bike shop for service.
On a separate note, there is some rust on the frame that you should remove. And PLEASE spray some lubricant into the bottle bosses on the downtube and plug them with the appropriate M5 or M6 bolt. Letting the internal and external rust continue will eventually cause the tubes to fracture which could result in a catastrophic road accident.
However based on the photos the drivetrain does really need a disassembly, cleaning, re-packing with grease, and re-assembly. For this you will need a crank puller to pull the cranks off the bottom bracket spindle, and a hooked spanner for removing the non-driveside bottom bracket lockring. Both bicycle-specific tools unfortunately.
If you don't do this, you run the risk of ruining your bottom bracket bearings and cups, which will be a more expensive repair than simple disassembly and cleaning of your existing BB. If there is a bike coop nearby you can borrow the tools mentioned above and look up the Park Tools video on bottom bracket install and removal. Otherwise please bring it to a bike shop for service.
On a separate note, there is some rust on the frame that you should remove. And PLEASE spray some lubricant into the bottle bosses on the downtube and plug them with the appropriate M5 or M6 bolt. Letting the internal and external rust continue will eventually cause the tubes to fracture which could result in a catastrophic road accident.
The last 4 pictures I posted were taken when the bike was turned upside-down; should I try to go counter-clockwise with a large adjustable wrench, when the bike is turned upside-down?
.
...yes, you shouldn't see any exposed threads like you have. But just tightening it without disassembly and service is a bad idea, because the bearing clearance in the BB is set from the other side (the adjustable cup.) No, there's no way to do this without at least a couple of special bicycle tools.
...yes, you shouldn't see any exposed threads like you have. But just tightening it without disassembly and service is a bad idea, because the bearing clearance in the BB is set from the other side (the adjustable cup.) No, there's no way to do this without at least a couple of special bicycle tools.
The bike rides like a champ though. It is a super fast bike. I have just repacked the ball bearings (10 on each side) and grease in the front wheel hub, and replaced gear and brake cables and casings, just last week. I will slowly buy the required tools and work on the bottom bracket when I find time.
By the way, I am planning to go on a 70-mile ride, tomorrow. Is it OK for me to go on the ride, tomorrow? Or will the bottom bracket loosen further and come off as I continue to ride without doing the proper fix?
09-29-23, 07:45 PM
#5
Senior Member
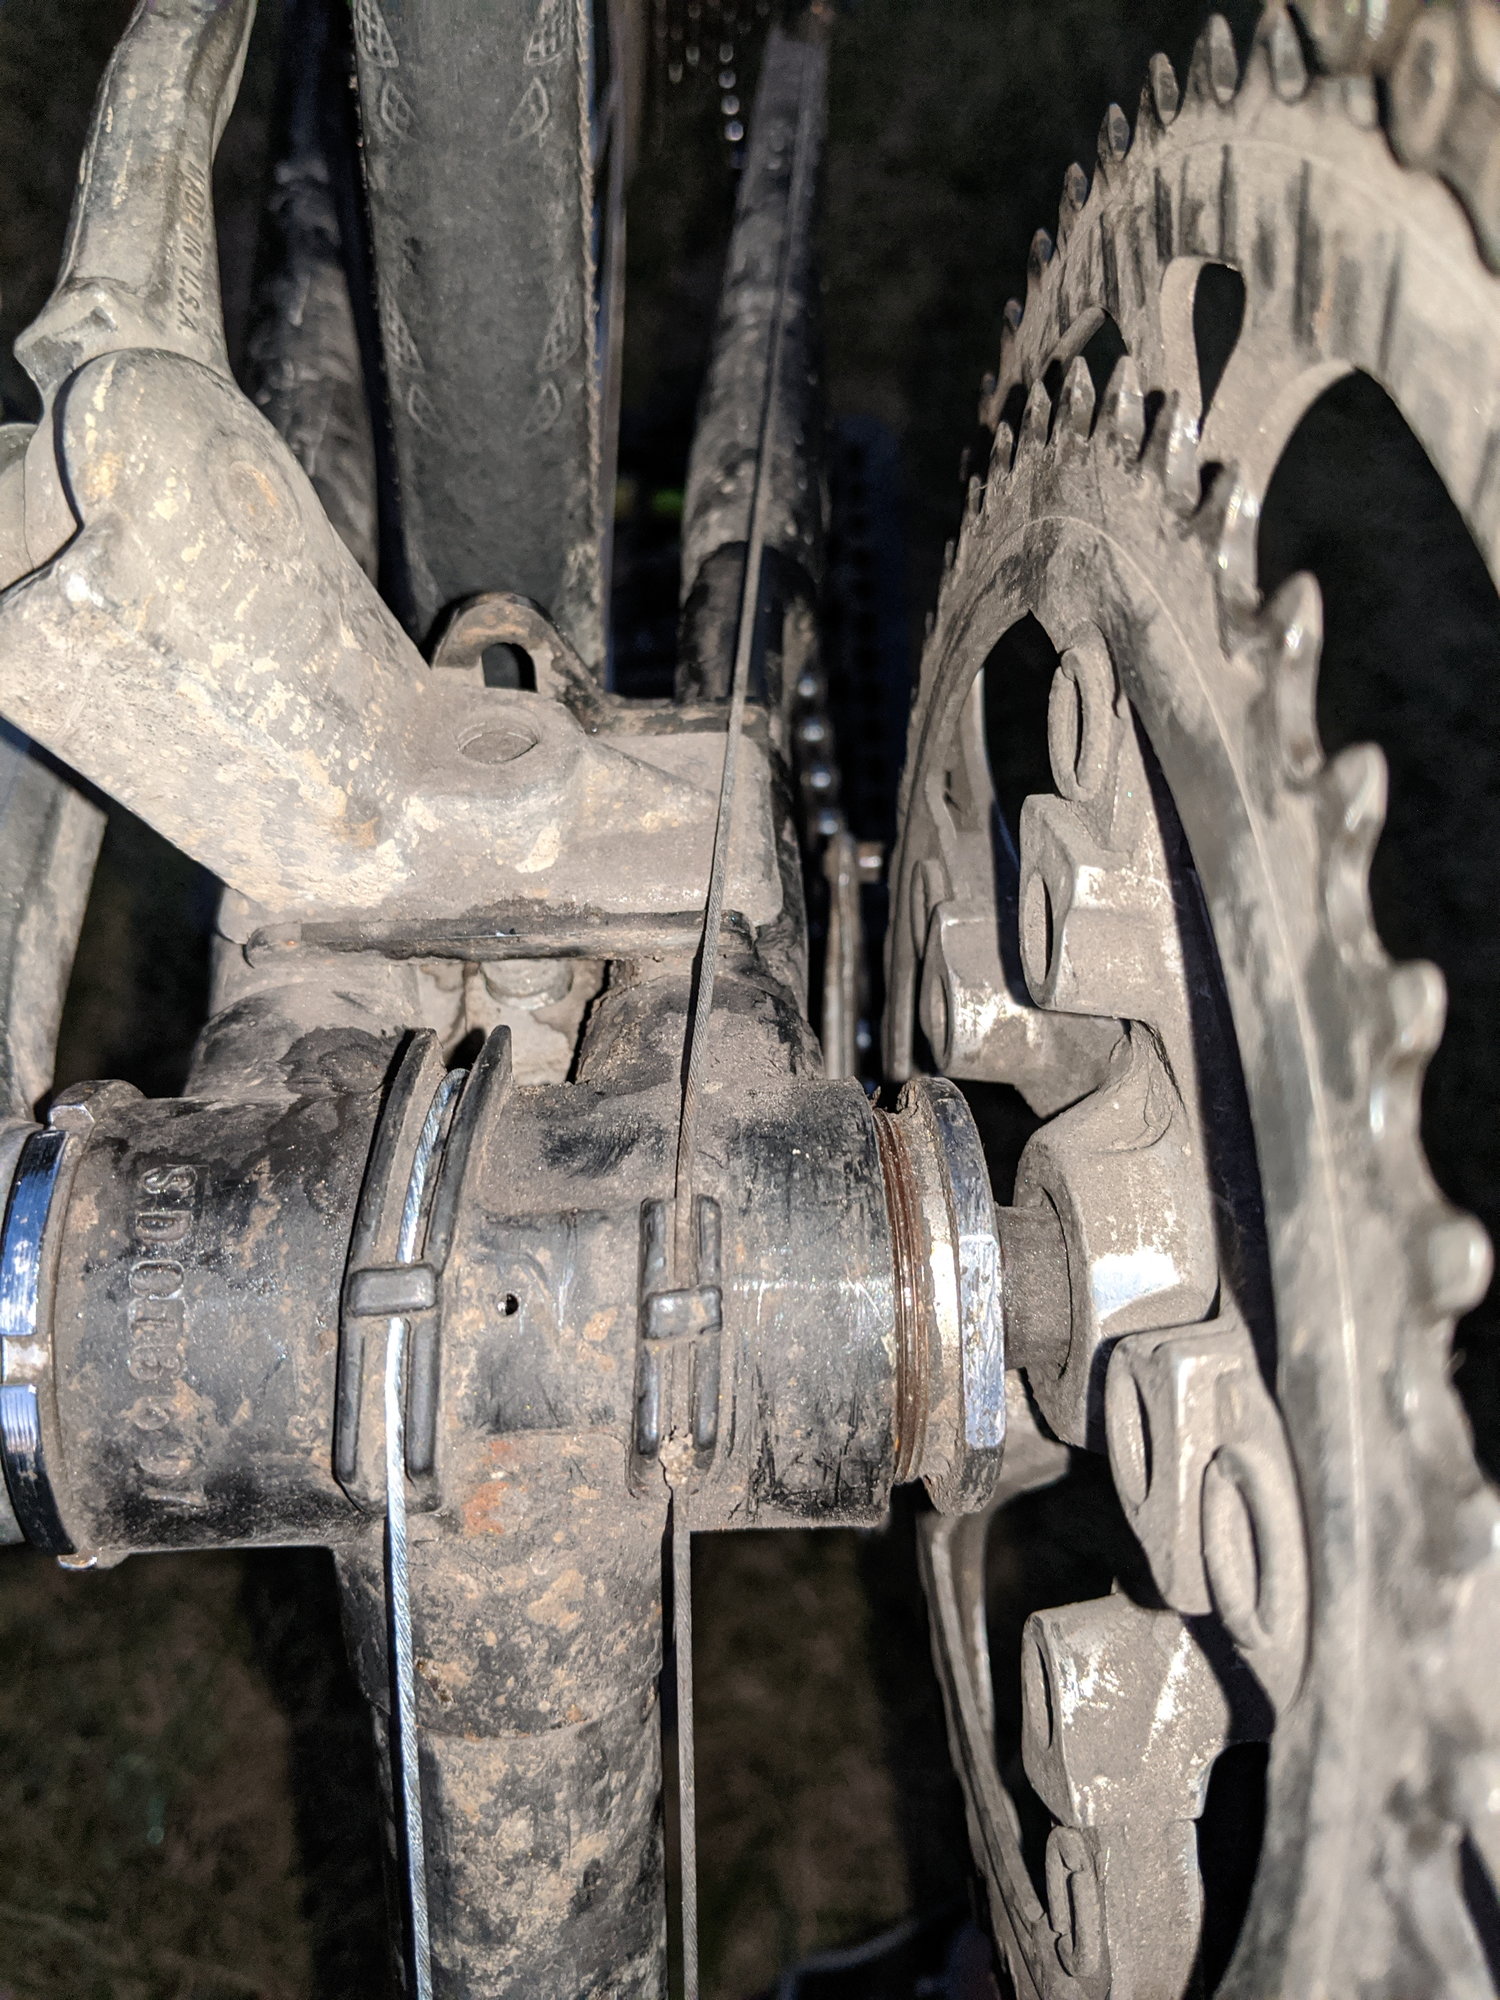
That's called the fixed cup. Is the bottom bracket REALLY loose, left-to-right? If not, you probably won't be able to tighten down the fixed cup anyway, because unless there's a LOT of left-right play, then the adjustable cup (non-drive side) is probably threaded too far in. So yeah, as dsecribed above, you'd be wise to open it up and re-lubricate it anyway, and put it back together properly.
Likes For madpogue:
09-29-23, 08:01 PM
#6
SE Wis
Join Date: Apr 2005
Location: Milwaukee, WI
Posts: 10,821
Bikes: '68 Raleigh Sprite, '02 Raleigh C500, '84 Raleigh Gran Prix, '91 Trek 400, 2013 Novara Randonee, 1990 Trek 970
Liked 3,661 Times
in
2,205 Posts
Likes For dedhed:
09-29-23, 08:08 PM
#7
Junior Member
Join Date: Apr 2015
Location: St Louis Park MN
Posts: 176
Bikes: Mead Ranger '24- Armstrong 3sp '64 Follis 172 '74 Centurian Accordo 80's Mercian '85 Mark Zeh road '86 Kona Explosif '93 Merkx Ti AX '97 Santana Arriva tandem '99 Bike Friday tandem
Likes: 0
Liked 31 Times
in
23 Posts
Ride 70 miles with the fixed cup that far out and the complete bottom bracket will more likely than not be destroyed.
Likes For MeadMan2:
09-29-23, 08:19 PM
#8
That's called the fixed cup. Is the bottom bracket REALLY loose, left-to-right? If not, you probably won't be able to tighten down the fixed cup anyway, because unless there's a LOT of left-right play, then the adjustable cup (non-drive side) is probably threaded too far in. So yeah, as dsecribed above, you'd be wise to open it up and re-lubricate it anyway, and put it back together properly.
Thank you. 🙏
P.S. Bought this vintage Schwinn bike from an old man for $65, last year, and have been riding it since. As I said the bike rides great. I am planning to clean it up and paint the bike when I find time, since I like this bike, very much.
Thank you. 🙏
09-29-23, 08:32 PM
#9
Why are you even posting? If as you say you have a large enough wrench it would have been faster to pull the crank and tighten that.
The ball bearings work by riding around against the race. With the cup not holding them against the race they are all over the place. Allow a big enough gap and instead of chasing each other they'll start doubling up, allowing the spindle to to twist down
The ball bearings work by riding around against the race. With the cup not holding them against the race they are all over the place. Allow a big enough gap and instead of chasing each other they'll start doubling up, allowing the spindle to to twist down
Likes For abdon:
Likes For Steel1:
09-29-23, 09:31 PM
#11
09-29-23, 09:42 PM
#12
Senior Member
Join Date: Oct 2015
Location: PDX
Posts: 13,517
Bikes: Merz x 5 + Specialized Merz Allez x 2, Strawberry/Newlands/DiNucci/Ti x3, Gordon, Fuso/Moulton x2, Bornstein, Paisley,1958-74 Paramounts x3, 3rensho, 74 Moto TC, 73-78 Raleigh Pro's x5, Marinoni x2, 1960 Cinelli SC, 1980 Bianchi SC, PX-10 X 2
Liked 6,830 Times
in
3,899 Posts
Sure, without special tools, this is how that turns out.
Simply asking that question says it all.
Simply asking that question says it all.
09-29-23, 10:06 PM
#13
Buying (ordering online and getting them delivered) specific tools takes a few days at least. As I said, I have decided to go on a 70-mile ride tomorrow either on this great gear bike, or on my single speed/fixie bike. I prefer to go on the ride on this bike; hence, I am looking for a quick fix, with the tools I already have with me now.
Thank you everyone for your replies. 🙏
By the way, I am planning to order these two tools 👇 (to use for this bike and two other bikes I own). I am thinking of avoiding to order a hook spanner, since a screw driver and hammer can do the same job that a hook spanner does.
https://www.amazon.com/Oumers-Bike-C...6040724&sr=8-2
https://www.amazon.com/109916-HCW-4-...00AOA2G8&psc=1
What other tools do I need to order? Please post the links of the specific tools I would need to remove and repack my bottom bracket. Thank you.🙏
09-29-23, 10:30 PM
#14
Looks like you are on right track. I would not ride until getting it straightened out, because something is very wonky.
HCW-4 is good for drive side (side with chain).
I use HCW-5 for non-drive side.
I think your crank arm puller will work, although I use a Park tool. Mine is CCP-1, looks same as Amazon CCP-22.
HCW-4 is good for drive side (side with chain).
I use HCW-5 for non-drive side.
I think your crank arm puller will work, although I use a Park tool. Mine is CCP-1, looks same as Amazon CCP-22.
09-29-23, 10:31 PM
#15
Senior Member
Join Date: Oct 2015
Location: PDX
Posts: 13,517
Bikes: Merz x 5 + Specialized Merz Allez x 2, Strawberry/Newlands/DiNucci/Ti x3, Gordon, Fuso/Moulton x2, Bornstein, Paisley,1958-74 Paramounts x3, 3rensho, 74 Moto TC, 73-78 Raleigh Pro's x5, Marinoni x2, 1960 Cinelli SC, 1980 Bianchi SC, PX-10 X 2
Liked 6,830 Times
in
3,899 Posts
When I started this thread, I thought it would be a simple and quick repair by threading in the bottom bracket.
Buying (ordering online and getting them delivered) specific tools takes a few days at least. As I said, I have decided to go on a 70-mile ride tomorrow either on this great gear bike, or on my single speed/fixie bike. I prefer to go on the ride on this bike; hence, I am looking for a quick fix, with the tools I already have with me now.
Thank you everyone for your replies. 🙏
By the way, I am planning to order these two tools 👇 (to use for this bike and two other bikes I own). I am thinking of avoiding to order a hook spanner, since a screw driver and hammer can do the same job that a hook spanner does.
https://www.amazon.com/Oumers-Bike-C...6040724&sr=8-2
https://www.amazon.com/109916-HCW-4-...00AOA2G8&psc=1
What other tools do I need to order? Please post the links of the specific tools I would need to remove and repack my bottom bracket. Thank you.🙏
The fixed cup needs to be tightened completely then the NDS, other side cup and lockring are carefully adjusted and tightened to hold the correct preload when done properly.
This is only achieved with good tools, lockring and pin spanner used well and takes practice.
Do not skimp or cheap out, when parts are stuck and you are learning, good tools can save you from yourself.
Tools are cheap, good ones are worth it as they can last a lifetime and save headaches for being able to get the job done when the going gets tough.
I would encourage you to find a good condition Sugino set, I have these, Campy and Park in multiples, the Sugino's have served the best for 50 years.
Likes For merziac:
09-29-23, 11:14 PM
#16
Looks like you are on right track. I would not ride until getting it straightened out, because something is very wonky.
HCW-4 is good for drive side (side with chain).
I use HCW-5 for non-drive side.
I think your crank arm puller will work, although I use a Park tool. Mine is CCP-1, looks same as Amazon CCP-22.
HCW-4 is good for drive side (side with chain).
I use HCW-5 for non-drive side.
I think your crank arm puller will work, although I use a Park tool. Mine is CCP-1, looks same as Amazon CCP-22.
09-30-23, 12:47 AM
#18
Senior Member
Join Date: Oct 2015
Location: PDX
Posts: 13,517
Bikes: Merz x 5 + Specialized Merz Allez x 2, Strawberry/Newlands/DiNucci/Ti x3, Gordon, Fuso/Moulton x2, Bornstein, Paisley,1958-74 Paramounts x3, 3rensho, 74 Moto TC, 73-78 Raleigh Pro's x5, Marinoni x2, 1960 Cinelli SC, 1980 Bianchi SC, PX-10 X 2
Liked 6,830 Times
in
3,899 Posts
I guess all you really need is a hammer, screwdriver, vice grips and a fit all, guess I've been doing it all wrong for a long time.
Likes For merziac:
09-30-23, 05:31 AM
#19
Edumacator
Join Date: Jan 2018
Location: Goose Creek, SC
Posts: 7,570
Bikes: '87 Crestdale, '87 Basso Gap, '92 Rossin Performance EL-OS, 1990 VanTuyl, 1980s Losa, 1985 Trek 670, 1982 AD SLE, 1987 PX10, etc...
Liked 3,596 Times
in
2,259 Posts
The good news is that if you order the proper tools now, you will save a ton of money later.
I would not ride on this bike until you get the BB area sorted out.
If in a hurry, a nearby bike co-op will likely help you do it cheaply (maybe a donation).
A 12�-15� adjustable can be used for the DS fixed cup, but a spanner is better.
Lockring tool, pin spanner, crank extractor tool, 15mm socket wrench will get you there.
__________________
1987 Crest Cannondale, 1987 Basso Gap, 1992 Rossin Performance EL, 1990ish Van Tuyl, 1985 Trek 670, 2003 Pinarello Surprise, 1990ish MBK Atlantique, 1987 Peugeot Competition, 1987 Nishiki Tri-A, 1981 Faggin, 1996 Cannondale M500, 1984 Mercian, 1982 AD SuperLeicht, 1985 Massi (model unknown), 1988 Daccordi Griffe , 1989 Fauxsin MTB, 1981 Ciocc Mockba, 1992 Bianchi Giro, 1977 Colnago Super, 1971 Raleigh International, 1998 Corratec Ap & Dun, 1991 Peugeot Slimestone
1987 Crest Cannondale, 1987 Basso Gap, 1992 Rossin Performance EL, 1990ish Van Tuyl, 1985 Trek 670, 2003 Pinarello Surprise, 1990ish MBK Atlantique, 1987 Peugeot Competition, 1987 Nishiki Tri-A, 1981 Faggin, 1996 Cannondale M500, 1984 Mercian, 1982 AD SuperLeicht, 1985 Massi (model unknown), 1988 Daccordi Griffe , 1989 Fauxsin MTB, 1981 Ciocc Mockba, 1992 Bianchi Giro, 1977 Colnago Super, 1971 Raleigh International, 1998 Corratec Ap & Dun, 1991 Peugeot Slimestone
Likes For jdawginsc:
09-30-23, 05:36 AM
#20
Edumacator
Join Date: Jan 2018
Location: Goose Creek, SC
Posts: 7,570
Bikes: '87 Crestdale, '87 Basso Gap, '92 Rossin Performance EL-OS, 1990 VanTuyl, 1980s Losa, 1985 Trek 670, 1982 AD SLE, 1987 PX10, etc...
Liked 3,596 Times
in
2,259 Posts
https://www.ebay.com/itm/28452763277...Bk9SR6yV8d3cYg
This would be a good start at a reasonable price.
This would be a good start at a reasonable price.
__________________
1987 Crest Cannondale, 1987 Basso Gap, 1992 Rossin Performance EL, 1990ish Van Tuyl, 1985 Trek 670, 2003 Pinarello Surprise, 1990ish MBK Atlantique, 1987 Peugeot Competition, 1987 Nishiki Tri-A, 1981 Faggin, 1996 Cannondale M500, 1984 Mercian, 1982 AD SuperLeicht, 1985 Massi (model unknown), 1988 Daccordi Griffe , 1989 Fauxsin MTB, 1981 Ciocc Mockba, 1992 Bianchi Giro, 1977 Colnago Super, 1971 Raleigh International, 1998 Corratec Ap & Dun, 1991 Peugeot Slimestone
1987 Crest Cannondale, 1987 Basso Gap, 1992 Rossin Performance EL, 1990ish Van Tuyl, 1985 Trek 670, 2003 Pinarello Surprise, 1990ish MBK Atlantique, 1987 Peugeot Competition, 1987 Nishiki Tri-A, 1981 Faggin, 1996 Cannondale M500, 1984 Mercian, 1982 AD SuperLeicht, 1985 Massi (model unknown), 1988 Daccordi Griffe , 1989 Fauxsin MTB, 1981 Ciocc Mockba, 1992 Bianchi Giro, 1977 Colnago Super, 1971 Raleigh International, 1998 Corratec Ap & Dun, 1991 Peugeot Slimestone
09-30-23, 05:38 AM
#21
Full Member
Join Date: May 2015
Location: Mason Ohio
Posts: 286
Bikes: '85 Schwinn Madison, '46 Higgins Ultralite, 50s Wally Green, '85 Trek 660, '82 3Rensho Super Record Export, '90 Trek 970, '91 Schwinn Paramount, '78 Dawes, '78 Trek 730, ‘69 Raleigh Professional, '97 Waterford 1200
Liked 338 Times
in
136 Posts
Service it, but probably a candidate for a sealed BB replacement, much less maintenance required.
09-30-23, 06:03 AM
#22
Happy With My Bikes

Join Date: Sep 2020
Location: Oklahoma
Posts: 2,487
Bikes: Hi-Ten bike boomers, a Trek Domane and some projects
Liked 2,769 Times
in
1,282 Posts
I zoomed in on the first picture posted, and it looks like the fixed cup may be cross threaded. I suspect the inside of that bottom bracket may hold a lot of surprises. I would plan on fixing it over planning a 70 mile ride on it.
__________________
"It is the unknown around the corner that turns my wheels." -- Heinz St�cke
"It is the unknown around the corner that turns my wheels." -- Heinz St�cke
09-30-23, 06:22 AM
#23
Senior Member

Join Date: May 2008
Location: Fredericksburg, Va
Posts: 9,711
Bikes: '65 Frejus TDF, '73 Bottecchia Giro d'Italia, '83 Colnago Superissimo, '84 Trek 610, '84 Trek 760, '88 Pinarello Veneto, '88 De Rosa Pro, '89 Pinarello Montello, '94 Burley Duet, 97 Specialized RockHopper, 2010 Langster, Tern Link D8
Liked 2,327 Times
in
1,162 Posts
[MENTION=542515]Eyes Roll[/MENTION] - There is no quick fix
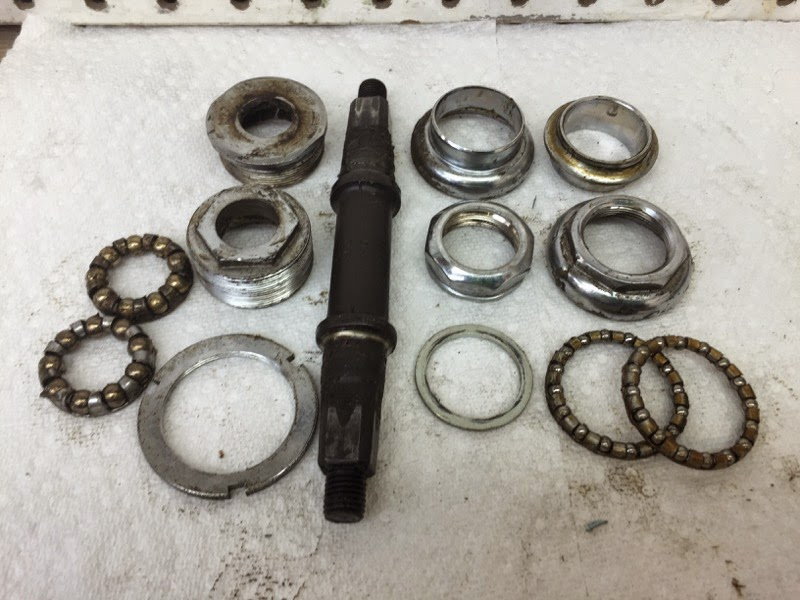
1. disassemble
2. Clean, clean clean clean.
3. Inspect for damage
4. Either reassemble or replace with new BB.
I would be surprised if any of the BB parts are not damaged. These pictures look like it has been in this condition for a long time. It also looks like the last assembly steps were done in reverse, look how close the NDS crank arm is to the BB shell. That just doesn't look right.
This is all based on the assumption the BB is the right size for the shell, 68 vs. 70.
The fixed cup needs to be really tight which necessitates not having the DS crank installed and would be even better if the spindle and bearings were not install yet..
The videos presented using a vice grip is very disturbing. Why would anyone intentionally damage parts unless they were going to discard them? A lot of lock rings are chrome plated. Using plyers or vice grips will break the chrome plating with a result of more rust. Given the amount of dirt, it is inevitable.
__________________
Bikes don't stand alone. They are two tired.
Bikes don't stand alone. They are two tired.
09-30-23, 06:40 AM
#24
Why are you even posting? If as you say you have a large enough wrench it would have been faster to pull the crank and tighten that.
The ball bearings work by riding around against the race. With the cup not holding them against the race they are all over the place. Allow a big enough gap and instead of chasing each other they'll start doubling up, allowing the spindle to to twist down
The ball bearings work by riding around against the race. With the cup not holding them against the race they are all over the place. Allow a big enough gap and instead of chasing each other they'll start doubling up, allowing the spindle to to twist down
 09-30-23, 06:41 AM
#25
SE Wis
Join Date: Apr 2005
Location: Milwaukee, WI
Posts: 10,821
Bikes: '68 Raleigh Sprite, '02 Raleigh C500, '84 Raleigh Gran Prix, '91 Trek 400, 2013 Novara Randonee, 1990 Trek 970
Liked 3,661 Times
in
2,205 Posts