


Thickest, stuckest seat post
 11-15-21, 07:34 AM
#26
Full Member
Thread Starter
Join Date: Feb 2020
Location: Little Rock, AR
Posts: 276
Bikes: Lots of Schwinns
Mentioned: 4 Post(s)
Tagged: 0 Thread(s)
Quoted: 109 Post(s)
Liked 250 Times
in
114 Posts
While I'm a good customer of my local Ace..for the last 30 years...you can buy step bits on amazon for $15-$25. Some are low quality(though some good brands are there too)..you're drilling out soft aluminum, slightly more challenging for a bit than a good hardwood. Actually a cheap bit might be a plus as you'd like it to stop cutting when it hits steel.
Seems like a good method as long as the starter hole is centered. I had a bike shop remove a stuck post years ago. While they got it out and only charged me $100(3+ hours they futzed with it), someone used a sawzall at some point and sliced a small (3/8ths inch) slit-hole in the seat tube. Small, but definitely there once the paint chipped off enough to see it. No idea if they knew they did it. It wasn't visible initially as it didn't come through the paint. Ended up giving the bike(a very nice bike..) to the son of a good friend. An added "decal" electrical tape pinstripe around the seat tube and good to go. He's 26 and starting an adult cycling habit. He loves the bike..so did I..
Seems like a good method as long as the starter hole is centered. I had a bike shop remove a stuck post years ago. While they got it out and only charged me $100(3+ hours they futzed with it), someone used a sawzall at some point and sliced a small (3/8ths inch) slit-hole in the seat tube. Small, but definitely there once the paint chipped off enough to see it. No idea if they knew they did it. It wasn't visible initially as it didn't come through the paint. Ended up giving the bike(a very nice bike..) to the son of a good friend. An added "decal" electrical tape pinstripe around the seat tube and good to go. He's 26 and starting an adult cycling habit. He loves the bike..so did I..
agreed, he had suggested going to a 1" max step bit which I only could find at Ace, I think that would be cutting it pretty close 25.4MM in a 27.2MM seat tube. I ordered the one he pictured with a max of 7/8 for $10 from Amazon. That should be 22MM which is the same as another person posted using a 22MM bit. I hope to avoid the saws all, but if I do need it, I have to bore the hole quite a bit bigger to fit it in there anyway. I could also use a hand hacksaw to finish it off if need be
thanks for the input, this sucker is coming out!
Last edited by justcynn; 11-15-21 at 07:38 AM.
 11-15-21, 07:46 AM
#27

Senior Member
Join Date: May 2008
Location: Fredericksburg, Va
Posts: 9,579
Bikes: '65 Frejus TDF, '73 Bottecchia Giro d'Italia, '83 Colnago Superissimo, '84 Trek 610, '84 Trek 760, '88 Pinarello Veneto, '88 De Rosa Pro, '89 Pinarello Montello, '94 Burley Duet, 97 Specialized RockHopper, 2010 Langster, Tern Link D8
Mentioned: 73 Post(s)
Tagged: 0 Thread(s)
Quoted: 1609 Post(s)
Liked 2,216 Times
in
1,103 Posts
I have one experience with a stuck post.
Treated it for months with Kroil. At the time it belonged to a person who used the same storage room at work. The saddle clamp was a separate part and had broken free enough to just rotate.
First step was to drill a hole through it to use it as a leaver for twisting. No go.
The bike was partially stripped during a weekend (Wash DC) and he replaced the bike. I offered to purchase and he sold for $50 sans wheels, stem, handlebar and brake levers.
All my attempts of a mechanical removal failed to extract it but mangled the remains of the post.
 P1030267 on Flickr
Even tried to saw it out but it was too far in, maybe 12". Note the bolt configuration to spread the saddle lug clamp.
 P1030271 on Flickr
Gave up and attacked with Lye.
Did this outside because the chemical reaction is H2 and it gets hot. Tried to plug the clamp area and inverted the frame.
 P1030273 on Flickr
Tried the Drano approach but it was not aggressive enough. Went directly to lye crystals. Pored it into the BB and got a quick reaction with lots of vapors and foam.
 P1030283 on Flickr
Not enough heat to damage the paint but you can't touch the frame. Located the clamp as far from the saddle lug as possible, only 100cc of lye solution at a time.
I think I did 4 treatments. Some paint damage from the leaks.
There was progress.
 P1030290 on Flickr
I finally got it out
 WP_20160107_001 on Flickr
Paint damage is what it was. Better than trashing the frame.
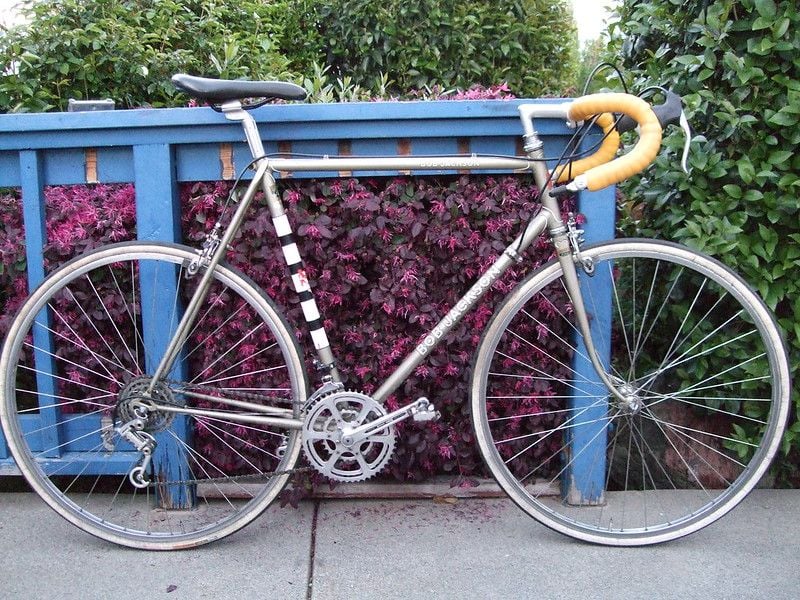
 Langster Seat Cluster by Patrick Boulden, on Flickr
The wheels were purchased off craigs list and the rest was in the stash except the BB needed replacement and the 42 tooth ring was replaced with 46. Rear 16t sprocket purchased as well along with a chain.
 2010 Langster Steel 61cm on Flickr
Treated it for months with Kroil. At the time it belonged to a person who used the same storage room at work. The saddle clamp was a separate part and had broken free enough to just rotate.
First step was to drill a hole through it to use it as a leaver for twisting. No go.
The bike was partially stripped during a weekend (Wash DC) and he replaced the bike. I offered to purchase and he sold for $50 sans wheels, stem, handlebar and brake levers.
All my attempts of a mechanical removal failed to extract it but mangled the remains of the post.
P1030267 on FlickrEven tried to saw it out but it was too far in, maybe 12". Note the bolt configuration to spread the saddle lug clamp.
P1030271 on FlickrGave up and attacked with Lye.
Did this outside because the chemical reaction is H2 and it gets hot. Tried to plug the clamp area and inverted the frame.
P1030273 on FlickrTried the Drano approach but it was not aggressive enough. Went directly to lye crystals. Pored it into the BB and got a quick reaction with lots of vapors and foam.
P1030283 on FlickrNot enough heat to damage the paint but you can't touch the frame. Located the clamp as far from the saddle lug as possible, only 100cc of lye solution at a time.
I think I did 4 treatments. Some paint damage from the leaks.
There was progress.
P1030290 on FlickrI finally got it out
WP_20160107_001 on FlickrPaint damage is what it was. Better than trashing the frame.
Langster Seat Cluster by Patrick Boulden, on FlickrThe wheels were purchased off craigs list and the rest was in the stash except the BB needed replacement and the 42 tooth ring was replaced with 46. Rear 16t sprocket purchased as well along with a chain.
2010 Langster Steel 61cm on Flickr
__________________
Bikes don't stand alone. They are two tired.
Bikes don't stand alone. They are two tired.
Likes For SJX426:
11-15-21, 08:05 AM
#28
Full Member
That has got to be the craziest seat post I have ever seen. I would go with drill it out till it is thin enough to peel away from seat tube?
I too would like to take a stab at a stuck seatpost bike just for ***** and giggles. Good luck!
I too would like to take a stab at a stuck seatpost bike just for ***** and giggles. Good luck!
11-15-21, 10:23 AM
#29
Full Member

Join Date: Oct 2019
Posts: 170
Bikes: Fuji Touring Series V 1985, Motobecane Grand Touring 1982, Specialized Stumpjumper 1993, Raleigh International 1972, Raleigh Grand Prix 1972, Kuwahara Count 1983, Trek Cirrus 1987, Shogun 2001 1983, Cannondale SM700 1990
Mentioned: 1 Post(s)
Tagged: 0 Thread(s)
Quoted: 90 Post(s)
Liked 174 Times
in
96 Posts
damn thats a thicky. the large drill bit method looks easiest method. I dont recommend using bismuth to embrittle the post cause you will still need to grind it out and its messy
11-15-21, 05:13 PM
#30
Edumacator
Join Date: Jan 2018
Location: Goose Creek, SC
Posts: 6,892
Bikes: '87 Crestdale, '87 Basso Gap, '92 Rossin Performance EL-OS, 1990 VanTuyl, 1980s Losa, 1985 Trek 670, 1982 AD SLE, 1987 PX10, etc...
Mentioned: 59 Post(s)
Tagged: 0 Thread(s)
Quoted: 2469 Post(s)
Liked 3,185 Times
in
2,005 Posts
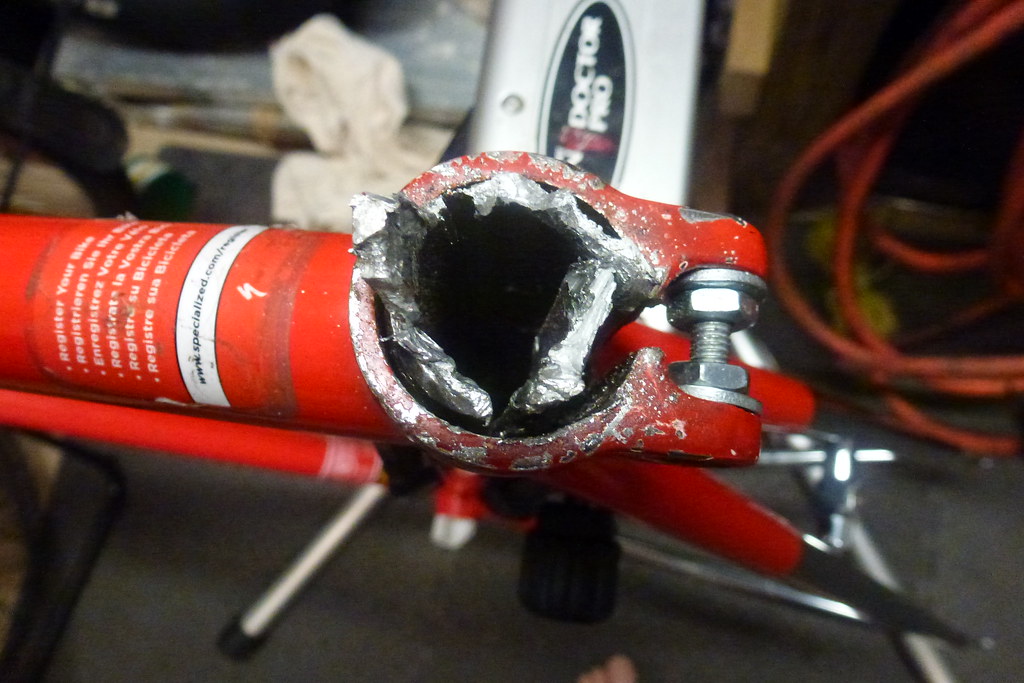
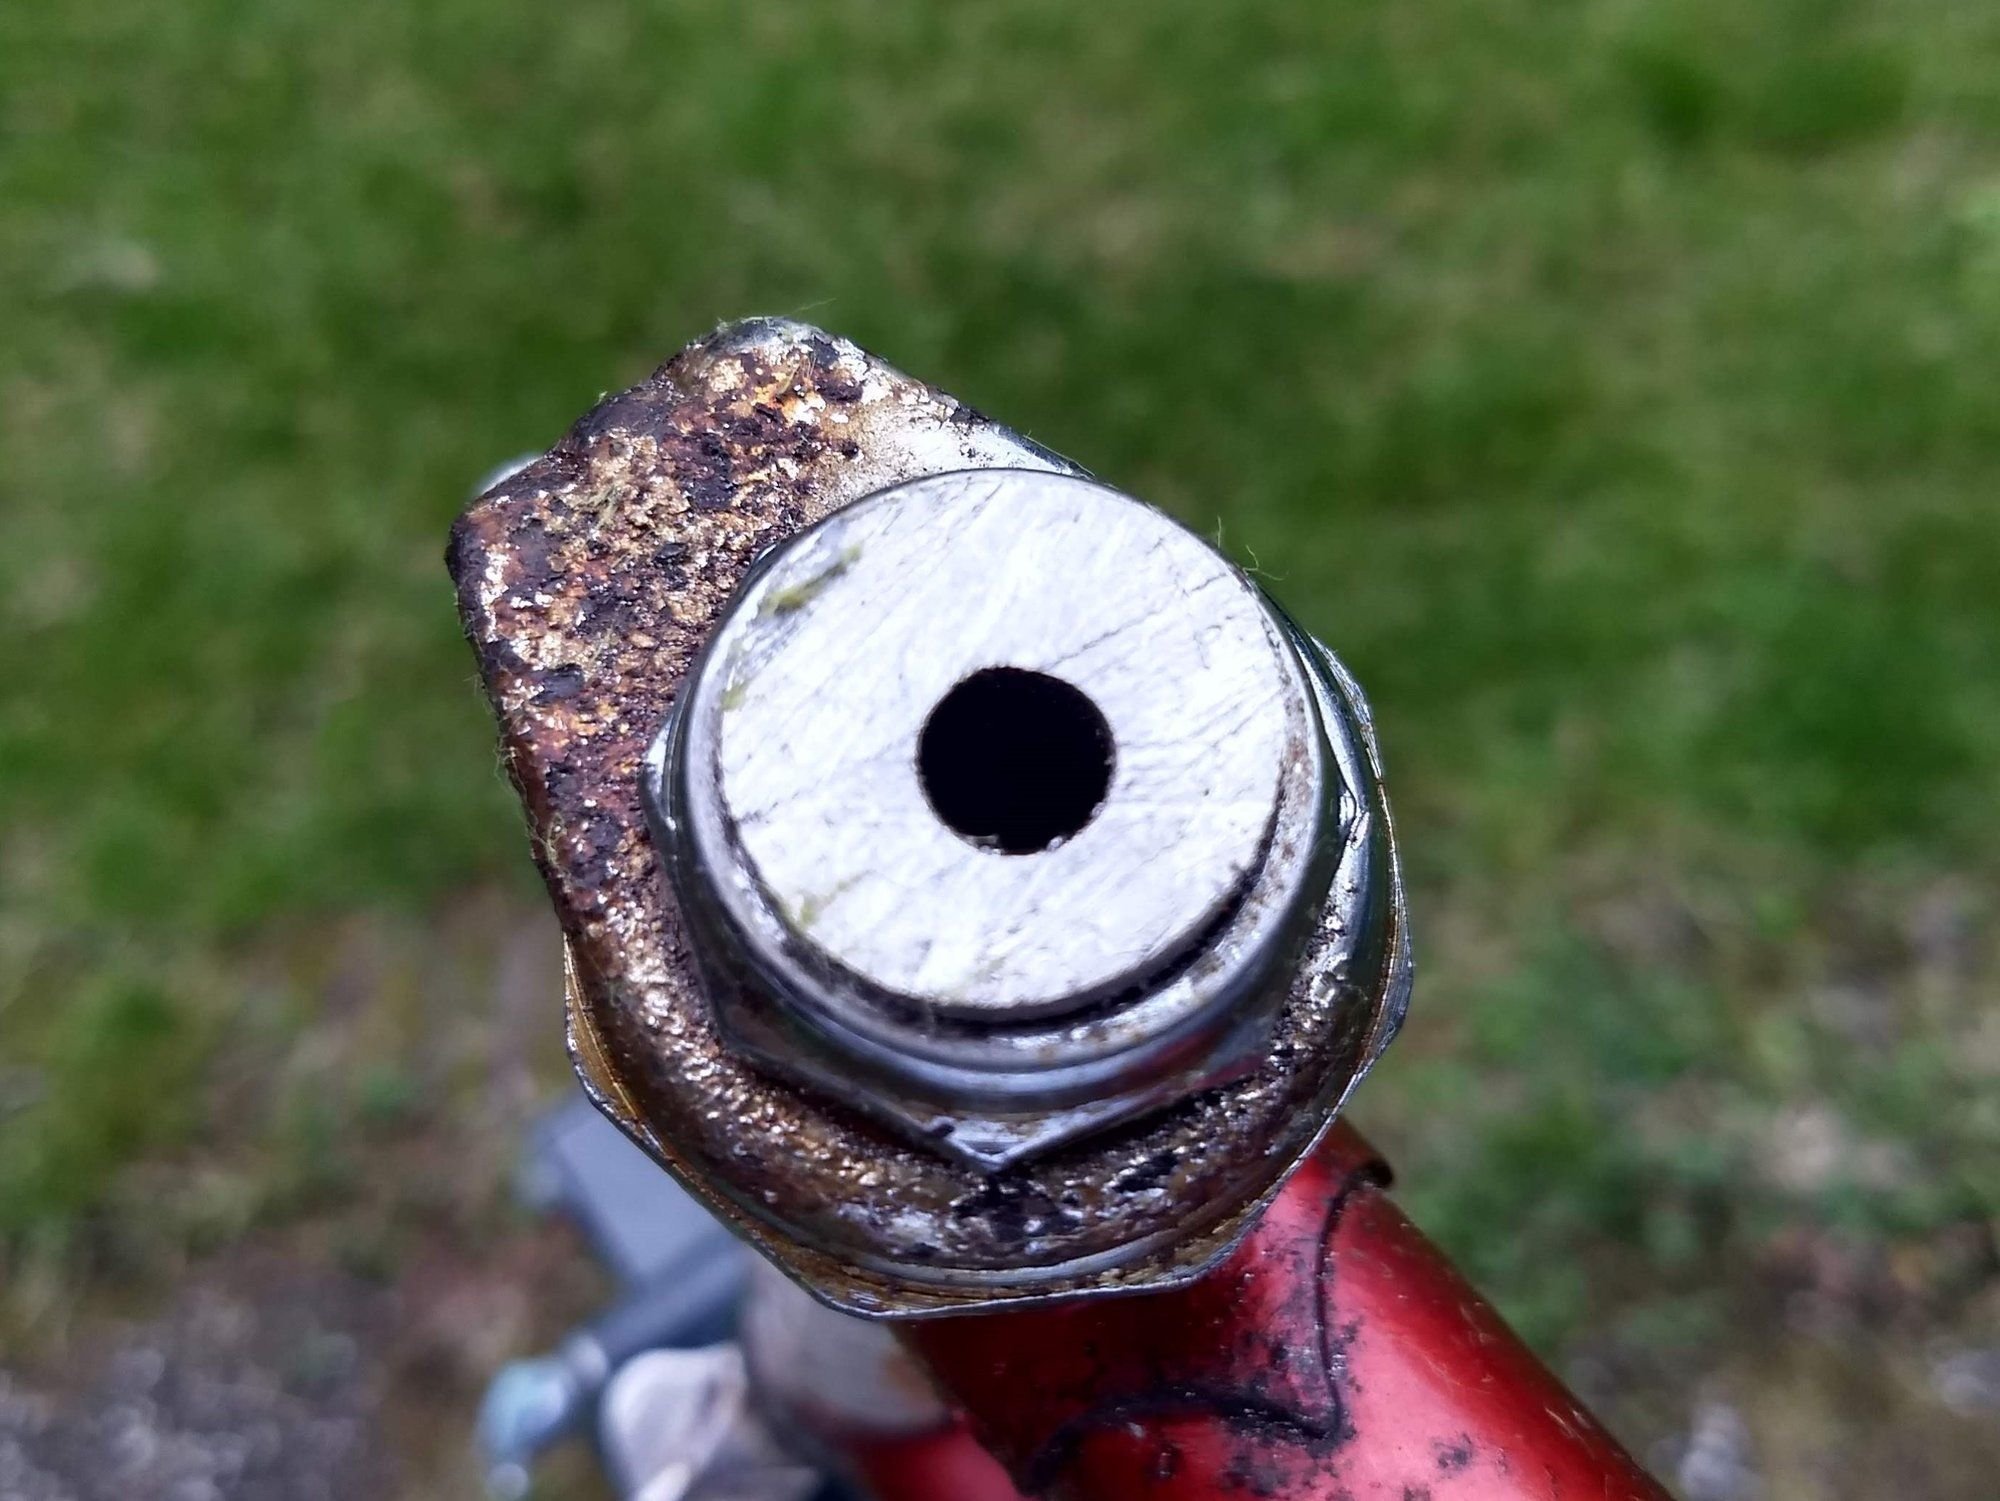
so, the find of the day turns out to have the thickest and very stuck seat post I have encountered. To make matters worse, is about 6-7 inches into the seat tube. This Reynolds 531 frame may not make it...
First I started with Drano, no luck. Then I cut it off and had planned to cut it out and discovered just how thick the side walls are...
I have read the lye ideas, prob not something I would want to try. Mostly interested in cutting it out, but I don't think my sawzall blade will fit. Maybe bore it out with a drill first? other ideas?
First of all, what the %$#^%@&#$ seatpost is that thick?
Secondly, that photo is cool...it almost looks like an acrylic painting.
__________________
1987 Crest Cannondale, 1987 Basso Gap, 1992 Rossin Performance EL, 1990ish Van Tuyl, 1985 Trek 670, 2003 Pinarello Surprise, 1990ish MBK Atlantique, 1987 Peugeot Competition, 1987 Nishiki Tri-A, 1981 Faggin, 1996 Cannondale M500, 1984 Mercian, 1982 AD SuperLeicht, 1985 Massi (model unknown), 1988 Daccordi Griffe , 1989 Fauxsin MTB, 1981 Ciocc Mockba, 1992 Bianchi Giro, 1977 Colnago Super, 1971 Raleigh International, 1998 Corratec Ap & Dun, 1991 Peugeot Slimestone
1987 Crest Cannondale, 1987 Basso Gap, 1992 Rossin Performance EL, 1990ish Van Tuyl, 1985 Trek 670, 2003 Pinarello Surprise, 1990ish MBK Atlantique, 1987 Peugeot Competition, 1987 Nishiki Tri-A, 1981 Faggin, 1996 Cannondale M500, 1984 Mercian, 1982 AD SuperLeicht, 1985 Massi (model unknown), 1988 Daccordi Griffe , 1989 Fauxsin MTB, 1981 Ciocc Mockba, 1992 Bianchi Giro, 1977 Colnago Super, 1971 Raleigh International, 1998 Corratec Ap & Dun, 1991 Peugeot Slimestone
11-15-21, 05:59 PM
#31
Full Member
Thread Starter
Join Date: Feb 2020
Location: Little Rock, AR
Posts: 276
Bikes: Lots of Schwinns
Mentioned: 4 Post(s)
Tagged: 0 Thread(s)
Quoted: 109 Post(s)
Liked 250 Times
in
114 Posts
fear not. That sucker is coming out one way or another. Even if it takes a year or more. It took 33 years to get that stuck.
and now that you say it- that seat post pic will make a good reminder in the bike shop. Framed and hung. (After the post is defeated!)
11-15-21, 07:02 PM
#33
Senior Member
Join Date: Mar 2021
Location: Beaverton, OR
Posts: 1,439
Bikes: You had me at rusty and Italian!!
Mentioned: 31 Post(s)
Tagged: 0 Thread(s)
Quoted: 566 Post(s)
Liked 1,057 Times
in
548 Posts
That is quite a seat post!!
I�m liking the idea of threaded rod and a slide hammer. Second choice would be the step drill bit. Regular feeding with your favorite penetrating fluid is a given.
Personally, not a fan of caustics but I�m very averse to strong chemicals in general.
I�m liking the idea of threaded rod and a slide hammer. Second choice would be the step drill bit. Regular feeding with your favorite penetrating fluid is a given.
Personally, not a fan of caustics but I�m very averse to strong chemicals in general.
Likes For RustyJames:
11-15-21, 08:06 PM
#35
Senior Member
Join Date: Sep 2017
Location: Eastern Shore, MD
Posts: 2,107
Bikes: Road ready: 1993 Koga Miyata City Liner Touring Hybrid, 1989 Centurion Sport DLX, "I Blame GP" Bridgestone CB-1. Projects: Yea, I got a problem....
Mentioned: 24 Post(s)
Tagged: 0 Thread(s)
Quoted: 754 Post(s)
Liked 737 Times
in
422 Posts
RJ The Bike Guy has a Youtube video illustrating the use of an impact driver to remove a seat post. I thing you might have enough of a stub left to try it.
11-16-21, 07:24 AM
#36
Senior Member
Join Date: Feb 2016
Location: SE Wisconsin
Posts: 1,852
Bikes: Lemond '01 Maillot Jaune, Lemond '02 Victoire, Lemond '03 Poprad, Lemond '03 Wayzata DB conv(Poprad), '79 AcerMex Windsor Carrera Professional(pur new), '88 GT Tequesta(pur new), '01 Bianchi Grizzly, 1993 Trek 970 DB conv, Trek 8900 DB conv
Mentioned: 12 Post(s)
Tagged: 0 Thread(s)
Quoted: 759 Post(s)
Likes: 0
Liked 810 Times
in
471 Posts
RJ The Bike Guy has a Youtube video illustrating the use of an impact driver to remove a seat post. I thing you might have enough of a stub left to try it.
https://www.youtube.com/watch?v=P-Yp...l=RJTheBikeGuy
https://www.youtube.com/watch?v=P-Yp...l=RJTheBikeGuy
11-16-21, 10:39 AM
#37
Ride, Wrench, Swap, Race

Join Date: Jan 2010
Location: Northern California
Posts: 9,196
Bikes: Cheltenham-Pedersen racer, Boulder F/S Paris-Roubaix, Varsity racer, '52 Christophe, '62 Continental, '92 Merckx, '75 Limongi, '76 Presto, '72 Gitane SC, '71 Schwinn SS, etc.
Mentioned: 132 Post(s)
Tagged: 0 Thread(s)
Quoted: 1566 Post(s)
Liked 1,299 Times
in
867 Posts
I can see how the high frequency cyclic torque is putting enough twist into the seatpost along it's length to progressively break the bond from top to bottom, so would work most effectively on thinner posts and which may be frozen along a greater length.
I've similarly used a back-and forth twisting, by hand, but which took a very long time to break a really-stuck post free.
For the OP's post, the thick walls up top allow more torque to be applied without tearing the post at the drilled holes.
It also might be possible to drill out the thick upper end of the post just enough to get a slender (or further slenderized, using a grinder, yes I've done this) sawzall blade well in there.
Note that a single slot, down to bare steel along the entire(!) length of the slot, will allow any post to be twisted out (the slot can remain bridged in the upper clamping area however).
But often one fails to remove some "bridge" of aluminum below the seat lug, which keeps the corrosion bond in compression, so the post won't move.
Even a sharpened (at the tip) Sawzall blade will not get any bite into the inside of the steel seat tube, unless it contacts the top edge of the seat tube where enough contact-force concentration (pressure) can allow the teeth to bite into the steel surface.
A steel probe like a sharpened and bent spoke can/should be used to verify that no more aluminum is bridging the slot anywhere along it's length before twisting it out.
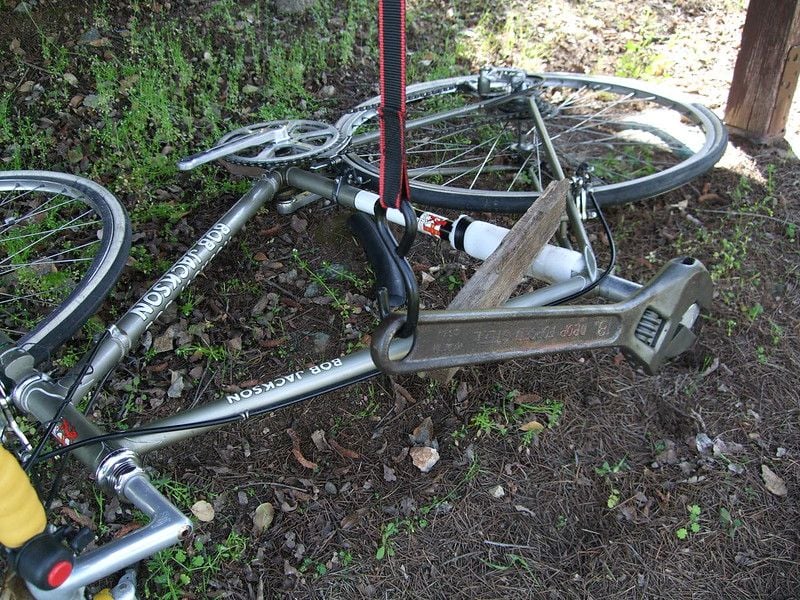
Removed this stubborn post from my Bob Jackson after numerous other approaches (including dry ice) as shown below., and there was absolutely no evidence of any cutting into the steel ID of the seat tube. I probed it with the bent spoke and it was perfectly smooth inside after all of the Sawzall activity.
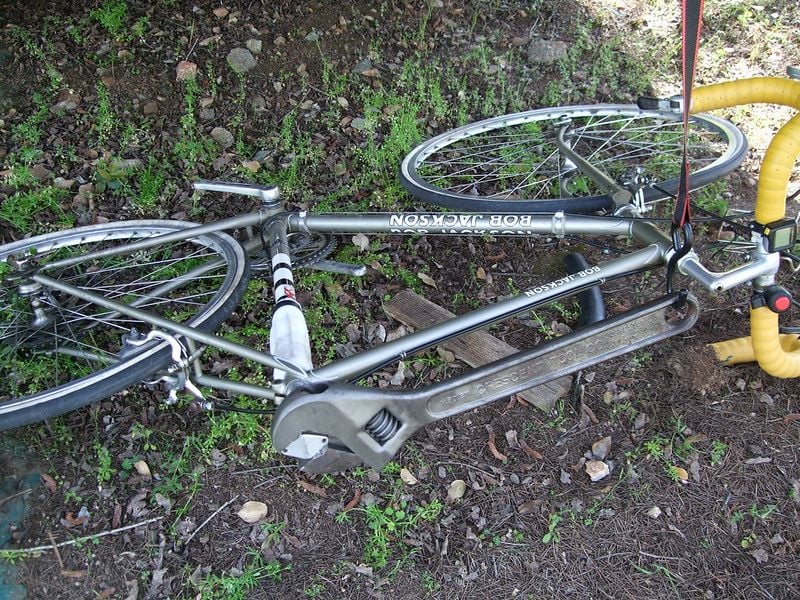


A couple of other considerations might be, 1) What tools does one have or want to buy, 2) Will there be too much stress on minimalist seatstay top eyes, and 3) What skillset does the operator feel most comfortable exploiting.
There is also this possibility, where an oversized steel post had been pounded in decades earlier and just was not wanting to budge (a steel post can not be sawed out):

I've similarly used a back-and forth twisting, by hand, but which took a very long time to break a really-stuck post free.
For the OP's post, the thick walls up top allow more torque to be applied without tearing the post at the drilled holes.
It also might be possible to drill out the thick upper end of the post just enough to get a slender (or further slenderized, using a grinder, yes I've done this) sawzall blade well in there.
Note that a single slot, down to bare steel along the entire(!) length of the slot, will allow any post to be twisted out (the slot can remain bridged in the upper clamping area however).
But often one fails to remove some "bridge" of aluminum below the seat lug, which keeps the corrosion bond in compression, so the post won't move.
Even a sharpened (at the tip) Sawzall blade will not get any bite into the inside of the steel seat tube, unless it contacts the top edge of the seat tube where enough contact-force concentration (pressure) can allow the teeth to bite into the steel surface.
A steel probe like a sharpened and bent spoke can/should be used to verify that no more aluminum is bridging the slot anywhere along it's length before twisting it out.
Removed this stubborn post from my Bob Jackson after numerous other approaches (including dry ice) as shown below., and there was absolutely no evidence of any cutting into the steel ID of the seat tube. I probed it with the bent spoke and it was perfectly smooth inside after all of the Sawzall activity.
A couple of other considerations might be, 1) What tools does one have or want to buy, 2) Will there be too much stress on minimalist seatstay top eyes, and 3) What skillset does the operator feel most comfortable exploiting.
There is also this possibility, where an oversized steel post had been pounded in decades earlier and just was not wanting to budge (a steel post can not be sawed out):
Last edited by dddd; 11-16-21 at 10:47 AM.
Likes For dddd:
11-16-21, 12:17 PM
#38
Shifting is fun!

Join Date: Aug 2009
Location: South Holland, NL
Posts: 11,021
Bikes: Yes, please.
Mentioned: 283 Post(s)
Tagged: 0 Thread(s)
Quoted: 2202 Post(s)
Liked 4,638 Times
in
1,777 Posts
Some more anecdotal evidence.
With a stuck seatpost I may be inclined to use brute-ish force, but with a stem I am more reluctant, afraid to damage the fork in one way or another.
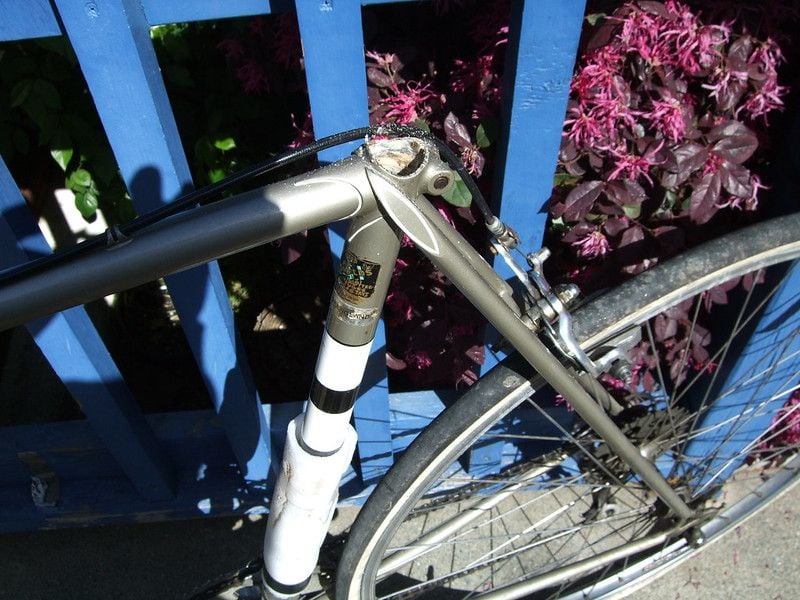
So when I was confronted with this stuck stem I did not see many options ...
... and I decided to get the drain cleaner, the vase and the gloves, as well as the adult beverage per dddd 's example. Sat for a couple of hours sipping the aforementioned beverage and looking at this happily bubbling away, adding some fresh drain cleaner every now and then:
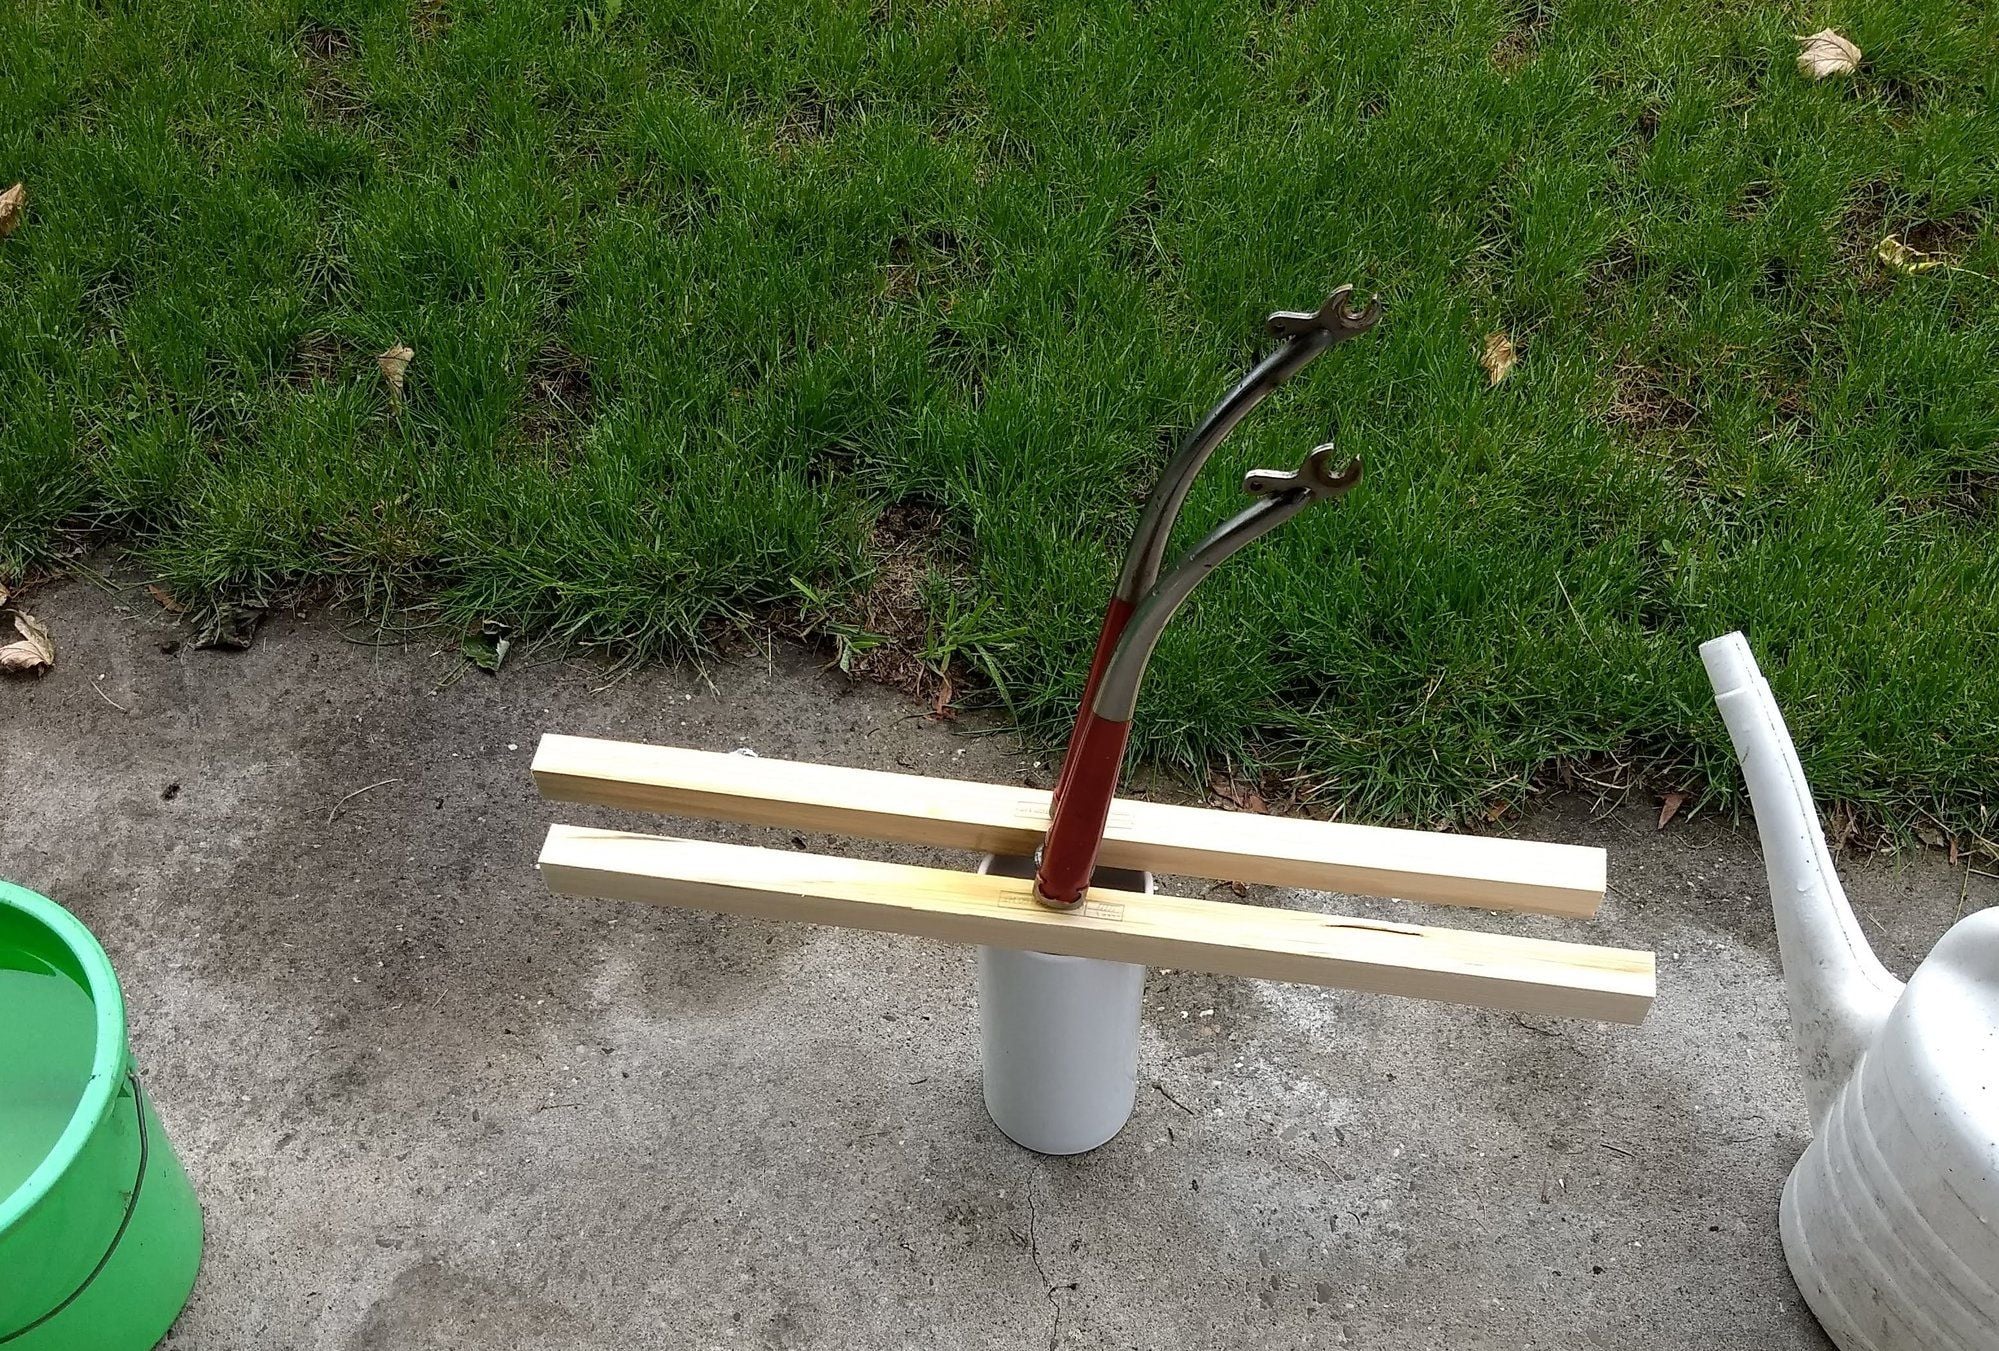
It may have taken a couple of years off my life expectancy, but it was the easiest wrenching ever. Result!

With a stuck seatpost I may be inclined to use brute-ish force, but with a stem I am more reluctant, afraid to damage the fork in one way or another.
So when I was confronted with this stuck stem I did not see many options ...
... and I decided to get the drain cleaner, the vase and the gloves, as well as the adult beverage per dddd 's example. Sat for a couple of hours sipping the aforementioned beverage and looking at this happily bubbling away, adding some fresh drain cleaner every now and then:
It may have taken a couple of years off my life expectancy, but it was the easiest wrenching ever. Result!
Likes For non-fixie:
11-16-21, 03:22 PM
#39
Senior Member

Join Date: Nov 2014
Location: Eugene, Oregon, USA
Posts: 27,545
Mentioned: 217 Post(s)
Tagged: 0 Thread(s)
Quoted: 18398 Post(s)
Liked 4,525 Times
in
3,361 Posts
A little late now, but I don't think my first option would be to cut off the seat post.
That takes away a lot of options such as putting the post in a vise and using the frame as a wrench. Also, if you have access to the seat tube through the bottom bracket,an intact seat post would be easier to treat with a penetrating oil, or lye.
That takes away a lot of options such as putting the post in a vise and using the frame as a wrench. Also, if you have access to the seat tube through the bottom bracket,an intact seat post would be easier to treat with a penetrating oil, or lye.
11-16-21, 03:47 PM
#40

Thrifty Bill
Join Date: Jan 2008
Location: Mountains of Western NC
Posts: 23,526
Bikes: 86 Katakura Silk, 87 Prologue X2, 88 Cimarron LE, 1975 Sekai 4000 Professional, 73 Paramount, plus more
Mentioned: 96 Post(s)
Tagged: 0 Thread(s)
Quoted: 1236 Post(s)
Liked 965 Times
in
629 Posts
Just a couple of observations, having dealt with dozens of stuck posts and stems. The vise and twist method can sometimes work, but I can put more twisting force on a frame is designed to take. As a result I have bent frames.
Cutting them out is always an option, just be careful, Seat posts tend to have a thick wall. Frame seat tubes tend to be THIN.
As far as drain cleaners/caustic soda methods, I highly recommend people NOT do this unless they have complete safety gear including SPLASH googles. Worst industrial accident in my career was an employee who was BLINDED in both eyes by relatively dilute caustic soda. Another accident (fortunately not in the eyes) resulted in extensive skin grafts. Caustic soda works, and it will dissolve body tissue as well as aluminum seat posts.
With my background, I am willing and able to use a variety of chemical products. Caustic soda is one I avoid.
I've never tried the impact driver, but it makes a lot of sense and I will try it in the future!
bill
Chem E PE.
Last edited by wrk101; 11-16-21 at 03:57 PM.
11-16-21, 08:10 PM
#41
Senior Member

Join Date: Mar 2014
Location: City of Angels
Posts: 4,870
Bikes: A few too many
Mentioned: 42 Post(s)
Tagged: 1 Thread(s)
Quoted: 1364 Post(s)
Liked 2,182 Times
in
1,184 Posts
I can see how the high frequency cyclic torque is putting enough twist into the seatpost along it's length to progressively break the bond from top to bottom, so would work most effectively on thinner posts and which may be frozen along a greater length.
I've similarly used a back-and forth twisting, by hand, but which took a very long time to break a really-stuck post free.
I've similarly used a back-and forth twisting, by hand, but which took a very long time to break a really-stuck post free.
 What type did you use on the inside of the frame?
Best, Ben
__________________
"EVERY PERSON IS GUILTY OF ALL THE GOOD THEY DID NOT DO"
Voltaire
Voice recognition may sometimes create odd spelling and grammatical errors
"EVERY PERSON IS GUILTY OF ALL THE GOOD THEY DID NOT DO"
Voltaire
Voice recognition may sometimes create odd spelling and grammatical errors
11-16-21, 08:27 PM
#42
Ride, Wrench, Swap, Race
Join Date: Jan 2010
Location: Northern California
Posts: 9,196
Bikes: Cheltenham-Pedersen racer, Boulder F/S Paris-Roubaix, Varsity racer, '52 Christophe, '62 Continental, '92 Merckx, '75 Limongi, '76 Presto, '72 Gitane SC, '71 Schwinn SS, etc.
Mentioned: 132 Post(s)
Tagged: 0 Thread(s)
Quoted: 1566 Post(s)
Liked 1,299 Times
in
867 Posts
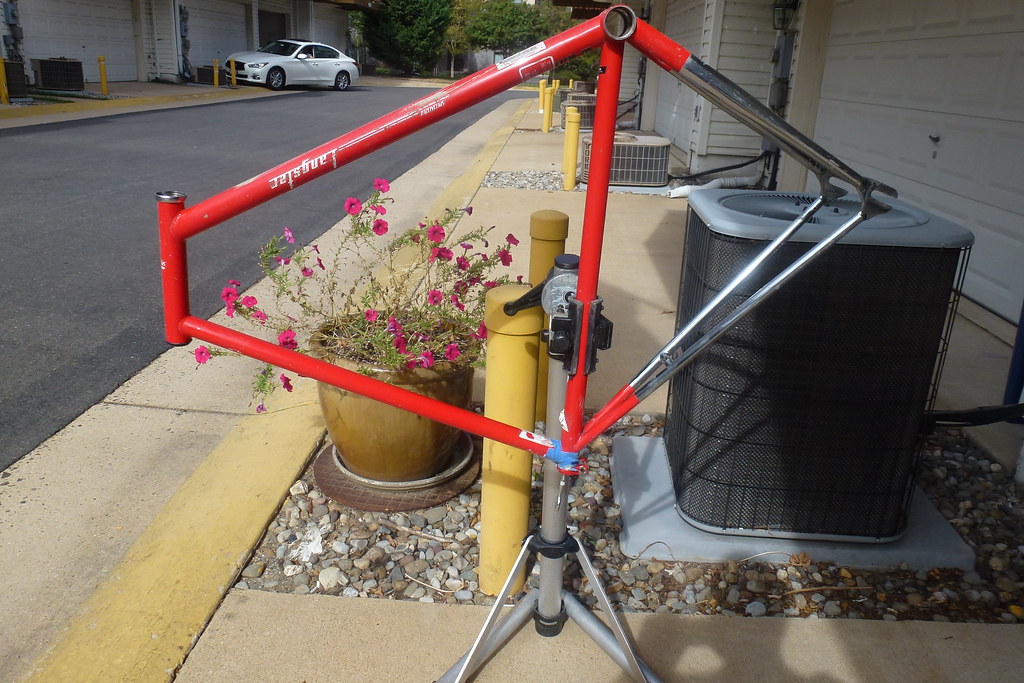
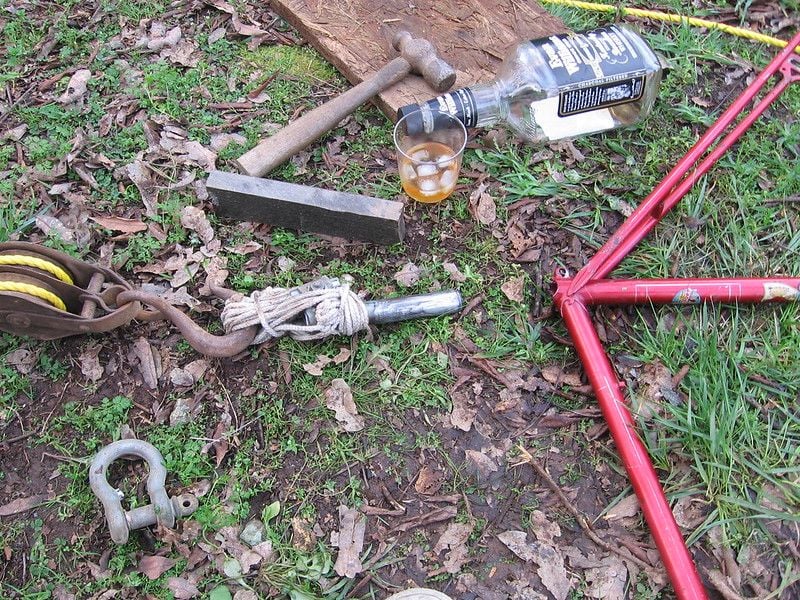
Not only did the 2-ton pulling force alone not remove the post, it took a simultaneous beating on the seat tube (using the 2# hammer and Trex block as shown) for some minutes in order for the post to slowly creep out of the seat tube.
Yeah, worked on that one for weeks, good reason for celebration!
11-16-21, 08:28 PM
#43
Full Member
Thread Starter
Join Date: Feb 2020
Location: Little Rock, AR
Posts: 276
Bikes: Lots of Schwinns
Mentioned: 4 Post(s)
Tagged: 0 Thread(s)
Quoted: 109 Post(s)
Liked 250 Times
in
114 Posts
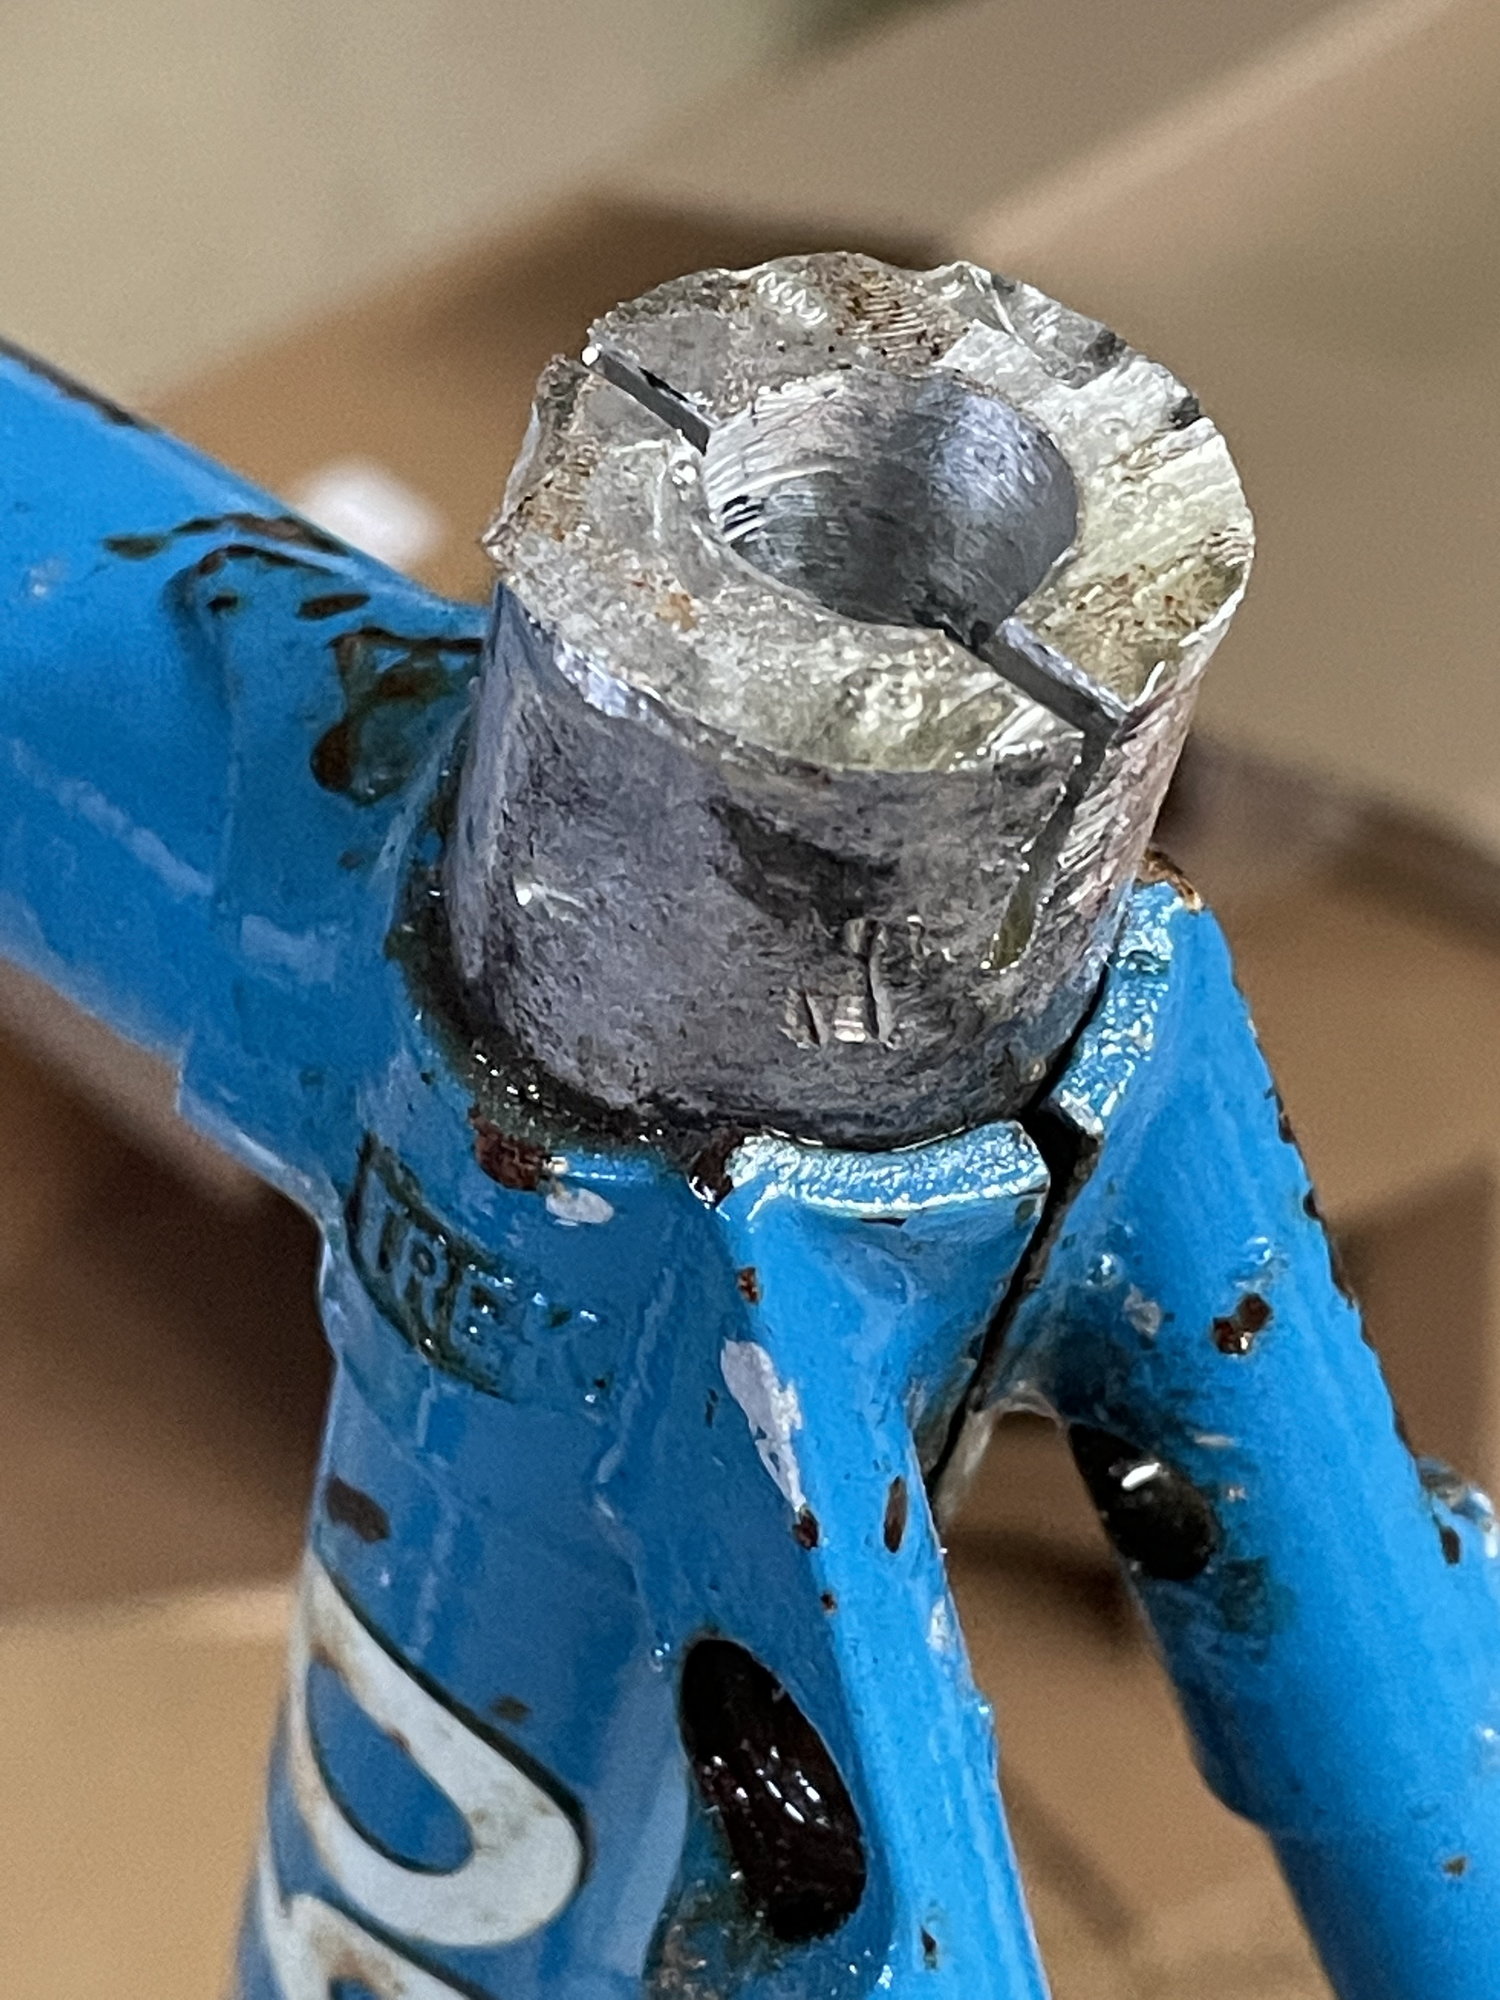
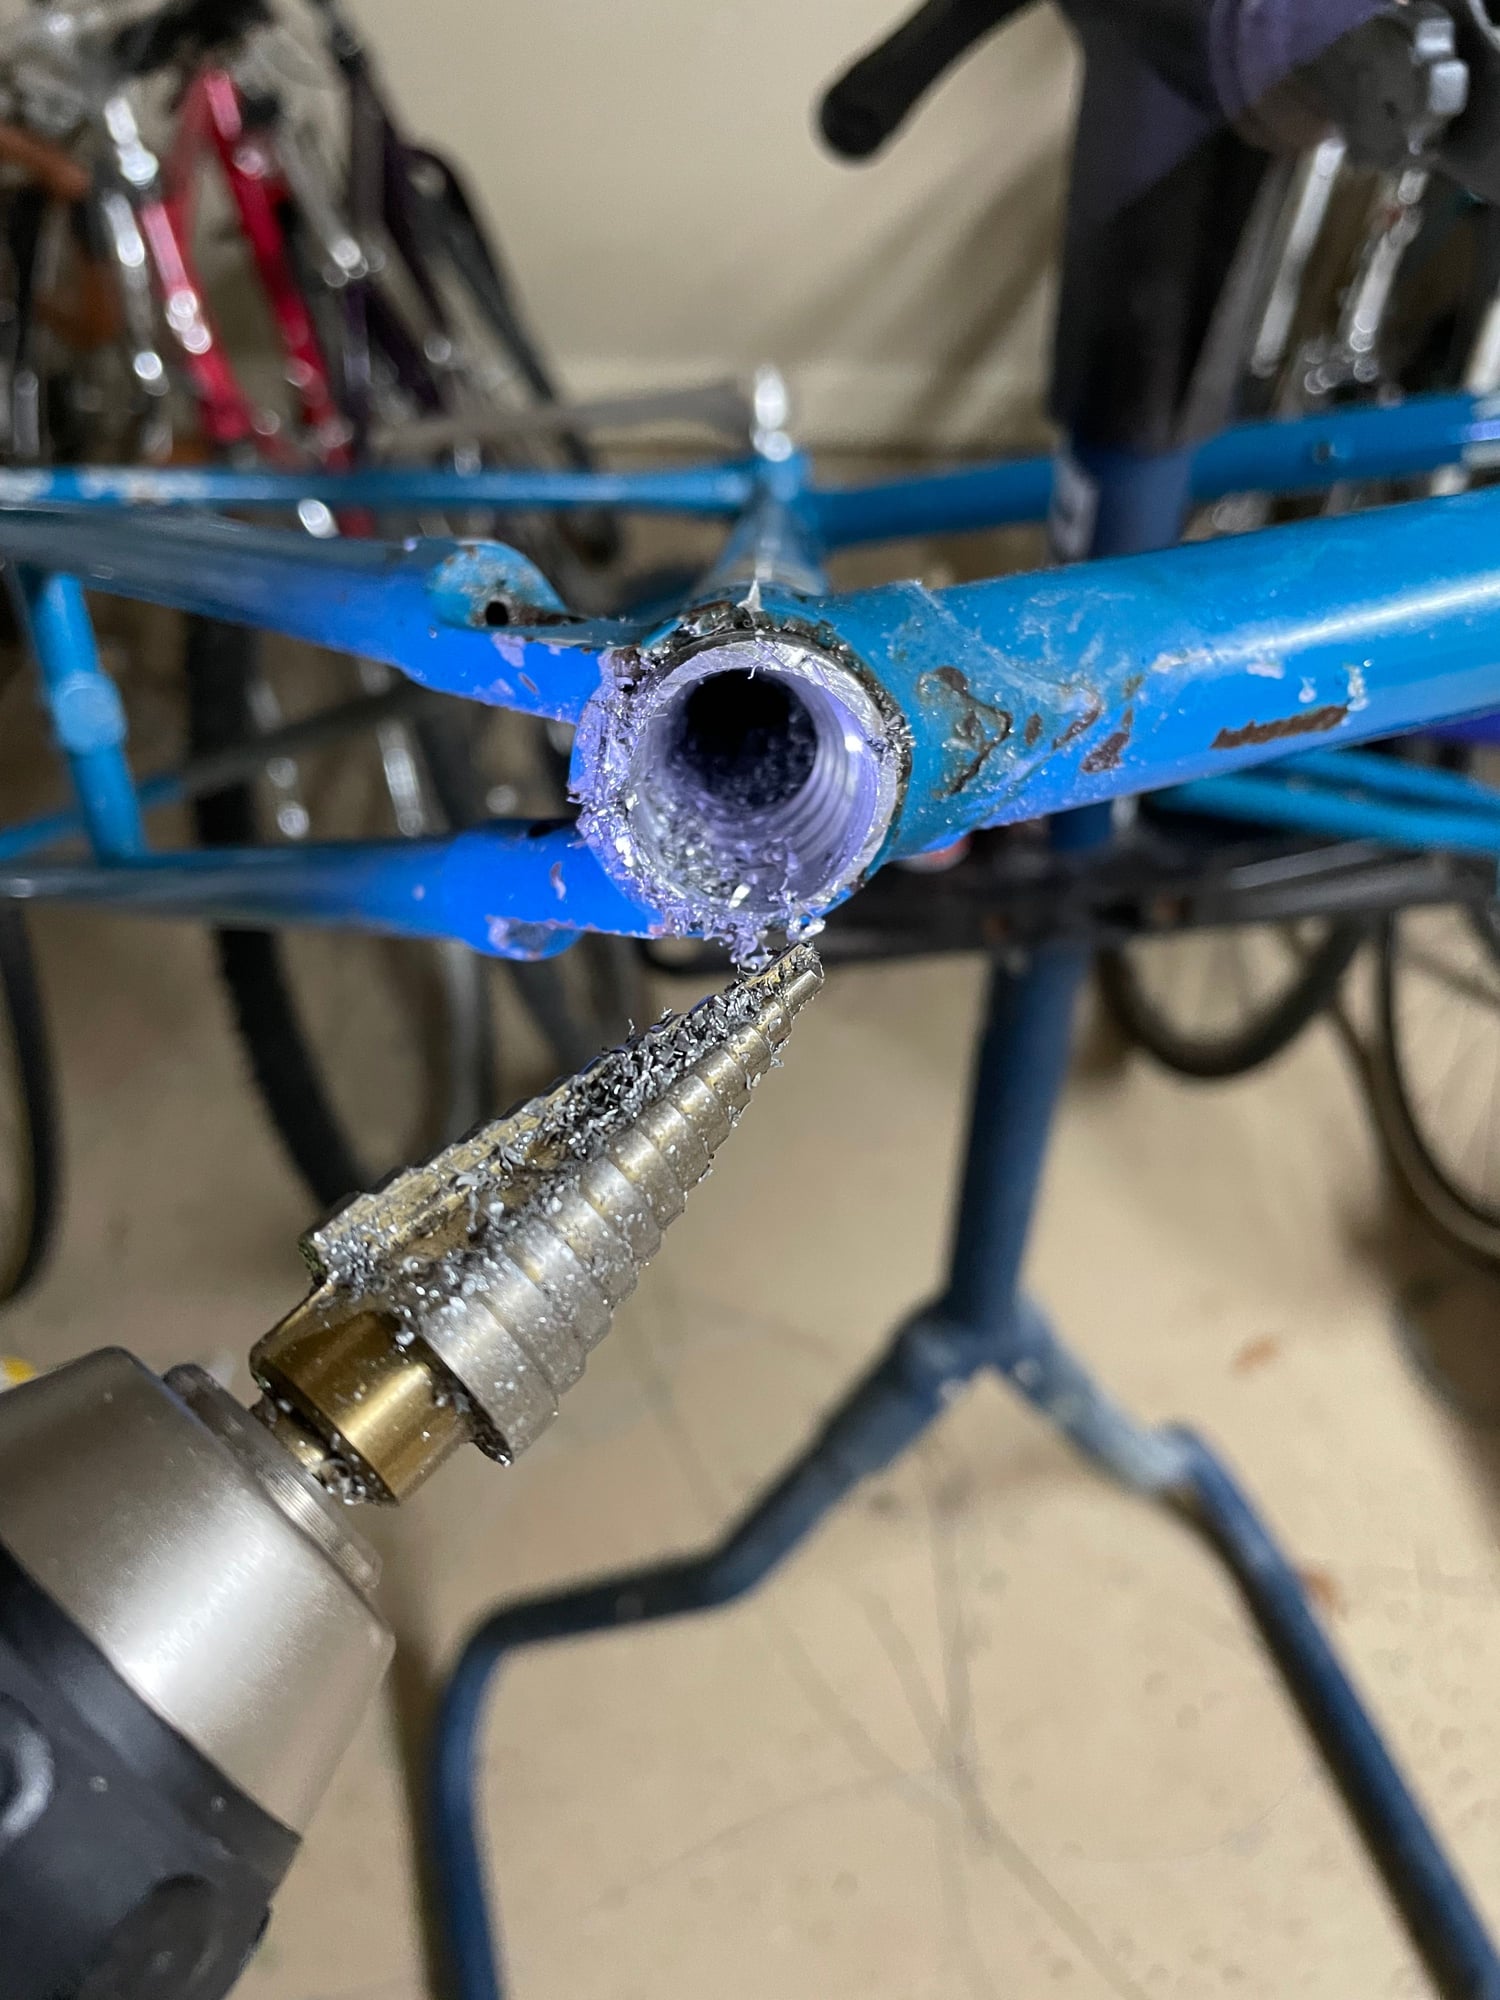
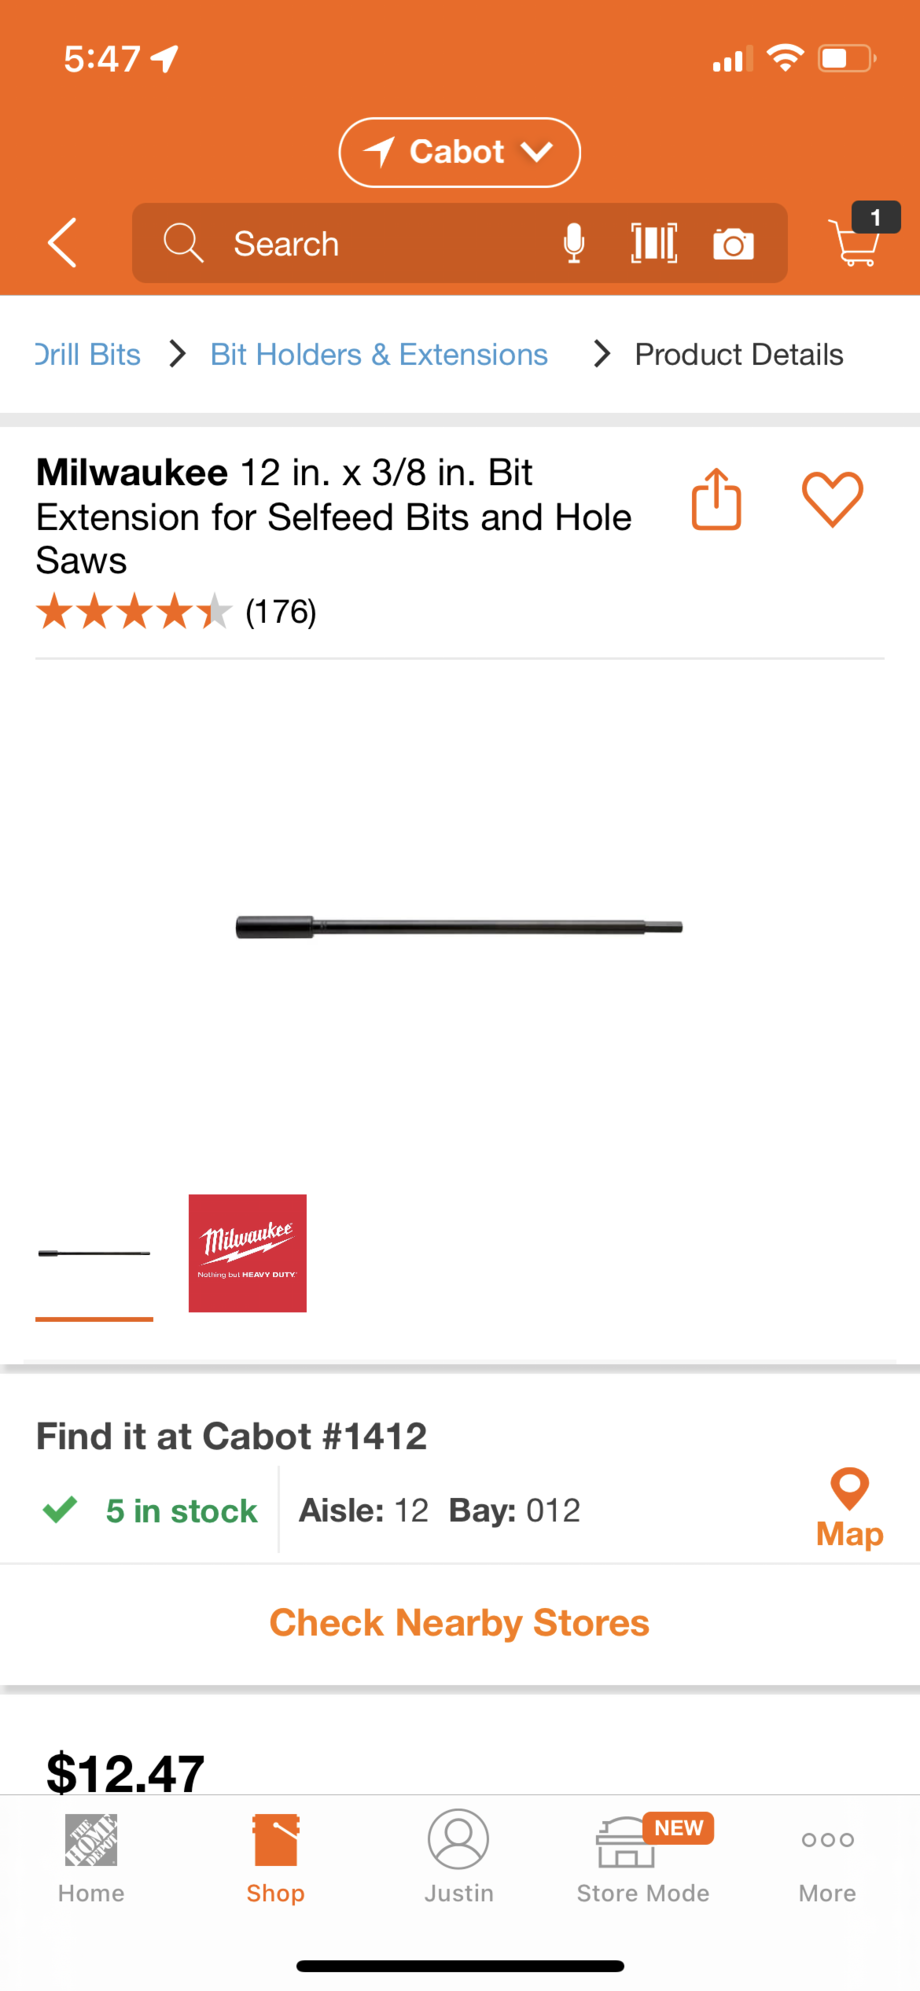
Victory! Sort of. So I went with a 7/8 Step Bit from Amazon ($10). quickly realized I needed some sort of extension, found that at my local Home Depot ($12). The step bit methodically, slowly drilled that sucker out. I did use gun oil as a cutter. Worked pretty well. This left about 5 MM of post (2.5MM thick) and a 22 MM hole. It was enough to get a saws all blade in there, I was able to cut a couple slots and peel the post back, it came out in pieces and there is a small piece down the tube that doesn't want to come out but it does move. I used the threaded rod appraoch and it slides down. but doesnt want to slide out . at this point I realized my mistake...
MY MISTAKE was I used too big of a screw driver too early in the process for leverage to peel the post back. This left two small creases in the seat tube! Could they be repaired? I hope so but IDK. but everything was going great till I did that. Thanks for all the advice, its not something I want to do again, but became a mission to get that sucker out! and in that sense, success!


nicked the top tube with saws all, not too bad
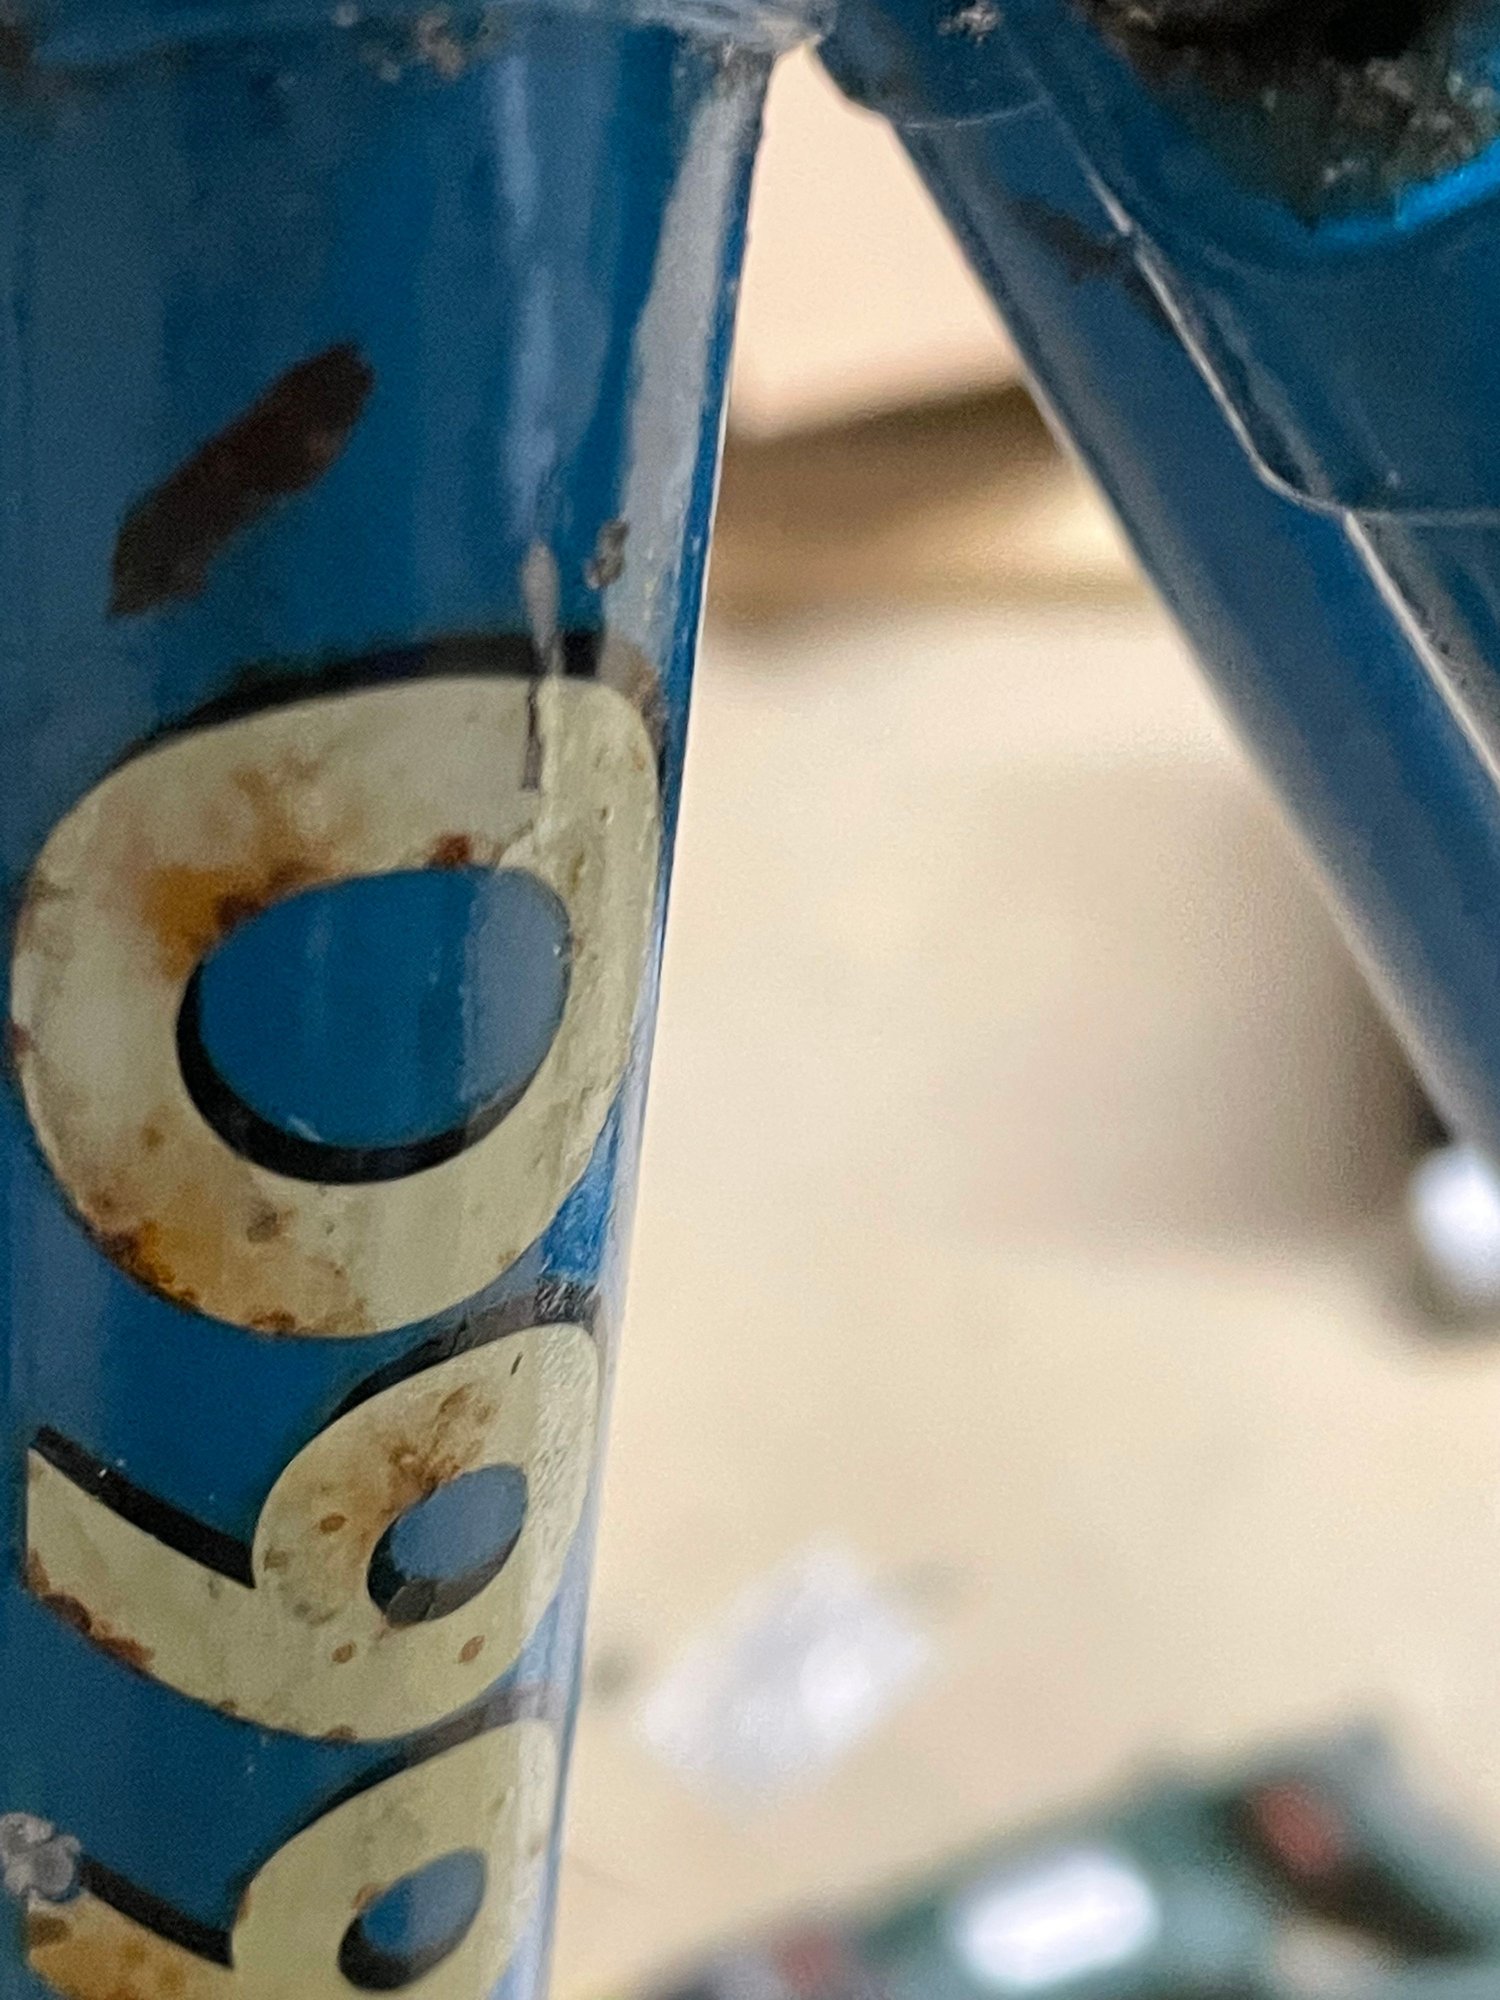
screw drivers will leave a mark! hate it that I did that. No need, just needed to keep methodically grind that sucker out.

MY MISTAKE was I used too big of a screw driver too early in the process for leverage to peel the post back. This left two small creases in the seat tube! Could they be repaired? I hope so but IDK. but everything was going great till I did that. Thanks for all the advice, its not something I want to do again, but became a mission to get that sucker out! and in that sense, success!
nicked the top tube with saws all, not too bad
screw drivers will leave a mark! hate it that I did that. No need, just needed to keep methodically grind that sucker out.
11-16-21, 09:13 PM
#44
ambulatory senior
Join Date: Dec 2016
Location: Peoria Il
Posts: 5,999
Bikes: Austro Daimler modified by Gugie! Raleigh Professional and lots of other bikes.
Mentioned: 76 Post(s)
Tagged: 0 Thread(s)
Quoted: 1956 Post(s)
Liked 3,662 Times
in
1,680 Posts
Excellent!
11-16-21, 09:57 PM
#45
Senior Member
Join Date: Nov 2014
Location: Eugene, Oregon, USA
Posts: 27,545
Mentioned: 217 Post(s)
Tagged: 0 Thread(s)
Quoted: 18398 Post(s)
Liked 4,525 Times
in
3,361 Posts
RJ The Bike Guy has a Youtube video illustrating the use of an impact driver to remove a seat post. I thing you might have enough of a stub left to try it.
https://www.youtube.com/watch?v=P-Yp...l=RJTheBikeGuy
https://www.youtube.com/watch?v=P-Yp...l=RJTheBikeGuy
Although, I have found the weakness of electric impact wrenches. I got a HF Earthquake cordless impact that is stronger than my DeWalt corded impact, but met its match on some wheel studs on my BMW project. GRRR... Some things the impact does better than the breaker bar, other things not.
I've never liked drilling masonry bits into steel (and as is obvious from the video, the bit was TOAST after drilling). I did drill a similar socket a while ago using regular high speed steel bits (perhaps the HF Cobalt bits). Always start with a small bit, drill, then go to a larger bit.
11-16-21, 10:09 PM
#46
Senior Member
Join Date: Nov 2014
Location: Eugene, Oregon, USA
Posts: 27,545
Mentioned: 217 Post(s)
Tagged: 0 Thread(s)
Quoted: 18398 Post(s)
Liked 4,525 Times
in
3,361 Posts
I see you got the post out. A little banged up, but hopefully it will be OK.
In another thread, @woodcraft suggested using a "pipe saver" bit on a stuck Carbon Fiber post. Generally designed for plastic, but there are a variety of designs. And, some may be work on aluminum. The perfect guide, and it should keep your bit centered well.
In another thread, @woodcraft suggested using a "pipe saver" bit on a stuck Carbon Fiber post. Generally designed for plastic, but there are a variety of designs. And, some may be work on aluminum. The perfect guide, and it should keep your bit centered well.
11-19-21, 05:01 PM
#47
Ride, Wrench, Swap, Race
Join Date: Jan 2010
Location: Northern California
Posts: 9,196
Bikes: Cheltenham-Pedersen racer, Boulder F/S Paris-Roubaix, Varsity racer, '52 Christophe, '62 Continental, '92 Merckx, '75 Limongi, '76 Presto, '72 Gitane SC, '71 Schwinn SS, etc.
Mentioned: 132 Post(s)
Tagged: 0 Thread(s)
Quoted: 1566 Post(s)
Liked 1,299 Times
in
867 Posts
Lessons from this removal might include firstly to go slow, check progress often (probing the slot with a sharpened, bent-tip spoke to gauge progress, as the sharp point will glide across steel but "snag" on aluminum).
The cut(s) went too far up, so the teeth contacted the seat tube opening where resulting excessive contact pressure resulted in the blade's teeth cutting into steel). Keeping the working edge of the blade tilted slightly away from the edge of the seat tube opening is important.
There is no need to slot the post any higher than the bottom of the slot in the seat tube, since, above that point, no compressive bonding of the corrosion can occur.
No need to pry open the clamping ears either, for the same reason, and best not to. I would not bother with trying too hard to get any penetrant down in there, at least not beyond using a few thermal cycles. Safer to add penetrant to the ever-growing slot in the post.
A single cut slot is all that is ever needed to release the compressive bond, but the slot does have to be continuous and down to bare steel, from the bottom of the seat tube's clamping slot down to the end of the post (hence, the need to periodically probe the slot being cut into the soft-metal post).
My basic reciprocating saw sells for just over $20 and is a useful tool to have. Blades are a few bux each at any hardware store, and specialty blades are available even at Walmart for pruning live tree limbs, cutting nail-studded wood or for cutting steel. I find that the wood/metal combination blades cut through aluminum well, and that the few teeth near the tip end up doing all of the work since I keep the blade tilted slightly away from the edge of the seat tube opening. I have at times resorted to sharpening the leading teeth of a well-used blade, using a Dremel grinding/cutting disc (being very careful to under-cut and to not shatter the wafer-thin disc).
The blade's teeth will not cut into steel unless contact pressure is applied up near the seat tube opening, thus concentrating the pressure (just don't use a diamond-crusted blade).
Last edited by dddd; 11-19-21 at 05:11 PM.
11-19-21, 05:43 PM
#48
Strong Walker

I had that problem once with a Laprade SR (,iirc). I didn't care much about the frame at a certain point, because I thought it was scrap anyway, and went at it wit with a big hammer -- no dice. The saw blade method needed 4 pieces and I still went on to bend the Microfusione lug at removing the bits. The actual contact corroded spot was smaller than my pinkies fingernail. Contact corrosion is a *****. Don't be a miser applying grease to alloy posts in steel frames is the lesson learnt there.
11-19-21, 06:57 PM
#49
Ride, Wrench, Swap, Race
Join Date: Jan 2010
Location: Northern California
Posts: 9,196
Bikes: Cheltenham-Pedersen racer, Boulder F/S Paris-Roubaix, Varsity racer, '52 Christophe, '62 Continental, '92 Merckx, '75 Limongi, '76 Presto, '72 Gitane SC, '71 Schwinn SS, etc.
Mentioned: 132 Post(s)
Tagged: 0 Thread(s)
Quoted: 1566 Post(s)
Liked 1,299 Times
in
867 Posts
I had that problem once with a Laprade SR (,iirc). I didn't care much about the frame at a certain point, because I thought it was scrap anyway, and went at it wit with a big hammer -- no dice. The saw blade method needed 4 pieces and I still went on to bend the Microfusione lug at removing the bits. The actual contact corroded spot was smaller than my pinkies fingernail. Contact corrosion is a *****. Don't be a miser applying grease to alloy posts in steel frames is the lesson learnt there.
How good of a bond can can there be when there is finally no more compression acting on it (once the slot goes fully through to the steel)?
It does help to apply back-and-forth torque to the slotted seatpost stub, as this doubles the range of motion that the post deforms, thus applying flex to break the bond (this in lieu of using limitless torque perhaps sufficient to crush the post).
Leaving the post un-slotted above the bottom of the seat tube clamping slot and perhaps inserting a dowel into the top end of the post remnant allows one to apply greater twisting force, while also protecting the seat tube opening from sawing scars (as the blade possibly concentrates it's force on the edge/end of the seat tube).
Emphasizing again that the teeth near the tip of the blade should be kept sharp, and made to do most of the work. I now keep a couple of slender new blades at home for use with seatpost removal, after which they are assigned to homeowner duties that make use of the rest of the sharp teeth.
Did you by chance probe the full length of the slots, to really verify that no bridge of metal was keeping the diameter of the post in compression against the inside of the seat tube?
I am recalling that someone (you?) posted photos of the 4-slotted seatpost pieces, and now wonder if those photos showed any bridging between the four bits(?).
That was the hard lesson that I learned the first time that I cut out a seatpost with a blade. It finally came out, but with great force required, revealing that a scant sliver of metal remained, bridging the structural "hoop" of the post and thus keeping it in compression.
I've only sawn out six or eight seatposts at this point, but all came out with only one slot being cut, and with many other forceful and thermally-shocking methods having already been tried (without success).
Last edited by dddd; 11-19-21 at 07:08 PM.
11-20-21, 03:22 PM
#50
Strong Walker
Once you get a continuous slot in the post that goes fully to bare steel, simply twisting the post now effects a lot more flexing motion along the length of the post.
How good of a bond can can there be when there is finally no more compression acting on it (once the slot goes fully through to the steel)?
How good of a bond can can there be when there is finally no more compression acting on it (once the slot goes fully through to the steel)?
It does help to apply back-and-forth torque to the slotted seatpost stub, as this doubles the range of motion that the post deforms, thus applying flex to break the bond (this in lieu of using limitless torque perhaps sufficient to crush the post).
Leaving the post un-slotted above the bottom of the seat tube clamping slot and perhaps inserting a dowel into the top end of the post remnant allows one to apply greater twisting force, while also protecting the seat tube opening from sawing scars (as the blade possibly concentrates it's force on the edge/end of the seat tube).
Emphasizing again that the teeth near the tip of the blade should be kept sharp, and made to do most of the work. I now keep a couple of slender new blades at home for use with seatpost removal, after which they are assigned to homeowner duties that make use of the rest of the sharp teeth.
Did you by chance probe the full length of the slots, to really verify that no bridge of metal was keeping the diameter of the post in compression against the inside of the seat tube?
I am recalling that someone (you?) posted photos of the 4-slotted seatpost pieces, and now wonder if those photos showed any bridging between the four bits(?).