


Adjusting Tension Bolt on Brooks Saddle
 03-01-24, 02:47 PM
#1
Senior Member
Thread Starter

Adjusting Tension Bolt on Brooks Saddle
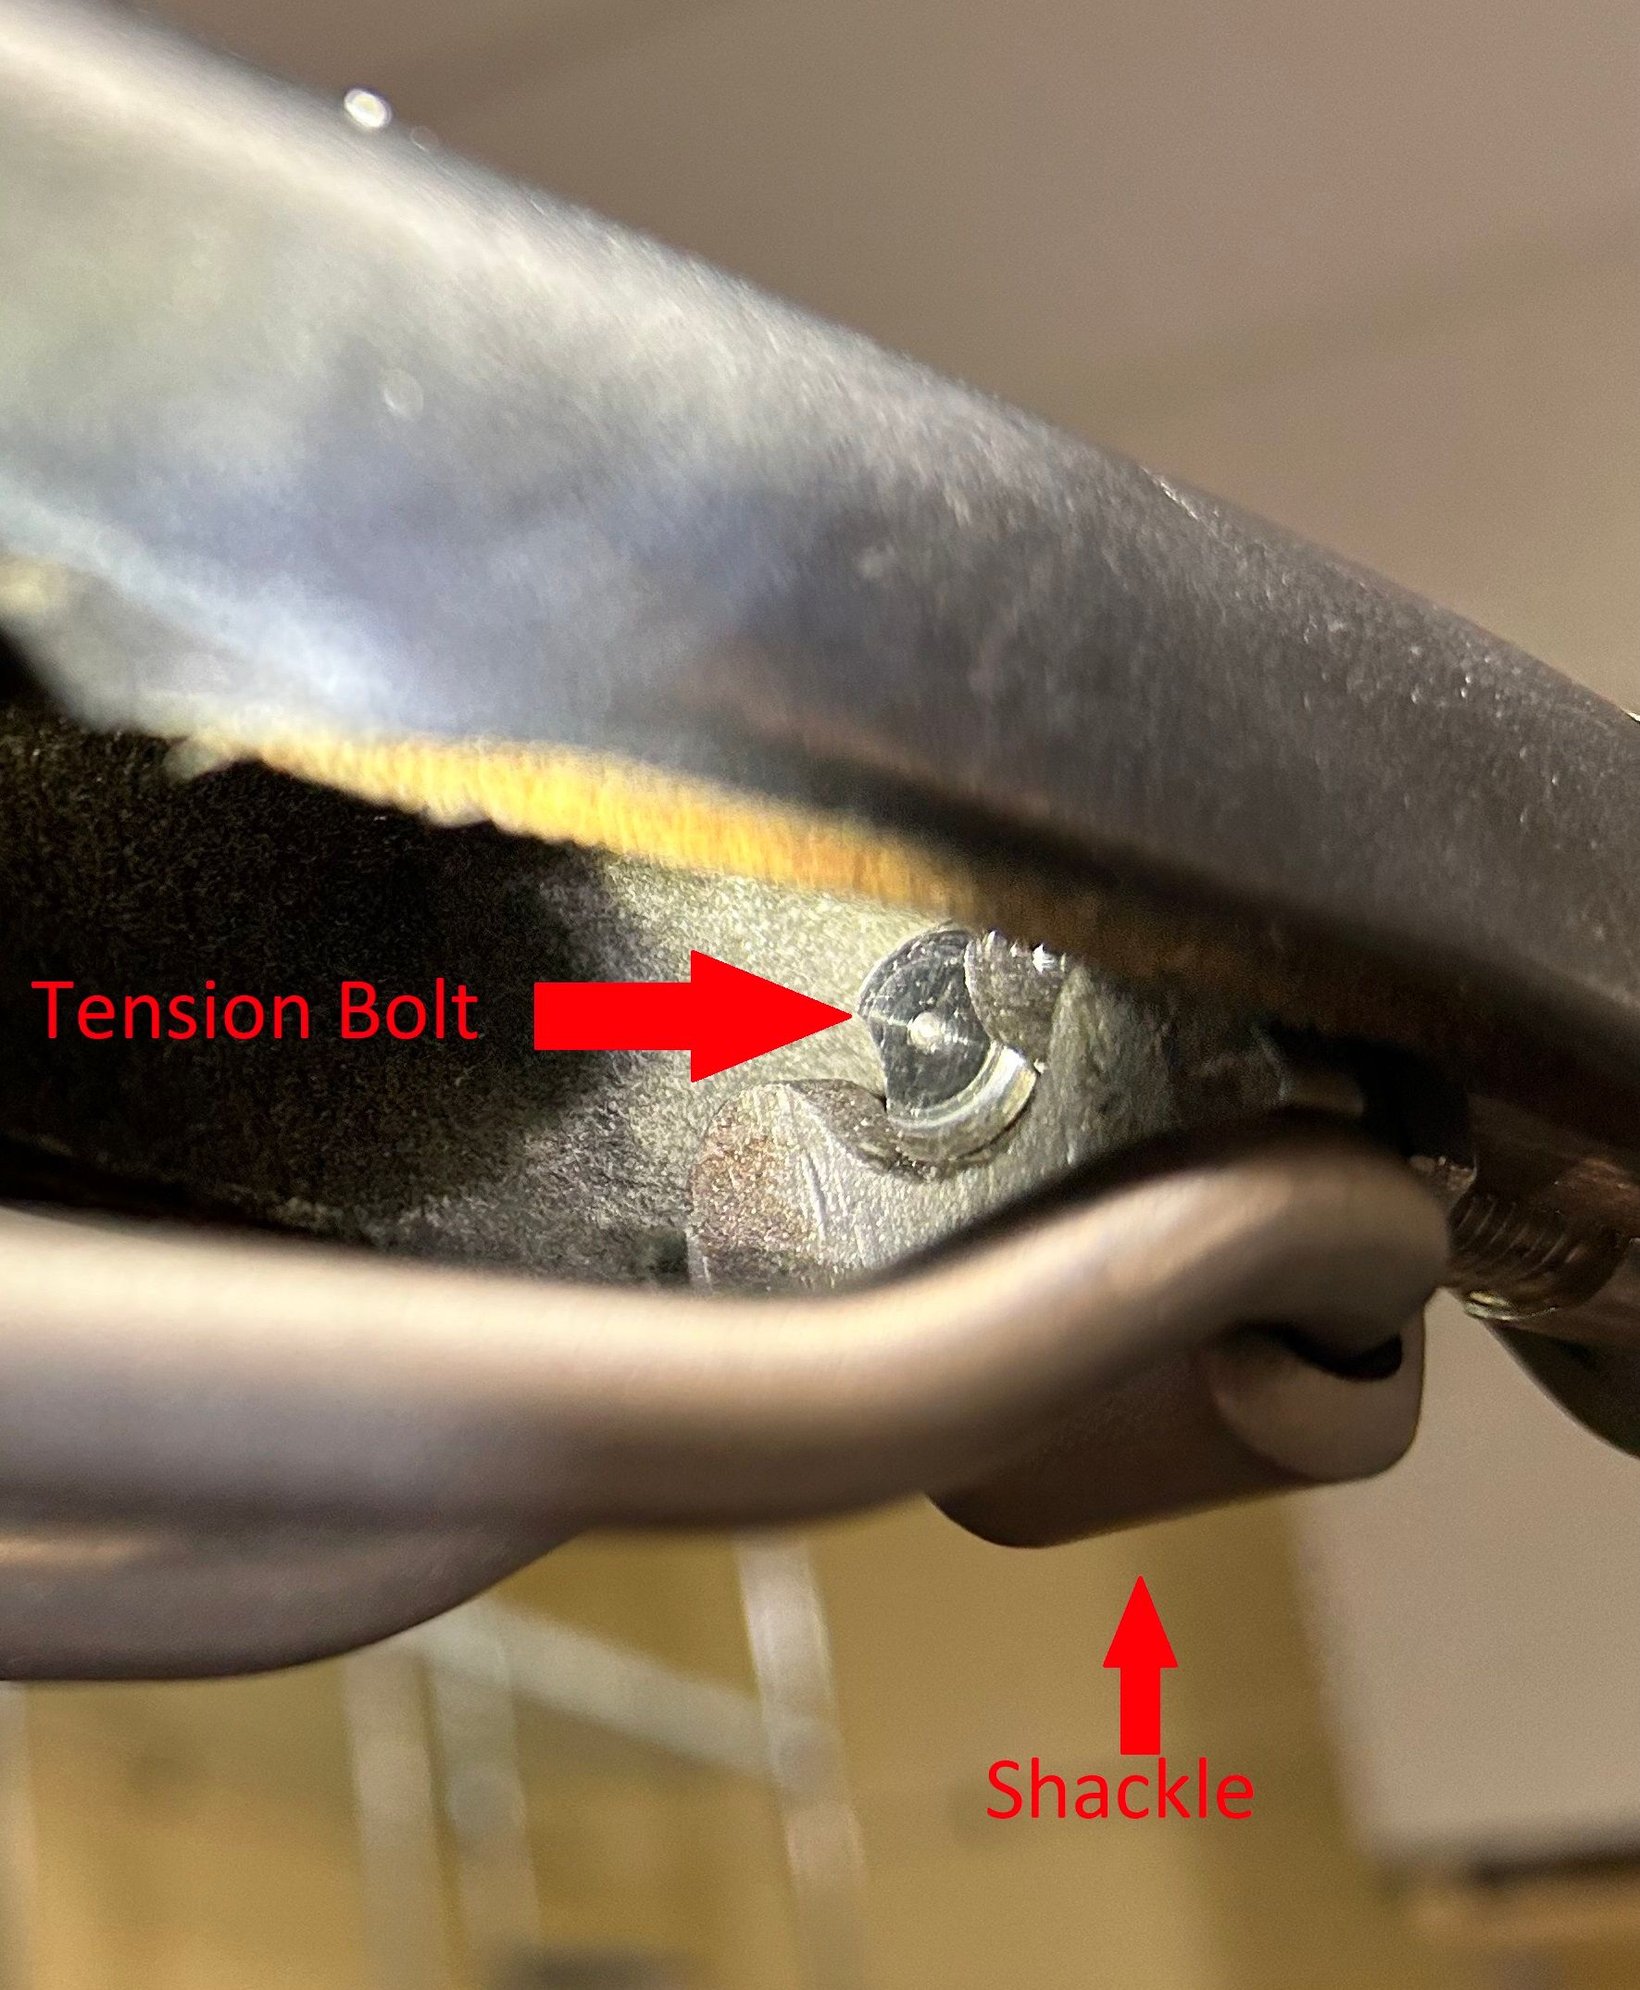
I have a Brooks Swallow titanium saddle that is turning into a hammock; it is a bit too much sag for my liking. So I want to adjust the tension bolt but I am unsure if it is at its maximum.
In the attached photos, you can see the end of the tension bolt is flush with the left side of the U-shaped shackle (opposite side to the adjusting nut). As you can see, the tension bolt sits in a valley on that shackle; ergo it is not threaded there.
Am I able to further adjust this bolt past the left side of the U-shaped shackle?
 03-01-24, 03:48 PM
#2

Senior Member
Join Date: Apr 2009
Location: New Rochelle, NY
Posts: 39,053
Bikes: too many bikes from 1967 10s (5x2)Frejus to a Sumitomo Ti/Chorus aluminum 10s (10x2), plus one non-susp mtn bike I use as my commuter
Mentioned: 141 Post(s)
Tagged: 1 Thread(s)
Quoted: 5970 Post(s)
Liked 2,878 Times
in
1,602 Posts
You may have already gone too far. The bolt is what traps the shackle, so it won't drop or cam under load.
You might get by this way if you're light but if heavier, your weight will cause the shakle to drop, and allow the saddle to sag completely.
If you absolutely must stretch it out more, either improvise a longer bolt, or try threading one from the other side to keep the shackle stabilized.
BTW I'm a long time Brooks user going back to my Pro from 1967 (still OK). I've seen that kind of stretch happening, usually by over use of leather conditioner.
Last edited by FBinNY; 03-01-24 at 03:58 PM.
03-01-24, 04:01 PM
#3
Senior Member
Thread Starter
You may have already gone too far. The bolt should extend through the shackle, so it won't cam under load.
You might get by this way if you're light but if heavier, your weight will cause the shake to rotate on the frame, and allow the saddle to sag completely.
If you absolutely must stretch it out more, either improvise a longer bolt, or try threading one from the other side to keep the shackle stabilized.
BTW I'm a long time Brooks user going back to my Pro from 1967 (still OK). I've seen that kind of stretch happening, usually by over use of leather conditioner.
Yeah, that's what I was thinking, if the bolt does not rest on the left side of the shackle, the shackle will rotate. I was thinking of making a replacement tension bolt, but the Swallow has a squarish shaped bolt that slots into the nose of the saddle. I could find a similar thread pitch bolt and, with patience, remove material to make the bolt head square so it won't rotate. Brooks does not have a longer bolt. Yes, I run the risk of tearing the rivets, but I only need about 1 full turn....maybe 1.5 turns....2 at most.
 03-01-24, 05:04 PM
#4
Senior Member
Join Date: Apr 2009
Location: New Rochelle, NY
Posts: 39,053
Bikes: too many bikes from 1967 10s (5x2)Frejus to a Sumitomo Ti/Chorus aluminum 10s (10x2), plus one non-susp mtn bike I use as my commuter
Mentioned: 141 Post(s)
Tagged: 1 Thread(s)
Quoted: 5970 Post(s)
Liked 2,878 Times
in
1,602 Posts
To fixture it, buy 2 extra nuts and slot them on one side so they clamp when you close the vise. Space them apart on the thread and close the vide with the bolt sticking out the side.
Keep in mind that you only need to form the tip. Brooks mills the entire length because it's easier for machine production.
Last edited by FBinNY; 03-01-24 at 05:08 PM.
03-01-24, 05:38 PM
#5
Senior Member
Thread Starter
If you have a vise, and are good with a file, it won't long. Find one overly long with enough thread. Cut off the head with a hacksaw, and have at it.
To fixture it, buy 2 extra nuts and slot them on one side so they clamp when you close the vise. Space them apart on the thread and close the vide with the bolt sticking out the side.
Keep in mind that you only need to form the tip. Brooks mills the entire length because it's easier for machine production.
i did find a bolt in my bolt bin that will fit the titanium nut, but it is much too short. I can go to the hardware store and find a longer one, and hopefully stainless.
Thank you for the advice!
Last edited by digger; 03-01-24 at 05:41 PM.
03-01-24, 05:47 PM
#6
Senior Member
Join Date: Apr 2009
Location: New Rochelle, NY
Posts: 39,053
Bikes: too many bikes from 1967 10s (5x2)Frejus to a Sumitomo Ti/Chorus aluminum 10s (10x2), plus one non-susp mtn bike I use as my commuter
Mentioned: 141 Post(s)
Tagged: 1 Thread(s)
Quoted: 5970 Post(s)
Liked 2,878 Times
in
1,602 Posts
Leave the bracket alone and make a bolt. Also buy a short length of copper tubing or pipe. Slot it lengthwise, and push through bolt through.
Clamp the assembly in the vise so it rests along the top slightly above the jaws. Now you can quickly file down along the length with the vise as a guide. If you don't already have a 12" mill bastard, buy one so the work goes fast.
Flip and do the second side, making sure to keep it parallel.
Clamp the assembly in the vise so it rests along the top slightly above the jaws. Now you can quickly file down along the length with the vise as a guide. If you don't already have a 12" mill bastard, buy one so the work goes fast.
Flip and do the second side, making sure to keep it parallel.
__________________
FB
Chain-L site
An ounce of diagnosis is worth a pound of cure.
Just because I'm tired of arguing, doesn't mean you're right.
�One accurate measurement is worth a thousand expert opinions� - Adm Grace Murray Hopper - USN
WARNING, I'm from New York. Thin skinned people should maintain safe distance.
FB
Chain-L site
An ounce of diagnosis is worth a pound of cure.
Just because I'm tired of arguing, doesn't mean you're right.
�One accurate measurement is worth a thousand expert opinions� - Adm Grace Murray Hopper - USN
WARNING, I'm from New York. Thin skinned people should maintain safe distance.
03-01-24, 06:15 PM
#7
Senior Member
Thread Starter
Leave the bracket alone and make a bolt. Also buy a short length of copper tubing or pipe. Slot it lengthwise, and push through bolt through.
Clamp the assembly in the vise so it rests along the top slightly above the jaws. Now you can quickly file down along the length with the vise as a guide. If you don't already have a 12" mill bastard, buy one so the work goes fast.
Flip and do the second side, making sure to keep it parallel.
Clamp the assembly in the vise so it rests along the top slightly above the jaws. Now you can quickly file down along the length with the vise as a guide. If you don't already have a 12" mill bastard, buy one so the work goes fast.
Flip and do the second side, making sure to keep it parallel.
like this you mean?
 03-01-24, 07:52 PM
#8
Senior Member
Join Date: Apr 2009
Location: New Rochelle, NY
Posts: 39,053
Bikes: too many bikes from 1967 10s (5x2)Frejus to a Sumitomo Ti/Chorus aluminum 10s (10x2), plus one non-susp mtn bike I use as my commuter
Mentioned: 141 Post(s)
Tagged: 1 Thread(s)
Quoted: 5970 Post(s)
Liked 2,878 Times
in
1,602 Posts
Don't worry about the copper. It's so soft you won't notice it as you file through it, along with the bolt.
BTW make a mark across one end as a reference for when you line up the second side.
Last edited by FBinNY; 03-02-24 at 03:11 PM.
03-01-24, 08:09 PM
#9
Senior Member
Thread Starter
I think getting it parallel will be a challenge.
03-02-24, 02:52 PM
#10
Senior Member
Join Date: Apr 2009
Location: New Rochelle, NY
Posts: 39,053
Bikes: too many bikes from 1967 10s (5x2)Frejus to a Sumitomo Ti/Chorus aluminum 10s (10x2), plus one non-susp mtn bike I use as my commuter
Mentioned: 141 Post(s)
Tagged: 1 Thread(s)
Quoted: 5970 Post(s)
Liked 2,878 Times
in
1,602 Posts
Once you've done one side, file a short section at the end to be a reference. Use a caliper or other thing to get it eyeball parallel. Clamp it and level out the reference, tighten and file away.
__________________
FB
Chain-L site
An ounce of diagnosis is worth a pound of cure.
Just because I'm tired of arguing, doesn't mean you're right.
�One accurate measurement is worth a thousand expert opinions� - Adm Grace Murray Hopper - USN
WARNING, I'm from New York. Thin skinned people should maintain safe distance.
FB
Chain-L site
An ounce of diagnosis is worth a pound of cure.
Just because I'm tired of arguing, doesn't mean you're right.
�One accurate measurement is worth a thousand expert opinions� - Adm Grace Murray Hopper - USN
WARNING, I'm from New York. Thin skinned people should maintain safe distance.
